background image

4

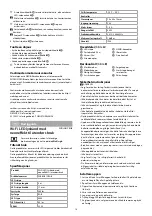
• 

Do not use the product if a part is damaged or defective. Replace a 
damaged or defective product immediately.

• 

Do not drop the product and avoid bumping.

• 

Do not unplug the product by pulling on the cable. Always grasp 
the plug and pull.

• 

This product may only be serviced by a qualified technician for 
maintenance to reduce the risk of electric shock.

• 

Always keep button cell batteries, both full and empty, out of 
reach of children to avoid the chance of swallowing. Dispose of 
used batteries immediately and safely. Button cell batteries can 
cause serious internal chemical burns in as little as two hours 
when swallowed. Keep in mind that the first symptoms may look 
like child diseases like coughing or drooling. Seek immediate 
medical attention when you suspect that batteries have been 
swallowed.

• 

Only power the product with the voltage corresponding to the 
markings on the product.

• 

Non-rechargeable batteries are not to be recharged.

• 

Do not short-circuit a battery.

• 

Make sure to match the (+) and (-) polarity markings.

• 

For more detailed information about disposal of your old battery, 
check the local rules and regulations for the correct disposal 
instructions.

Installing the app

1.  Download the Nedis Smartlife app for Android or iOS on your 

phone via Google Play or the Apple App Store.

2.  Open the Nedis Smartlife app on your phone.
3.  Create an account with your e-mail address and tap Continue.
4.  Enter the received verification code.
5.  Create a password and tap Done.
6.  Tap Add Home to create a SmartLife Home.
7.  Set your location, choose the rooms you want to connect with 

and tap Done.

Connecting the product

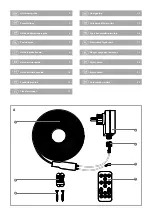
1.  Screw the NEMO connector 

A

5

 onto the power adapter 

A

4

.

2.  Tap + in the top right corner in the Nedis SmartLife app.
3. Plug 

A

4

 into a power outlet.

4.  Under Search Device, select the product from the list of available 

devices.

5.  Check if the LED strip 

A

1

 is blinking. If so, confirm in the app.


4

If 

A

1

 does not blink, unplug and replug 

A

4

 from the power 

source three times until 

A

1

 starts to blink.

6.  Rename the product after it has been found and added.
7.  Enter the password of the Wi-Fi network to which your phone is 

connected and tap Confirm.

Setting up the product

1. Unplug 

A

4

 from the power outlet.

2.  Place the start of 

A

1

 in the desired position.


4

Make sure the power outlet is within reach.

3. Place 

A

1

 using the included mounting brackets 

A

2

 and screws 

A

3

, or use suitable adhesive.


4

Evenly space 

A

2

 to support 

A

1

.


-

Do not bend 

A

1

 at sharp angles to prevent damage.


4

If desired, cut 

A

1

 to size.


-

Cutting 

A

1

 removes the waterproof qualities of the product.


-

Shield the cut side of the LED strip 

A

1

 to make it waterproof 

for outdoor use.

4. Plug 

A

4

 into a power outlet.

Controlling the product

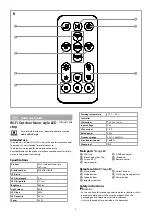
• 

Press 

B

7

 to switch the product on or off.

• 

Press the mode button 

B

2

 to change modes.

• 

Press the brightness buttons 

B

4

 to adjust the brightness.

• 

Press the colour buttons 

B

5

 to adjust the colour.

• 

Press the speed buttons 

B

3

 to adjust the speed.


4

The product can be connected to Google Home or Amazon 
Alexa to enable speech control.

Declaration of Conformity

We, NEDIS, as manufacturer, declare that product WIFILN51CRGB 
from the brand Nedis, produced in China was tested according to all 
relevant CE standards / regulations and passed all tests.

The complete Declaration of Conformity ( + safety datasheet if 
applicable ) can be found and downloaded via http://webshop.
nedis.com
For other compliant-related information, please contact customer 
service desk for support:

via website: http://www.nedis.com
via e-mail: [email protected]
NEDIS B.V., De Tweeling 28,
5215 MC ’s-Hertogenbosch, THE NETHERLANDS

c

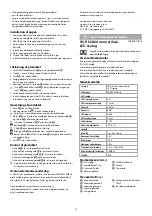
 Kurzanleitung

Wi-Fi Outdoor 

Neon-LED-Streifen

WIFILN51CRGB

Weitere Informationen finden Sie in der erweiterten 
Anleitung online: 

ned.is/wifiln51crgb

Bestimmungsgemäße Verwendung

Dieses Produkt ist ein Smart-WLAN-LED-Streifen mit einer drahtlosen 
Fernbedienung.
Das Produkt ist nicht für den professionellen Einsatz gedacht.
Dieses Produkt ist zur Verwendung drinnen und draußen gedacht.
Jegliche Modifikation des Produkts kann Folgen für die Sicherheit, 
Garantie und ordnungsgemäße Funktionalität haben.

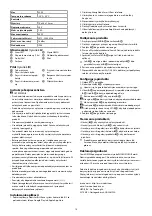
Spezifikationen

Produkt

Wi-Fi Outdoor 

Neon-LED-Streifen

Artikelnummer

WIFILN51CRGB

LED-Leiste
Länge LED-Streifen

5 m

Breite LED-Streifen

17 mm

Helligkeit

960 lm

Lichtfarbe

RGB

LED-Typ

5050

LED-Anzahl

60 /m

Leistung

32 W

Arbeitstemperatur

-20 °C – 50 °C

Steuerung
Abmessungen

70 x 30 x 15 mm

Eingangsspannung

24 V

Max. Strom

1.5 A

Nennleistung

36 W

Frequenzbereich

2412 - 2484 MHz

Max. Sendeleistung

16 dBm

Wasserdicht

IP44

Summary of Contents for WIFILN51CRGB

Page 1: ...ned is wifiln51crgb Wi Fi Outdoor Neon style LED Strip supporting multicolour patterns WIFILN51CRGB...

Page 2: ...da all avvio 8 hGu a de inicio r pido 9 iGuia de inicia o r pida 10 eSnabbstartsguide 12 gPika aloitusopas 13 fHurtigguide 14 2Vejledning til hurtig start 15 kGyors be zemel si tmutat 16 nPrzewodnik S...

Page 3: ...nstall or use the product Keep the packaging and this document for future reference Only use the product as described in this document 2 4 5 1 5 7 6 3 B aQuick start guide Wi Fi Outdoor Neon style LED...

Page 4: ...m Setting up the product 1 Unplug A4 from the power outlet 2 Place the start of A1 in the desired position 4 Make sure the power outlet is within reach 3 Place A1 using the included mounting brackets...

Page 5: ...len Sie ein Passwort und tippen Sie auf Done Fertigstellung 6 Tippen Sie auf Add Home Familie hinzuf gen um ein SmartLife Zuhause zu erstellen 7 Legen Sie Ihren Standort fest w hlen Sie die R ume aus...

Page 6: ...iers sympt mes peuvent ressembler des maladies infantiles comme la toux ou la bave Si vous pensez que des piles ont t aval es consultez imm diatement un m decin N alimentez le produit qu avec la tensi...

Page 7: ...pp op je telefoon 3 Maak met je e mailadres een account aan en tik op Continue Verder 4 Voer de ontvangen verificatiecode in 5 Maak een wachtwoord aan en tik op Done 6 Tik op Add Home om een SmartLife...

Page 8: ...apparaten 5 Controleer of de LED strip A1 knippert Zo ja bevestig dit dan in de app 4 Als A1 niet knippert haal je de stekker van A4 uit het stopcontact en steek je deze drie keer opnieuw erin totdat...

Page 9: ...ia batteria controllare le normative e i regolamenti locali Installazione dell app 1 Scaricare l app Nedis Smartlife per Android o iOS sul telefono tramite Google Play o l Apple App Store 2 Aprire l a...

Page 10: ...e describe en este documento No use el producto si alguna pieza est da ada o presenta defectos Sustituya inmediatamente un producto si presenta da os o est defectuoso No deje caer el producto y evite...

Page 11: ...o apoio ao cliente no website http www nedis com por e mail service nedis com NEDIS B V De Tweeling 28 5215 MC s Hertogenbosch HOLANDA Tipo de LED 5050 Quantidade de LED 60 m Pot ncia 32 W Temperatur...

Page 12: ...monteringsf stena A2 och skruvarna A3 eller anv nd l mpligt lim 4 F rdela j mnt A2 f r att st dja A1 I syfte att undvika skada b j inte A1 i skarpa vinklar 4 Om du s vill sk r A1 till r tt storlek N...

Page 13: ...k ytett viss olevien laitteiden luettelosta 5 Tarkista ett LED valonauha A1 vilkkuu Jos vilkkuu vahvista sovelluksessa 4 Jos LED valonauha A1 ei vilku irrota virtasovitin A4 virtal hteest ja kytke se...

Page 14: ...pne Nedis Smartlife appen p telefonen din 3 Opprett en konto med e postadressen din og trykk Continue fortsett 4 Skriv inn bekreftelseskoden du mottok 5 Lag et passord og trykk p Ferdig 6 Trykk p Leg...

Page 15: ...nektoren A5 p str madapteren A4 2 Trykk p verst i h yre hj rne i Nedis SmartLife appen 3 Koble A4 inn i et str muttak 4 Under Search Device S k etter enhet velger du produktet fra listen over tilgjeng...

Page 16: ...mailadresse og tryk p Continue forts t 4 Indtast den modtagne verifikationskode 5 Opret en adgangskode og tryk p Udf rt 6 Tryk p Tilf j hjem for at oprette et SmartLife hjem 7 Indstil din placering v...

Page 17: ...e ejtse le a term ket s ker lje az t d st Ne a k beln l fogva h zza ki a term ket a csatlakoz aljb l Mindig fogja meg a dug t s h zza ki Ezt a term ket csak szakk pzett technikus szervizelheti az ram...

Page 18: ...na uzyska kontaktuj c si z dzia em obs ugi klienta strona www http www nedis com e mail service nedis com NEDIS B V De Tweeling 28 5215 MC s Hertogenbosch HOLANDIA Moc 32 W Temperatura robocza 20 C 50...

Page 19: ...Search Device 5 LED A1 4 A1 A4 A1 6 7 Wi Fi Confirm 1 A4 2 A1 4 3 A1 A2 A3 4 A2 A1 A1 4 A1 A1 x LED Wi Fi WIFILN51CRGB online ned is wifiln51crgb LED Wi Fi LED Wi Fi WIFILN51CRGB LED LED 5 m LED 17 mm...

Page 20: ...cim ozna eniam na v robku Nenab jate n bat rie sa nesm nab ja Dbajte na to aby nedo lo ku skratovaniu bat rie Dbajte na dodr anie zodpovedaj ceho ozna enia polarity a Ak chcete z ska podrobnej ie info...

Page 21: ...SmartLife 3 Pripojte A4 k nap jacej elektrickej z suvke 4 V r mci polo ky Search Device Vyh ada zariadenie zvo te v robok v zozname dostupn ch zariaden 5 Skontrolujte i LED p sik A1 blik Ak no potvr...

Page 22: ...Android nebo iOS z obchodu Google Play nebo Apple App Store 2 Otev ete ve sv m telefonu aplikace Nedis SmartLife 3 Vytvo te si et pomoc e mailov adresy a klepn te na Pokra ovat 4 Zadejte p ijat ov ova...

Page 23: ...arcajele polarit ii i s corespund Pentru informa ii mai detaliate referitoare la bateria dvs veche verifica i regulile i reglement rile locale pentru instruc iunile de eliminare corect Instalarea apli...

Page 24: ...Nedis BV De Tweeling 28 5215 MC s Hertogenbosch The Netherlands 01 22...

Reviews: