background image

41 (I)

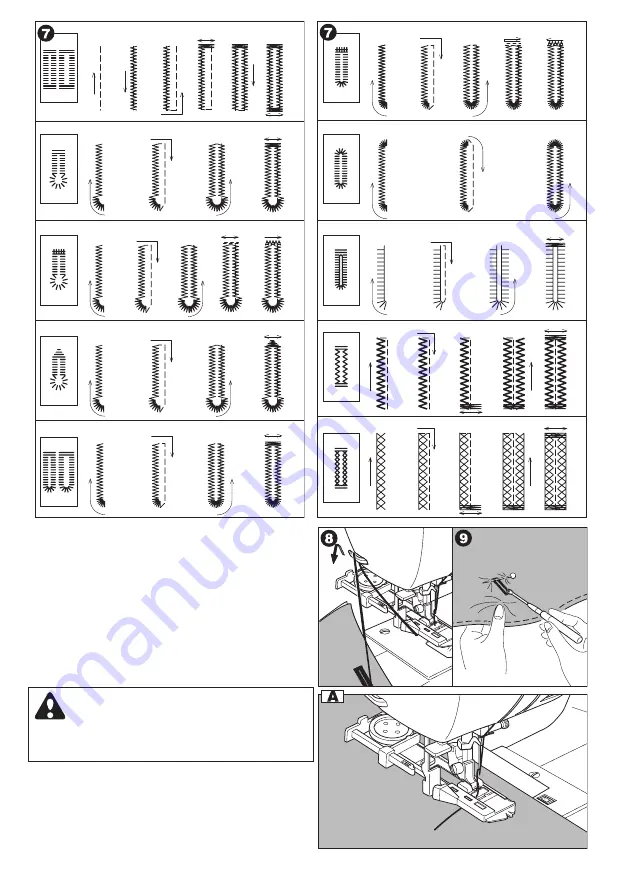
7. La macchina esegue l'asola nell'ordine

illustrato e si ferma automaticamente dopo
la cucitura.

8. Alzate il piedino e tagliate il filo.

Per ricucire la stessa asola alzate il piedino
e tornate nella posizione di partenza.

9. Tagliate l'asola al centro, facendo

attenzione a non tagliare i punti laterali.
Usate uno spillo come fermo.

ATTENZIONE: Per prevenire incidenti.

Quando usate un apri cuciture non mettete il
dito davanti allo strumento.

A. PER CUCIRE TESSUTI ELASTICI

E' consigliabile usare un rinforzo sul rovescio
del tessuto.
Nota: La densità dei cordoncini dell'asola si
può regolare con il controllo lunghezza punto.

1

2

3

4

5

6

1

2

3

4

5

1

2

3

4

1

2

3

4

5

1

2

3

4

1

2

3

4

1

2

3

4

5

1

2

3

4

5

1

2

3

4

1

2

3

Summary of Contents for N420E

Page 1: ...MANUALE ISTRUZIONI Mod NECCHI N420E Mod NECCHI N422E Mod NECCHI N424E INSTRUCTION MANUAL Model N420E Model N422E Model N424E...

Page 2: ...ssistenza pi vicino per un eventuale controllo riparazione o regolazione di tipo elettrico o meccanico 6 Non utilizzate mai la macchina per cucire con le apertura di ventilazione ostruite Mantenete se...

Page 3: ...MOD N424E ASOLA RIPIEGATA42 APPLICAZIONE BOTTONI 44 QUILTING 46 QUILTING A EFFETTO MANUALE 47 PUNTI UTILI DECORATIVI 47 MOD N424E CUCITURA DI PUNTI DECORATIVI E CARATTERI 48 MOD N422E CUCITURA PUNTI D...

Page 4: ...ago 20 Vite morsetto ago 21 Guidafilo barra ago 22 Ago 23 Coperchio spolina 24 Fermo coperchio spolina 25 Leva tendifilo interna 26 Mod N422E N420E Regolatore tensione 27 Placca guidafilo 28 Portarocc...

Page 5: ...ingolo 4 Tasto Ritorno 5 Tasti Regolazione 6 Tasto Lunghezza ampiezza 7 Tasto Punto diritto 8 Tasto Punto zigzag 9 Tasto Conferma 10 Tasto Cancella 11 Tasti Cursore 12 Tasto Punto utile 13 Tasto Punto...

Page 6: ...gate la spina alla presa di alimentazione elettrica 4 Accendete l interruttore generale 5 Ad interruttore acceso si accende anche la lampadina 6 Per scollegare spegnete l interruttore generale simbolo...

Page 7: ...rlo coperto D 12 Piedino cerniera E 13 Piedino satin B 14 Barra per quilting 15 Piedino asola 16 Piedino standard A montato sulla macchina imballata MOD N424E N422E 17 Piedino per bottoni MOD N424E 18...

Page 8: ...Ruotate il volantino verso di voi finch l ago si trova nel punto pi alto 2 Sollevate la leva alzapiedino 3 Rimuovete il piedino spingendo la leva rilascio piedino verso di voi 4 Posizionate il piedin...

Page 9: ...aghi piegati o spuntati Appoggiate l ago su una superficie piana e verificatene l integrit TABELLA TESSUTO FILATO AGO Scegliete dimensione di filato e ago in base al tessuto da cucire Tipo di tessuto...

Page 10: ...top si disattiva B TASTO RETROMARCIA La macchina continua a cucire all indietro a bassa velocit mentre questo tasto premuto e si ferma quando il tasto viene rilasciato Nota Quando il reostato collegat...

Page 11: ...La sua funzione quella di trasportare il tessuto durante la cucitura La leva disinnesto trasporto controlla la griffa Nella normale cucitura spostate la leva verso destra in modo da alzare la griffa a...

Page 12: ...uando il reostato collegato il tasto start stop si disattiva B TASTO RETROMARCIA La macchina continua a cucire all indietro a bassa velocit mentre questo tasto premuto e si ferma quando il tasto viene...

Page 13: ...destra in modo da alzare la griffa al massimo La leva resta in questa posizione per la maggior parte delle cuciture Per rammendo ricamo a mano libera o nei casi in cui il tessuto viene spostato a man...

Page 14: ...asto Punto utile Appariranno sullo schermo i primi 5 punti utili 2 Premendo il tasto Indicatore o scorreranno avanti o indietro 4 gruppi di punti utili Selezionate il gruppo che volete cucire 3 Premen...

Page 15: ...o nel modo seguente f Lunghezza punto La lunghezza punto impostata viene indicata da un numero evidenziato Per accorciare il punto premete il tasto Meno Per allungare il punto premete il tasto Pi g Am...

Page 16: ...punto zigzag C PER SELEZIONARE UN PUNTO UTILE 1 Premete il tasto Punto utile Appariranno sullo schermo i primi 6 punti utili 2 Premendo il tasto Pi o Meno scorreranno avanti o indietro 6 punti Premet...

Page 17: ...o nel modo seguente f Lunghezza punto La lunghezza punto impostata viene indicata da un numero evidenziato Per accorciare il punto premete il tasto Meno Per allungare il punto premete il tasto Pi g Am...

Page 18: ...numero di punto lunghezza ed ampiezza punto vengono reimpostate sui valori standard Potete selezionare prima il numero del punto e poi regolare lunghezza e ampiezza 2 PER SELEZIONARE PUNTO DIRITTO ZI...

Page 19: ...0 5 0 5 0 5 0 5 0 6 0 7 0 Punto Num 40 41 42 43 44 45 46 47 48 49 50 51 52 53 54 55 56 57 58 59 Lungh 0 5 0 5 0 5 0 5 0 5 1 6 0 5 0 5 0 5 0 5 1 6 1 6 2 6 2 6 2 6 2 6 2 6 2 6 2 6 2 6 Amp 7 0 7 0 7 0 7...

Page 20: ...o premete il tasto Per accorciare il punto premete il tasto Potete regolare la lunghezza durante la cucitura 1 Premete il tasto Modalit ampiezza punto Si accende un indicatore luminoso e sul display a...

Page 21: ...asola viene premuto il tasto Start anche se il piedino non viene alzato per tornare alla posizione originale 3 Avvolgimento spolina Luce verde accesa Il perno filarello spinto verso destra modalit av...

Page 22: ...agganciate il filo dall apertura posteriore 2 Portate il filo in avanti e fatelo passare attraverso la placca guidafilo da dx a sin 3 Portate il filo a destra e fatelo passare dal lato inferiore del g...

Page 23: ...te il filo lungo la scanalatura dall alto in basso Tendete il filo verso destra per tagliarlo 4 Rimontate il coperchio della spolina Inserite le linguette di sinistra nei fori della placca ago e sping...

Page 24: ...e fatelo passare attraverso la placca guidafilo da dx a sin 3 Portate il filo a destra e fatelo passare dal lato inferiore del guidafilo Fatelo passare sotto il disco tensione in senso antiorario 4 I...

Page 25: ...polina 3 Tirate il filo verso sinistra e lungo l interno della molla b fino alla scanalatura c assicurandovi che il filo non scivoli fuori dalla scanalatura a 4 Estraete circa 10 cm di filo Riposizion...

Page 26: ...per facilitare lo svolgimento del filo Lasciate un piccolo spazio tra la bobina ed il ferma bobina come illustrato in figura C INFILATURA SUPERIORE 1 Trattenete il filo con entrambe le mani e fatelo p...

Page 27: ...e rilasciatela Il gancio ruota e fa passare il filo attraverso la cruna formando un anello 7 Infilare il filo nella cruna dell ago per circa 20 cm 8 Alzare il piedino di cucitura agendo sulla leva alz...

Page 28: ...o del fermo in base alla dimensione del rocchetto C INFILATURA SUPERIORE 1 Trattenete il filo con entrambe le mani e fatelo passare nella guida dall apertura posteriore 2 Portate il filo in avanti e f...

Page 29: ...o passa attraverso la cruna 3 Tirate il filo nel guidafilo a e tiratelo verso destra 4 Tirate il filo nella guida b Il filo si aggancia a c 5 Agganciate il filo al tagliafilo da dietro a davanti Tirat...

Page 30: ...la velocit di cucitura premendo il tasto Lento 4 Quando arrivate a fine cucitura premete il tasto Start stop per interrompere o rilasciate il reostato Mod N424E 5 Premete il tasto Tagliafilo 6 Solleva...

Page 31: ...nto di fermatura 2 Iniziate a cucire La macchina cuce un punto di fermatura e poi inizia a cucire il punto scelto 3 A fine cucitura premete una volta il tasto Retromarcia La macchina esegue un punto d...

Page 32: ...iedino 2 Spingete il pulsante di fermo sul lato destro del piedino standard e abbassate il piedino 3 Iniziate a cucire Con il perno del piedino bloccato il tessuto viene alimentato uniformemente a La...

Page 33: ...viene aumentata Il filo inferiore appare sul diritto del tessuto C Quando la tensione viene diminuita Il filo superiore appare sul rovescio del tessuto D Tensione non per punto diritto La tensione non...

Page 34: ...Ruotate il selettore tensione verso sinistra C Quando il filo superiore appare sul rovescio del tessuto Ruotate il selettore tensione verso destra D Tensione per punti zigzag Per realizzare punti zigz...

Page 35: ...rmate la macchina 4 MOD N424E Premete il tasto Tagliafilo MOD N422E N420E Alzate il piedino e tagliate il filo B Punto diritto con fermatura automatica 1 Posizionate il tessuto sotto al piedino e abba...

Page 36: ...unto ZIGZAG MULTIPLO Usato per cuciture su elastico e per sopraggitto su tessuti in maglia N424E N422E N420E 13 9 09 Zigzag multiplo Piedino standard A A Cucitura su elastico Tirate l elastico davanti...

Page 37: ...er prevenire incidenti Il piedino sopraggitto deve essere usato solo con i punti indicati e con ampiezza punto non inferiore a 5 0 E possibile che l ago colpisca il piedino e si rompa quando si cambia...

Page 38: ...iedino invisibile assicura il trasporto regolare quando si cuce un orlo invisibile La guida e si regola ruotando l apposita vite f 3 Posizionate il tessuto in modo che i punti diritti o piccoli zigzag...

Page 39: ...ITURA ELASTICA Assicura una cucitura robusta e flessibile senza rischio di rottura Utile per facilitare la cucitura di tessuti difficili e di maglina Utile per unire tessuti resistenti come il jeans N...

Page 40: ...ura d Rovescio del tessuto 2 Premete per aprire la cucitura Imbastite il nastro della cerniera Posizionate la cerniera aperta e rivolta in basso sul bordo della cucitura con i denti contro la linea di...

Page 41: ...l pedino cerniera Inserite il lato sinistro del perno piedino sul supporto piedino quando cucite il lato destro della cerniera il lato destro del perno piedino al supporto quando cucite il lato sinist...

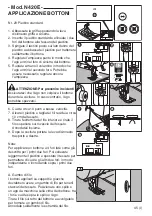
Page 42: ...ate sul tessuto posizione e lunghezza dell asola 2 Inserite il bottone nella base Se il bottone non entra nella base regolate il cursore considerando il diametro del bottone pi il suo spessore a Lungh...

Page 43: ...facendo attenzione a non tagliare i punti laterali Usate uno spillo come fermo ATTENZIONE Per prevenire incidenti Quando usate un apri cuciture non mettete il dito davanti allo strumento A PER CUCIRE...

Page 44: ...ritaglio 2 Abbassate la leva dell asola ed eseguite l asola vd pagina precedente La macchina esegue l asola nell ordine illustrato e si ferma automaticamente a fine cucitura 3 Alzate il piedino e tag...

Page 45: ...e cucite lungo i lati allo spessore di un ago di distanza dalla linea di cucitura originaria Rimuovete l imbastitura c Rovescio del tessuto 11 Piegate il tessuto nell altra direzione e cucite le estr...

Page 46: ...punti a bassa velocit 6 Alzate il piedino e tagliate i fili residui a circa 5 cm dal tessuto 7 Tirate l estremit del filo inferiore e tirate il filo superiore sul rovescio del tessuto Annodateli insie...

Page 47: ...6 Cucite circa 10 punti a bassa velocit 7 Alzate il piedino e tagliate i fili residui a circa 10 cm dal tessuto 8 Tirate l estremit del filo inferiore e tirate il filo superiore sul rovescio del tess...

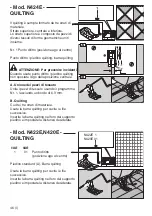
Page 48: ...la posizione centrale A Unione dei pezzi di tessuto Unite i pezzi di tessuto usando il programma Nr 1 lasciando un bordo di 6 3 mm B Quilting Cucite i tre strati di materiale Usate la barra quilting p...

Page 49: ...punto Durante la cucitura il filo inferiore viene portato in superficie per rendere l effetto di un quilting tradizionale a mano MOD N422E N420E Aumentate al massimo la tensione Durante la cucitura il...

Page 50: ...l gruppo di punti desiderato 3 Premendo il tasto Pi o Meno scorrono 2 7 punti avanti o indietro Premete questi tasti finch appare il punto desiderato 4 Premete il tasto Cursore o per evidenziare il pu...

Page 51: ...ursore L evidenziazione si sposta a sinistra 3 Controllate i punti selezionati premendo i tasti Cursore o 4 Premete ancora il tasto Ritorno R per tornare alla modalit di selezione D REGOLAZIONE LUNGHE...

Page 52: ...RA DEI PUNTI SELEZIONATI Modalit cucitura Singola Ripetuta Potete modificare la modalit di cucitura premendo il tasto Punto di fermatura a Modalit singola Pre impostata Il segno appare sullo schermo L...

Page 53: ...esiderato Nota Quando viene evidenziato il punto pi laterale premendo il tasto Cursore o appare il gruppo successivo o precedente 4 Premete il tasto OK Un unit di punto decorativo o un carattere vengo...

Page 54: ...ghezza e ampiezza In questo caso appare il segno c 4 Premete ancora il tasto Ritorno R per tornare alla modalilt di selezione Mod N422E B PER CANCELLARE I PUNTI SELEZIONATI 1 Se selezionate un punto i...

Page 55: ...La macchina indica il motivo cucito sul lato sinistro in alto dello schermo Nota Se modificate la modalit di cucitura durante la cucitura questa potrebbe modificarsi dopo aver eseguito per intero il m...

Page 56: ...trambi i lati del tessuto APPLICAZIONI N424E N422E N420E 26 18 24 Piedino standard A 1 Fissate l applicazione sul tessuto con colla per tessuti termoadesivo o imbastitura 2 Cucite il bordo dell applic...

Page 57: ...imo filo nel modo consueto 3 Infilate la cruna di sinistra a mano da davanti a dietro 4 Posizionate il perno rocchetto extra con la rondella di feltro sul perno filarello 5 Posizionate il secondo rocc...

Page 58: ...tra 3 Posizionate il tessuto sotto al piedino in modo che il punto di inizio sia da questo lato Abbassate il piedino b Quando cucite travette su un bordo di tessuto spesso come una tasca posizionate u...

Page 59: ...o e iniziate a cucire lentamente guidando il bordo grezzo di fronte al piedino per arrotolarlo regolarmente 3 mm 5 cm Solo mod N424E CORDONCINO No 11 Punto Zigzag per cordoncino singolo No 13 Zigzag m...

Page 60: ...ano avanti e indietro con movimento regolare cucendo punti in file ravvicinate sopra lo strappo o l area consumata 3 Quando l area stata riempita di punti muovete il tessuto da lato a lato in modo sim...

Page 61: ...424E N422E CARATTERI 1 Se i punti sono deformati come nella figura C ruotate la vite in direzione del segno 2 Se i punti sono deformati come nella figura D ruotate la vite in direzione del segno A B C...

Page 62: ...pporto Rimuovete coperchio spolina e spolina Rimuovete le viti di fissaggio placca ago 2 Rimuovete la placca ago sollevando il lato destro della placca 3 Sollevate il cestello e rimuovetelo 4 Pulite a...

Page 63: ...Abbassate il piedino Abbassate la leva dell asola Inserite il piedino asola CAUSA Macchina non correttamente infilata Filo aggrovigliato nella spolina Ago inserito male Tensione eccessiva Filato non...

Page 64: ...62 I Mod N424E TABELLA PUNTI La parte chiara del punto decorativo un unit di punto PUNTI UTILI PUNTI DECORATIVI GOTICO X 1 VOLTA CORSIVO X 2 VOLTE CARATTERE...

Page 65: ...63 I CARATTERE X 1 VOLTA Mod N422E TABELLA PUNTI PUNTI UTILI PUNTI DECORATIVI La parte chiara del punto decorativo un unit di punto X 2 VOLTE...

Page 66: ...ate la griffa trasporto portando la leva sulla sinistra Consultate il manuale istruzioni fornito con l unit di ricamo per ulteriori informazioni Alla fine delle operazioni riposizionate la leva della...

Page 67: ...INSTRUCTION MANUAL Model N420E Model N422E Model N424E...

Page 68: ...tion of lint dust and loose cloth 5 Never drop or insert any object into any opening 6 Do not use out doors 7 Do not operate where aerosol spray products are being used or where oxygen is being admini...

Page 69: ...RTING ZIPPERS CENTERED INSERTION 38 LAPPED INSERTION 39 BUTTONHOLE SEWING 40 Model N424E ONLY BOUND BUTTONHOLE42 SEWING ON BUTTONS 44 QUILTING 46 HAND LOOK QUILTING STITCH 47 UTILITY DECORATIVE STITCH...

Page 70: ...e 20 Needle Clamp Screw 21 Needle Bar Thread Guide 22 Needle 23 Bobbin Cover 24 Bobbin Cover Latch 25 Thread Take Up Lever Inside 26 Model N422E N420E Thread Tension Regulator 27 Thread Guide Plate 28...

Page 71: ...ad Button 5 Up Down Buttons 6 Length Width Button 7 Straight Stitch Button 8 Zigzag Stitch Button 9 OK Button 10 Clear Button 11 Cursor Buttons 12 Utility Stitch Button 13 Decorative Stitch Button 14...

Page 72: ...ct the power line plug to the electric outlet 4 Turn on the power switch 5 A lamp will light up when switch is turned on 6 To disconnect turn the power switch to the off position symbol O then remove...

Page 73: ...vercasting Foot C 11 Blind Foot D 12 Zipper Foot E 13 Satin Foot B 14 Quilting Bar 15 Buttonhole Foot 16 Regular Foot A On machine when delivered Model N424E N422E 17 Button Sewing Foot Model N424E 18...

Page 74: ...n the hand wheel toward you until the needle is at its highest point 2 Raise the presser foot lifter 3 Remove the presser foot by pushing the presser foot release lever toward you 4 Place desired foot...

Page 75: ...blunt needle Place needle on a flat plate and check straightness FABRIC THREAD AND NEEDLE TABLE Select size of thread and needle in accordance with fabric to be sewn Type of Fabric Light Weight thin g...

Page 76: ...stop button will be disactivated B REVERSE BUTTON The machine will continue to sew in reverse at low speed while this button is pressed and stop when this button is released Note When the foot contro...

Page 77: ...the needle plate directly below the presser foot Their function is to move the fabric being sewn The drop feed lever controls the fabric feed dogs For ordinary sewing move the lever to the right This...

Page 78: ...ad sensor When the foot controller is connected start stop button will be disactivated B REVERSE BUTTON The machine will continue to sew in reverse at low speed while this button is pressed and stop w...

Page 79: ...ing move the lever to the right This raises feed dogs to their highest position For most sewing the lever should be in this position For darning or free motion embroidery or whenever fabric is to be m...

Page 80: ...button First 5 patterns of utility stitch will appear on the L C D 2 By pressing the tab or button utility 4 groups will change incrementally or decrementally Select a group you want to sew 3 By pres...

Page 81: ...nformations will change as follows f Stitch Length Preset stitch length is indicated as a highlighted number For shorter stitch length press the down button For longer stitch length press the up butto...

Page 82: ...ag stitch button C TO SELECT A UTILITY PATTERN 1 Press the utility stitch button First 6 patterns of utility stitch will appear on the L C D 2 By pressing the up or down button 6 patterns will change...

Page 83: ...se informations will change as follows f Stitch Length Preset stitch length is indicated as a highlighted number For shorter stitch length press the down button For longer stitch length press the up b...

Page 84: ...change the stitch pattern number the stitch length and width will be re set to pre set length and width Therefore you should select the pattern number first and next adjust the length and width 2 TO...

Page 85: ...0 6 0 2 5 7 0 7 0 Pattern Number 40 41 42 43 44 45 46 47 48 49 50 51 52 53 54 55 56 57 58 59 Length 0 5 0 5 0 5 0 5 0 5 1 6 0 5 0 5 0 5 0 5 1 6 1 6 2 6 2 6 2 6 2 6 2 6 2 6 2 6 2 6 Width 7 0 7 0 7 0 7...

Page 86: ...For shorter stitch length press the button You can adjust stitch length while sewing 1 Press the Stitch Width Mode Button Indicator light will turn on and stitch width will appear on the display 2 Ad...

Page 87: ...lowered or After buttonhole sewing start button is pressed although presser foot is not raised to return to original position 3 Bobbin Winding Green light turn on Bobbin winder spindle is pushed to t...

Page 88: ...thread frontward and pass through the thread guide plate from rigth to left 3 Bring thread to the right and pass thread to the thread guide from under side Pass through under tension disc in counter...

Page 89: ...ull thread along the groove from up to down Pull thread to the right to cut the thread 4 Replace the bobbin cover Set the left tabs into the holes in needle plate and push the right side of bobbin cov...

Page 90: ...te from rigth to left 3 Bring thread to the right and pass thread to the thread guide from under side Pass through under tension disc in counter clockwise 4 Insert thread through hole in bobbin and pl...

Page 91: ...holding the bobbin 3 Pull thread toward the left and along the inside of spring b until it slips into notch c being sure that thread does not slip out of notch a 4 Pull thread out about 10 cm Replace...

Page 92: ...se the small thread cap when you use cross wound thread Leave small opening between cap and spool as illustration C THREADING THE UPPER THREAD 1 Hold thread in both hands and pass thread to the guide...

Page 93: ...back to front Pull and cut thread 6 Lower the lever once more and release the lever Hook will turn and pass thread through needle eye while making a loop 7 Pull thread out from needle eye 8 Raise the...

Page 94: ...Reverse spool cap direction according to the size of spool C THREADING THE UPPER THREAD 1 Hold thread in both hands and pass thread to the guide from rear opening 2 Bring thread frontward and pass thr...

Page 95: ...ough the needle eye 3 Draw thread through thread guide a and pull toward the right 4 Draw thread into the guide b Thread will be hooked to the c 5 Hook the thread to the thread cutter from back to fro...

Page 96: ...d by pressing the slow button 4 When you reach end of seam press the start stop button to stop sewing or release the foot controller pedal Model N424E 5 Press the thread cutter button 6 Raise the pres...

Page 97: ...sew Machine will sew tacking automatically and start to sew the selected pattern 3 When you reach the end of seam press the reverse button once Machine will sew tacking and stop automatically 4 If you...

Page 98: ...c edge aligning this guide line E SEWING HEAVY FABRIC When sewing heavy fabrics the toe end of presser foot tends to lift up and sewing cannot be started smoothly In such case set as follows 1 Raise t...

Page 99: ...sion is increased Bobbin thread will appear on the top side of fabric C When thread tension is decreased Upper thread will appear on the bottom side of fabric D Thread tension except for straight stit...

Page 100: ...Turn the tension dial to the left C When upper thread appears on the bottom side of fabric Turn the tension dial to the right D Thread Tension for Zigzag Stitches To sew zigzag stitches the thread te...

Page 101: ...you reach the end of seam stop sewing 4 Model N424E Press the thread cutter button Model N422E N420E Raise the presser foot and cut thread B Straight Stitch With Auto reverse Stitch 1 Position the fa...

Page 102: ...titch Attach the satin foot for this stitch FREE ARM SEWING By simply removing the extension table machine becomes a free arm machine making hard to reach areas readily accessible Refer to page 6 for...

Page 103: ...brics CAUTION To prevent accidents Overcasting foot should be used for sewing above patterns only and do not change the stitch width narrower than 5 0 It is possible that needle could hit the presser...

Page 104: ...oot ensures even feeding of the fabric when blind hem stitching The guide e is adjusted by turning the adjusting screw f 3 Place fabric so that the straight stitches or small zigzag stitches are on th...

Page 105: ...ELASTIC STITCH SEWING It assures you of a stitch that is strong and flexible and will give with the fabric without breaking Good for easy to ravel and knit fabrics It is good for joining durable fabr...

Page 106: ...stitch b End of opening c Basting d Wrong Side of fabric 2 Press open the seam allowance Baste the zipper tape Place the open zipper face down on the seam allowance with the teeth against the seam lin...

Page 107: ...the zipper foot Attach the left side of the presser foot pin to the presser foot holder when sewing the right side of the zipper and right side of the presser foot pin to the holder when sewing the l...

Page 108: ...Buttonhole See page 42 Buttonhole Foot F 1 Mark position and length of buttonhole on fabric 2 Set button on the base If button does not fit on the base adjust slide on base to diameter of button plus...

Page 109: ...ole being careful not to cut stitches on either side Use a pin as a stopper CAUTION To prevent accidents When using seam ripper do not put your finger in the path of ripper A WHEN SEWING STRETCH FABRI...

Page 110: ...e of fabric b Wrong side of patch 2 Lower the buttonhole lever and sew buttonhole See previous page Machine wiil sew the buttonhole in the order as shown and stop automatically after sewing 3 Raise th...

Page 111: ...h along the seams on each side just a needle width from the original stitching line Remove the basitng c Wrong side of fabric 11 Fold the fabric another direction and stitch the trianglar ends on the...

Page 112: ...peed 6 Raise the foot and cut the threads remaining about 2 inces to the fabric 7 Pull the end of bobbin thread and pull upper thread to the wrong side of fabric Tie them together 8 After sewing move...

Page 113: ...y 10 stitches at slow speed 7 Raise the foot and cut the threads remaining about 10 cm to the fabric 8 Pull the end of bobbin thread and pull upper thread to the wrong side of fabric Tie them together...

Page 114: ...needle position from center A Joining the pieces of fabric Join the pieces of fabric using Pattern No 1 with a seam allowance of 1 4 inch 6 3 mm B Quilting Sew three layers of material Use quilting b...

Page 115: ...When you sew bobbin thread will pull to the top and give the appearance of a traditional hand quilting stitch Model N422E N420E Increase the thread tension to the maximum When you sew bobbin thread wi...

Page 116: ...pressing the up or down button 2 7 patterns will change incrementally or decrementally Press these buttons until desired pattern will appear 4 Press the cursor or button to highlight the pattern you d...

Page 117: ...rns are having built in tack stitch 2 If you want to delete all patterns press the clear C button long time over 0 5 sec Machine will delete all selected patterns D ADJUSTING STITCH LENGTH AND WIDTH Y...

Page 118: ...ED PATTERNS Sewing mode Single Repeat You can change the sewing mode alternately by pressing the tack button a Single mode Pre set The mark will appear on the L C D Machine will stop automatically aft...

Page 119: ...t the pattern you desire Note When the most right or left side pattern is highlighted by pressing the cursor or button next or previous patterns will appear 4 Press the OK button One unit of decorativ...

Page 120: ...ome decorative patterns can not change the length and width In this case the mark c will appear 4 Press the read R button again to return to selecting mode B TO DELETE SELECTED PATTERN 1 If you select...

Page 121: ...r foot and start sewing 3 Machine will indicate the sewing pattern on the top left side of LCD Note If you change the sewing mode at the middle of sewing it may change after sewing one memorized patte...

Page 122: ...ic APPLIQUE N424E N422E N420E 26 18 24 Regular Foot A 1 Fix applique on fabric with fabric glue fusible iron on or basiting stitches 2 Sew edge of applique while dropping the needle as close to the ed...

Page 123: ...rst thread as usual following threading route 3 Thread the left needle eye by hand from front to back 4 Place the Extra Spool Pin with felt washer on bobbin winder spindle 5 Place second spool of thre...

Page 124: ...d bobbin threads to the left 3 Position fabric under presser foot so that the starting point comes this side Lower the foot b When you sew bar tack on edge of thick fabric such as pocket place same th...

Page 125: ...ape 3 Lower the presser foot and start sewing slowly with guiding raw edge of fabric in front of hemmer evenly into scroll 3 mm 5 cm Model N424E ONLY CORDING No 11 Zigzag Stitch for Single Cording No...

Page 126: ...and forward and backward with an even motion stitching in closely spaced rows over the hole or worn area 3 When the area is filled with new stitches move fabric from side to side in a similar manner t...

Page 127: ...l Model N424E N422E ONLY LETTER STITCH PATTERN 1 If patterns are misformed as illustration C turn screw in direction of symbol 2 If patterns are misformed as illustration D turn screw in direction of...

Page 128: ...needle presser foot and holder Remove the bobbin cover and bobbin Remove the screws holding the needle plate 2 Remove the needle plate by lifting up the rigtht side of the plate 3 Lift up the bobbin...

Page 129: ...ch the buttonhole foot CAUSE Machine not properly threaded Thread entwined around bobbin Needle inserted incorrectly Thread tension too tight Thread of incorrect size or poor quality Bobbin threaded i...

Page 130: ...62 E Model N424E PATTERN CHART Bold part of decorative stitch pattern is one unit of pattern UTILITY PATTERN DECORATIVE PATTERN GOTHIC X 1 TIME SCRIPT X 2 TIMES LETTER...

Page 131: ...63 E LETTER X 1 TIME Model N422E PATTERN CHART UTILITY PATTERN DECORATIVE PATTERN Bold part of decorative stitch pattern is one unit of pattern X 2 TIMES...

Page 132: ...turn off the power switch of sewing machine and lower the drop feed lever to the left See instruction manual provided with the embroidery unit for more instruction After embroidary sewing turn the dr...

Reviews: