English-5
English
For box contents, please refer to the printed contents sheet
provided in the box.
This device cannot be used or installed without the Tabletop
Stand or other mounting accessory for support. For proper
installation it is strongly recommended to use a trained,
NEC authorized service person. Failure to follow NEC
standard mounting procedures could result in damage to the
equipment or injury to the user or installer. Product warranty
does not cover damage caused by improper installation.
Failure to follow these recommendations could result in
voiding the warranty.
Mounting
CAUTION
DO NOT mount the monitor yourself. Please ask your
supplier. For proper installation it is strongly recommended to
use a trained, qualified technician. Please inspect the location
where the unit is to be mounted. Mounting on wall or ceiling
is the customer’s responsibility. Not all walls or ceilings are
capable of supporting the weight of the unit. Product warranty
does not cover damage caused by improper installation, re-
modeling, or natural disasters. Failure to comply with these
recommendations could result in voiding the warranty.
DO NOT block ventilated openings with mounting
accessories or other accessories.
For NEC Qualified Personnel:
To ensure safe installation, use two or more brackets to
mount the unit. Mount the unit to at least two points on the
installation location.
Please note the following when mounting
on wall or ceiling
CAUTION
• Whenusingmountingaccessoriesotherthanthosethat
are NEC approved, they must comply with the VESA-
compatible (FDMlv1) mounting method.
• NECrecommendsmountinginterfacesthatcomplywith
UL1678 standard in North America.
• NECstronglyrecommends
using size M6 screws
(10-12 mm + thickness
of bracket and washers in
length). If using screws
longer than 10-12 mm,
check the depth of the hole.
(Recommended Fasten
Force:470-635N•cm).Bracket
hole should be under
8.5 mm.
• Priortomounting,inspecttheinstallationlocationto
ensure that it is strong enough to support the weight of
the unit so that the unit will be safe from harm.
•
For detailed information, refer to the instructions included
with the mounting equipment.
Make sure that there is no gap between the monitor and the
bracket.
When used in a video wall configuration for a longer
time, slight expansion of the monitors may happen due to
temperature changes. Due to this it is recommended that
over one millimeter gap is kept between adjacent monitor
edges.
CAUTION:
• Wheninstalling,donotapplypressureto
the screen or excessive force to any part of
the monitor by pushing or leaning on it.
This may cause the monitor to become
distorted or damaged.
•
To prevent the LCD monitor from falling
off from the wall or ceiling, NEC strongly
recommends using a wire.
•
Please install LCD monitor in a spot of the
wall or ceiling strong enough to support the
monitor.
•
Prepare the LCD monitor using mounting
accessories such as hook, eyebolt or
mounting parts and then secure the LCD
monitor with a wire. The installed wire must
not be tight.
• Donotattempttohangthemonitorusing
an installation safety wire. The monitor
must be properly installed on a VESA
compatible mount.
•
Please make sure the mounting
accessories are strong enough to support
the LCD monitor before mounting it.
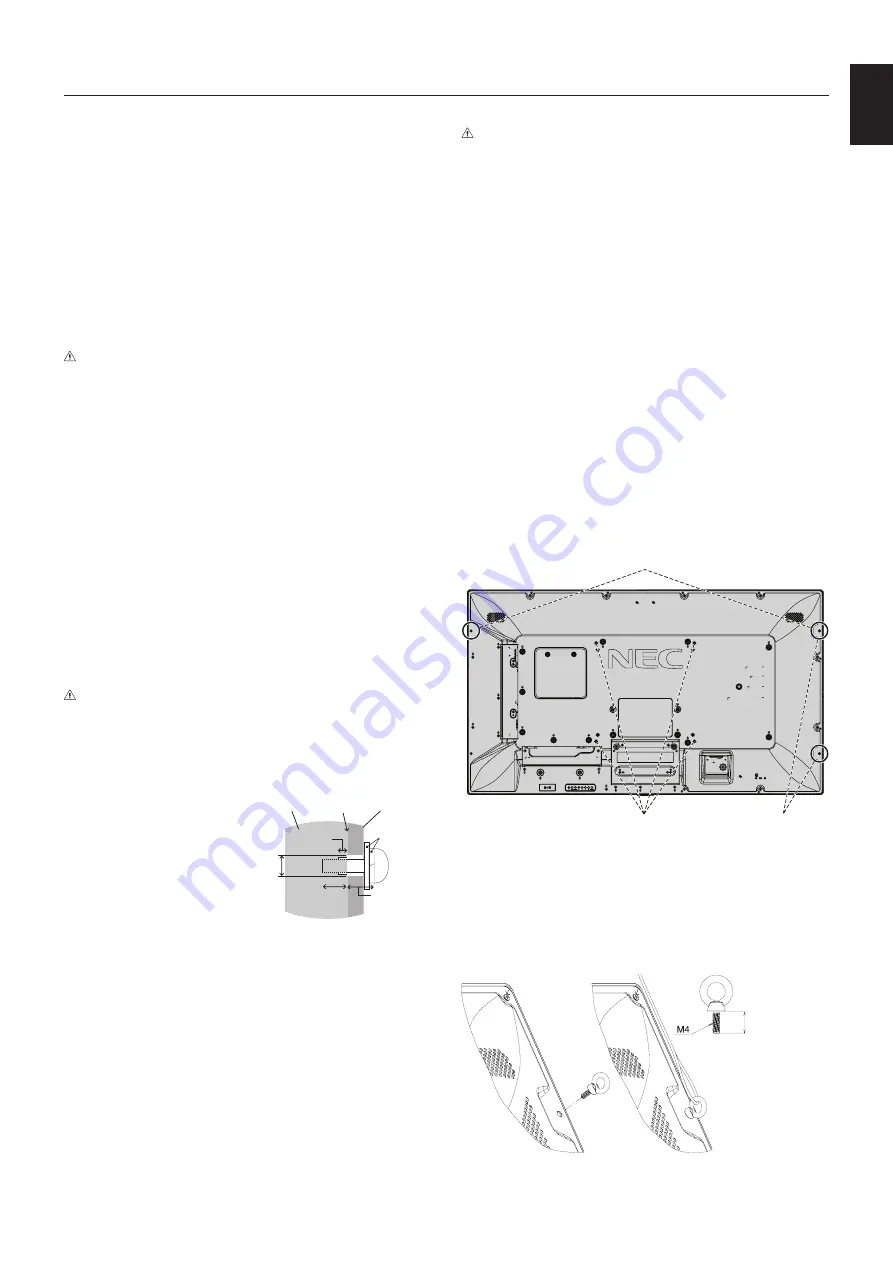
Please use the two optional speaker mounting holes.
(RecommendedFastenForce:139-189N•cm)
.
Landscape installation for safety wire
Portrait installation
for safety position
VESA Mounting Interface (M6)
Installing a wire to a monitor with no speakers installed
Please use eyebolts to install a wire to the monitor.
To prevent the LCD monitor from falling off from the wall or
ceiling, NEC strongly recommends using a wire.
Please install LCD monitor in a spot of the wall or ceiling
strong enough to support the monitor.
Less than 12 mm
Installation
Screw
Unit
10-12 mm
Thickness
of bracket
and washers
under
8.5 mm
No gap
Washers
Mounting
Bracket
No thread
4 mm


