background image

Français-17

Fr

ançais

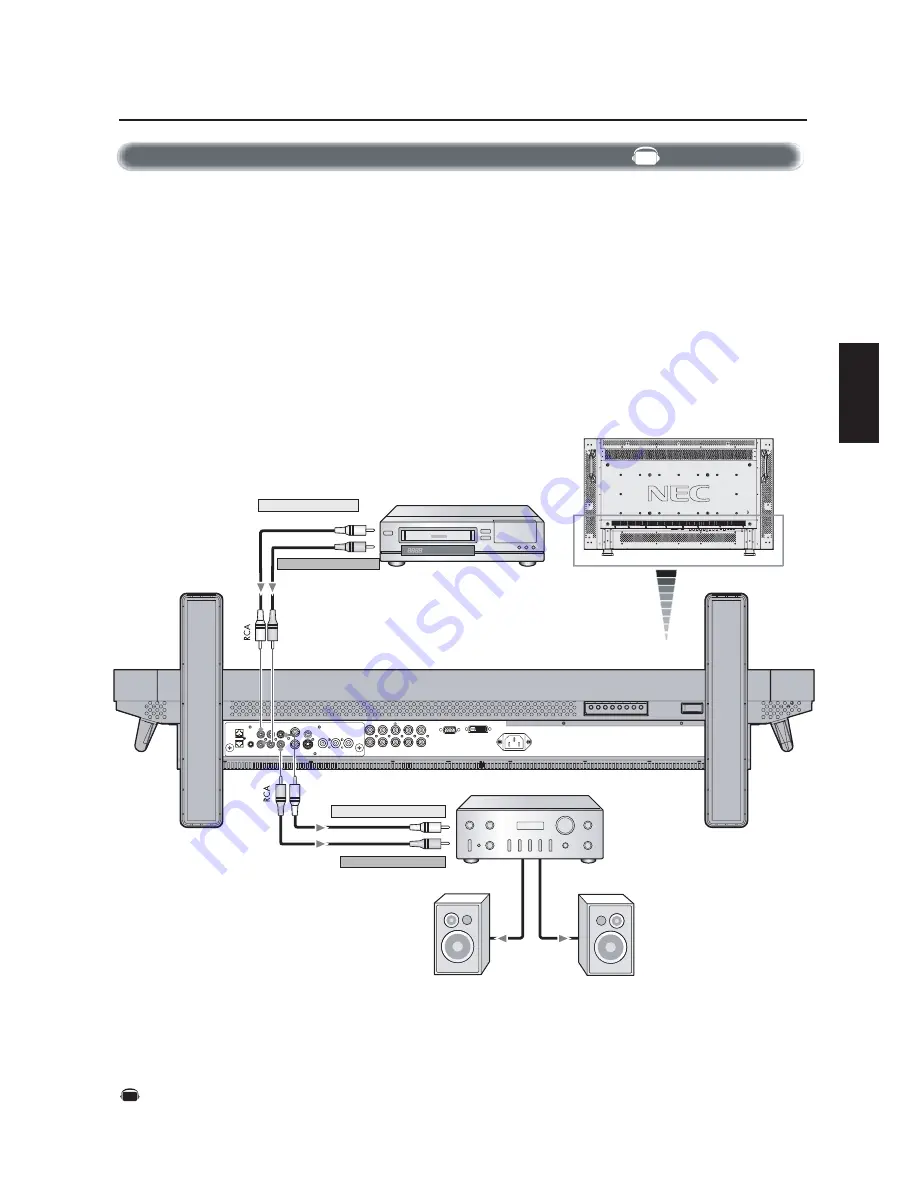
Vous pouvez brancher votre amplificateur stéréophonique à votre moniteur LCD. Reportez-vous au manuel d’utilisation de votre
amplificateur pour des informations supplémentaires.

Brancher à un amplificateur stéréophonique

• Mettez en marche le moniteur LCD et l’amplificateur uniquement après avoir effectué tous les branchements.
• Utilisez un câble RCA pour brancher le connecteur SORTIE AUDIO (RCA) au moniteur LCD et l’entrée audio à l’amplificateur.
• N’inversez pas les douilles audio gauche et droite.
• L’ENTRÉE AUDIO est utilisée pour une entrée audio.
• La douille SORTIE AUDIO dirige le son du dispositif d’entrée audio (VCR) sélectionné par le moniteur LCD vers le dispositif de sortie

externe (amplificateur stéréophonique).

Branchements 

–suite

Moniteur

VCR ou lecteur de disque laser

Amplificateur stéréophonique

Vers sortie audio gauche

Vers sortie audio droite

Vers entrée audio droite

Haut-parleur externe

Haut-parleur externe

Vers entrée audio gauche

AV

Indique une fonction de l’appareil AV.

        Toutes les fonctions AV sont activées quand l’appareil AV
        est installé.

AV

Summary of Contents for MultiSync LCD4010

Page 1: ......

Page 2: ......

Page 3: ......

Page 4: ......

Page 5: ...Digital Output English 15 Connecting to a DVD Player English 16 Connecting to a Stereo Amplifier English 17 Basic Operation Power On and Off modes English 18 Power Indicator English 19 When Using Power Management Function English 19 Selecting a Video Source English 19 Picture Size English 19 Picture Mode English 19 OSM Information English 19 OSM On Screen Manager Controls English 20 Picture Englis...

Page 6: ...llowing measures Reorient or relocate the receiving antenna Increase the separation between the equipment and receiver Connect the equipment into an outlet on a circuit different from that to which the receiver is connected Consult your dealer or an experienced radio TV technician for help If necessary the user should contact the dealer or an experienced radio television technician for additional ...

Page 7: ...rous shock hazards or other risks Refer all servicing to qualified service personnel Do not spill any liquids into the cabinet or use your monitor near water Do not insert objects of any kind into the cabinet slots as they may touch dangerous voltage points which can be harmful or fatal or may cause electric shock fire or equipment failure Do not place any heavy objects on the power cord Damage to...

Page 8: ... s Manual Video Signal Cable D SUB to D SUB Cable Wireless Remote Control and AA Batteries The following optional components are available to use with the MultiSync LCD4010 MultiSync LCD4610 To obtain the optional components and additional information contact Customer Service at 800 632 4662 Macintosh Cable Adapter External Speakers Screw M4 x 8 x 4 Band x 2 CD ROM CD ROM Stand x 2 Thumbscrew for ...

Page 9: ...n damage to the equipment or injury to the user or installer Product warranty does not cover damage caused by improper installation Failure to follow these recommendations could result in voiding your warranty When using mounting accessories other than NEC compliant and approved they must comply with the VESA compatible mounting method NEC strongly recommends using screws M6 size and 10mm in lengt...

Page 10: ...unction press both and simultaneously and hold down for three 3 seconds To go back to user mode press both and simulta neously and hold for three 3 seconds POWER button Switches the power on off See page 18 MUTE button Switches the audio mute ON OFF INPUT button Acts as SET button within the OSM menu Selects which signal connected to the display is shown Toggle switches between RGB1 RGB2 RGB3 DVD ...

Page 11: ... connect multiple MultiSync LCD4010 MultiSync LCD4610 EXTERNAL SPEAKER TERMINAL Outputs the audio signal from the selected audio source AC IN connector Connects with the supplied power cord RGB 1 IN DVI D To input digital RGB signals from a computer or HDTV device having a digital RGB output This connector does not support analog input RGB 2 IN mini D Sub 15 pin To input analog RGB signals from a ...

Page 12: ...ture STILL button ON OFF button To turn on off the still picture mode CAPTURE button Capture the new picture Note Will not work when pixel clock is greater than 108MHz DISPLAY button To turn on off the Information OSM See page 19 AUTO SETUP button To enter the auto setup menu See page 23 MENU button To turn on off the menu mode UP button Acts as button to move the highlighted area up to select the...

Page 13: ...hin a distance of about 3 m 10 ft Do not open the remote control other than to install batteries Do not allow water or other liquid to splash onto the remote control If the remote control gets wet wipe it dry immediately Avoid exposure to heat and steam The remote control system may not function when direct sunlight or strong illumination strikes the remote control sensor of the LCD moni tor or wh...

Page 14: ... NEC recommends the following battery use Place AA size batteries matching the and signs on each battery to the and signs of the battery compartment Do not mix battery brands Do not combine new and old batteries This can shorten battery life or cause liquid leakage of batteries Remove dead batteries immediately to prevent battery acid from leaking into the battery compartment Don t touch exposed b...

Page 15: ... When using external speakers We recommend using the optional speakers designed for the MultiSync LCD4010 MultiSync LCD4610 The external speaker terminals of the MultiSync LCD4010 MultiSync LCD4610 may be connected with the speaker plug of a mainframe sound speaker It this case please exchange the lead connector of a mainframe sound speaker for an attached speaker plug Setup Procedure continued St...

Page 16: ...e of noise Attach the Ferrite Core to the both ends of PC Audio Cable For PC Audio Cable Ferrite Core Band Band Ferrite Core AV Before connecting external equipment to LCD First turn off the power to all of the equipment associated with the LCD as well as that of the equipment to be connected For questions regarding external equipment please refer to the user s manual supplied with that equipment ...

Page 17: ...to mini D sub 15 pin To connect the RGB 3 connector BNC on the LCD monitor use a signal cable mini D sub 15 pin to BNC x 5 Select RGB 3 from the INPUT button When connecting one or more LCD monitor use the RGB OUT connector BNC The AUDIO IN 1 2 and 3 can be used for audio input For connection select AUDIO 1 2 or 3 from the AUDIO INPUT button Connecting the LCD Monitor to a PC Connections continued...

Page 18: ...s Display of America Inc at 800 632 4662 To connect the RGB 3 IN connector BNC on the LCD monitor use the signal cable available separately mini D sub 15 pin to BNC x 5 If you will be connecting the LCD monitor to a Macintosh PowerBook set Mirroring to off Refer to your Macintosh s owner s manual for more information about your computer s video output requirements and any special identification or...

Page 19: ...inued AV AV The RGB 1 IN connector also accepts a DVI D cable Input TMDS signals conforming to DVI standards To maintain display quality use a cable recommended by DVI standards The AUDIO IN 1 2 and 3 can be used for audio input For connection select AUDIO 1 2 or 3 from the AUDIO INPUT button Mode selection see DVI MODE of page 25 Denotes an AV unit function All AV functions are enabled when the A...

Page 20: ...able You will need a BNC to RCA adapter to connect a DVD player with an RCA pin jack to the BNC connector cable not provided Some DVD players may have different connectors such as DVD HD connector Y Cb Pb and Cr Pr Select DVD HD input mode from the INPUT button The AUDIO IN 2 and 3 both RCA can be used for audio input For connection select AUDIO 2 or AUDIO 3 from the AUDIO INPUT button Mode select...

Page 21: ...een made Use an RCA cable to connect the AUDIO OUT connector RCA on the LCD monitor and the audio input on the amplifier Do not reverse the audio left and right jacks The AUDIO IN used for audio input The AUDIO OUT jack outputs sound from the Audio input device VCR selected by the LCD monitor to the external output device stereo amplifier Connections continued AV Denotes an AV unit function All AV...

Page 22: ...tch on the LCD monitor 3 Pressing the Main Power Switch NOTE When the Main Power Switch is used to power off the LCD the remote control and the power button will not activate the LCD Be sure to turn the Main Power Switch to ON before using options 1 or 2 The LCD monitor power indicator will turn green while powered on and will turn red while powered off The monitor can be powered on or off using t...

Page 23: ...COLOR SYSTEM menu to set AUTO NTSC PAL SECAM PAL60 4 43NTSC in according to your video for mat Basic Operation continued Power Indicator Status Power ON Green Power OFF Red Power Standby Red On when SCHEDULE is enabled Green Blinking Power Standby Red Green Information OSM RGB1 2 3 DVD HD VIDEO PIP or POP Main RGB2 Sub VIDEO S Video Input mode Input signal Information Audio input mode Picture Size...

Page 24: ...on to increase reduction level Press button to decrease reduction level MAIN MENU PICTURE SCREEN AUDIO PIP CONFIGURATION 1 CONFIGURATION 2 ADVANCED OPTION SEL SET NEXT EXIT RETURN MENU EXIT MENU MAIN MENU PICTURE SCREEN AUDIO PIP CONFIGURATION 1 CONFIGURATION 2 ADVANCED OPTION SEL SET NEXT EXIT RETURN MENU EXIT MENU PICTURE BRIGHTNESS CONTRAST SHARPNESS BLACK LEVEL COLOR CONTROL COLOR TEMPERATURE ...

Page 25: ...age on the screen SCREEN INPUT RGB2 3 only INPUT RGB2 3 only INPUT RGB1 2 3 only PICTURE BRIGHTNESS CONTRAST SHARPNESS TINT COLOR BLACK LEVEL NOISE REDUCTION SEL SET NEXT EXIT RETURN MENU EXIT MENU ADJ EXIT RETURN MENU EXIT MENU 32 TINT PICTURE BRIGHTNESS CONTRAST SHARPNESS TINT COLOR BLACK LEVEL NOISE REDUCTION SEL SET NEXT EXIT RETURN MENU EXIT MENU ADJ EXIT RETURN MENU EXIT MENU 32 COLOR PICTUR...

Page 26: ...rease BASS sound Press button to decrease BASS sound AUDIO Adjusts the balance of stereo sound Press button to move the stereo sound image to right Sound of the left side will be quieter Press button to move the stereo sound image to left Sound of the right side will be quieter SCREEN H POSITION V POSITION CLOCK CLOCK PHASE H RESOLUTION V RESOLUTION ZOOM MODE SCREEN RESET SEL SET NEXT EXIT RETURN ...

Page 27: ...y from when DVD HD and VIDEO input signal is lost OSM control menus are available in seven languages MAIN MENU PICTURE SCREEN AUDIO PIP CONFIGURATION 1 CONFIGURATION 2 ADVANCED OPTION SEL SET NEXT EXIT RETURN MENU EXIT MENU PIP PIP SIZE PIP AUDIO PIP RESET SEL SET NEXT EXIT RETURN MENU EXIT MENU PIP PIP SIZE PIP AUDIO PIP RESET SEL SET NEXT EXIT RETURN MENU EXIT MENU SEL EXIT RETURN MENU EXIT MENU...

Page 28: ... decreased when ON is selected MOTION Image is slightly expanded and moved 4 directions UP DOWN RIGHT LEFT periodically time setting is adjustable Movement area is approximately 10mm from original position please locate the important information such as text within 90 area of screen image See note 1 for these functions PIP POP Side by Side and STILL will be disabled when MOTION is active COLOR SYS...

Page 29: ... video input signal is not present the monitor searches for a video signal from the other video input port If the video signal is present in the other port then the monitor switches the video source input port to the new found video source automatically This function is available at input RGB 1 2 3 VIDEO DETECT DVD HD or VIDEO inputs will have priority over RGB1 2 3 When DVD HD or VIDEO input sign...

Page 30: ...ET SEL SET NEXT EXIT RETURN MENU EXIT MENU ADVANCED OPTION EXIT RETURN MENU EXIT MENU MONITOR ID ID No 1 SEL Sets of the resolution of input signal to one of the following 1024x768 1280x768 and 1360x768 AUTO Determines the resolution automatically 1024x768 Sets the resolution to 1024x768 1280x768 Determines the resolution to 1280x768 1360x768 Determines the resolution to 1360x768 Selects the S Vid...

Page 31: ...ARY Set PRIMARY at the head of the daisy chained monitors by RS 232C SECONDARY Set SECONDARY after 2nd daisy chained monitor LOCK Disable the monitor control by infra red wireless remote controller Keep pressing DISPLAY button for 5 or more seconds this setting will return to NORMAL See NOTE 2 on page 28 EXIT SET RETURN SET MENU EXIT MENU IR CONTROL SEL NORMAL PRIMARY SECONDARY LOCK EXIT RETURN ME...

Page 32: ...number of the monitor that can be controlled via daisy chain by the current monitor Press or buttons to change the ID No of the monitor to be con trolled To control all of the daisy chained monitors simultaneously select ALL as the ID No 4 Use the wireless remote controller to control the SECONDARY monitor while aiming at the PRIMARY monitor The MENU OSM of the SECONDARY monitor will appear on the...

Page 33: ...unction Data code Data Data End code 0Dh 30h 30h In ASCII code 0 0 fixed A code of each fixed control move A code of each fixed control data number and not always indicated 0Dh In ASCII code fixed Address code Function code Data code End code PC to RS 232C IN terminal RS 232C Cable IN OUT RS 232C OUT terminal can connect to MultiSync LCD4010 LCD4610 only Do not connect to other equipment from RS 2...

Page 34: ...h 72h 32h 5Fh 72h 33h 5Fh 76h 31h 5Fh 76h 32h Operation POWER ON POWER OFF INPUT RGB 1 INPUT RGB 2 INPUT RGB 3 INPUT VIDEO INPUT DVD HD ASCII _r1 _r2 _r3 _v1 _v2 Sending commands from the PC etc 30 30 21 0D 0 0 30 30 21 0D 0 0 Status code from LCD monitor Meaning Command for POWER ON Command received Command echo back POWER OFF command should not be used less than 1 minute after the power is turne...

Page 35: ...ndard Around Power PCB Around Power PCB Function vP vP vI vI vI vI vI vM vM tcx1 tc1 tcx2 tc2 Data Receive 1 0 r1 r2 r3 v1 v2 p1 p2 ex 25 0 ex 25 ex 30 5 ex 31 Function 76 50 76 50 76 49 76 49 76 49 76 49 76 49 76 4D 76 4D 74 63 78 31 74 63 31 74 63 78 31 74 63 32 Data Receive 31 30 72 31 72 32 72 33 76 31 76 32 70 31 70 32 2B 20 32 35 2E 30 2B 20 32 35 2B 20 33 30 2E 35 2B 20 33 31 resolution 0 5...

Page 36: ...he Microsoft solution with the Windows 95 98 ME 2000 XP operating system facilitates setup and installation by allowing the monitor to send its capabilities such as screen size and resolutions supported directly to your computer automatically optimizing display performance Intelligent Power Manager IPM System provides innovative power saving methods saving two thirds of your monitor energy costs M...

Page 37: ...n the display mode is changed the OSM Image Adjust settings may need to be readjusted Check the monitor and your display card with respect to compatibility and recommended signal timings If your text is garbled change the video mode to non interlace and use 60Hz refresh rate Image of component signal is greenish Check to see if the DVD HD input connector is selected LED on monitor is not lit no gr...

Page 38: ...nical Support www necmitsubishi com support Sales and Product Information Sales Information Line 888 NEC MITS 888 632 6487 Canadian Customers 866 771 0266 Ext 4037 Government Sales 800 284 6320 Government Sales email gov necmitsubishi com Electronic Channels World Wide Web http www necmitsubishi com Product Registration http www necmitsubishi com productregistration European Operations http www ne...

Page 39: ... 330 D mm with Stand 1147 W x 761 H x 312 D mm 57 3 lbs 26 0kg without Stand 60 6 lbs 27 5kg with Stand 77 2 lbs 35 0kg 3 x 200mm x 200mm 8 Holes 2 x 200mm x 200mm 6 Holes UL 60950 1 CSA C22 2 No 60950 1 TUV GS EN60950 1 FCC B DOC B EN55022 A EN55024 EN61000 3 2 EN61000 3 3 CE VESA DPM VESA DDC2B DDC CI NTSC PAL SECAM 4 43NTSC PAL60 HDTV 480i 480p 720p 1080i User s manual Power Cord Video Signal C...

Page 40: ...and 1112 8 W x 687 1 H x 351 D mm with Stand 1278 W x 837 H x 312 D mm 68 3 lbs 31 0kg without Stand 72 3 lbs 32 8kg with Stand 89 3 lbs 40 5kg 3 x 200mm x 200mm 8 Holes 2 x 200mm x 200mm 6 Holes UL 60950 1 CSA C22 2 No 60950 1 TUV GS EN60950 1 FCC B DOC B EN55022 A EN55024 EN61000 3 2 EN61000 3 3 CE VESA DPM VESA DDC2B DDC CI NTSC PAL SECAM 4 43NTSC PAL60 HDTV 480i 480p 720p 1080i User s manual P...

Page 41: ...D N G 6 C N 7 S T R 8 S T C 9 C N o N n i P e m a N 1 D N G 2 D N G 3 e c n a n i m u L Y 4 a m o r h C C 1 2 X T 9 1 X T 7 1 0 X T 2 2 X T 0 1 1 X T 8 1 O X T 3 4 X T 2 X T d l e i h S 1 1 3 X T 1 X T d l e i h S 9 1 5 X T P X T d l e i h S 4 C N 2 1 C N 0 2 C N 5 C N 3 1 C N 1 2 C N 6 k c o l C l a i r e S C D D 4 1 r e w o p 5 2 2 C X T d l e i h S 7 a t a D l a i r e S C D D 5 1 V 5 d n u o r ...

Page 42: ...ve prior approval which may be obtained by calling 1 800 632 4662 The Product shall not have been previously altered repaired or serviced by anyone other than a service facility authorized by NMD A to render such service the serial number of the product shall not have been altered or removed In order to be covered by this warranty the Product shall not have been subjected to displaying of fixed im...

Page 43: ...ltiSync LCD4010 L404G6 MultiSync LCD4610 L464G7 is in compliance with Council Directive 73 23 EEC EN 60950 1 Council Directive 89 336 EEC EN 55022 EN 61000 3 2 EN 61000 3 3 EN 55024 and marked with NEC Mitsubishi Electric Visual Systems Corporation 4 13 23 Shibaura Minato Ku Tokyo 108 0023 Japan ...

Page 44: ... Brancher à un lecteur DVD Français 16 Brancher à un amplificateur stéréophonique Français 17 Fonctionnement de base Modes de mise sous tension et hors tension Français 18 Voyant d alimentation Français 19 Lors de l utilisation de la fonction de gestion de la consommation Français 19 Sélectionner une source vidéo Français 19 Taille de l image Français 19 Mode image Français 19 Information OSM Fran...

Page 45: ... des mesures suivantes Réorienter ou repositionner l antenne de réception Augmenter la distance entre l appareil et le récepteur Connecter l appareil à une prise de courant sur un circuit différent de celui sur lequel le récepteur est connecté Consulter son revendeur ou un technicien radio TV pour obtenir de l aide Si nécessaire l utilisateur doit contacter le revendeur ou un technicien radio TV a...

Page 46: ...ites appel à du personnel de service qualifié pour toute réparation Ne renversez aucun liquide dans le coffret ou n utilisez pas votre moniteur près d une source d eau N insérez pas d objets de toute sorte dans les fentes du coffret car ils pourraient toucher des points de haute tension dangereux qui peuvent provoquer des blessures ou la mort un choc électrique un incendie ou une défaillance de l ...

Page 47: ...e et piles AA Les composants optionnels suivants sont disponibles pour être utilisés avec le MultiSync LCD4010 MultiSync LCD4610 Pour obtenir les composants optionnels et des renseignements supplémentaires contactez le service à la clientèle au 800 632 4662 Adaptateur de câble Macintosh Haut parleurs externes Vis M4 x 8 x 4 Bande x 2 CD ROM CD ROM Support x 2 Vis de serrage pour support x 2 Couver...

Page 48: ... M6 et de 10 mm de long Si vous utilisez des vis d une longueur supérieureà10mm vérifiezlaprofondeurdu trou Forcedefixation recommandée 470 635N cm NEC recommande d utiliser une interface de montage conforme à la norme UL1678 en Amérique du Nord Table Écran protecteur Support de table 5 Pour éviter d utiliser l interrupteur d alimentation principal Pour éviter l utilisation de l interrupteur d ali...

Page 49: ... fonctions de touche contrôle Pour activer la fonction de verrouillage de touche contrôle appuyez à la fois sur et sur simultanément et maintenez les enfoncées pendant 3 secondes Pour revenir au mode utilisateur appuyez à la fois sur et simultanément et maintenez les enfoncées pendant 3 secondes Bouton ALIMENTATION Met l alimentation sur marche arrêt Consultez la page 18 Bouton SOURDINE Met la sou...

Page 50: ...multiple BORNE DE HAUT PARLEUR EXTERNE Sort le signal audio de la source audio sélectionnée Connecteur ENTRÉE EN CA Se branche au cordon d alimentation fourni ENTRÉE 1 RVB DVI D Pour saisir les signaux RVB numériques à partir d un ordinateur ou d un dispositif TVHD muni d une sortie RVB numérique Ce connecteur n est pas compatible avec une entrée analogique ENTRÉE 2 RVB mini D Sub à 15 broches Pou...

Page 51: ...SORTIE Retourne au menu précédent dans le menu OSM RGB3 DVD HD VIDEO 1 B G R _ _ _ 2 B G R _ _ _ 3 B G R _ _ _ D H D V D _ O E D I V Sous image Image pricipale Remarque Le rapport hauteur largeur d incrustation synchronise une configuration dans l image principale RGB2 RGB1 _ Télécommande sans fil Bouton ALIMENTATION Met l alimentation sur marche arrêt Si l indicateur d alimentation ne s illumine ...

Page 52: ...à environ 3m 10 pi Ouvrez uniquement la télécommande pour y mettre des piles Ne laissez pas d eau ou d autre liquide éclabousser la télécommande Si la télécommande est mouillée séchez la immédiatement Évitez toute exposition à la chaleur et à la vapeur Le système de la télécommande peut ne pas fonctionner quand la lumière du soleil ou une forte illumination est directement dirigée sur le capteur d...

Page 53: ...losions NEC recommande l utilisation des piles suivantes Placez des piles de taille AA en faisant correspondre les signes et sur chaque pile aux signes et du compartiment des piles Ne mélangez pas des piles de marque différente Ne combinez pas des piles neuves et vieilles Ceci peut raccourcir la durée de vie des piles ou provoquer une fuite de liquide des piles Retirez les piles usées immédiatemen...

Page 54: ...ous recommandons d utiliser les haut parleurs optionnels conçus pour le MultiSync LCD4010 MultiSync LCD4610 Les bornes de haut parleur externes du MultiSync LCD4010 MultiSync LCD4610 doivent être branchées à la prise de haut parleur d un haut parleur de l ordinateur central Dans ce cas veuillez échanger le connecteur principal d un haut parleur de l ordinateur central avec une prise de haut parleu...

Page 55: ... câble audio du PC Tore magnétique Bande Bande Tore magnétique Avant de brancher l équipement externe au LCD Mettez d abord hors tension tout l équipement associé au LCD ainsi que l équipement qui doit être branché Pour des questions concernant l équipement externe veuillez vous référer au manuel d utilisation fourni avec l équipement Circuit de câblage AV AV AV AV AV Moniteur Ordinateur personnel...

Page 56: ... sub à 15 broches au BNC x 5 Sélectionnez RVB 3 à l aide de la touche ENTRÉE Lors du branchement d un ou de plusieurs moniteurs ACL utilisez le connecteur SORTIE RVB BNC LES ENTRÉES AUDIO 1 2 et 3 peuvent être utilisées pour l entrée audio Pour le branchement sélectionnez AUDIO 1 2 ou 3 à l aide de la touche ENTRÉE AUDIO Brancher le moniteur LCD au PC Branchements suite Moniteur À la sortie audio ...

Page 57: ...au moniteur LCD utilisez le câble de signal disponible séparément mini D sub à 15 broches au BNC x 5 Si vous avez l intention de brancher le moniteur LCD à un PowerBook Macintosh mettez Miroitage à l arrêt Référez vous au manuel d utilisation de votre Macintosh pour des renseignements supplémentaires concernant les exigences de sortie vidéo de votre ordinateur et toute identification ou configurat...

Page 58: ...vec un câble DVI D Entrez les signaux TMDS conformément aux normes DVI Pour maintenir la qualité d affichage utilisez un câble recommandé par les normes DVI Les ENTRÉES AUDIO 1 2 et 3 peuvent être utilisées pour l entrée audio Pour le branchement sélectionnez AUDIO 1 2 ou 3 à l aide de la touche ENTRÉE AUDIO Pour la sélection du mode reportez vous à MODE DVI de la page 25 Indique une fonction de l...

Page 59: ...n d un adaptateur BNC à RCA pour brancher un lecteur DVD avec une fiche femelle RCA au câble connecteur BNC non fourni Certains lecteurs DVD peuvent avoir différents connecteurs tels que le connecteur DVD HD Y Cb Pb et Cr Pr Sélectionnez le mode d entrée DVD HD à l aide de la touche ENTRÉE Les ENTRÉES AUDIO 2 et 3 les deux sont RCA peuvent être utilisées pour l entrée audio Pour le branchement sél...

Page 60: ...e audio à l amplificateur N inversez pas les douilles audio gauche et droite L ENTRÉE AUDIO est utilisée pour une entrée audio La douille SORTIE AUDIO dirige le son du dispositif d entrée audio VCR sélectionné par le moniteur LCD vers le dispositif de sortie externe amplificateur stéréophonique Branchements suite Moniteur VCR ou lecteur de disque laser Amplificateur stéréophonique Vers sortie audi...

Page 61: ...le moniteur LCD 3 Appuyer sur l interrupteur d alimentation principal REMARQUE Quand l interrupteur d alimentation principal est utilisé pour mettre le LCD hors tension la télécommande et la touche d alimentation n activeront pas le LCD Assurez vous de mettre l interrupteur d alimentation principal sur MARCHE avant d utiliser les options 1 ou 2 L indicateur d alimentation du moniteur ACL deviendra...

Page 62: ...DIO 3 SIZE WIDE VIDEO S NTSC AUDIO 3 SIZE NORMAL RGB2 1024 x 768 48kHz 60Hz AUDIO 1 VIDEO S NTSC SIZE FULL Voyant d alimentation AV Type de signal 4 3 Taille normale Taille recommandée NORMAL ZOOM DYNAMIC FULL WIDE Compression Letterbox RGB 1 2 3 DVD HD VIDEO FULL ZOOM NORMAL FULL WIDE ZOOM NORMAL AV AV AV AV Sélectionner une source vidéo Taille l image Mode image AV AV Voyant d alimentation Le mo...

Page 63: ...z sur la touche MENU ou EXIT pour quitter SET Ajuste le niveau du de réduction du bruit Appuyez sur la touche pour augmenter le niveau de réduction Appuyez sur la touche pour diminuer le niveau de réduction MENU PRINCIPAL IMAGE ÉCRAN AUDIO IMAGE DANS IMAGE CONFIGURATION 1 CONFIGURATION 2 OPTION AVANCÉE SEL SET NEXT EXIT RETURN MENU EXIT MENU MENU PRINCIPAL IMAGE ÉCRAN AUDIO IMAGE DANS IMAGE CONFIG...

Page 64: ...réglage Appuyez sur la touche pour étendre la largeur de l image à l écran Appuyez sur la touche pour diminuer la largeur de l image à l écran ÉCRAN ENTRÉE RVB2 3 seulement ENTRÉE RVB2 3 seulement ENTRÉE RVB1 2 3 seulement IMAGE LUMINOSITÉ CONTRASTE NETTETÉ TEINTE COULEUR NIVEAU DE NOIR RÉDUCTION DU BRUIT SEL SET NEXT EXIT RETURN MENU EXIT MENU ADJ EXIT RETURN MENU EXIT MENU 32 TEINTE IMAGE LUMINO...

Page 65: ...haute fréquence Appuyez sur la touche pour augmenter le son des AIGUS Appuyez sur la touche pour diminuer le son des AIGUS Ajuste le son des basses fréquences Appuyez sur la touche pour augmenter le son de la BASSE Appuyez sur la touche pour diminuer le son de la BASSE AUDIO Ajuste l équilibre du son stéréo Appuyez sur la touche pour déplacer l image de son stéréo vers la droite Le son du côté gau...

Page 66: ...chronisation RVB1 2 3 est perdu Sélectionnez VIDÉO à MARCHE mettra l écran en mode de gestion de consommation environ 10 minutes après que le signal d entrée DVD HD et VIDÉO est perdu Les menus de contrôle OSM sont disponibles en sept langues MENU PRINCIPAL IMAGE ÉCRAN AUDIO IMAGE DANS IMAGE CONFIGURATION 1 CONFIGURATION 2 OPTION AVANCÉE SEL SET NEXT EXIT RETURN MENU EXIT MENU IMAGE DANS IMAGE TAI...

Page 67: ...MOUVEMENT L image est légèrement étendue est déplacée dans 4 directions HAUT BAS DROIT GAUCHE périodiquement le réglage du temps est ajustable La zone du mouvement est d environ 10 mm de la position originale veuillez situer l information importante telle que du texte à l intérieur de la zone à 90 de l image d écran Voir remarque 1 pour ces fonctions Les fonctions IMAGE SUR IMAGE SURIMPRESSION JUX...

Page 68: ...ponible à l entrée RVB 1 2 3 DERNIER DÉTECTÉ Lorsque le moniteur affiche un signal de la source actuelle et qu une nouvelle source secondaire est fournie au moniteur le moniteur changera automatiquement pour la nouvelle source vidéo Lorsque le signal d entrée vidéo actuel n est pas présent le moniteur cherche pour un signal vidéo autre que le signal vidéo de l autre port d entrée vidéo Si le signa...

Page 69: ...EN OFF SEL SEL SET NEXT EXIT RETURN MENU EXIT MENU OPTION AVANCÉE Sélectionne un niveau d expansion de noir Afin d éviter de descendre sous le niveau de découpage de noir veuillez ajuster le Niveau de noir en modération dans le menu OSM Sélectionne comment l image sera renversée NORMAL affichage normal MIROIR H une image miroir pour la direction horizontale MIROIR V une image miroir pour la direct...

Page 70: ...mmande sans fil PRIMAIRE Règle PRIMAIRE en haut des moniteurs en guirlande avec RS 232C SECONDAIRE Règle SECONDAIRE après le deuxième moniteur en guirlande VERROUILLE Désactiver la commande de moniteur par télécommande infrarouge sans fil Continuez d appuyer sur la touche AFFICHAGE pendant 5 secondes ou plus ce réglage reviendra à NORMAL Voir REMARQUE 2 à la page 28 EXIT SET RETURN SET MENU EXIT M...

Page 71: ... du moniteur en cours dans la guirlande No ID Affiche le numéro ID du moniteur qui peut être commandé via la guirlande par le moniteur en cours Appuyez sur les touches ou pour changer le No ID du moniteur à commander Pour commander tous les moniteurs de guirlande simultanément sélectionnez TOUS comme No ID 4 Utilisez la télécommande à infrarouge pour commander le moniteur SECONDAIRE en la dirigean...

Page 72: ...de fonction Fonction Fonction Code de données Données Données Code de fin 0Dh 30h 30h En code ASCII 0 0 fixe Un code pour chaque mouvement de commande fixe Un code de chaque donnée de commande fixe numéro et pas toujours indiqué 0Dh En code ASCII fixe Code d adresse Code de fonction Code de données Code de fin PC Vers borne RS 232C ENTRÉE Câble RS 232C IN OUT La borne de SORTIE RS 232C peut unique...

Page 73: ...après avoir reçu un encode Si la commande n est pas réceptionnée correctement le moniteur LCD n enverra pas la commande de retour 3 L ordinateur personnel vérifie la commande et confirme si la commande qui a été envoyée a été exécutée ou non 4 Ce moniteur LCD envoie des codes variés autres que le code de retour Lors de l envoi d une séquence de commande via RS 232C d autres codes venant d ordinate...

Page 74: ... Recevoir 1 0 r1 r2 r3 v1 v2 p1 p2 ex 25 0 ex 25 ex 30 5 ex 31 Fonction 76 50 76 50 76 49 76 49 76 49 76 49 76 49 76 4D 76 4D 74 63 78 31 74 63 31 74 63 78 31 74 63 32 Données Recevoir 31 30 72 31 72 32 72 33 76 31 76 32 70 31 70 32 2B 20 32 35 2E 30 2B 20 32 35 2B 20 33 30 2E 35 2B 20 33 31 resolution 0 5 C resolution 1 C resolution 0 5 C resolution 1 C REMARQUE Pour des renseignements complets v...

Page 75: ...déos en temps réel Prêt à l emploi La solution Microsoft avec le système d exploitation Windows 95 98 ME 2000 XP facilite la configuration et l installation en laissant au moniteur la possibilité de transmettre ses capacités comme la taille de l écran et les résolutions acceptées directement à votre ordinateur en optimisant automatiquement les performances de l écran Le Système Intelligent Power M...

Page 76: ...e la phase d horloge Quand le mode d affichage est changé les réglages d image OSM peuvent nécessiter un réajustement Vérifiez la compatibilité du moniteur et de votre carte vidéo et si la synchronisation des signaux recommandée a été effectuée Si votre texte est brouillé changez le mode vidéo pour ne pas entrelacer et utilisez une fréquence de rafraîchissement de 60Hz L image du signal du composa...

Page 77: ...nce technique en ligne www necmitsubishi com support Ventes et information produit Ligne d information sur les ventes 888 NEC MITS 888 632 6487 Clientèle canadienne 866 771 0266 Ext 4037 Ventes au gouvernement 800 284 6320 Adresse électronique du service des ventes au gouvernement gov necmitsubishi com Courrier électronique World Wide Web www necmitsubishi com Produit enregistré www necmitsubishi ...

Page 78: ...x 330 P mm avec support 1147 L x 761 H x 312 P mm 57 3 lb 26 0 kg sans le support 60 6 lb 27 5 kg avec support 77 2 lb 35 0 kg 3 x 200 mm x 200 mm 8 trous 2 x 200 mm x 200 mm 6 trous UL 60950 1 CSA C22 2 No 60950 1 TUV GS EN60950 1 FCC B DOC B EN55022 A EN55024 EN61000 3 2 EN61000 3 3 CE DPM VESA VESA DDC2B DDC CI NTSC PAL SECAM 4 43NTSC PAL60 HDTV 480i 480p 720p 1080i Manuel de l utilisateur cord...

Page 79: ...sans le support 1112 8 L x 687 1 H x 351 P mm avec support 1278 L x 837 H x 312 P mm 68 3 lb 31 0 kg sans le support 72 3 lb 32 8 kg avec support 89 3 lb 40 5 kg 3 x 200 mm x 200 mm 8 trous 2 x 200 mm x 200 mm 6 trous UL 60950 1 CSA C22 2 No 60950 1 TUV GS EN60950 1 FCC B DOC B EN55022 A EN55024 EN61000 3 2 EN61000 3 3 CE DPM VESA VESA DDC2B DDC CI NTSC PAL SECAM 4 43NTSC PAL60 HDTV 480i 480p 720p...

Page 80: ...uminosité 4 a m o r h C C 1 2 X T 9 1 X T 7 1 0 X T 2 2 X T 0 1 1 X T 8 1 O X T 3 Blindage TX2 TX4 Blindage TX1 TX3 Blindage TX0 TX5 11 19 4 NC 12 NC 20 NC 5 NC 13 NC 21 NC 6 Horloge série DDC 14 allimentation 5v 22 Blindage TXC 7 Données série DDC 15 Terre 5V 23 C X T 8 NC 16 Détection de branchement à chaud 24 C X T 1 Entrée RVB analogique Mini D sub 15 broches R G B 2 2 EnrtéeS VIDEO V I D E O ...

Page 81: ...uits retournés à NMD A pour l entretien DOIVENT avoir eu une approbation ultérieure qui peut être obtenue en téléphonant au 1 800 632 4662 Le produit ne peut avoir été ultérieurement modifié réparé ou entretenu par toute autre personne que le centre de réparation agréé par NMD A pour donner un tel service le numéro de série du produit ne doit pas avoir été modifié ou enlevé Afin d être couvert sou...

Page 82: ...tiSync LCD4010 L404G6 MultiSync LCD4610 L464G7 conformes à la directive 73 23 EEC du Counseil EN 60950 1 la directive 89 336 EEC du Counseil EN 55022 EN 61000 3 2 EN 61000 3 3 EN 55024 et porte le sigle NEC Mitsubishi Electric Visual Systems Corporation 4 13 23 Shibaura Minato Ku Tokyo 108 0023 Japan ...

Page 83: ...shi Electronics Display of America Afin de permettre l amélioration du design et des caractéristiques techniques les informations contenues dans ce document sont sujettes à modifications sans préavis La reproduction totale ou partielle de ce document sans l accord préalable de NEC Mitsubishi Electronics Display of America est interdite DÉCLARATION DE CONFORMITÉ Cet appareil est conforme à l articl...

Page 84: ...ign and specification improvements the information in this document is subject to change at any time without notice Reproduction of this document or portions thereof without prior approval of NEC Mitsubishi Electronics Display of America is prohibited DECLARATION OF CONFORMITY This device complies with Part 15 of FCC Rules Operation is subject to the following two conditions 1 This device may not ...

Reviews: