background image

English-5

English

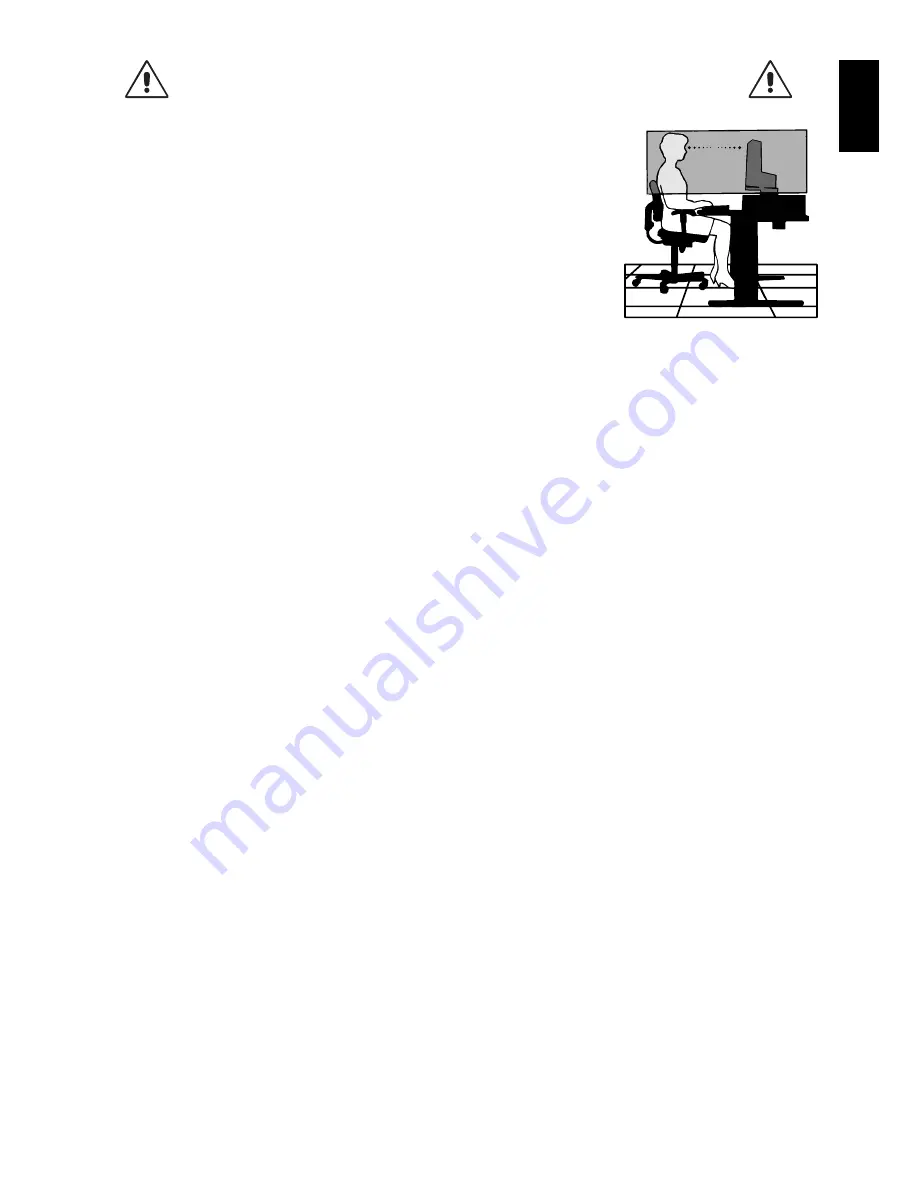
CORRECT PLACEMENT AND ADJUSTMENT OF THE MONITOR CAN

REDUCE EYE, SHOULDER AND NECK FATIGUE. CHECK THE

FOLLOWING WHEN YOU POSITION THE MONITOR:

• 

For optimum performance, allow 20 minutes for the display to warm up.

• 

Adjust the monitor height so that the top of the screen is at or slightly below eye level. 
Your eyes should look slightly downward when viewing the middle of the screen.

• 

Position your monitor no closer than 40 cm (15.75 inches) and no further away than 
70 cm (27.56 inches) from your eyes. The optimal distance is 50 cm (19.69 inches).

• 

Rest your eyes periodically by focusing on an object at least 20 feet away. Blink often.

• 

Position the monitor at a 90° angle to windows and other light sources to minimize glare 
and refl ections. Adjust the monitor tilt so that ceiling lights do not refl ect on your screen.

• 

If refl ected light makes it hard for you to see your screen, use an anti-glare fi lter.

• 

Clean the LCD monitor surface with a lint-free, non-abrasive cloth. Avoid using any 
cleaning solution or glass cleaner!

• 

Adjust the monitor’s brightness and contrast controls to enhance readability.

• 

Use a document holder placed close to the screen.

• 

Position whatever you are looking at most of the time (the screen or reference material) directly in front of you to minimize 
turning your head while you are typing.

• 

Avoid displaying fi xed patterns on the monitor for long periods of time to avoid image persistence (after-image effects).

• 

Get regular eye checkups.

Ergonomics

To realize the maximum ergonomics benefi ts, we recommend the following:

• 

To avoid eye fatigue, adjust the brightness to a moderate setting. Place a sheet of white paper next to the LCD screen for 
luminance reference.

• 

Do not position the Contrast control to its maximum setting.

• 

Use the preset Size and Position controls with standard signals.

• 

Use the preset Color Setting.

• 

Use non-interlaced signals with a vertical refresh rate between 60-75 Hz.

• 

Do not use primary color blue on a dark background, as it is diffi cult to see and may produce eye fatigue due to insuffi cient 
contrast.

Cleaning the LCD Panel

• 

When the LCD is dusty, please gently wipe with a soft cloth.

• 

Do not rub the LCD panel with coarse or hard material. 

• 

Do not apply pressure to the LCD surface. 

• 

Do not use OA cleaner as it will cause deterioration or discoloration to the LCD surface. 

Cleaning the Cabinet

• 

Unplug the power supply

• 

Gently wipe the cabinet with a soft cloth

• 

To clean the cabinet, dampen the cloth with a neutral detergent and water, wipe the cabinet and follow with a dry cloth.

NOTE: 

Many plastics are used on the surface of the cabinet. DO NOT clean with benzene, thinner, alkaline detergent, 
alcoholic system detergent, glass cleaner, wax, polish cleaner, soap powder, or insecticide. Do not touch rubber or 
vinyl to the cabinet for a long time. These types of fl uids and fabrics can cause the paint to deteriorate, crack or peel.

For more detailed information on setting up a healthy work environment, write to the American National Standard for Human Factors Engineering of Computer 
Workstations - ANSI/HFES 100-2007 - The Human Factors Society, Inc. P.O. Box 1369, Santa Monica, California 90406.

Summary of Contents for MultiSync E224Wi

Page 1: ...MultiSync E224Wi MultiSync E243WMi User s Manual ...

Page 2: ...se English 4 Contents English 6 Quick Start English 6 Controls English 12 Specifications E224Wi English 16 Specifications E243WMi English 17 Features English 18 Troubleshooting English 19 TCO Certified Displays 6 English 20 Manufacturer s Recycling and Energy Information English 21 ...

Page 3: ... ALSO DO NOT USE THIS UNIT S POLARIZED PLUG WITH AN EXTENSION CORD RECEPTACLE OR OTHER OUTLETS UNLESS THE PRONGS CAN BE FULLY INSERTED REFRAIN FROM OPENING THE CABINET AS THERE ARE HIGH VOLTAGE COMPONENTS INSIDE REFER SERVICING TO QUALIFIED SERVICE PERSONNEL CAUTION Please use the power cord provided with this display in accordance with the table below If a power cord is not supplied with this equ...

Page 4: ...alled and used in accordance with the instructions may cause harmful interference to radio communications However there is no guarantee that interference will not occur in a particular installation If this equipment does cause harmful interference to radio or television reception which can be determined by turning the equipment off and on the user is encouraged to try to correct the interference b...

Page 5: ...ion Technical Equipment in an office or domestic environment The product is intended to be connected to a computer and is not intended for the display of television broadcast signals Windows is a registered trademark of Microsoft Corporation NEC is a registered trademark of NEC Corporation ErgoDesign is a registered trademark of NEC Display Solutions Ltd in Austria Benelux Denmark France Germany I...

Page 6: ... your monitor from the wall outlet and move to a safe location then refer servicing to qualified service personnel under the following conditions If the monitor is used in this condition the monitor may cause fall fire and electric shock If the monitor stand has been cracked or peeled If the monitor has been wobbled If the monitor has an unusual odor When the power supply cord or plug is damaged I...

Page 7: ...s Ergonomics To realize the maximum ergonomics benefits we recommend the following To avoid eye fatigue adjust the brightness to a moderate setting Place a sheet of white paper next to the LCD screen for luminance reference Do not position the Contrast control to its maximum setting Use the preset Size and Position controls with standard signals Use the preset Color Setting Use non interlaced sign...

Page 8: ...and packing material to transport or ship the monitor 1 Type of power cord included will depend on the where the LCD monitor is to be shipped 2 E243WMi only Quick Start To attach the Base to the LCD stand 1 Place monitor face down on a non abrasive surface Figure 1 NOTE Handle with care when monitor facing down for avoiding damage to the front control buttons 2 Please pivot base 90 degrees as show...

Page 9: ...y Macintosh cable adapter For a PC with DisplayPort output Connect the DisplayPort cable not included to the connector of the display card in your system Figure A 4 Figure A 1 Figure A 3 Macintosh Cable Adapter not included Figure A 2 Figure A 4 DisplayPort cable not included NOTE 1 Please use a DisplayPort cable with DisplayPort logo 2 When removing the DisplayPort cable hold down the top button ...

Page 10: ...Connect one end of the power cord to the AC inlet on the back of the monitor and the other end to the power outlet NOTE Please refer to Caution section of this manual for proper selection of AC power cord 8 Turn on the computer then turn on the monitor by pressing the power sign on the front bezel Figure E 1 9 No Touch Auto Adjust automatically adjusts the monitor to optimal settings upon initial ...

Page 11: ...must be raised to the highest level and tilt to avoid knocking the screen on the desk or pinching your fingers To raise the screen place a hand on each side of the monitor and lift up to the highest position Figure RL 1 To rotate screen place a hand on each side of the monitor screen and turn clockwise from landscape to portrait or counter clockwise from portrait to landscape Figure R 1 Figure R 1...

Page 12: ... face down on a non abrasive surface Figure S 1 NOTE Handle with care when the monitor is facing down 4 Remove the 4 screws connecting the stand to the monitor Figure S 1 NOTE In order to avoid stand drop when removing screws please support stand with your hand 5 Remove the stand Figure S 2 6 The monitor is now ready for mounting in an alternate manner 7 Connect the cables to the back of the monit...

Page 13: ...ld only be used with an approved arm e g GS mark Figure F 1 Weight of LCD assembly 3 9 kg E224Wi 4 3 kg E243WMi 100 mm 100 mm Thickness of Bracket Arm 2 0 3 2 mm Additional VESA Holes for Lower Monitor Head Position Additional 4 VESA holes are provided for those users needing a lower monitor head position than that is available from the monitor stand in shipping configuration The monitor stand can...

Page 14: ...reen Icon Select Displays OSD menu and selects function icon Moves leftward Moves rightward Function Adjustment Reset the function Adjusts the function of the selected icon Adjusts down Adjusts up 2 OSD structure Example E224Wi Main Menu Icon Select Sub Menu Icon Select Touch SELECT key Touch SELECT key again Touch or to select an icon Main Menu Adjust Sub Menu Adjust Touch SELECT key Touch SELECT...

Page 15: ...sts the Image Position the H Size and Fine setting LEFT RIGHT Analog input only Controls Horizontal Image Position within the display area of the LCD DOWN UP Analog input only Controls Vertical Image Position within the display area of the LCD H SIZE Analog input only Adjusts the horizontal size by increasing or decreasing this setting FINE Analog input only Improves focus clarity and image stabil...

Page 16: ...y This function works when user selects below special input signal timing Select resolution s priority of input signal to one of the following signal 1280x768 1360x768 and 1366x768 or 1400x1050 and 1680x1050 1280x768 1360x768 1366x768 Determines the resolution to 1280x768 1360x768 or 1366x768 1400x1050 1680x1050 Determines the resolution to 1400x1050 or 1680x1050 OSD TOOL LANGUAGE OSD control menu...

Page 17: ... power is turned on or when there is a change of input signal or video is inactive the NO SIGNAL window will appear OUT OF RANGE This function gives a recommendation of the optimized resolution and refresh rate After the power is turned on or there is a change of input signal or the video signal doesn t have proper timing the OUT OF RANGE menu will appear ...

Page 18: ...920 x 1080 at 60 Hz NEC DISPLAY SOLUTIONS cites recommended resolution for optimal display performance Active Display Area Landscape Horiz Vert Portrait Horiz Vert 476 1 mm 18 7 inches 267 8 mm 10 5 inches 267 8 mm 10 5 inches 476 1 mm 18 7 inches Power Supply 100 240 V 50 60 Hz Current Rating 0 45 0 25 A Dimensions Landscape Portrait Height Adjustment 507 4 mm W x 364 5 474 5 mm H x 213 9 mm D 20...

Page 19: ...a Landscape Horiz Vert Portrait Horiz Vert 527 0 mm 20 7 inches 296 5 mm 11 7 inches 296 5 mm 11 7 inches 527 0 mm 20 7 inches AUDIO AUDIO Input STEREO Mini Jack DisplayPort Connector Analog Audio Digital Audio Stereo L R 1 0 Vrms 20 Kohm PCM 2ch 32 44 1 48 kHz 16 20 24bit Headphone Output STEREO Mini Jack Headphone Impedance 32 Ohm Speakers Practical Audio Output 1 0 W 1 0 W Power Supply 100 240 ...

Page 20: ... Capability Allows you to use the entire screen area in most resolutions significantly expanding image size VESA Standard Mounting Interface Allows users to connect your monitor to any VESA standard third party mounting arm or bracket Environmental Impact E224Wi Annual typical maximum operating carbon footprint of this monitor world wide average is approximately 22 7 kg calculated by rated wattage...

Page 21: ...ne of the supported modes OSD warning OUT OF RANGE is displayed on a blank screen Signal frequency is out of range Choose one of the supported modes Image is unstable unfocused or swimming is apparent Signal cable should be completely attached to the computer Use the OSD Image Adjust controls to focus and adjust display by increasing or decreasing the fine total When the display mode is changed th...

Page 22: ...ack Minimum one year product warranty Minimum three year availability of spare parts Product takeback Packaging Limits on hazardous substances in product packaging Packaging prepared for recycling Ergonomic User centered design Visual ergonomics in products with a display Adjustability for user comfort displays headsets Acoustic performance protection against sound spikes headsets and fan noise pr...

Page 23: ...Japan or http www necdisplay com in USA Energy Saving This monitor features an advanced energy saving capability When a Display Power Management signal is sent to the monitor the Energy Saving mode is activated The monitor enters a single Energy Saving mode Mode Power consumption LED color Maximum Operation 25 W E224Wi 26 W E243WMi Blue Normal Operation 22 W Default setting E224Wi 19 W Default set...

Reviews: