background image

2. Installation and Connection

Express5800/T110i-S  User’s Guide 

101

Chapter 2  Preparations 

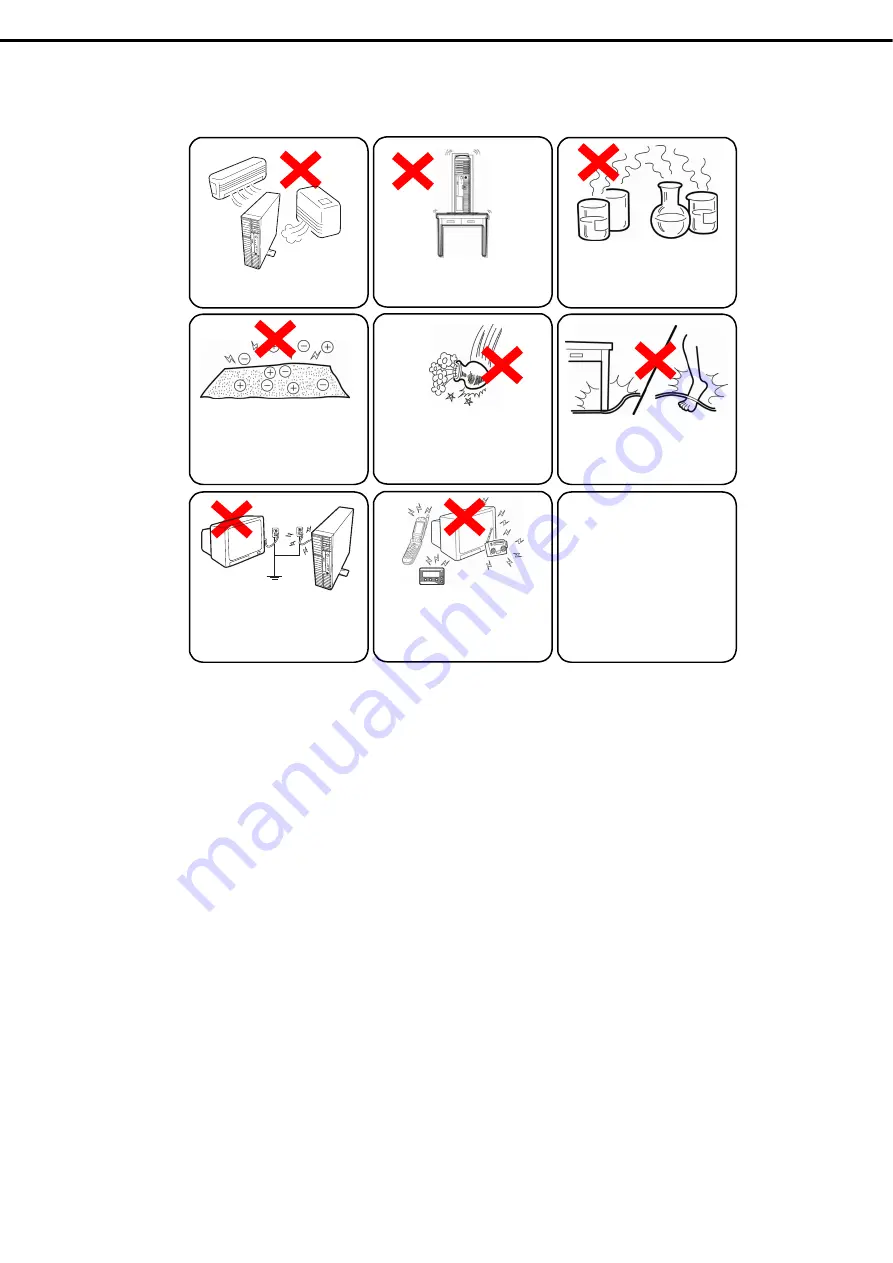
Do not install the server in an environment in which any of the following conditions apply: Installing the server 
in any of the following conditions will cause the server to malfunction. 

Place of drastic temperature change, 
near a heater, air conditioner, or 
refrigerator. 

Place where a carpet not subject to 
anti-static process is laid. 

Place where the power cord of the 
server must be connected to an AC 
outlet that shares the ground wire with 
another outlet where another device 
with large power consumption is 
connected. 

Place where intense vibration may be 
generated. 

Place where some objects may be 
fallen. 

Place near a device generating intense 
magnetic field such as TVs, radios, 
broadcast/communication antennas, 
power transmission wires, and 
electromagnetic cranes is placed. 

Places where corrosive gas is present,
such as environments where there is
sulfur vapor in the atmosphere, or
places where chemicals are nearby or
may be accidentally sprayed over. 

Places where the power cords or 
interface cables may be stepped on or 
tripped over. 

Do not install where there is power 
supply noise nearby such as contact 
sparks when turning power on or off 
during power relays. If you must install 
the server close to such equipment, 
separate power cables or install noise 
filter. 

Summary of Contents for Express5800/T110i-S

Page 1: ...General Description Chapter 2 Preparations Chapter 3 Setup Chapter 4 Appendix NEC Express Server Express5800 Series Express5800 T110i S EXP333 333A User s Guide 10 116 01 101 02 Aug 2018 NEC Corporat...

Page 2: ...on of peripheral devices and suitable location for this server Chapter 3 Setup System BIOS configurations and summary of EXPRESSBUILDER Chapter 4 Appendix Specifications and other information Installa...

Page 3: ...16 1 Introduction 17 2 Accessories 18 3 Features 19 3 1 Firmware and Software Version Management 20 4 Names and Functions of Parts 21 4 1 Front of the Server 21 4 2 Rear View 22 4 3 Internal View 23...

Page 4: ...tra 2 5 inch HDD cage 66 1 10 4 How to open the extra 2 5 inch HDD cage door 67 1 10 5 Installing the hard disk drive 68 1 10 6 1 11 Optical Disk Drive 69 Replacing drives 69 1 11 1 Removal 70 1 11 2...

Page 5: ...118 3 2 EXPRESSSCOPE ENGINE 3 Network Configuration 118 4 EXPRESSBUILDER 120 4 1 Features of EXPRESSBUILDER 120 4 2 Usage of EXPRESSBUILDER 120 5 Installing Software Components 121 6 Turning off the...

Page 6: ...on This symbol indicates the presence of a hazard if the instruction is ignored An image in the symbol illustrates the hazard type Prohibited Action This symbol indicates prohibited actions An image i...

Page 7: ...ld occur Note Indicates items that must be confirmed when handling hardware or operating software Tips Indicates information that is helpful to keep in mind when using this server Optical disk drive T...

Page 8: ...ver 2016 Datacenter Windows Server 2016 Standard Windows Server 2016 Essentials Windows Server 2012 R2 Windows Server 2012 R2 Standard Windows Server 2012 R2 Datacenter Windows Server 2012 R2 Foundati...

Page 9: ...rver are registered trademarks or trademarks of Microsoft Corporation in the United States and other countries Intel Pentium and Xeon are registered trademarks of Intel Corporation of the United State...

Page 10: ...CIDENTAL SPECIAL EXEMPLARY OR CONSEQUENTIAL DAMAGES INCLUDING BUT NOT LIMITED TO PROCUREMENT OF SUBSTITUTE GOODS OR SERVICES LOSS OF USE DATA OR PROFITS OR BUSINESS INTERRUPTION HOWEVER CAUSED AND ON...

Page 11: ...TRIBUTIONS file for more instructions License This software may be distributed used and modified under the terms of BSD license Redistribution and use in source and binary forms with or without modifi...

Page 12: ...4 NEC Corporation assumes no responsibility for effects resulting from your operations 6 The sample values used in this document are not the actual values Keep this document for future reference Lates...

Page 13: ...labels Warning labels are attached on or near the components with potential hazards These labels are either attached or printed on the components Do not remove or black out this label and keep it clea...

Page 14: ...We do not guarantee that the server s optical disk drive will play a copy protected CD that does not conform to standards In the following cases check and adjust the system clock before operation Aft...

Page 15: ...n from reflecting bright lights and to make the display contents easy to see Working without adjusting the display to a comfortable angle makes it difficult for you to maintain a proper posture and yo...

Page 16: ...chapter introduces the features of this server and the name of each part 1 Introduction 2 Accessories Describes the accessories of the server 3 Features Describes the features of the server and the s...

Page 17: ...tel Pentium Processor NEC s latest technology and architectures realize high power and high speed operation that cannot be matched by existing servers The server is designed with consideration of not...

Page 18: ...Cable Tie for securing AC power cord Getting Started Safety Precautions and Regulatory Notices 1 Requires 2 5 inch HDD cage Make sure you have all accessories and inspect them If an accessory is miss...

Page 19: ...agement utilities NEC ESMPRO ExpressUpdate Remote controlling feature EXPRESSSCOPE Engine 3 RAID system management utility Universal RAID Utility Hard disk drive monitoring Power saving and noiseless...

Page 20: ...ontrol by including the alternate function of UPS Self diagnosis Power On Self Test POST Test and Diagnosis T D utility Easy setup EXPRESSBUILDER OS setup utility BIOS setup utility SETUP Maintenance...

Page 21: ...POWER Capping LED green An LED for showing the power capping status 7 STATUS LED 1 2 1 green 2 amber LEDs for showing the server status 8 Global HDD LED 1 2 1 green 2 amber LEDs for showing the statu...

Page 22: ...rs Connectors for connecting USB 3 0 interface devices 7 LAN Connectors Connectors for connecting to a network 1000BASE T 100BASE TX 10BASE T If Shared BMC LAN feature is enabled in ROM Utility LAN1 c...

Page 23: ...igure shows when an non redundant power supply unit is installed 2 Cooling Fan CPU 3 DIMM Slots 4 Hard Disk Drive Bay The figure shows the view when 2 5 inch hard disk drives are installed 5 Optical D...

Page 24: ...ly Unit The figure shows when an redundant power supply unit is installed 2 Cooling Fan CPU 3 DIMM Slots 4 Hard Disk Drive Bay The figure shows the view when 2 5 inch hard disk drives are installed 5...

Page 25: ...e it when replacing MB to keep using the data 17 PCI Card Slots 17 1 PCI EXPRESS x2 x8 connector 17 2 PCI EXPRESS x1 x8 connector 18 3 PCI EXPRESS x16 x16 connector 19 4 PCI EXPRESS x4 x8 connector 18...

Page 26: ...of the following LEDs 4 5 1 POWER LED POWER LED indicates the power ON OFF status of the server POWER LED pattern Description On green The server is normally powered on Off The server is off powered F...

Page 27: ...TATUS LED will turn green after POST completes Watchdog timer expired Turn the power off and then turn it on If POST screen displays any error message take notes of the message and contact your sales...

Page 28: ...it few seconds after power is turned on or reset and this is normal behavior Blinking green Blinking amber In case that RAID is constituted with optional RAID controller or 2 5 inch HDD cage Rebuildin...

Page 29: ...led Hard disk drive is being accessed Off On amber 2 5 inch HDD cage installed RAID constitution Hard disk drive is failing Contact your sales representative Blinking green Blinking amber 2 5 inch HDD...

Page 30: ...network Off The server is disconnected from network SPEED LED 1 2 M This LED indicates which network interface is used The standard LAN ports 1 and 2 support 1000BASE T 100BASE TX and 10BASE T The man...

Page 31: ...green The power cable is connected and AC power is supplied Cold Redundant feature is enabled On amber The power cable is not connected in redundant power configuration Connect the power cable The po...

Page 32: ...l Description 4 5 9 Battery LED Optional When N8181 152 Internal simple UPS is installed the Battery LED is available on the internal simple UPS Battery LED This LED indicates the state of the interna...

Page 33: ...s preparations for using this server 1 Installing Internal Optional Devices Describes how to install or remove optional devices You can skip this section if you did not purchase any optional devices 2...

Page 34: ...ons to install and remove optional devices properly and safely WARNING Be sure to observe the following precautions to use the server safety Failure to observe the precautions may cause death or serio...

Page 35: ...nnector at the rear 4 Remove the side cover See Chapter 2 1 3 Removing the Side Cover 5 Remove the front bezel See Chapter 2 1 4 Removing the Front Bezel 6 Depending on the components to be installed...

Page 36: ...erview of Installation and Removal for preparations 2 Unlock the chassis if necessary 3 Lay the server slowly and gently so that the side cover faces upward and remove a screw 4 1 While pressing the t...

Page 37: ...r preparations 2 Remove the screw 3 Place the server in the direction shown in the figure and then pull the front bezel slightly toward the front until the tab can be released from the frame Important...

Page 38: ...e Note The TPM kit once installed cannot be removed See the steps 1 to 5 in Chapter 2 1 2 Overview of Installation and Removal for preparations 1 Pull the hard disk drive cage toward the front accordi...

Page 39: ...e the server to fail You will be charged to repair failures or damages caused by the use of such products even within the warranty period To avoid static electricity see Chapter 1 1 8 Anti static Meas...

Page 40: ...Up to 4TB of the main memory is available to each virtual machine VMware ESXi 6 5 Later 12TB 64GB Up to 6TB of the main memory is available to each virtual machine Installation order 1 6 2 Install DIM...

Page 41: ...lot 5 Firmly close the lever 6 Continue to install or remove internal optional devices mount and connect the server and turn it on 7 Confirm that no error messages are displayed in POST screen If any...

Page 42: ...ut from the slot in a straight direction Important Do not apply too much pressure when you pull a DIMM out from the socket 4 Assemble the server 5 Turn on the server and confirm that no error messages...

Page 43: ...ure to back up the hard disk drive before installing the RAID controller and configuring the RAID system Note In the RAID system use hard disk drives that have the same specifications capacity rotatio...

Page 44: ...t change the mode to hibernate when building a RAID system c Installation For the instruction of installing the optional RAID Controller see Chapter 2 1 9 PCI Card Important When connecting a RAID con...

Page 45: ...0 4 4 RAID 50 6 RAID 60 6 Use SAS SATA hard disk drives or SSDs that have the same capacity and rotational speed RAID 10 using a hard disk drive of 2 TB or more cannot be supported if SW RAID controll...

Page 46: ...ive Cage Kit 0 1 2 3 4 5 N8154 82F 2 5 inch Hot Plug Drive Cage Kit N8154 83F 2 5 inch Hot Plug Drive Cage Kit 3 5 inch HDD cage and 2 5 inch Hot Plug Drive Cage Kit 5 1 N8154 84F 3 5 inch non Hot Plu...

Page 47: ...se the flash backup unit that supports the RAID controller which is used Before installing the flash backup unit touch the metal frame part of the server to discharge the static electricity from your...

Page 48: ...178 The control board part is installed to N8103 206 207 208 as standard Connecting the flash backup unit control cable To connect the flash backup unit control cable into the flash backup unit see t...

Page 49: ...ket slightly toward the right and then pull the bracket toward the front to remove it Important Be careful that the cable does not come out from the connector when pulling the front panel bracket 3 In...

Page 50: ...ler 1 Connect another connector of the flash backup unit control cable to the RAID controller Check the marker of the connector and connect the cable straight into the connector Be careful not to pres...

Page 51: ...pter 2 Preparations 2 Install the RAID controller into the PCI slot 4 and fix it in place Be careful not to disconnect the cable 3 Connect the cables and components that you removed Removal 1 8 3 To r...

Page 52: ...egulatory Notices When installing PCI cards see Chapter 2 1 9 2 List of optional devices and installation slots to prevent mistaking slot numbers Configure the Option ROM in PCI Configuration accordin...

Page 53: ...ble below PCI device PCI bus number Device number Function number Onboard NIC1 8Fh 0 0 Onboard NIC2 8Fh 0 1 Slot 1 60h Slot 2 30h Slot 3 1h Slot 4 90h Set Disabled for the optional ROM of a LAN device...

Page 54: ...er 1GB RAID 0 1 5 6 card performance PCI Express 3 0 x8 Cannot be used when a 3 5 inch HDD cage is installed N8103 178 3 RAID controller 2GB RAID 0 1 5 6 card performance PCI Express 3 0 x8 N8118 307...

Page 55: ...es Up to two cards from the following can be installed N8103 184 SAS Controller up to one N8104 152 Quad Port 1000BASE T Adapter No limitations for other cards No Up to one card of N8103 184 SAS Contr...

Page 56: ...itch or jumper settings on the PCI card are proper according to the instruction manual supplied with the card if necessary 2 See Chapter 2 1 2 Overview of Installation and Removal for preparations 3 T...

Page 57: ...nent parts of the card securely connect to the slot Important If you have trouble installing the card remove the card once and try again If you apply excessive pressure on the card there is a risk of...

Page 58: ...a BIOS utility the startup message banner is displayed in ascending order of the PCI bus numbers Removal 1 9 5 Remove a PCI card connected to a PCI slot by using the following procedure 1 See Chapter...

Page 59: ...4 020 1 Not available for this server 3 RS 232C cable B 804 062746 820 1 4 PCI bracket 1 243 112122 001 1 Preinstalled to cable 5 PCI bracket 2 243 112122 002 1 For full height PCI This product uses a...

Page 60: ...e and attach it securely 7 Arrange the cable so as not to buffer other PCI cards and connect to the COM connector used for internal connections in the motherboard See the following for the position of...

Page 61: ...rver The N8154 83F 2 5 inch Hot Plug Drive Cage Kit extra 2 5 inch HDD cage can be installed in 3 5 inch expansion bay 1 Important Use hard disk drives provided by NEC Second Hard Disk Drive First Har...

Page 62: ...DD cage so that its tabs A and B 4 come fit into the slits on the chassis Insert one side of the lock plate into the slits 5 of the chassis Push the lock plate in the direction shown by the arrow to l...

Page 63: ...the side cover you removed in step 2 9 Removing hard disk drives 1 10 2 Remove the hard disk drives by using the following procedure Important When disposing of the hard disk drives follow the instruc...

Page 64: ...ithin the same RAID array Mount SATA SAS hard disk drives in order from slot 0 and mount the SSDs to the remaining slots The N8154 82F 2 5 inch HDD cage can mount a SAS HDD and the N8154 83F 2 5 inch...

Page 65: ...he C side 4 must face upward Do not push the HDD cage to the end for connecting cables later Connect the interface cable and power cable to the HDD cage Use the interface cable that comes 5 with the H...

Page 66: ...s 1 To remove the side cover and the front bezel see Chapter 2 1 3 Removing the Side Cover and 1 4 2 Removing the Front Bezel Remove one screw and the dummy cover from the 3 3 5 inch expansion bay Ins...

Page 67: ...ront door of the standard 2 5 inch HDD cage is closed How to open the extra 2 5 inch HDD cage door 1 10 5 Open the extra 2 5 inch HDD cage in the server by using the following procedure Unlock and ope...

Page 68: ...e hard disk drive until it comes into contact with back of the HDD cage 2 When finished close the lever to lock the hard disk drive Important Use only the hard disk drives provided by NEC For details...

Page 69: ...l DVD Super MULTI drive 1 See Chapter 2 1 2 Overview of Installation and Removal for preparations 2 To remove the side cover and the front bezel see Chapter 2 1 3 Removing the Side Cover and 1 4 Remov...

Page 70: ...disk drive on the DVD SuperMULTI drive 8 Install the bracket with DVD SuperMULTI drive installed to the server 9 Connect the SATA cable and DC power cable you disconnected in step 3 to the server Thi...

Page 71: ...nstall the backup device in 3 5 inch expansion bay 1 Non redundant power unit server install the backup device in 3 5 inch expansion bay 2 Tips An optional internal USB cable is required to install a...

Page 72: ...is server to attach the backup device to the tray 5 Insert the backup device into chassis Do not push the backup device in completely as the cable has to be connected to the device 6 Connect the inter...

Page 73: ...rations 1 13 N8181 152 153 Internal simple UPS N8181 152 optional Internal simple UPS can be installed to 3 5 inch expansion bay 2 of this server The internal simple UPS can be installed only on the m...

Page 74: ...s 2 To remove the side cover and the front bezel see Chapter 2 1 3 Removing the Side Cover and 1 4 Removing the Front Bezel 3 Check the components of N8181 153 Internal simple UPS Control Kit Control...

Page 75: ...he following procedures 1 Insert the control kit under the 3 5 inch expansion bay 2 Fix it with a countersunk screw and a flat head screw The parts indicated by circle on the figure on the right 3 Rem...

Page 76: ...e on the figure on the right 6 Connect two power cords on control kit to the connector on the motherboard you removed at step 3 6 Install the LED cable to the device tray you removed at step 4 1 Attac...

Page 77: ...Internal Optional Devices Express5800 T110i S User s Guide 77 Chapter 2 Preparations 8 Put the device tray with LED cable back to 3 5 inch expansion bay Then connect LED cable to the connector of the...

Page 78: ...is mounted to the tray then fix it with a countersunk screw 3 Connect the cable of the internal simple UPS a power cord and two signal cords to the connector of the control kit 4 Reassemble the server...

Page 79: ...me 30 seconds Battery turn off delay time 3600 seconds Boot after power recovery Enable Boot timeout after DC ON 0 seconds Removal 1 13 3 You can replace or remove the internal simple UPS by a reverse...

Page 80: ...internal simple UPS is shown in figure below a Using internal simple UPS When using N8181 152 internal simple UPS set jumper BIOS OR on the motherboard to Enabled Jumper on the motherboard BIOS OR En...

Page 81: ...r operating with internal battery 1 13 5 Charge the battery before you start operation You can check charging state and settings of internal battery with EXPRESSSCOPE Engine 3 or NEC ESMPRO For detail...

Page 82: ...rear is used as the dedicated fan When N8154 82F 2 5 inch Hot Plug Drive Cage Kit is used the air duct for HDD is added In this case length of the card that can be mounted to PCI slots 1 to 3 is limit...

Page 83: ...ting hard disk drives This section describes how to connect additional hard disk drives a Using 3 5 inch hard disk drives Connect the cables as in the following figure when adding 3 5 inch hard disk d...

Page 84: ...dding an optional RAID controller N8103 188 176 Connecting to a RAID controller N8103 188 176 requires a SATA cable provided with the N8154 84F 3 5 inch non Hot Plug Drive Cage Kit and RAID LED cable...

Page 85: ...ally installed use the SATA cable attached to the 3 5 type HDD cage N8154 84 and RAID LED cable K410 444 00 At first install the hard disk drive into the leftmost slot viewing from the front side and...

Page 86: ...nected install OS to extra 2 5 inch HDD cage A SATA cable provided with the N8154 84F 3 5 inch non Hot Plug Drive Cage Kit RAID LED cable K410 293 00 and a SAS SATA cable K410 364 00 are required SATA...

Page 87: ...ed to the 3 5 type HDD cage N8154 84 optional KK410 444 00 RAID LED cable and K410 364 00 built in SAS SATA cable For the additional 2 5 type HDD cage N8154 83 the attached SATA cable is not used At f...

Page 88: ...hard disk drive connected to the RAID controller accesses or not connect the RAID LED cable of the RAID controller installation kit Connect to the LED connector on the mother board and to the connecto...

Page 89: ...drives Connect the cables as in the following figure when adding 2 5 inch hard disk drives Install the hard disk drives in order from slot 0 Connecting to the MiniSAS HD connector on the motherboard U...

Page 90: ...es are installed and used in a RAID system with a RAID controller N8103 176 177 178 188 Use an SATA cable provided with the 2 5 inch Hot Plug Drive Cage and N8154 83F 2 5 inch Hot Plug Drive Cage Kit...

Page 91: ...d disk drive is installed use the SATA cable attached to the 2 5 type HDD cage N8154 82 and additional 2 5 type HDD cage N8154 83 N8103 209 N8103 205 206 207 208 210 211 Flash backup unit control cabl...

Page 92: ...ckup devices The 3 5 inch expansion bay of the server can mount USB devices for internal connection a Mounting an internal USB device on non redundant power supply model Use the internal USB cable K41...

Page 93: ...2 SATA mount kit N8118 307 which mounted at most 2 of 120GB M 2 SATA SSD N8150 736 for internal connection Tips Only 3 5 inch HDD cage install model can be supported when the high temperature resista...

Page 94: ...D Use the dedicated internal SAS SATA cable K410 365 00 and connecting to the RAID controller Note M 2 SATA SSD and hard disc drive cannot be connected to the same RAID controller RAID LED cable K410...

Page 95: ...mple of connecting the power cables Power cables other than those shown here are not used by the devices 1 Using 3 5 inch hard disk drives in non redundant power supply model an extra 2 5 inch HDD cag...

Page 96: ...Guide 96 Chapter 2 Preparations 3 Using 2 5 inch hard disk drives in non redundant power supply model an extra 2 5 inch HDD cage and a backup device 4 Using 2 5 inch hard disk drives in liquid coolin...

Page 97: ...xpress5800 T110i S User s Guide 97 Chapter 2 Preparations 5 Using internal battery The figure below is an example of when 3 5 inch hard disk drive and extra 2 5 inch HDD cage are mounted See the figur...

Page 98: ...tab inside the front bezel into the hole on the front upper side of the server push the left side of the front bezel toward the server and then lock the bezel by using the tab on the upper side of th...

Page 99: ...eversing the removal procedure Make sure that hooks at both the top and bottom of the side cover are securely inserted in the holes on the server frame Also make sure that the hooks at the front of th...

Page 100: ...r is as follows Hold the server firmly and slowly and gently place it in the position in which it is to be installed The environment that satisfies the following conditions Operating Ambient temperatu...

Page 101: ...power consumption is connected Place where intense vibration may be generated Place where some objects may be fallen Place near a device generating intense magnetic field such as TVs radios broadcast...

Page 102: ...ottom of the server as instructed below Removing installing the stabilizer Removing the stabilizer Release the lock lever and slide it in the direction of the arrow to remove Installing the stabilizer...

Page 103: ...lternately can remove the gap between servers 2 Mounting for horizontal To mount the server horizontally attach the provided rubber feet to the positions shown in the figure Important When the server...

Page 104: ...o observe the precautions may cause death or serious injury For details refer to Safety Precautions and Regulatory Notices Do not hold the power plug with wet hands CAUTION Be sure to observe the foll...

Page 105: ...ontact the sales representative to check whether they can be used Direct connection from the standard serial port of this sever to the dedicated network line is disabled To connect to the dedicated li...

Page 106: ...e 106 Chapter 2 Preparations Display unit Front view Rear view USB devices A device with serial interface such as a modem Connect the provided power cord to an outlet when the cable connection is comp...

Page 107: ...s To connect the power cord to a UPS connect it to the outlet provided at the rear of the UPS For details refer to the instruction manual supplied with the UPS In order to link the power supply from t...

Page 108: ...ctions in this section 3 EXPRESSSCOPE ENGINE 3 EXPRESSSCOPE Engine 3 provides useful features through the Baseboard Management Controller BMC 4 EXPRESSBUILDER EXPRESSBUILDER helps you to install Windo...

Page 109: ...play uninterruptible power supply UPS and other peripherals 3 If STATUS LED 1 turns on green and STATUS LED 2 terns on amber wait until them are unlit 4 Press POWER Switch at the front of the server P...

Page 110: ...ST In such a case press F1 to continue POST Board configuration can be made using the utility described later 1 POST runs automatically when the server is turned on NEC logo appears on the screen as f...

Page 111: ...optical disk drive the system starts from CD DVD even if F3 key is pressed F4 key Run the offline tool For details see Chapter 1 9 Offline Tools in Maintenance Guide F12 key Boot from network 6 When t...

Page 112: ...ed and POST stops turn off the server and check if the bootable device or bootable media is correct 9 The OS starts after POST is completed POST error messages 1 1 2 If POST detects an error an error...

Page 113: ...ss F2 SETUP F4 ROM Utility F12 Network If you press F2 key SETUP starts upon completion of POST and the Main menu appears Tips In Legacy boot mode you can also launch SETUP by pressing the F2 key whil...

Page 114: ...ver Boot and Save Exit key key Changes the parameter of the chosen item You cannot use this key when a menu which has on the left is selected Enter key Determines the chosen parameter Esc key Returns...

Page 115: ...ng message the default settings of SETUP are restored The default settings are different from the factory settings See Chapter 2 1 System BIOS in Maintenance Guide for details Load Setup Defaults Yes...

Page 116: ...is PCI slot number of the RAID controller Advanced PCI Configuration PCI Device Controller and Option ROM Settings LAN1 Option ROM Scan Disabled Option ROM on LAN1 must be disabled Memory Configure th...

Page 117: ...word is set the entry of password is displayed when SETUP is launched Set a password to restrict booting Security Password on Boot Enabled You can select this parameter after you set a password Use Tr...

Page 118: ...ly access a CD DVD floppy disk ISO image USB memory To enable this feature the optional license for remote management N8115 04 is required To actualize these functions virtual USB mass storage Remote...

Page 119: ...uired Subnet Mask Required Default Gateway and DNS Server when you do not use DHCP Tips If Shared BMC LAN is enabled Web feature remote media KVM feature or command line interface feature may be inter...

Page 120: ...in Boot Selection Menu Manuals Stores User s Guide Installation Guide Maintenance Guide and other manuals 4 2 Usage of EXPRESSBUILDER If you want to configure RAID arrays or run EXPRESSBUILDER by usi...

Page 121: ...e Components Express5800 T110i S User s Guide 121 Chapter 3 Setup 5 Installing Software Components Continue to install the operating system and other bundled software See the instructions below Instal...

Page 122: ...ocedure When the power cord of the server is connected to a UPS refer to the documentation supplied with the UPS or the documentation for the application controlling the UPS 1 Shut down the OS 2 If th...

Page 123: ...ess5800 T110i S Appendix 1 Specifications Describes specifications of the server 2 Interrupt Lines Describes the interrupt lines assigned to this server 3 Glossary Describes glossaries of this documen...

Page 124: ...t Expansion slot PCI 1x PCI Express 3 0 x16 lane x16 socket 1x PCI Express 2 0 x4 lane x8 socket 1x PCI Express 2 0 x2 lane x8 socket 1x PCI Express 2 0 x1 lane x8 socket External interface USB3 0 Fro...

Page 125: ...slot PCI 1x PCI Express 3 0 x16 lane x16 socket 1x PCI Express 2 0 x4 lane x8 socket 1x PCI Express 2 0 x2 lane x8 socket 1x PCI Express 2 0 x1 lane x8 socket External interface USB3 0 Front 2 port re...

Page 126: ...t 1x PCI Express 2 0 x4 lane x8 socket 1x PCI Express 2 0 x2 lane x8 socket 1x PCI Express 2 0 x1 lane x8 socket External interface USB3 0 Front 2 port rear 4 ports internal 1 port Serial 1 port D sub...

Page 127: ...xpress 2 0 x4 lane x8 socket 1x PCI Express 2 0 x2 lane x8 socket 1x PCI Express 2 0 x1 lane x8 socket External interface USB3 0 Front 2 port rear 4 ports internal 1 port Serial 1 port D sub 9 pin Net...

Page 128: ...eference when you add optional devices Interrupt lines As factory settings interrupt lines are assigned as follows IRQ Peripheral Device Controller IRQ Peripheral Device Controller 0 System timer 8 Re...

Page 129: ...led with NEC ESMPRO Manager to PC for Management ExpressUpdate A feature for updating BIOS firmware driver or software of the server This feature is available when NEC ESMPRO Manager cooperates with E...

Page 130: ...Configuration of former models Starter Pack Software package for the server This software includes the customized drivers for Windows This must be installed before using Windows on the server TPM Kit...

Page 131: ...0i S User s Guide 131 Chapter 4 Appendix 4 Revision Record Revision Document Number Date Issued Description 10 116 01 101 01 April 2017 Newly created 10 116 01 101 02 May 2018 Support new RAID control...

Page 132: ...T110i S User s Guide Aug 2018 NEC Corporation 7 1 Shiba 5 Chome Minato Ku Tokyo 108 8001 Japan NEC Corporation 2018 The contents of this manual may not be copied or altered without the prior written...

Reviews: