Page 16
➻
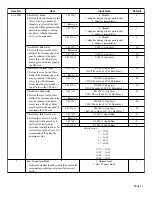
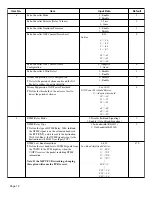
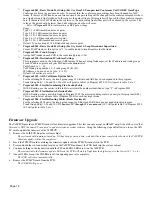
Program 0901 - Basic Trunk Port Setup (Part A), Item 23:
Unsupervised Conference Call CODEC Gain Type
Conference calls may experience an echo. To prevent this, the conference gain settings have been changed for VoIP
trunks. If there is a VoIP trunk on a conference circuit, the gain setting will be changed for the conference member who is
on a trunk or single line telephone. In these cases, the gain setting in this program will be used for those conference mem-
bers. If there are two VoIP trunks in the conference, the gain setting from either port will be chosen by the system. The
value of the gain should be lower than 0 dB, otherwise an echo will occur.
Refer to
Program 0154
for information on DSP gain settings.
Range:
Type 1: 1 (0 dB transmit and receive gain)
Type 2: 42 (-5 dB transmit and receive gain)
Type 3: 38 (-3 dB transmit and receive gain)
Type 4: 6 (+3 dB transmit and receive gain)
Type 5: 10 (+5 dB transmit and receive gain)
Default: Type 2 setting 42 (-5 dB transmit and receive gain)
➻
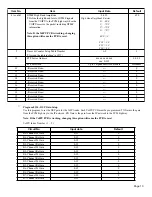
Program 0901 - Basic Trunk Port Setup (Part A), Item 31: Loop Disconnect Supervision
For each VoIP trunk, set this option to ‘1
’
to enable trunk-to-trunk transfers for the trunk.
➻
Program 0905 - Trunk Groups
Assign VoIP trunks on each PCB to the same trunk group (1-26).
➻
Program 0928 - Destination IP Address Settings
This program is used by the F-Route or ARS feature. When not using Gatekeeper, set the IP address and trunk groups.
For an IP address, please ask your MIS network administrator.
Table Number: 1 – 96
VoIP Trunk group number: 0 – Trunk group MAX (26)
IP Address: xxx.xxx.xxx.xxx (xxx: 0 – 255)
Default: All entries are set to ‘0
’
.
➻
Program 2101 - ARS Call Route Options Table
For the referring 0928 entry, the trunk group range of F-Route and ARS have been expanded in this program:
Trunk Group Entry: 1-26 and 101-126 (101 will point to table 1 in Program 0928, 102 will point to table 2, etc.)
➻
Program 2902 - Flexible Numbering Plan Lookup Table
With F-Routing, use the entries in this table to associate the numbers identified as type “9” in Program 0501.
➻
Program 2903 - Flexible Route Selection Table
With F-Routing, when a match is found in Program 2902, the associated data points to an entry in this program (0-48).
This is used to select a Route Table (Program 2904) for each day/night mode.
➻
Program 2904 - Flexible Routing Tables (Route Treatment)
For the referring 0928 entry, the trunk group range for F-Route and ARS have been expanded in this program:
Trunk Group Entry: 1-26 and 101-255 however 127 through 254 are not used. (101 will point table 1 in Program 0928,
102 will point to table 2, etc.)
Firmware Upgrade
The VoIP PCB provides a PCMCIA card slot for firmware upgrades. This slot can only accept an
ATA
PC card.
It should be noted that
this card is NOT the same PC card used to update telephone system software.
Using the following steps will allow you to use the ATA
PC card to update the firmware of the VoIP PCB.
1.
Remove the VoIP PCB from the system cabinet.
The system should remain powered up. If it has been powered down, wait until the system completely reboots or the VoIP PCB
firmware update will not be completed.
2.
Insert the PCMCIA card containing the firmware update into the PCMCIA card slot on the PCB.
3.
Press and hold the red load switch located on the VoIP PCB and insert the PCB back into the system cabinet.
4.
Continue holding in the load switch until the PLT and LED1 LEDs are lit on the VoIP PCB.
The system starts the firmware update. LEDs on the PCB will start to light from the highest port to the lowest (8, 7, 6, etc.).
5.
Once all LEDs except the CDLED are off, the updating process is complete.
The PCB will reboot automatically.
6.
Remove the PCMCIA card from the PCB.
The CDLED will go out.

