background image

32

NAVMAN  

iCN 620 user manual

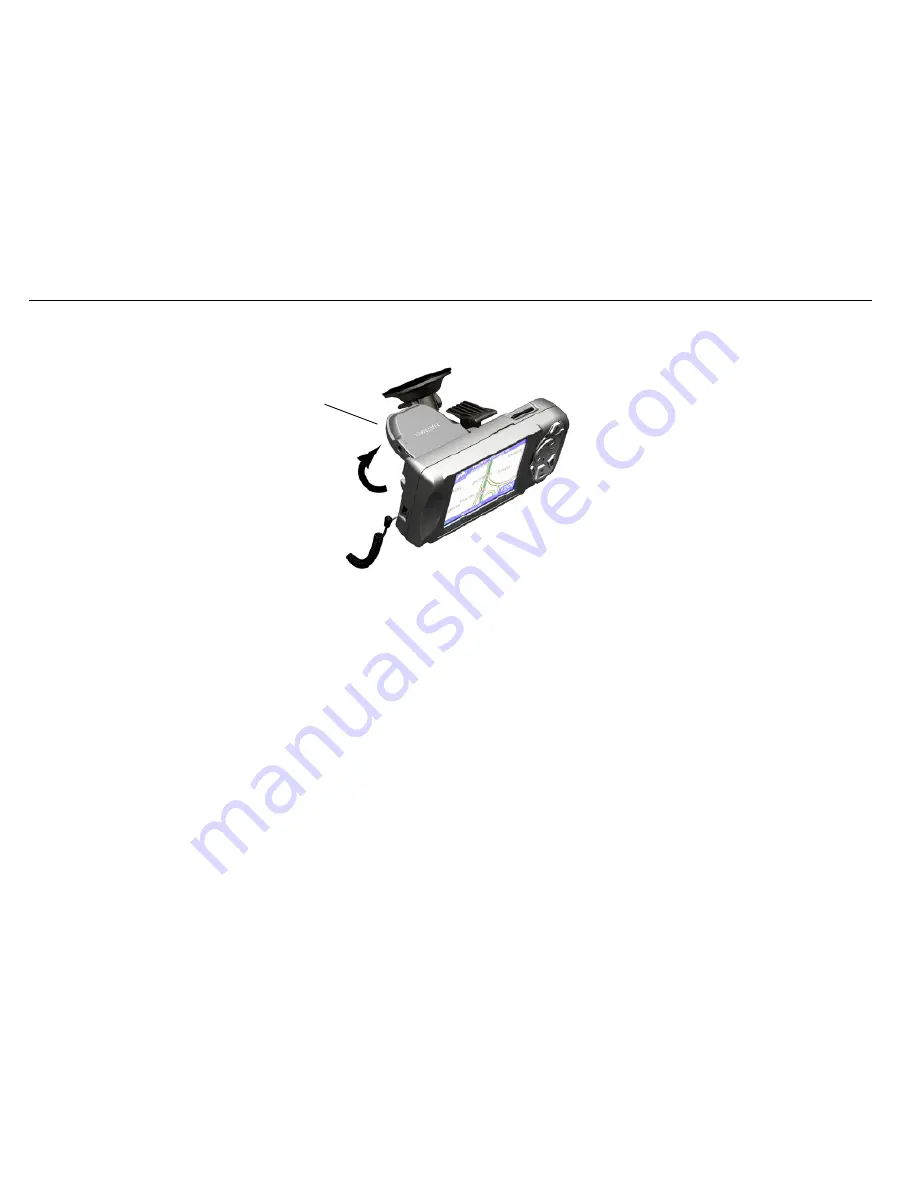
To unclip the iCN 620 

unit from the 

mounting bracket, 

press down on the 

back of the upper 

plastic clip to release 

the top of the unit, 

then lift the unit 

out of the 

bottom two slots.

In vehicles where 
auxiliary power is 

permanently on, the 

unit can be switched 

on and programmed 

as soon as the 

power adaptor is 

connected. Switching 

the engine on will not 

reset the unit.

Aerial points up 
and out

10     Flip the aerial outwards so that the aerial is pointing horizontally.

11     Plug the power cable into the socket on the left hand side of the unit.

12     Plug the other end of the power adaptor into the vehicle’s cigarette lighter socket.

13     Make sure that the unit is positioned such that the aerial has a clear view of the sky.

14     In most vehicles, you will need to have the engine idling in order to program your route into the unit. While you 

can switch on the unit with just the auxiliary power on (i.e. your key in the Auxiliary ON position), turning the key 
to switch on the engine may interrupt power to the unit and your programmed route will be saved for re use. It is 
recommended that you program your route with the engine may already idling, but with the automatic shift of your 
car in ‘Park’ and the handbrake applied. 

Summary of Contents for iCN 620

Page 1: ...NAVMAN User Manual iCN 620...

Page 2: ...unit learn how to operate it effectively and safely plus find out all of the different features available to you IMPORTANT NOTICE When using your iCN 620 in a vehicle it is your sole responsibility t...

Page 3: ...a position where it cannot obstruct the driver s view of the road This unit must not interfere with the normal operation of any airbags or other vehicle safety equipment For security purposes and to a...

Page 4: ...he iCN 620 to Your Computer 14 Windows XP Users 15 Windows 2000 Users 17 Windows ME 98SE 18 Step 2 Installing iCN Application 20 Step 3 Installing Maps 21 Step 4 Reading User Manuals and Quick Start G...

Page 5: ...Volume 44 6 GETTING STARTED 46 Powering Up 46 Main Menu 47 Driver Protection 47 Getting a GPS Fix 48 7 SETTING YOUR DESTINATION 49 Using a Shortcut 50 Setting a New Destination 51 Heading to an Addres...

Page 6: ...tcut 74 10 PROGRAMMING FAVOURITES 75 Adding a New Favourite 75 Editing or Deleting a Saved Favourite 78 11 USING THE GPS STATUS INFORMATION 80 GPS Reception 81 Satellite Signal Strengths 82 Satellite...

Page 7: ...ating Antennae 95 Memory Cards 96 Memory Card Writers 96 15 AVAILABLE MAPS 98 16 FREQUENTLY ASKED QUESTIONS 100 17 TROUBLESHOOTING 101 18 ADDITIONAL INFORMATION 103 End User and Warranty Agreement 103...

Page 8: ...llites in total orbiting the earth at around 12 000 miles While a GPS receiver can detect signals from up to 12 satellites at any one time only three are needed to provide the two dimensional position...

Page 9: ...620 user manual UNPACKING THE iCN 620 Here s what you should find in the box If there is anything missing contact your retailer for assistance 2 3 1 5 4 6 7 2 8 This will vary depending on the country...

Page 10: ...ide in Adobe Acrobat PDF format Adobe Acrobat Reader 3 Vehicle windshield and dashboard mounting bracket a Ball foot b Locking nut c Mounting clip d Sucker pad 4 12 24 V Vehicle power cable 5 Mains po...

Page 11: ...n 14 Accessories Other Accessories Further accessories are available for your iCN 620 In Car Navigation Unit You can purchase the following from your retailer An external antenna required if your vehi...

Page 12: ...firstly need to set up the iCN Desktop software on your PC You will then be able to download software and maps to your iCN 620 unit via a USB port on your PC Installing iCN Desktop 1 Place the CD ROM...

Page 13: ...ep 1 Connect the iCN 620 to your computer Step 2 Install the smartMAP application onto your iCN 620 unit Step 3 Install the maps you require onto your iCN 620 unit Step 4 Read the user manual to famil...

Page 14: ...first time you have powered up your iCN 620 unit the above screen is displayed prompting you to connect the USB cable supplied Plug the USB cable into a USB port on your computer Plug the other end in...

Page 15: ...tinue with the installation if you are presented with this message 8 The drivers for the iCN 620 should automatically be installed during the desktop installation If that does not happen or you get th...

Page 16: ...16 NAVMAN iCN 620 user manual Click continue Anyway Click Finish...

Page 17: ...elect Browse and locate the USB Drivers folder on the iCN installer CD and select OK to complete the installation If you do not see this screen then the installation has completed automatically Enter...

Page 18: ...ay see the screen below Select Browse and locate the USB Drivers folder on the iCN installer CD and select OK If you do not see this screen then the installation has completed automatically You may no...

Page 19: ...19 NAVMAN iCN 620 user manual Click OK...

Page 20: ...620 to Your Computer for more information Your unit is correctly connected if the display shows a computer and iCN 620 unit connected together 1 Click iCN Application from the Main Menu 2 This is a tw...

Page 21: ...try of purchase The iCN 620 has 64 Mbytes of internal memory available for storing maps the unit can store one or many map regions depending on their size Additional maps can be stored on SD or MMC me...

Page 22: ...of the map that you currently have selected Maps installed in the iCN 620 unit Maps installed on the memory card plugged into your iCN 620 Maps installed on the card in the memory card writer on your...

Page 23: ...indows term that describes using the mouse to move items from one place to another To drag and drop a map point to Multiple map regions can be selected and copied across to the iCN 620 or memory cards...

Page 24: ...our SD writer click on Add to PC RM Alternatively drag and drop the region to one of the windows on the right hand side of the screen iCN or iCN SD 3 To search for a particular city on the map Click F...

Page 25: ...0 unit Follow the instructions above using the Add to iCN SD option 3 Alternatively you may have purchased a memory card writer Ensure the memory card writer is connected to your PC via a USB port Ins...

Page 26: ...Options Backing Up Device Settings This function allows you to back up the Settings Favourites and Shortcuts that you have programmed into your iCN 620 unit You can save any number of backups onto yo...

Page 27: ...een your backup will be stored as at the current date and time Rename the backup here if you wish by typing over the default name Click OK to continue the backup Your backup will be stored in your com...

Page 28: ...ps from your computer Click on the backup that you wish to delete from the list provided Click Delete Visit Navman Website Click on this option to visit the Navman website for updates support and gene...

Page 29: ...on straight onto the windshield By suction or an adhesive disc onto the dash Alternative mounting options may be available specifically for your make and model of vehicle Follow these mounting instruc...

Page 30: ...indshield where the iCN 620 will be clearly visible by the driver Follow the safety guidelines at the front of this manual to ensure that the unit does not obstruct the view of the driver or interfere...

Page 31: ...o the ball foot 7 Adjust the position of the socket clip so that the unit will be clearly visible by the driver 8 Wind the locking nut onto the thread of the socket clip until firm 9 Snap the iCN 620...

Page 32: ...nto the socket on the left hand side of the unit 12 Plug the other end of the power adaptor into the vehicle s cigarette lighter socket 13 Make sure that the unit is positioned such that the aerial ha...

Page 33: ...sen is flat enough you can simply use the suction cup to mount the unit directly onto the dash 4 Adhesive Mount If the location you have chosen is not suitable to use the suction cup alone stick the s...

Page 34: ...isible by the driver 9 Wind the locking nut onto the thread of the socket clip until firm 10 Snap the iCN 620 unit onto the socket clip First position the two locating tabs on the underside of the uni...

Page 35: ...engine on will not reset the unit Aerial points up and out 11 Flip the aerial outwards so that the aerial is pointing horizontally 12 Plug the power cable into the socket on the left hand side of the...

Page 36: ...t of the time you will use 4 main buttons OK ESC PAGE and the 8 way Toggle Button The 8 way Toggle Button enables you to move a cursor around the screen in a similar manner to using the mouse on a com...

Page 37: ...scroll up and down through the menus and to move around the map when selecting your destination Menu Power Button This button is used for two different reasons 1 Press to return to the main menu at a...

Page 38: ...menu of options To move around menus 1 Scroll through the menu options using the 8 way toggle button 2 To select a menu option make sure the option you require is highlighted then press the OK button...

Page 39: ...tions are disabled and Automatic Rerouting enabled Select Page Fwd or press to view the next screen Moving Around the Settings Screens The screen below shows an example of one of the screens found in...

Page 40: ...er half of the screen Use the up down toggle button to scroll between the keyboard the text entry line and the window containing a list of streets or areas To type in the name 1 Move around the keyboa...

Page 41: ...w this where possible Changing the Brightness and Volume You are able to modify both the brightness of the display and the volume of the voice guidance instructions to suit the driving conditions To a...

Page 42: ...the very next instruction Press for longer to alter the volume To alter the volume of the voice guidance instructions 1 Hold down the Vol button until you see the volume bar displayed on the screen T...

Page 43: ...then announce upcoming turns and display your directions in a manner that best suits you Powering Up 1 Press the MENU Power button down for 1 second 2 A short tutorial is available to show you how to...

Page 44: ...ver Protection This unit must not be operated by the driver while the vehicle is moving If any button is pressed while the vehicle is moving the Driver Protection screen is displayed Passengers may co...

Page 45: ...minimize the amount of time that this takes by remaining stationary in your vehicle until the unit has a fix GPS strength indicator is red when the unit has no GPS fix and green with signal strength i...

Page 46: ...ou have previously programmed for destinations used on a regular basis Set a new DESTINATION by entering a specific street address selecting the intersection of two streets choosing a Point of Interes...

Page 47: ...ur route For information on setting new Shortcuts refer to Section 9 Programming Shortcuts 1 From the Main Menu select SHORTCUTS 2 Select your previously programmed destination from the Shortcut list...

Page 48: ...tion Refer to Section 6 Controls and Keyboard help you enter the address details 1 From the Main Menu select DESTINATION then ADDRESS 2 Select COUNTRY in the Destination Address screen Use the left ri...

Page 49: ...ext entry screen type in a region Once you have finished position the cursor on the text entry line and press OK to confirm your selection Alternatively use the up down toggle button to choose from th...

Page 50: ...avigation screens Select SHOW The unit will not calculate the route but will simply display the address using the Map Browser mode From here you can select this address as your destination or move aro...

Page 51: ...f two streets as your destination 1 From the Main Menu select DESTINATION then INTERSECTION 2 Select COUNTRY in the Destination Intersection screen Use the left right toggle button to cycle around the...

Page 52: ...e list provided then press OK to confirm your selection 4 Select TOWN As above type in a town or choose from the list provided 5 Select INT OF A list of streets in your chosen town is displayed Type i...

Page 53: ...rowser mode From here you can select this address as your destination or move around the map to find a different destination Refer to Section 7 Setting Your Destination Straight From the Map for more...

Page 54: ...rks to name just a few 1 From the Main Menu select DESTINATION then POINTS OF INTEREST 2 Select CATEGORY in the Destination POI screen Use the left right toggle button to cycle around the options prov...

Page 55: ...se from the list provided then press OK to confirm your selection 6 Once you have entered all the information in the Destination POI screen press OK 7 Press OK to select a POI from the list provided i...

Page 56: ...mply display the address using the Map Browser mode From here you can select this address as your destination or move around the map to find a different destination Refer to Section 7 Setting Your Des...

Page 57: ...enu select DESTINATION then FAVOURITES 2 Select your destination from the Favourite list 3 You are taken to the Edit Favourite screen where your destination is displayed and you are able to change det...

Page 58: ...the map to find a different destination Refer to Section 7 Setting Your Destination Straight From the Map for more information Select DELETE This will delete your saved Favourite and return you to the...

Page 59: ...on the navigation screen Select SHOW The unit will not calculate the route but will simply display the address using the Map Browser mode From here you can select this address as your destination or m...

Page 60: ...stination is or if you have selected SHOW from a previous entry screen The iCN 620 will allow you to scroll around a map and pick a point on the map The unit will automatically load the address detail...

Page 61: ...isplay the destination on the navigation screen Select START This sets your chosen location as your departure point normally your departure point is assumed to be your present location Refer to the fo...

Page 62: ...een displays a list of your next 4 turns with the street name direction of turn and distance to go Note These are the only four screens available for the driver to view while travelling The Driver Pro...

Page 63: ...e Map Browser screen to set your destination Refer to Section 7 Setting Your Destination Straight From the Map for more information Navigation Map Similar to the Map Browser view except that the map i...

Page 64: ...ft right toggle button to scroll through the options Current speed Current time Current bearing heading HDG Distance to next turn Distance to go to destination DTG Expected time of arrival at destinat...

Page 65: ...ing heading HDG Distance to next turn Distance to go to destination DTG Expected time of arrival at destination ETA Time to go to destination TTG Direction of next turn The street you are travelling o...

Page 66: ...top of the list Your current street name is displayed along the bottom of the screen As with the Next Instruction screen the iCN 620 must have planned a route before you can use this screen Refer to...

Page 67: ...position 2 If you power down while you are in the process of changing Settings the changes you have made will be lost 3 If you power down while entering a destination address before the unit has calc...

Page 68: ...destinations can be stored in the unit to save you time Once saved your Shortcuts can be accessed quickly through the Shortcuts menu with the minimum of key presses and without having to re enter any...

Page 69: ...7 Setting Your Destination Heading to a Point of Interest CURRENT LOCATION iCN 620 will automatically store the location of your current position as a new Shortcut you must have a GPS fix to use this...

Page 70: ...croll to the NAME box and press OK In the text entry screen scroll to the text entry line and hold down the ESC button to delete the line of text already printed Type in the name you require Select EN...

Page 71: ...hortcuts or select a destination from the list Deleting a Shortcut To delete all Shortcuts use the Clear Shortcuts option in the User Settings screen For more information refer to Section 12 Modifying...

Page 72: ...ough the Destination Favourites menu Adding a New Favourite 1 From the Main Menu select DESTINATION then FAVOURITES 2 Select NEW 3 Select one of the options from the New Favourite list ADDRESS follow...

Page 73: ...omize the look of each of your Favourites by giving the destination a nickname e g HOME You can also choose to save the Favourite as one of eight Shortcut destinations which means that you can access...

Page 74: ...through the available options by pressing the left right toggle button Choose one of the following Save your destination as a Shortcut or a normal Favourite Select SAVE 7 You are returned to the Favo...

Page 75: ...hange the name of the Favourite that you have saved or perhaps make it one of your Shortcuts 1 From the Main Menu select DESTINATION then FAVOURITES 2 Select the Favourite destination that you wish to...

Page 76: ...tination on the navigation screens Select SHOW The unit will not calculate the route but will simply display the address using the Map Browser mode From here you can select this address as your destin...

Page 77: ...heck out the problem USING THE GPS STATUS INFORMATION The GPS status screens tell you how well you can receive the GPS satellite information There are three different screen displays available to you...

Page 78: ...egments The satellites are represented as follows A yellow segment indicates a satellite that is being tracked but is not being used to determine your position A red segment indicates a satellite that...

Page 79: ...re displayed in the form of a bar graph Colours are used to indicate the status of each satellite The circle on the right hand side of the screen is coloured green when there is a valid fix 2D or 3D a...

Page 80: ...lecting that satellite using the left right toggle button The performance of the selected satellite is displayed as shown below Again the satellites are displayed in different colours to represent the...

Page 81: ...urs and brightness of the DISPLAY to suit the driving conditions or your own preferences Use the ROUTE GUIDANCE screen to instruct the unit to find the shortest distance or fastest time to avoid certa...

Page 82: ...s menu to improve the contrast in light and dark conditions Select your preferred Map Colour by cycling through the options using the left right toggle button Route and Guidance Settings There are a n...

Page 83: ...lect both or neither if you wish Enable or disable the Back on Track feature from the Rerouting menu enable Automatic Rerouting if you want the iCN 620 to automatically update the planned route when y...

Page 84: ...nly in accommodation and entertainment venues and may want to disable such categories as schools and churches 1 From the Main Menu select SETTINGS then POINTS OF INTEREST 2 Enable the Show Icons on Ma...

Page 85: ...SETTINGS then GPS 2 Select the format to display GPS position from the Position Format menu 3 Set the local time by using the table below to help program the Local Time Offset Local time is derived by...

Page 86: ...ylight CST Central Standard 6 hours MDT Mountain Daylight MST Mountain Standard 7 hours PDT Pacific Daylight PST Pacific Standard 8 hours ADT Alaskan Daylight ALA Alaskan Standard 9 hours HAW Hawaiian...

Page 87: ...ng Page Fwd 6 Enable the Auto Simulate box to run an automatic route simulator This allows you to program a route without a GPS fix for example from inside a building and view the route without going...

Page 88: ...er Settings The User Settings function allows you to quickly clear some or all of the information that you have stored in the unit for example your Favourites You can also disable the tutorial that is...

Page 89: ...N 620 user manual Maps The maps setting allows you to manage maps loaded on both the internal memory and a secure Digital SD card Maps will only be loaded when the unit is turned on if the check boxes...

Page 90: ...te without going anywhere To use the auto simulator you must first set a departure point and a destination There are many ways to do this but here is an example of one way you can set up the auto simu...

Page 91: ...is location as your departure point 8 You are then returned to the Map Browser screen Press OK to display gridlines 9 Again use the gridlines to select the DESTINATION point that you require 10 Press...

Page 92: ...ignals getting to the unit are greatly reduced There are two options available to ensure that sufficient GPS signal is available to the unit External antenna this antenna is fitted by a magnet to the...

Page 93: ...ilable memory cards They are used widely in many applications such as digital cameras cellular phones and PDAs Personal Digital Assistants These memory cards are useful in the iCN 620 because of their...

Page 94: ...e that connects to your PC via a USB port and is used in conjunction with the iCN Desktop application to download maps to SD or MMC memory cards Note SD and MMC cards must be formatted using FAT 16 fo...

Page 95: ...user manual 15 Europe disk 1 Europe disk 2 AVAILABLE MAPS A number of maps are supplied with your unit on CD ROM Depending on the country in which you have purchased your unit the following country m...

Page 96: ...96 NAVMAN iCN 620 user manual US disk 1 US disk 2 Australia...

Page 97: ...speed However in order for GPS data to be correctly displayed on the map you will need to have the relevant map loaded into your iCN 620 unit Refer to Section 3 Installing Software and New Maps for m...

Page 98: ...hicle does not have an athermic heat reflecting or a heated windshield these cut out all electromagnetic signals including GPS signals Owners of vehicles fitted with athermic or heated windshields sho...

Page 99: ...s The memory card plugs into the top of your iCN 620 unit and gives you more memory to store additional maps There are no audible instructions when I am driving to my destination What could be wrong I...

Page 100: ...may cause accidents personal injury or property damage or in any way obstruct the visibility of the Customer The Customer is solely responsible for observing safe driving practices and will not opera...

Page 101: ...the original product or component This is Your exclusive remedy for defective products Limitations This warranty does not apply to products that have been damaged or rendered defective a as a result o...

Page 102: ...48 GPS receiver SiRF low power chipset Display Display Type color transmissive thin film transistor TFT liquid crystal display Resolution W x H 320 x 240 pixels Viewable image W x H 71 5 x 53 6 mm 2 8...

Page 103: ...sex RH10 9RZ United Kingdom e mail support navman mobile com website www navman com Support for Australia For technical support frequently asked questions software updates and additional information v...

Page 104: ...ore of the following measures Reorient or relocate the receiving antenna Increase the separation between the equipment and receiver Connect the equipment into an output on a circuit different from tha...

Page 105: ...105 NAVMAN iCN 620 user manual...

Page 106: ...106 NAVMAN iCN 620 user manual...

Reviews: