background image

Replacement of Parts     121

6.1    Replacement Procedure

CAUTION

1.  When performing maintenance and/or servicing the 

water heater, always turn off the electric power, gas and 

water shut-off valve. Wait for the water heater to become 

cool. Be careful to avoid injury to your fingers on sharp 

edges.

2.  Drain all water from the water heater when removing the 

waterway components.

3.  Before any disassembly, make sure that all issues and error 

codes are properly diagnosed.

4.  Handle all parts carefully.

5.  When reassembling, prevent any foreign substance, i.e. 

dust, etc. from entering back into the water heater.

6.  After reassembling, check for gas and water leakage. 

Then, test for proper ignition. Make sure that there is no 

gas leakage from the gas connections by testing with 

soap bubble solution. Bubbles indicate a gas leak that 

must be corrected.

7.  Check the performance and operation after the water 

heater has been serviced.

To remove and replace any parts from the water heater, you will 

need a screwdriver that is at least 8 ~ 10 inches long. A flashlight 

and magnetic tip are also recommended. Navien recommends 

the use of a parts tray to hold small parts and screws. All of the 

hardware is essential to the proper operation of the unit upon 

re-assembly.

NOTE

When disassembling and reassembling the water heater, refer 

the components diagram & parts list.

6.2    Components Replacement 

Instructions

6.2.1    PCB

1.  Turn off the gas supply to the unit.

2.  Disconnect the unit from the power supply.

3.  Turn off the water supply to the unit.

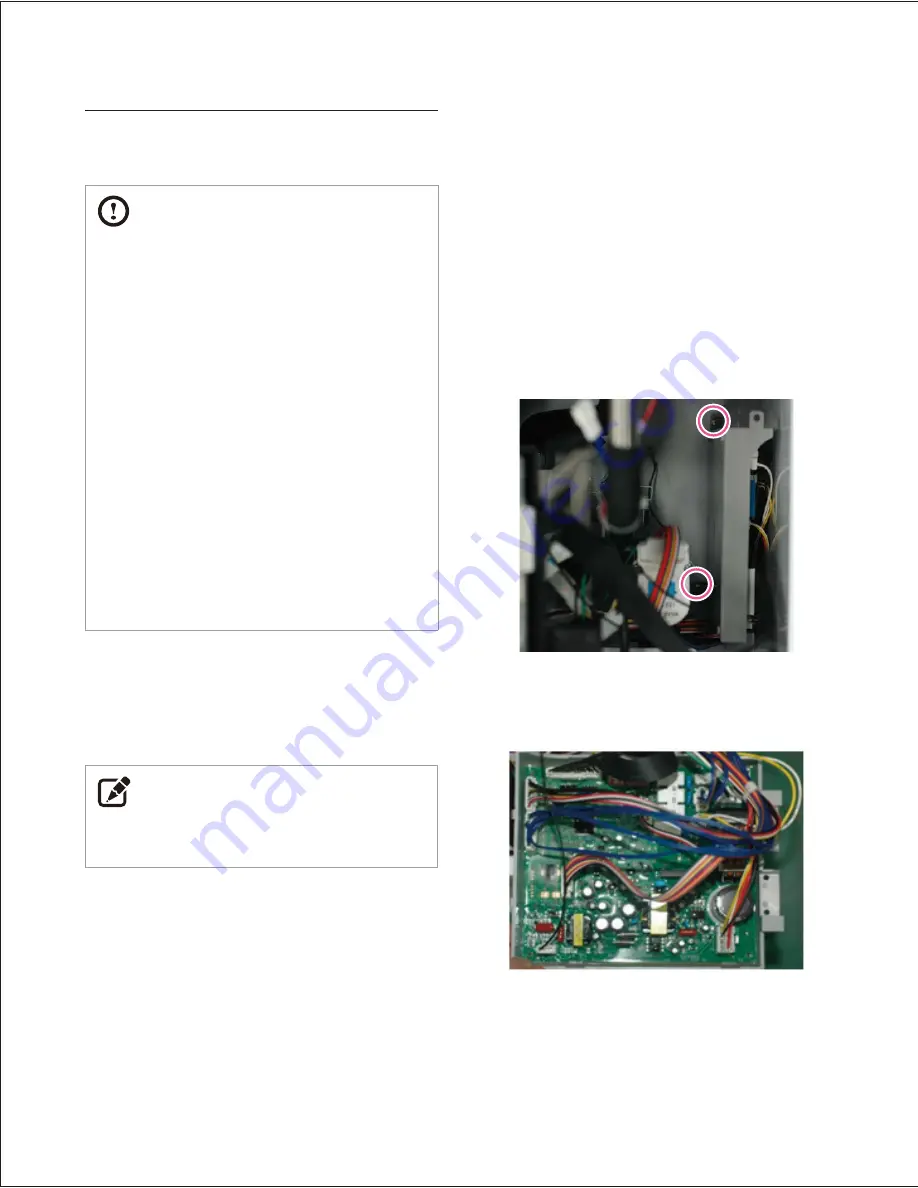
4.  Remove the screws that are located near the top and bottom 

of the PCB that hold it in place as shown in Figure 1.

Figure 1

5.  Disconnect all wiring connectors from the PCB as shown in 

Figure 2.

Figure 2 

6.  Remove the 2 screws located on the back of the case.

6.    Replacement of Parts

Summary of Contents for NPE-180A

Page 1: ...ontact the technician or professional who installed your water heater Contact a licensed professional for the affected system for example a plumber or electrician When you contact Technical Support please have the following information at hand Model number Serial number Date purchased Installation location and type Error code if any appears on the front panel display Navien Inc 800 519 8794 www Na...

Page 2: ...be performed by a qualified installer service agency or the gas supplier The installation must conform with local codes or in the absence of local codes the National Fuel Gas Code ANSIZ223 1 NFPA 54 and or CSA B149 1 Natural Gas and Propane Installation Code When applicable the installation must conform with the Manufactured Home Construction and Safety Standard Title 24 CFR Part 3280 and or CAN C...

Page 3: ......

Page 4: ...E 180S 210S 240S July 22 13 2 10 Additional funtion Front Panel September 12 13 2 20 Additional sub error code list and Supplement of ComfortAir Manual April 14 14 2 21 NPE S Energy factor change November 24 14 2 22 Additional models NPE 150S July 11 15 2 30 Warranty Change Add NSS Hotline Number November 8 16 2 22 Reviewed by Albert Choi Revisions ...

Page 5: ...ror 94 5 1 9 109Error 96 5 1 10 110Error 98 5 1 11 407Error 99 5 1 12 421Error 100 5 1 13 432Error 101 5 1 14 434Error 102 5 1 15 438Error A models only 105 5 1 16 439Error 107 5 1 17 441Error 110 5 1 18 445Error 110 5 1 19 515Error 113 5 1 20 517Error 114 5 1 21 593Error 114 5 1 22 594Error 115 5 1 23 615Error 115 5 1 24 736Error 116 5 1 25 782Error 116 5 1 26 740Error 117 5 1 27 760Error 117 5 1...

Page 6: ...and Return Policy procedures previously provided to Installer and as is available on Navien s website Such policies include but are not limited to the Installer s failure to first contact Navien Technical Support while in front of the product for purposes of trouble shooting the identified problem or issue Use of the NPE Series Water Heater for space heating only purposes shall void the warranty H...

Page 7: ...eration of the rating plate OtherTerms This Limited Warranty is subject further to the terms and conditions set forth herein and as may be further specified in the Terms and Conditions page located on Navien s website at www navien com WITH THE EXCEPTION OF THIS LIMITED WARRANTY NAVIEN DISCLAIMS ANY OBLIGATION OR LIABILITY WITH RESPECT TO THE PRODUCTS OR THEIR SALE AND USE AND NAVIEN NEITHER ASSUM...

Page 8: ...AP Air Pressure APS Air Pressure Sensor DHW Domestic Hot Water FM Fan Motor GARC Gas Air Ratio Control GPM Gallons Per Minute GV Gas Valve Main and Solenoid MGV Main Gas Valve RPM Revolutions Per Minute WAV Water Adjustment Valve PCB Printed Circuit Board EMI Electromagnetic Interface HTL High Temperature Limiter Abbreviations and Definitions ...

Page 9: ...tructions The following symbols are used throughout the instructions to bring attention to important information concerning the appliance IMPORTANT Warns of a risk of damage and environmental pollution NOTE Indicates additional information that is important but not related to personal injury or property damage 1 4 Safety Precautions DANGER FLAMMABLE MATERIALS Keep the area around the water heater ...

Page 10: ...nt Notify your plumbing heating contractor from the outside of the building DANGER FLAMMABLEVAPORS Vapors from flammable liquids will explode and catch fire causing death or severe burns Do not use or store flammable products such as gasoline solvents or adhesives in the same room or area near the water heater Keep flammable products far away from the water heater in approved containers tightly cl...

Page 11: ...ter heater is serviced Read all related information in the Installation Manual The Water Heaters must be installed according to all local and state codes or in the absence of local and state codes the most recent edition of the National Fuel Gas Code ANSI Z223 1 NFPA 54 in the USA or the National Gas and Propane Installation Code CAN CSA B 149 1 in Canada Massachusettscoderequiresthiswaterheaterto...

Page 12: ... shock WARNING GASTYPE and ACVOLTAGE ThiswaterheaterisconfiguredforNaturalGasfromthefactory If conversion to Propane Gas is required the conversion kit supplied with the water heater must be used Be sure to use 120 VAC 60 Hz minimum 2 A current Using abnormally high or low AC voltage may cause abnormal operation and may reduce the life expectancy of this product If the unit does not match requirem...

Page 13: ...peration Do not use unapproved replacement or accessory parts Doing so may result in improper or dangerous operation and will void the manufacturer s warranty Do not place anything in or around the vent terminals such as a clothes line that could obstruct the air flow in or out of the water heater This water heater has been approved for use in the USA and Canada only Using the water heater in any ...

Page 14: ...ition Transformer Burner Primary Heat Exchanger Secondary Heat Exchanger Flow Sensor Condensate Trap Front Panel PCB Box Water Adjustment Valve Water Inlet Filter Power Switch Condensate Drain Fitting Condensate Drain Lid Fan Motor Dual Venturi Gas Pipe High Limit Switch APS Air Pressure Sensor Buffer Tank Circulation Pump Gas Valve Gas Inlet Fitting DHW Supply Fitting 2 Way Valve Recirculation In...

Page 15: ...ger Flow Sensor Condensate Trap Front Panel PCB Box Mixing Valve Water Inlet Filter Power Switch Condensate Drain Fitting Condensate Drain Lid Fan Motor Dual Venturi Gas Pipe High Limit Switch APS Air Pressure Sensor Gas Valve Freeze Protection Switch Gas Inlet Fitting Water Adjustment Valve DHW Supply Fitting NPE 180S 210S 240S Refer to components Diagram and Part List in page 133 ...

Page 16: ...ary Heat Exchanger Secondary Heat Exchanger Flow Sensor Condensate Trap Front Panel PCB Box Mixing Valve Water Inlet Filter Condensate Drain Fitting Condensate Drain Lid Fan Motor Single Venturi Gas Pipe APS Air Pressure Sensor Gas Valve Freeze Protection Switch Gas Inlet Fitting Water Adjustment Valve DHW Supply Fitting NPE 150S ...

Page 17: ... Wall Hung Venting Type Forced Draft Direct Vent Ignition Electronic Ignition Water Pressure 15 150 PSI Natural Gas Supply Pressure from source 3 5 in WC 10 5 in WC Propane Gas Supply Pressure from source 8 in WC 13in WC Natural Gas Manifold Pressure min max 0 04 in WC 0 40 in WC 0 04 in WC 0 84 in WC 0 05 in WC 0 36 in WC 0 05 in WC 0 58 in WC Propane Gas Manifold Pressure min max 0 05 in WC 0 42...

Page 18: ...nections Description Diameter A Air Intake 2 B Exhaust Gas Vent 2 C Hot Water Outlet 3 4 D Recirculation Inlet A models only 3 4 E Cold Water Inlet 3 4 F Gas Inlet 3 4 G Condensate Outlet 1 2 OverheadView 3 0 77mm 6 7 170mm 4 5 115mm 0 4 10mm 1 5 38mm 14 3 364mm 2 6 67mm A B Supply Connections 13 2 336mm 2 3 60mm 3 0 77mm 8 3 212mm 17 3 440mm 2 4 61mm 2 4 61mm C F D G E ...

Page 19: ... Exchanger Buffer Tank Flow Sensor Domestic Water Supply Hot Water Supply Check Valve Water Adjustment Valve 2 Way Valve Open Circulation Pump Internal Recirculation Mode Primary Heat Exchanger Secondary Heat Exchanger Buffer Tank Flow Sensor Domestic Water Supply Hot Water Supply Recirculation Water Supply Check Valve Water Adjustment Valve 2 Way Valve Closed Circulation Pump External Recirculati...

Page 20: ...System Details 19 NPE 150S 180S 210S 240S Mixing Valve Flow Adjustment Valve Flow Sensor Hot Water Supply Cold Water Supply Primary Heat Exchanger Secondary Heat Exchanger ...

Page 21: ...or 0 53 gpm 120v Power Applied System Initialization Displays version Standby Mode Fan start up Fan control Stage 1 or Stage 2 Dual venturi OFF Stage 1 Dual venturi ON Flame ON Yes IG OFF Flame check time 3 sec Burner Operation Flow sensor 0 48 gpm NO NO Yes MGV1 OFF MGV2 OFF Post Purge Fan Stop Yes Stage 2 NO IG ON MGV1 ON MGV2 ON ...

Page 22: ...mperature and remote controls Freeze protection is activated as needed 4 3 Setting the DIP Switches The water heater has two DIP switch locations on the main circuit board PCB and on the front panel Each location has two sets of DIP switches that control the functionality of the water heater Set the DIP switches appropriately based on the installation environment and the gas type 4 3 1 Setting the...

Page 23: ... 760 error when the set time period has been reached to indicate a flush or service is necessary High Altitude Above 2 000 ft 610 m the water heater will de rate by 4 for each 1 000 ft 305 m of altitude gain Internal Recirculation No Recirculation 1 ON 2 OFF 3 OFF External Recirculation No Recirculation 1 OFF 2 ON 3 OFF Intelligent Preheating No Recirculation 1 ON 2 ON 3 OFF Recirculation Mode Ext...

Page 24: ... settings are controlled by the DIP switch settings on the master unit When installing an NPE water heater with NR NP or CH series units individual unit settings apply to the lime alarm and cascade venting 2 switch Panel Switch Function Setting 1 Cascade Vent Common Vent 1 OFF Individual Vent 1 ON 2 Gas Type Applies to Main PCB Front panel version V1 4 July 11 2013 or later versions only Natural G...

Page 25: ... sufficient inlet gas pressure Measuring the inlet gas pressure should be performed by a licensed professional only The inlet gas pressure must be maintained between 3 5 and 10 5 WC for natural gas and between 8 0 and 13 WC for liquefied propane The appliance and its individual shutoff valve must be disconnected from the gas supply piping system during any pressure testing of that system at test p...

Page 26: ... 080 1 950 1 840 1 630 3 11 300 7 780 6 250 5 350 4 740 4 290 3 950 3 670 3 450 3 260 2 890 4 23 100 15 900 12 700 10 900 9 660 8 760 8 050 7 490 7 030 6 640 5 890 in Cubic Feet ft3 per Hour 0 60 Specific Gravity 3 0 WC Pressure Drop Contact your gas supplier for BTU ft3 ratings Use 1 000 BTU ft3 for simplified calculations This table is recommended for supply pressures of 6 WC or greater Pipe Siz...

Page 27: ...85 175 155 140 129 1 1 150 787 632 541 480 434 400 372 349 330 292 265 243 1 1 4 2 350 1 620 1 300 1 110 985 892 821 763 716 677 600 543 500 1 1 2 3 520 2 420 1 940 1 660 1 480 1 340 1 230 1 140 1 070 1 010 899 814 749 2 6 790 4 660 3 750 3 210 2 840 2 570 2 370 2 200 2 070 1 950 1 730 1 570 1 440 NOTE For installations using CSST flexible gas piping please refer to the sizing charts provided by t...

Page 28: ...dwich effect Quicker hot water delivery to fixtures which results in less water wasted NOTE When using external recirculation mode with the built in pump observe the following maximum recirculation pipe lengths including fittings 3 4 pipe is recommended 1 2 Copper Pipe 100 30m of equivalent length 3 4 Copper Pipe 500 150m of equivalent length Lengths in excess of these limits will require a proper...

Page 29: ...er heater to EXT 3 Set the front panel DIP switches at the far left set of ten to 1 OFF 2 ON 1 2 3 4 5 6 7 8 9 10 ON ON The following diagram shows the external recirculation flow for pre heating External Recirculation Mode Primary Heat Exchanger Secondary Heat Exchanger Buffer Tank Flow Sensor Domestic Water Supply Hot Water Supply Recirculation Water Supply Check Valve Water Adjustment Valve 2 W...

Page 30: ...ment or accessories who is experienced in such work familiar with all precautions required and has complied with all of the requirements of the authority having jurisdiction In Canada The conversion shall be carried out in accordance with the requirements of the provincial authorities having jurisdiction and in accordance with the requirements of the CAN B149 1 and CAN1 B149 2 Installation Code To...

Page 31: ...re natural gas ONLY 3 Once the front cover is removed place it in a safe location to prevent accidental damage With the internal components exposed locate the gas inlet pipe and the Gas Valve near the left side of the unit which are highlighted in Figure 2 4 Use a Phillips screwdriver to remove the two screws at Location A the connection below the Gas Valve where it connects to the pipe See Figure...

Page 32: ...proceeding to the next step 8 Replace the gas inlet pipe to its original position and use all screws to secure all connections Note Do not overtighten as this may damage or crack the components DANGER Inspect the O ring between the gas valve and gas valve inlet adapter whenever they are disassembled The O ring must be in good condition and must be installed Failure to comply will cause a gas leak ...

Page 33: ...Using a 5 32 in or 4 mm Allen wrench turn the set screw no more than 1 4 turn clockwise to raise or counterclockwise to lower the CO2 value Figure 8 Set Screw Location Note The set screw is located behind the screw on cover This must be removed first 1 2 NG 1 2 LP 1 2 3 1 2 4 5 6 7 8 9 10 ON ON DANGER When conversion is required be sure to set the Front Panel DIP switches according to the supply g...

Page 34: ... calorifique Max 180 000 Min 19 900 BTUh Conversion Kit No NAC 02 Inlet Gas Pressure Pression d entrée du gaz Min 8 0 to Max 13 0 inches with Kit No ________________________ This water heater was converted on name and address of organization making this conversion who accepts responsibility for the correctness of this conversion ______ ______ ______ to ____________ gas by _________________________...

Page 35: ... it a Error g Master Unit A code will appear on the display Cascade operation b Hot Water Recirculation h Display Recirculation Mode c Diagnostics button i Up button For installers only Increases the temperature d Information button j Down button Shows basic information Decreases the temperature e Reset button k Power button Resets the water heater When an error occurs Turns the water heater on or...

Page 36: ...irculator and any external circulating pumps are off NOTE If a hot water faucet is open you can adjust the temperature only from 98 110 F 37 43 C 2 Press the Up or Down buttons until the desired temperature appears on the display You can adjust the temperature while the display is flashing Once the display stops flashing the temperature setting is stored NOTE The water heater will retain your sett...

Page 37: ...onds HIGH appears on the display To exit Commercial Mode Press the up and down button simultaneously for 10 seconds LoW appears on the display NOTE To adjust the temperature press the up button for 5 seconds to adjust in 10 F 5 C increments CommercialWarranty Applies when this mode is used Refer to the Warranty for more details 4 7 4 Viewing Basic Information To view information about the water he...

Page 38: ...tion flashing Error history off Combustion icon Displays during a combustion cycle The combustion icon flashes at intervals of 1 second when the water heater is operating to prevent freezing Flame signal state display Master icon Displayed on the Master unit in a cascade system Master ON Slave OFF On at Master Segment Displays data according to each setting and display condition on 4 segments IN O...

Page 39: ... Diagnostic PLUS long key 5 sec Cascade assigns master unit and completes set up Possible at Normal mode Diagnostic MINUS long key 2 sec Cascade assigns slave unit Diagnostic RESET long key 5 sec Cancels cascade operation from master unit removes individual slave unit from cascade system Possible at Normal mode with Cascade operation activated Diagnostic POWER long key 5 sec Cascade system power A...

Page 40: ...d on the AHU outdoor temperature will be displayed and when space heating is off DHW temperature setting will be displayed 4 When an alarm occurs the A 760 code and the setting temperature are toggled and displayed at intervals of 1 second 5 While an alarm occurs press the Reset button for over 2 seconds to display RST and then release the alarm 6 When a level1 error occurs the error icon flashes ...

Page 41: ...ser Info Service Info Error History and Component Test mode 6 Press the RESET button once with the error code displayed to reset the water heater The front panel will display RST for 3 seconds and then release the error if the cause of the error has been resolved 7 If it is impossible to release the error the error code will display after 3 seconds 4 7 12 Hot water temperature setting 1 At the Nor...

Page 42: ... Data 2 Whenever the button is pressed the Information Data item can be selected and displayed 3 The data items being currently outputted are displayed by an LED ICON Flow rate GPM LPM leaving water temperature OUT entering water temperature IN 4 Press the Reset button once to return to the Normal operation mode 5 If there is no button input for 5 minutes it automatically returns to the Normal ope...

Page 43: ...ssed time display The time between the currently displayed error and the just previously generated error is displayed in 1 hr unit 0 is displayed if the error code is empty Ex When the most recent error code is 615 the sub error code is 5 and 24 hours have passed since the error was generated When the Sub Error Code is 0 i e there is no sub error code the display is as follows 4 7 15 Service infor...

Page 44: ...d 100 Fully opened 0 display of the valve close ratio in percentage ex When closed 24 F Mixing valve condition Mixing valve condition display Fully closed 0 Fully opened 56 A models S models display of the valve close ratio in percentage ex When closed 46 G Heat exchanger flow rate Calculated value by the mixing valve open condition from the total flow rate For A models this flow will be the same ...

Page 45: ...resents the type of unit ex Capacity 180 Condensing M Recirculation setting information 2nd letter Pump I Internal Pump E External Pump B Both Internal External Pump 3rd 4th letters Circulation Intelligent Preheat EC External Circulation IC Internal Circulation IT Intelligent Preheat Displays the recirculation mode that has been selected on the front panel Preheating not working Internal pump inte...

Page 46: ...ts Ex 8 units working O Cascade information Cascade ON OFF condition display Individual Master Slave number and operation condition display Segment display ID o ON X OFF CASCADE OFF CASCADE ON MASTER UNIT standby ON CASCADE ON MASTER UNIT standby OFF CASCADE ON SLAVE UNIT standby ON ex ID 12 CASCADE ON SLAVE UNIT standby OFF ex ID 12 P Information on gas type Displays the current gas panel version...

Page 47: ...ter versions only OUT temperature display ex 120 F S Heat exchanger inlet temperature Display of the current inlet temperature Applies to Front panel version V1 6 July 23 2013 or later versions only IN temperature display ex 120 F T AHU outdoor temperature Displays the current AHU outdoor temperature AHU Off or AHU Outdoor Off AHU On AHU Outdoor On ex 120 F U Heating temperature based on the AHU o...

Page 48: ...mode after operation ends Excluding the Dual Venturi Test 6 During the component check operation a test is automatically performed without pressing additional buttons except for Dual Venturi test 7 The Dual Venturi Test function is to perform an On Off manual operation test with the buttons and if the Reset button is pressed or there is no key input for 5 minutes then it returns to the D VEN displ...

Page 49: ...reases decreases the operation condition and flashes at intervals of 500msec If the condition is not changed for 3 seconds it works at the displayed operation condition NORMAL operation condition 1 stage MIN 1 stage MAX 2 stage MIN 2 stage MAX NORMAL operation condition 3 If the Reset button is pressed once then it returns to the TEST INFORMATION MENU MODE Displayed as the previously entered item ...

Page 50: ...the DHW temperature exceeds 131 F 55 C the mixing valve operates to limit the temperature to 131 F 55 C Off Mixing valve control is not in use fully closed at all times 4 7 20 Initial setting of a cascade system 1 At the Normal operation mode press the Diagnostic PLUS button for over 5 seconds to set the current water heater as the MASTER unit and to enter Cascade setup mode 2 Once in Cascade setu...

Page 51: ...into the MASTER unit cancel the CASCADE SYSTEM and then repeat the CASCADE SYSTEM initialization procedure as described previously 4 7 23 Cascade system Slave unit addition Configuration with NPE units only 1 In order to add an additional slave unit connect a Ready Link communication cable to the new unit and wait for the MASTER unit to automatically recognize the new unit The slave unit will auto...

Page 52: ... the Down buttons simultaneously for two seconds 6 The master water heater periodically scans for slave water heaters and assigns IDs 1 15 to the corresponding units in order 7 For NR NP or CH units a model specific configuration may be used to complete the master unit configuration 8 For details about slave ID assignment see page 50 NOTE Ensure that you have properly configured the cascade protoc...

Page 53: ...t Valve Feedback M WAV BR O R B Y R W BK Pump Y W M Dual Venturi W BR B IG Spark Electrode Flame Rod BR B BK FM Fan Motor R OW Y BK MGV Main Gas Valve W Y R BK Neutral W Hot BK Ground GY GY Power Cord W Fuse 5A Power Switch GY GY Ground Pump Y W Ground External Color Code B O R W Y BK BR GY Blue Orange Red White Yellow Black Brown Green Yellow A B C D E F G H K J L I If any of the original wires a...

Page 54: ...l Venturi W BR B IG Spark Electrode Flame Rod BR B BK FM Fan Motor R OW Y BK MGV Main Gas Valve W Y R BK Neutral W Hot BK Ground GY GY Power Cord W Fuse 5A GY GY Ground Pump Y W Ground External Color Code B O R W Y BK BR GY Blue Orange Red White Yellow Black Brown Green Yellow A B C D E F G H K J L I Optional If any of the original wires as supplied with the water heater must be replaced they must...

Page 55: ...low Control DC15V UART Communication Interface Ready Link Interface Ready Link Fan Hall Sensor Outlet Thermistor 2 Inlet Thermistor 1 Inlet Thermistor 2 Outlet Thermistor 1 Exhaust Thermistor EXT_PUMP FRONT PANEL Communication Interface Relay 3 Relay 2 Relay 4 Driving Circuit MGV1 MGV2 Relay 1 FSA Power Switch Flame Rod 150V PWM EMI FILTER DC5V H T L WD PSS SMPS Primary Secondary 3 15A NPE 180A 21...

Page 56: ...rface Ready Link Fan Hall Sensor Outlet Thermistor 2 Inlet Thermistor 1 Inlet Thermistor 2 Outlet Thermistor 1 Exhaust Thermistor EXT_PUMP FRONT PANEL Communication Interface Relay 3 Relay 2 Relay 4 Driving Circuit MGV1 MGV2 Relay 1 FSA Power Switch Flame Rod 200V PWM EMI FILTER DC5V H T L WD PSS SMPS Primary Secondary 3 15A Water Mixing Valve Flow Control Flow Control NPE 180S 210S 240S only NPE ...

Page 57: ...Version 2 21 56 NPE Service Manual 4 10 Electrical Diagnostic Points ...

Page 58: ...ixing Valve position BLUE BROWN ORANGE YELLOW PULSE Check Pulse F Flame Rod BLACK 0 10 uA Measure the current when the burner is operating G Fan Motor BLACK RED DC 127V 184 V Confirm steady voltage BLACK YELLOW DC 15 V Confirm steady voltage BLACK ORANGE DC 0 7 5 V Voltage changes relative to fan operation BLACK WHITE 0 rpm 6500 rpm Check PULSE H Pump YELLOW WHITE ON AC 96 138 V Confirm voltage as...

Page 59: ... of the unit Failure Event Malfunctioning PCB Effects A component may not operate within the unit and could produce an error code In most cases of PCB failure the whole unit will not operate until the problem is resolved Error Code E515 E615 Diagnostic Visual inspection Connection and or breakage of wires and or burn marks on the PCB Color Number of wires 25 see page 40 ...

Page 60: ...6 F or 92 C in heat exchanger will activate the high limit switch Failure Event Unable to detect excessively high water temperature if switch fails Effects Unable to shut down the water heater if the water temperature from the heat exchanger exceeds 197 6 F 92 C Error Code E016 E046 Diagnostic 1 Visual inspection Connection and or breakage of wires 2 Resistance check Check range of resistance show...

Page 61: ...ot water Error Code E047 E407 E421 E432 E441 Diagnostic 1 Visual inspection Connection and or breakage of wires 2 Check the resistance of the sensor Stop operating and lower the temperature before checking Color Number of wires Resistance range Please refer to the table below Temp F Thermistor kΩ Exhaust LimitTemperature Sensor kΩ 32 40 17 9 25 4 113 6 180 7 40 50 14 5 20 3 89 2 139 5 50 60 11 4 1...

Page 62: ...mbly screw is loose and or the fan is disassembled 3 Disconnected or defective fan connection terminal assembly Effects 1 Unstable combustion condition 2 Unit vibrating and noise 3 The water heater is not operating properly Error Code E109 E110 Diagnostic 1 Visual inspection check the fan connection wire and or the fan mounting location 2 Voltage check Check range of voltage shown below Color Numb...

Page 63: ...o ignite during the ignition process 2 Produces multiple unsuccessful attempts to ignite Effects 1 The unit cannot ignite during the ignition process and E003 or E004 error codes will display 2 Durability of the igniter wears down Error Code E003 E004 E012 Diagnostic Visual inspection Connection and or breakage of wires Color Number of wires BLACK 0 10 uA Bracket Flame rod Igniter Gap distance 3 5...

Page 64: ...multiple unsuccessful attempts to ignite Effects 1 The unit cannot ignite during the ignition process and E003 or E004 error codes will display 2 Durability of the igniter wears down Error Code E003 E004 Diagnostic 1 Visual inspection Connection and or breakage of wires 2 Voltage check Check range of voltage shown below Color Number of wires Blue On AC 97 138 V Off 0 V Input Voltage Output Voltage...

Page 65: ... Effects 1 The water heater is not operating 2 Produces excessive carbon monoxide emissions Error Code E110 Diagnostic 1 Visual inspection Connection and or breakage of wires 2 Voltage check Check range of voltage shown below 3 Check the exhaust duct for obstruction or blockages 4 Check the condensate trap and drain piping for obstruction or blockages 5 Check for decreased hot water output Color N...

Page 66: ...lly and prevents unsafe situations Failure Event Unable to open close Effects 1 No flames 2 No operation of the unit Error Code E003 E012 Diagnostic 1 Visual inspection Connection and or breakage of wires 2 Voltage check Check range of voltage shown below Color Number of wires RED YELLOW DC 22 24 V WHITE RED DC 22 24 V Test Pout with manometer for specified pressure range to ensure that the Gas Va...

Page 67: ... initialize sustain combustion 2 Dust or soot deposit on the burner surface 3 Possible gas leakage from burners Effects 1 Abnormal combustion 2 Unstable flame conditions and or flame loss 3 Ignition failure Error Code E003 E004 E012 Diagnostic Visual inspection Excessive deposits on the burner surface and or unstable flame conditions during operation Color Number of wires N A Fuel Gas Supply Combu...

Page 68: ...not operating properly 2 Abnormal flow detected during normal operation E434 displayed 3 Temperature fluctuations at the hot water outlet Error Code E434 Diagnostic 1 Visual inspection Connection and or breakage of wires Clean the Domestic cold water inlet filter 2 Voltage check Check range of voltage shown below Color Number of wires RED BLACK DC 12 V WHITE BLACK Start position DC 0 V Any open po...

Page 69: ...y hot water temperatures Failure Event 1 Unable to detect or measure water flow rate 2 Damage to and or water leakage from the water flow sensor Effects Ignition sequence does not start Error Code E439 Diagnostic 1 Visual inspection Connection and or breakage of wires 2 Visual Inspection Check for damage and or scale formation on sensor ...

Page 70: ... Failure Event 1 Water and or exhaust gas leakage through a crack 2 Improper heat transfer can cause the water in the heat exchanger to boil due to possible scale formation Effects 1 Exhaust gas leakage 2 Excessive heating of the water that produces boiling noises Error Code E016 E030 E047 Diagnostic 1 Visual inspection Check if there is a crack on the surface of heat exchanger 2 Sound inspection ...

Page 71: ...ber which minimizes heat loss Failure Event 1 Water and or exhaust gas leakage through a crack 2 Improper heat transfer can cause the water in heat exchanger to boil Effects 1 Exhaust gas leakage 2 Excessive heating of the water that produces boiling noises Error Code E016 E030 E047 Diagnostic 1 Visual inspection Check if there is a crack on the surface of heat exchanger 2 Sound inspection Check i...

Page 72: ...d to operate without a minimum flow rate with the use of the internal circulation pump Failure Event Cracking and or water leakage due to wear Effects Temperature fluctuations in the hot water outlet and or leaking Error Code N A Diagnostic Visual inspection Check the mini buffer tank for any cracks Color Number of wires N A ...

Page 73: ...lure Event Unable to detect or measure water flow rate when the pump is called to operate Effects 1 The water heater freezes 2 Temperature fluctuations when the water heater is set to internal recirculation 3 Hot water is not quickly available at fixtures when the water heater is set to external recirculation Error Code E438 Diagnostic 1 Visual inspection Check the circulation pump connection wire...

Page 74: ...heat exhaust limit sensor shuts down the unit when the flue temperature exceeds 230 F 110 C for more than 10 seconds Turn OFF the system for at least 30 minutes then restart Clean the inlet water filter Check exhaust thermistor and verify K value in DIAGNOSTIC mode Check for proper dipswitch settings Check the water adjustment valve Check the heat exchanger a flush may be necessary E047 1 Abnormal...

Page 75: ...Abnormal Hot water inlet2 thermistor Short Replace the thermistor E445 1 Abnormal mixing valve Open Check the mixing valve 2 Abnormal mixing valve Close E515 1 7 Abnormal communicatin between PCB and Ignitor Check the PCB 8 Abnormal communication between PCB and Ignitor Check the PCB connection Check the Ignitor 9 Abnormal communication between PCB and FAN Check the PCB connection Check the Fan 10...

Page 76: ...erature sensor Open appears only when the outdoor reset curve is enabled 1 Ensure that the outdoor reset curve is configured properly 2 Check the outdoor temperature sensor wiring connection 2 Abnormal outdoor temperature sensor Short appears only when the outdoor reset curve is enabled E760 0 Flushing service alarm A heat exchanger flush is necessary E782 0 Abnormal Main Panel communication Check...

Page 77: ...eck the flame rod wiring and grounding 6 Check if the air pressure hose is broken or clogged 7 Check if the air pressure sensor works properly 8 Check the PCB DIP switch settings 9 Adjust the offset pressure see page 29 10 Check the gas orifice plate for the proper gas type 11 Check the flue and air supply for any collected water for vertical vent installations 12 Tighten the ground connection scr...

Page 78: ...odel low gas pressure can cause Ignition Failure Normal gas pressure 8 0 13 0 w c NO NO NO Yes Yes Yes Is gas valve operating normally Does the main gas valve have proper voltage Is gas valve open Scenario3 Restart unit Check connector 1 of CON10 Clean or replace the flame rod Check whether ground circuit is properly installed Check the current 1 of CON 10 1 20μA see page 52 for Wiring Diagram NO ...

Page 79: ...tage MAX combustion setting DIP S W 1 1 ON 5 If a CSST connector has been used check to ensure that it is not been overtightened resulting in the seal obstructing gas flow 6 Check the meter class Example Gas meter Water heater Furnace Domestic gas stove 425 CFH Gas Meter 195 CFH Water Heater 58 8 CFH Furnace 63 7 CFH Domestic gas stove 1 CFH 1 020 Btuh Digital pressure manometer Check gas supply p...

Page 80: ... is a discharge of electricity from the metallic part of the burner Ensure that the insulating gasket is installed between the electrode and burner casing Check the input power to the ignition transformer AC 102 132 V If there is sufficient power to the ignition transformer replace the ignition transformer Replace the PCB if there is no power or insufficient power supplied to the ignition transfor...

Page 81: ...the voltage of the solenoid valve White Yellow White Red Repeated ignition out Flame sensing error 1 Check the location of the flame if there is any deformation or foreign substance repair or replace the part 2 Check the flame rod wire for proper connection and or damage 3 Check the grounding to the water heater case to verify proper grounding at the outlet If the ground wire is improperly connect...

Page 82: ...tinues despite checking above items replace the PCB 5 1 2 004Error Error occurrence conditions and check items Error Description E04 False flame detection 1 Pre ignition false flame If a flame signal is detected continuously for 3 seconds before combustion stand by pre purge pre ignition a false flame error 04E automatically cleared is displayed on the front panel and the system performs continuou...

Page 83: ...gas valve Replace the gas flame if flame occurs before combustion or if there is remaining flame after combustion is stopped Error before after combustion Discharge of electricity from electrode Spark discharges from electrode to flame sensor at ignition Replace or correct location of flame detecting rod Gas valve Gas may leak as the main gas valve is pushed by the gas supply over the standard pre...

Page 84: ...front panel Check items 1 Measure with a manometer the gas supply pressure NG 3 5 10 5 W C LP 8 13 0 W C 2 Check the Gas meter Capacity 3 Tighten the ground connection screws on heat exchanger Check the flame detection AD value for proper resistance refer to page 42 43 4 Check if the gas orifice is clogged 5 Check if the PCB is working properly Check connector 1 of CON10 see page 52 for Wiring Dia...

Page 85: ...ssure Gas supply pressure during stand by Check the dynamic pressure Gas supply pressure at 2nd stage MAX combustion setting DIP S W 1 1 ON MAX combustion 3 Check the gas pipe connector If a CSST connector has been used check to ensure that it is not been overtightened resulting in the seal obstructing gas flow 4 Check the gas meter capacity Example Gas meter Water heater Furnace Domestic gas stov...

Page 86: ...Troubleshooting 85 ...

Page 87: ...PE 240A NPE 240S NG 0 04 0 01 LP 0 02 0 01 Check the offset values for low fire Offset value for low fire Flame Rod Electrode Replace the electrode or clean the fire detecting electrode Cause Due to the properties of the electrode the oxide film is created due to long term exposure to the high temperature therefore errors may be caused in detecting the fires Check up Use sandpaper to clean the fir...

Page 88: ...be checked Fasten the ground screw 2EA after fastening the assembly screw 3EA in the front of the heat exchanger Location of assembly screw and ground bolt in heat exchanger Defected metal fiber 1 Check the presence of debris in the metal fiber 2 Check the sagging of the metal fiber and then the gaps with the electrode Gap between the electrode and metal fiber 12mm Flame loss during 2nd stage Bloc...

Page 89: ...Out and performs post purge continuously and operates the pump Check items 1 Check if the overheat controller is working properly Check resistance value or continuity refer to page 59 2 Check the hot water temperature sensor refer to page 60 Measuring should be done at least 30 minutes after error Check connector 1 and 2 of CON 6 Replace HTL 1 step Flushing Clean Filter 2 step Try to restart Check...

Page 90: ...controller Check if the overheat controller wire is disconnected Normal 0 3Ω Temperature sensor error Defective hot water output temperature sensor 1 If the hot water temperature is sensed lower than it actually is due to a defective sensor check if the deviation of temperature is large due to a defective temperature sensor Check the output temperature displayed on the front panel 2 Measure the te...

Page 91: ...E 150 1 2 3 4 ON 1 2 3 4 5 6 ON NPE 180 1 2 3 4 5 6 ON NPE 210 1 2 3 4 5 6 ON NPE 240 1 2 3 4 5 6 ON 2 switch Panel Switch Function Setting 1 Cascade Vent Common Vent 1 OFF Individual Vent 1 ON 2 Gas Type Natural Gas 2 OFF Propane Gas 2 ON 1 2 3 4 5 6 7 8 9 10 ON ON ON 1 2 3 4 1 2 3 4 5 6 ON DIPS W1 1 DIPS W1 2 Primary heat exchanger overheated The surface temperature rises due to heavy scale depo...

Page 92: ...of 230 F 110 C for 10 minutes or over E030 error code will display and perform post purge Automatically cleared 2 When the controller detects the exceeding temperature of 140 F 60 C while performing post purge Manually cleared 3 When the conroller detects the exceeding temperature of 230 F 110 C for 10 seconds or over three times or more after the error is automatically cleared Manually cleared Ch...

Page 93: ... exchanger if it is damaged or cannot be unclogged Defective part Defective overheat controller Defective contact point of the exhaust gas overheat controller 230 F 110 C Max Check connection of the overheat controller If the resistance is abnormal replace the temperature sensor refer to page 60 Check the output temperature displayed on the PCB Check if the hot water temperature sensor is open Err...

Page 94: ...ep Replace PCB Yes Yes Is heat exchanger thermistor normally operating Is resistance within normal range refer to page 59 NO NO 5 1 7 047Error Error occurrence conditions and check items Check connector 9 and 10 of CON6 Replace exhaust thermistor Resistance between 9 and 10 of CON6 is from 2kΩ to 300kΩ at normal condition see page 52 for Wiring Diagram NO Is exhaust thermistor operating normally Y...

Page 95: ...ms 1 Check that the Dual Venturi is operating correctly 2 Check that the wiring harness is connected correctly and the cables are not damaged Replace the controller Is Dual venturi OFF Reset the Unit Yes Yes Replace the Dual venturi NO NO Is Dual venturi closed Is Dual venturi repeatedly open and closed Replace the controller Is Dual venturi ON Reset the Unit Yes NO Yes Check the Dual venturi wire...

Page 96: ... until Fan Auto Adjusting is complete 4 Enter the Dual Venturi Test Mode and perform a test 1 Repeat the test at least twice Turning the unit ON and OFF once makes one test cycle ON OFF ON OFF is the minimum sequence 2 Confirm that the Dual Venturi is operating correctly a Listen to the Dual Venturi while it is running and check for operational noise clicks at unit ON and unit OFF b If operational...

Page 97: ...e sensor should be normal Check items 1 Check if the fan motor works normally using the component test mode refer to page 47 2 Check the power supply to the fan Black Red approx DC 127 184 V 3 If RPM is significantly low while the fan works and the power supply is normal replace the fan motor 4 If the fan connector is wet due to any reason including leakage take corrective action by powering the u...

Page 98: ...r supply is normal Follow the instructions listed below and replace the fan 1 Unplug the power cable to the unit and then wait for 10 seconds until the remaining SMPS voltage completely discharges 2 Disconnect the fan cable and then re connect it 3 Plug the power cable and turn on the unit 4 Fan Auto Adjusting verifies error conditions for error code E109 If an E109 error occurs enter the Fan Test...

Page 99: ... is not up the standard value Check items 1 Check if the venturi burner hole is clogged 2 Check if the condensation drain line or the drain is clogged 3 Check the flue and exhaust to verify proper installation and clearances Circulation of exhaust gas generates noise 4 Check if the air supply exhaust flue is clogged rainwater may collect inside from an improperly installed air supply exhaust pipe ...

Page 100: ...Defective air supply exhaust flue Deformed or clogged flue 1 Check the exterior of the flue for damage and obstructions 2 Check if rainwater is collected due to vertical installation of the air intake pipe Exhaust gas flows in through the supply pipe If the exhaust gas enters into the air supply pipe abnormal combustion may cause E110 Check the installation of the flue 5 1 11 407Error Error condit...

Page 101: ...B Check connector 1 and 2 of CON 7 Replace inlet thermistor Resistance between 1 and 2 of CON7 is from 0 437kΩ to 176kΩ at normal condition see page 52 for Wiring Diagram NO Is the inlet thermistor normal Yes Check method Fault Possible Causes Check method Defective sensor Defective temperature sensor connector Check if the temperature sensor is open and if the connector is connected properly Temp...

Page 102: ...es shutdown mode Check items 1 Check if the cold water temperature sensor is open and if the connector is attached properly 2 Check the defect of the cold water temperature sensor 3 Defective PCB Before measuring resistance of the thermistor detach the connector from the PCB Check connector 5 and 6 of CON 7 see page 52 for Wiring Diagram Replace the secondary heat exchanger inlet thermistor Resist...

Page 103: ...back sensor water adjustment valve or PCB board the system displays 434E cleared automatically manually only when in CASCADE mode Water adjustment valve error The system commands opening of the water adjustment valve but the valve remains closed Check the feedback sensor Cleared manually If the Water adjustment valve sensor open short circuit is detected the system displays an error message If flo...

Page 104: ...e Component Test mode refer to page 47 2 If the PCB is defective the motor keeps operating as the water adjustment valve is OPEN or CLOSED or the valve repeats open close 3 Replace the water adjustment valve for other symptoms 4 As a temporary measure you can disassemble the water adjustment valve open it manually and separate the power cable of the water adjustment valve Water heater works but er...

Page 105: ... water from the unit 2 Remove the top bottom clips of the water adjustment valve 3 Disassemble the motor and open the lid 4 Turn the water adjustment valve axis disk counterclockwise until it does not turn anymore 5 Pull out the water adjustment valve power connector 6 Reconnect power and start the unit while using hot water Turn the gear clockwise to open the valve manually Closed Position Open P...

Page 106: ...Defective pump Check water filter for debris Check for locked air in the pump 3 Defective PCB Check the operation of the pump and flow sensor using the Component Test mode refer to page 47 Check water flow sensor Check the PUMP resistance PanelTest operation mode PUMP operation Supply cold water to the water heater Reset the unit Check the voltage 1 and 3 of CON2 97 138VAC see page 52 for Wiring D...

Page 107: ...ater is discharged from the hot water tap Direct water temperature sensor Defective pump Defective pump 1 Check if the pump is working normally 2 Check the pump power cable connector and verify that the wiring is properly installed 3 Check the power supply to the pump AC 102 132 V 4 Check for air in the system Circulation pump Circulation pump wire Yellow White Other trouble Defective PCB If the i...

Page 108: ...as a defective flow sensor The system displays 439E cleared manually on the front panel and switches the unit operation into the Lock Out mode gas valve and ignition transformer locked Check items 1 Check the supply of cold water while the cascade system is disabled frozen locked valve 2 Defective flow sensor 3 Defective PCB Check flow sensor connector CON6 Clean water flow sensor Disable cascade ...

Page 109: ... the flow sensor 3 Check the input voltage of the flow sensor Operating voltage Black Red Defective PCB if DC 12 V is not supplied 4 Replace the flow sensor if no flow is detected while the operating voltage is normal Other trouble Defective PCB If the issue continues despite the checking of items above the PCB is defective Emergency measures for a defective flow sensor Replacement of the part is ...

Page 110: ...water from the unit then remove the 4 screws and retaining clips from the flow sensor 2 Detach the 2 wire connectors that connect the flow sensor to the PCB 3 Blow air through the flow sensor Check that the impeller rotates freely ...

Page 111: ...displays 445E cleared automatically manually Mixing valve error The system commands opening of the mixing valve but the valve remains closed Check the feedback sensor Cleared manually If a mixing valve sensor open or short circuit is detected the system displays an error message If flow is detected the system clears the error automatically and provides hot water If an open or short circuit is dete...

Page 112: ...e 47 2 If the PCB is defective the motor keeps operating as the mixing valve is OPEN or CLOSED or the valve repeats open close 3 Replace the mixing valve for other symptoms 4 As a temporary measure you can disassemble the mixing valve open it manually and separate the power cable of the mixing valve Water heater works but error occurs Defective mixing valve sensor 1 Open or short circuit of the fl...

Page 113: ... and drain water from the unit 2 Remove the top bottom clips of the mixing valve 3 Disassemble the motor and open the lid 4 Turn the mixing valve axis disk counterclockwise until it does not turn anymore 5 Pull out the mixing valve power connector 6 Reconnect power and start the unit while using hot water Turn the gear clockwise to open the valve manually Closed Position Open Position ...

Page 114: ...he POWER RESET switch 2 In that same case replace the Main PCB 1 Check the wire connection between dual venturi and Main controller 2 Check the dual venturi Number 1 2 or 10 Check the sub code number of E515 Number 3 or 4 Number 9 Number 11 or 12 Check method Fault Possible Causes Check method PCB or Electrical supply Defective PCB Replace the PCB if there is an error with the PCB internal circuit...

Page 115: ...conditions and check items Change the DIP S W to the proper settings Reset the unit Yes Are the DIP S W on the PCB properly set NO 5 1 21 593Error Error occurrence conditions and check items Replace front panel Reset the unit Yes Are the panel keys operating normally NO ...

Page 116: ...r Abnormal communication by PCB 1 Click the Reset button on Front panel 2 Turn the POWER to the unit OFF then ON Disconnect then reconnect power if necessary 3 If the system still displays E594 replace the main PCB 5 1 23 615Error Error occurrence conditions and check items Error Description E615 error Abnormal signal input by PCB Check items 1 Turn the POWER RESET switch OFF then ON or unplug and...

Page 117: ...set the unit Yes Is the Ready Link cascade cable properly installed on all units NO 5 1 25 782Error Error occurrence conditions and check items Reconnect panel to the PCB 1 step Reset the unit 2 step If problem persists replace the PCB and Front panel Yes Is the wiring from the front panel properly connected to the PCB NO ...

Page 118: ...ons and check items Error Description E760 Flushing Alram If the water heater operate more than set flushing time day The system displays the error message E760 on the front panel If this occurs the water heater operate with Normal Mode Check items 1 Check the water heate and flushing the water heate if it is required 2 Reset the timer with reset button on the front panel 5 1 28 785Error Error occ...

Page 119: ... 40 If noise occurs at standard value adjust setting above below the standard 2 Gas supply error due to defective air pressure sensor 3 If the same error is repeated it is due to a defective PCB Noise during combustion Boiling noise How to check boiling Boiling occurs if the water temperature rises to149 F 167 F 65 C 75 C The heat exchanger is clogged partially due to scale deposits Flush the main...

Page 120: ...ture sensor may not work be working properly Low hot water temperature Hot water setting error Check the hot water temperature setting on the front panel Water mixed with cold water The temperature of hot water at the tap is low while the temperature is high at the hot water outlet Cold water and hot water are mixed due to improper pipe installation Cold water and hot water are mixed due to improp...

Page 121: ...ve Check if the wire is fixed and properly attached on the main side of the heat exchanger Normal assembly Short circuit due to defective assembly Wiring near the heat exchanger Circuit breaker operates while the water heater is running If circuit breaker trips during the operation of the water heater check the order of operation and replace the concerned part e g The circuit breaker operates at s...

Page 122: ... a gas leak that must be corrected 7 Check the performance and operation after the water heater has been serviced To remove and replace any parts from the water heater you will need a screwdriver that is at least 8 10 inches long A flashlight and magnetic tip are also recommended Navien recommends the use of a parts tray to hold small parts and screws All of the hardware is essential to the proper...

Page 123: ...ssembly bracket with the attached intake port Figure 4 7 Remove the old PCB and replace it with the new part 8 Reattach all wiring connectors to the PCB 9 Set the proper DIP S W settings on the PCB refer to page 90 10 Reinstall the PCB using the 2 screws previously removed 11 Turn on the water and gas supplies then reconnect the power supply to the unit NOTE All wiring harness connections to the P...

Page 124: ... the unit from the power supply 3 Turn off the water supply to the unit 4 Remove the Ignition Transformer insulated cables 5 Remove the 2 screws from the flame rod as shown in Figure 7 below Figure 7 6 Disconnect the wiring connector from the fan assembly and then remove the 4 screws from the gas valve connection as shown in Figure 5 below Figure 5 7 Pull out the fan assembly and remove the 4 scre...

Page 125: ...TE Verify that the Ignition Transformer insulated cables are firmly connected to the flame rod 6 Remove the flame rod wiring connector Figure 8 7 Remove the flame rod from the burner assembly and replace with the new part 8 Reconnect the 2 ignition transformer insulated cables to the new flame rod 9 Place the new flame rod back onto the burner assembly and secure it by using the 2 screws from Figu...

Page 126: ...gas supply to the unit NOTE Confirm that the new air pressure sensor is in the proper position before turning the unit back on 6 2 7 Main Gas Valve 1 Turn off the gas supply to the unit 2 Disconnect the unit from the power supply 3 Turn off the water supply to the unit 4 Remove the 2 screws 5 Disconnect the wiring connector at the gas valve Figure 13 6 2 6 APS 1 Turn off the gas supply to the unit...

Page 127: ... to correctly assemble the components according to these in structions may result in a gas leak or explosion 13 Check that all gas connections are tightly sealed to ensure that no gas leaks are present 14 Turn on water supply power supply and gas supply to the unit 15 Verify the gas pressures to the unit with the values provided in this Service Manual NOTE Always replace the old O rings and gasket...

Page 128: ...and gas supply to the unit NOTE Ensure that the condensate drain trap is completely inserted into the condensate fitting to eliminate leaking Use the pin to secure the cap to the fitting 6 2 8 CondensateTrap 1 Turn off the gas supply to the unit 2 Disconnect the unit from the power supply 3 Turn off the water supply to the unit 4 Remove the pin that secures the condensate drain cap and then remove...

Page 129: ...ully open a hot water tap and ensure there are no leaks at the flow sensor connections 6 2 10 BufferTank 1 Turn off the gas supply to the unit 2 Disconnect the unit from the power supply 3 Turn off the water supply to the unit Drain all water from the appliance 4 Remove the gas valve to gain access to the buffer tank refer to the gas valve replacement procedures Figure 21 6 2 9 Flow Sensor 1 Turn ...

Page 130: ...gas supply to the unit 2 Disconnect the unit from the power supply 3 Turn off the water supply to the unit Drain all water from the appliance 4 Remove the 3 screws from the bottom of the case along with the screw that connects the rear bracket to the case in order to detach the front panel from the unit Figure 24 5 Remove the clip at the bottom of the buffer tank Figure 22 6 Remove the 3 mounting ...

Page 131: ...the 2 fixing screws 14 Reinstall the pump drain plug at the bottom of the unit 15 Reconnect the wiring connector at the pump 16 Attach the controller back onto the unit by using the 3 screws at the bottom of the unit 17 Fix the pump bracket to the case with the mounting screw 5 Move the controller aside for better access to the Circulation Pump 6 Remove the 2 screws from the bottom of the case Fig...

Page 132: ...o the unit 21 Open a hot water tap and ensure that there are no leaks at the pump connections 22 Open the air vent on top of pump to release air within the system NOTE Always use proper O rings at the pump connection to ensure tight seals 6 2 12 2 Way Valve 1 Turn off the gas supply to the unit 2 Turn off the 120V power supply to the unit 3 Turn off the water supply to the unit Drain all water fro...

Page 133: ...ment valve connections 7 Remove the 3 buffer tank screws and pull out the buffer tank Figure 32 8 Replace with new 2 way valve 9 Place the 2 round stainless steel clips and 2 flat stainless clips back onto the 2 way valve connections 10 Replace the 4 buffer tank mounting screws 11 Reconnect the wiring connector at the 2 way valve 12 Place the front panel back onto the unit using 4 screws 13 Turn o...

Page 134: ...Components Diagram and Part List 133 7 1 Case Assembly 12 7 13 8 9 10 18 2 1 3 4 6 5 17 16 15 14 11 7 Components Diagram and Part List ...

Page 135: ...011694A NPE 150S 180S 210S 240S 7 Case Lower Bracket 20007643B 8 PCB 30011690D 9 Power Switch 30009482A 10 Front Panel 30008333A 11 Case Bracket 20007609A 12 Exhaust Pipe Assembly 30008673A 13 Rubber Ring 20025127A 14 Saddle 20013508A NPE 150S 180S 210S 240S 15 Saddle Bracket 1 20026170A NPE 150S 180S 210S 240S 16 Freeze Protector Sensor 30002587A NPE 150S 180S 210S 240S 17 Freeze Protector Sensor...

Page 136: ...mponents Diagram and Part List 135 7 2 Burner Assembly NPE 180A 210A 240A 7 6 18 13 3 7 1 10 9 12 19 21 19 21 8 14 11 12 4 1 6 1 4 12 17 1 11 1 12 12 1 15 17 12 6 6 1 14 5 2 17 6 1 6 1 6 1 6 1 19 20 19 20 ...

Page 137: ...5x2 7t 20006947A 7 WPA A Clip 20018344A 7 1 Thermistor 30008366A 8 WPA B 20018343A 9 H Ex Middle Pipe 30009126A NPE 180A 30010803A NPE 210A 30008439A NPE 240A 10 Hot Water Outlet Pipe 30009145A NPE 180A 30008442A NPE 210A 240A 11 WPA A Screw 30008569A 11 1 Thermistor 30008366A 12 Fastner 20017726A 13 Ignition Transformer 30010455A 14 Fastner 20007853A 15 Ignitor 30012226A 16 Damper 30008825A 17 Bu...

Page 138: ...Components Diagram and Part List 137 7 3 Burner Assembly NPE 150S 180S 210S 240S 10 4 10 5 3 2 13 12 1 18 17 10 15 23 9 10 10 14 6 20 9 10 7 10 9 24 16 21 10 17 15 10 6 9 10 25 19 22 8 9 10 11 ...

Page 139: ...x2 7t 20006947A 11 Cold Inlet Pipe 30214751A NPE 150S 30011521A NPE 180S 30011665A NPE 210S 30011517A NPE 240S 12 Fan Damper 30008825A 13 Fan Packing 20022744A 14 Fan Bracket F 20022095A 15 Backup Ring 20018744B 16 High Limit Switch 30002577A 17 Fastner 20007853A 18 WPA A Clip 20018344A 19 Thermistor 30008366A Water 20 WPA B 20033191A NPE 150S 20018343A NPE 180S 210S 240S 21 H Ex Middle Pipe 30014...

Page 140: ... 2 8 3 12 13 14 8 4 9 3 7 1 12 1 12 2 12 3 12 4 12 5 11 6 9 11 17 3 3 3 4 4 3 11 4 5 2 4 Description Part Remark 1 Buffer Tank 30009030A 2 Hot Water Outlet Pipe Assembly 30008338A 2 1 Pipe Adapter 20024496A 2 2 O RING P20 20017212A 2 3 Thermistor Red 30008366A 2 4 O RING P16 20017210A 2 5 Pipe Clip 20007733B 3 Return Pipe Assembly 30008350A 3 1 Pipe adapter 20024496A ...

Page 141: ...n 30009756B 8 1 O Ring Φ31 7x3 5t 20018013A 8 2 Syphon Clip 20018155A 8 3 Hose Clip 20007833A 8 4 Syphon Hose 20018429A 9 Pump Outlet Pipe Assembly 30008361A 9 1 Check Valve 30008359A 9 2 Pipe Clip 20017722A 9 3 O Ring P16 20017210A 10 Return Pipe clip 20017767A 11 Fastner 20007859A 12 Cold Water Inlet Pipe Assembly 30009437A 12 1 Water Filter 30008171A 12 2 O RING P19 20017211A 12 3 Pipe adapter ...

Page 142: ...agram and Part List 141 7 5 Waterway Assembly NPE 150S 180S 210S 240S 10 15 2 12 6 6 13 8 14 11 10 11 8 9 11 8 12 11 17 16 8 6 7 6 5 4 3 2 1 6 10 15 2 12 6 6 13 8 14 11 10 11 8 9 11 8 12 11 17 16 8 6 7 6 5 4 3 2 1 6 ...

Page 143: ...011597A 5 O Ring P15 20017217A 6 Fastner 20007859A 7 Flow Sensor 30011534A 8 O Ring P16 20017210A 9 Flow Sensor Outlet Adapter 20025959A 10 Outlet Adapter 20025961A 11 Fastner 20017726A 12 Water Adjustment Valve WAV 30011532A 13 Inlet Adapter 20025962A 14 O Ring P18 20006947A 15 How Water Outlet Adapter 30011601A 16 Siphon 30009756B 17 Siphon Hose 20018429A ...

Page 144: ...nents Diagram and Part List 143 7 6 Fan Gas Assembly 9 8 9 5 9 10 9 4 9 7 12 9 11 9 9 9 10 9 3 9 15 9 10 9 1 9 13 9 14 9 6 9 2 NPE 180S 180A 210S 210A 240S 240A 6 12 11 7 16 13 3 10 2 10 10 5 14 8 4 NPE 150S ...

Page 145: ...240S 240A 8 Silence 30015322A NPE 150S 20019142A NPE 180S 180A 20023829A NPE 210S 210A 240S 240A 9 Silence Adapter 20023861A NPE 180S 180A 20019141A NPE 210S 210A 240S 240A 10 O Ring P20 20006934A 11 O Ring G70 20007001A NPE 150S O Ring G75 20018079A NPE 180S 180A 210S 210A 240S 240A 12 Fan Packing 20022744A 13 Gas Orifice 20029420B NPE 150S NG 20034178A NPE 150S LP 20024159A NPE 180S 180A NG 2002...

Page 146: ...t panel is moisture resistant but it is not waterproof Keep it as dry as possible 8 1 2 Draining the Water Heater You need to drain the water heater before performing maintenance tasks such as cleaning the inlet water filter or to prevent the water heater from freezing when it will not be used for an extended period To drain the water heater 1 Place a bucket under the water heater to collect the r...

Page 147: ... close the pump drain plug 11 To refill the water heater follow the steps of Draining the Water Heater in reverse Draining the water in the condensate trap Referring to the below figures place a bucket under the water heater and remove the cap from the bottom of the trap to drain collected condensate 1 2 3 4 5 6 Description 1 Remove the retaining clip 2 Place a bucket under the water heater 3 Twis...

Page 148: ...ee end in the bucket 5 Connect one of the tubes to the circulation pump outlet and the cold water line at the B valve 6 Connect one tube to the circulation pump inlet and place the free end in the bucket 7 Pour the cleaning solution into the bucket 8 Open both A and B valves 9 Turn on the circulation pump and allow the solution to circulate through the water heater for at least 45 minutes 10 Rinse...

Page 149: ...leaning the Air Intake Filter If the air intake filter becomes clogged by dust or lint the water heater will cease to operate and Error Code 10 will appear on the front panel display To properly maintain the water heater you should clean the air intake filter every 3 4 months To clean the air intake filter 1 Press the Power button on the front panel to turn off the water heater 2 Disconnect the po...

Page 150: ...nnual Servicing In order to maintain its safe and efficient operation it is recommended that the water heater is serviced annually CAUTION Servicing must be performed by a qualified service agency or gas supplier Inspection Visual inspection for general signs of corrosion Checking and adjusting the gas air ratio Checking Flue Gas Carrying Out a Water Leak Test in Operation Carrying out a gas leak ...

Page 151: ...n Operation YES NO Carrying Out a Gas Leak Test in Operation YES NO Checking Hot Water Temperature and Flow YES NO Checking Noise YES NO Checking Venting Systems YES NO Checking the front panel YES NO 8 4 Maintenance Report Inspection Items References Date Date Draining the Water Heater and Cleaning the Inlet Water Filter YES NO Cleaning the Return Filter YES NO Checking the Intake Air Filter YES ...

Page 152: ...ency or the gas supplier The installation must conform with local codes or in the absence of local codes the National Fuel Gas Code ANSI Z223 1 NFPA 54 and or CSA B149 1 Natural Gas and Propane Installation Code WARNING The outdoor vent cover gets hot during operation Install the heater in a location where the top of the vent cover kit cannot be reached by children and pets Exhaust gas will be rel...

Page 153: ...or vent cover is installed it does not need to be removed before removing the front cover of the water heater 9 2 Installing Procedure 1 Remove the two Phillips screws on the top front of water heater 2 Position the outdoor vent cover on top of the water heater and securely press it into the intake and exhaust collars as illustrated Make sure all the screw holes are aligned and connectors for both...

Page 154: ...gas water and electrical supplies Before proceeding read the water heater installation manual Choose an outside wall for the installation Installation on a wall protected by an overhang above is recommended Size the water and gas connections according to the instructions in the water heater installation manual Use unions when connecting both water lines and the gas supply line to the heater Instal...

Page 155: ... Mounting Water Heater Navien water heaters come with a mounting bracket that is pre drilled at 16 inches on center for easy installation on standard wall studs If the strength of the wall is insufficient or if the framing is non standard or uneven reinforce the area before installing the water heater Avoid installation on common walls as the unit will make some operational noises while it is runn...

Page 156: ...Installation the Outdoor Vent Cover 155 9 5 Ventilation Flow Intake Air Flow Exhaust Gas Flow ...

Page 157: ...in 12 300mm min Venting Intake and Exhaust to Dierent Locations Exhaust Condensate Drain Intake Cap To determine the size of a common vent 1 Add the BTU H input ratings for each water heater in the cascading system to determine the total BTU H rating 2 Determine the total length L of the common vent which consists of the horizontal width W and the vertical height H Total length L W H Exhaust Conde...

Page 158: ...m 398 000 2 60 18m 100 30m 160 48m 540 000 3 70 21m 110 33m 160 48m 559 000 2 1 70 21m 110 33m 160 48m 578 000 1 2 70 21m 110 33m 160 48m 597 000 3 70 21m 110 33m 160 48m D 5 D 6 D 7 D 8 739 000 3 1 80 24m 120 37m 758 000 2 2 80 24m 120 37m 777 000 1 3 80 24m 120 37m 796 000 4 80 24m 120 37m 995 000 5 60 18m 90 27m 130 40m 1 194 000 6 80 24m 100 30m 140 43m 1 393 000 7 70 21m 90 27m 120 36m D 7 D ...

Page 159: ... for installation and application After installation is complete check the product s operation by following the instructions provided in this manual NOTE Allwiringmustbeinstalledinaccordancewithlocalregulations of the installation site 10 1 About the H2Air Navien H2Air is an add on controller for the Navien NPE 180A 240A water heaters It adds input and output functions to the NPE 180A 240A water h...

Page 160: ...evice This section provides information required to install the H2Air add on controller in an NPE 180A 240A water heater WARNING Ensure that you have turned off the power to the water heater before installing the device 10 1 2 Specifications Refer to the following table for product specifications Items Specifications Model name KDO A100 Device type Add on controller for Navien NPE 180A 240A water ...

Page 161: ...es and connectors to the PCB Proceed to the next step For NEW PCBVersion KDC 330 5M P20 The existing PCB can be used Pull out the PCB from the tray but do NOT disconnect any cables or wires Proceed directly to the next step 10 2 1 Basic Principles The following diagram shows the basic operation of an NPE 180A 240A water heater system with the H2Air add on controller System Diagram WARNING A mixing...

Page 162: ...y Align the latch at the back of the case with the front lip of the PCB tray 6 Align the two latches at the back of the H2Air with the two catch bars at the back of the water heater s PCB tray Then pivot the H2Air onto the PCB tray until the latches snap on to the catch bars 7 Connect cables to the H2Air For more details refer to 10 5 2 Entering the R D Information Menu on page 165 8 Set the prope...

Page 163: ...t Insert the exposed wire into the terminal Then tighten the terminal screw with a screwdriver NOTE Use thermostat wire 18 gauge wire for the outdoor temperature sensor connection When installing the outdoor temperature sensor avoid installing it in direct sunlight Connecting theThermostat Cables The H2Air receives input signals from thermostats to control the AHU Insert the fork connector into th...

Page 164: ...gineering drawings This drawing represents a concept system and does not imply compliance with local building codes Actual installation requirements may vary depending on installation locations and parameters All installation work must be carried out in accordance with all local building codes Verify with local building officials before commencing system installation The following example demonstr...

Page 165: ...gh and stops supplying the space heating when the water heater is running at or above 85 of its maximum capacity 1 2 3 4 ON Set the DIP switch SW 2 to On to configure the system to operate DHW and space heating mode simultaneously 10 5 Configuring the NPE 180A 240A Water Heater This section provides information required to properly configure the NPE 180A 240A water heater to setup and utilize the ...

Page 166: ...et point 11 2 Stage T S Output Heat Capacity 10 5 4 Configuring Water Heater Functions This section describes the water heater functions and provides the information required to configure the parameters for the desired operation Pump Exercise OperationTime P04 The pump exercise function is designed to prevent the stagnation of hot water in the heating system The pump exercise function operates eve...

Page 167: ...ating is turned on default 30 sec NOTE If no buttons are pressed for 10 seconds or if the Info button is pressed the current parameter value will be saved automatically To return to the PARAMETER INFORMATION MENU MODE press the Reset button once If no buttons are pressed for five minutes the display will automatically return to the PARAMETER INFORMATION MENU MODE Pump Post PurgeTime P 06 This func...

Page 168: ...ue is outside the normal range the 740 error message is displayed and the system operates the same way as with the Outdoor Reset OFF DIP switch 1 ON setting Outdoor LowTemperature Set point P 07 To change the outdoor low temperature set point 1 In the Parameter information time mode use the Up or Down buttons to select P 07 Then press the Info button to enter the Outdoor low temperature set point ...

Page 169: ...ON MENU MODE press the Reset button once If no buttons are pressed for five minutes the display will automatically return to the PARAMETER INFORMATION MENU MODE Heating MIN Set point P 09 To change the heating MIN set point 1 In the Parameter information time mode use the Up or Down buttons to select P 09 Then press the Info button to enter the Heating MIN set point mode 2 In the Heating MIN set p...

Page 170: ...hermostat or can be automatically controlled by the H2Air controller If the DIP switch 3 is OFF When using the automatic 2 stage heating feature the system will modulate between the 1 stage and 2 stage based on the set heat capacity parameter of the water heater This heat capacity value can be adjusted based on the desired modulation point default heat capacity is 25 To change the 2 stage T S outp...

Page 171: ...unTherm corporation MMVE0S4NAAA MMVE0M4NAAA the flow rate will be approximately 3 GPM 10 6 Maintenance The Navien NPE 180A and NPE 240A water heaters that are used in the DHW heating systems should be properly maintained and flushed on an annual basis Please see the NPE Water Heater Service Manual for more details regarding annual servicing and maintenance 10 7 Appendix This section provides addit...

Reviews: