16 – KOMPLETE AUDIO 6 – Manual
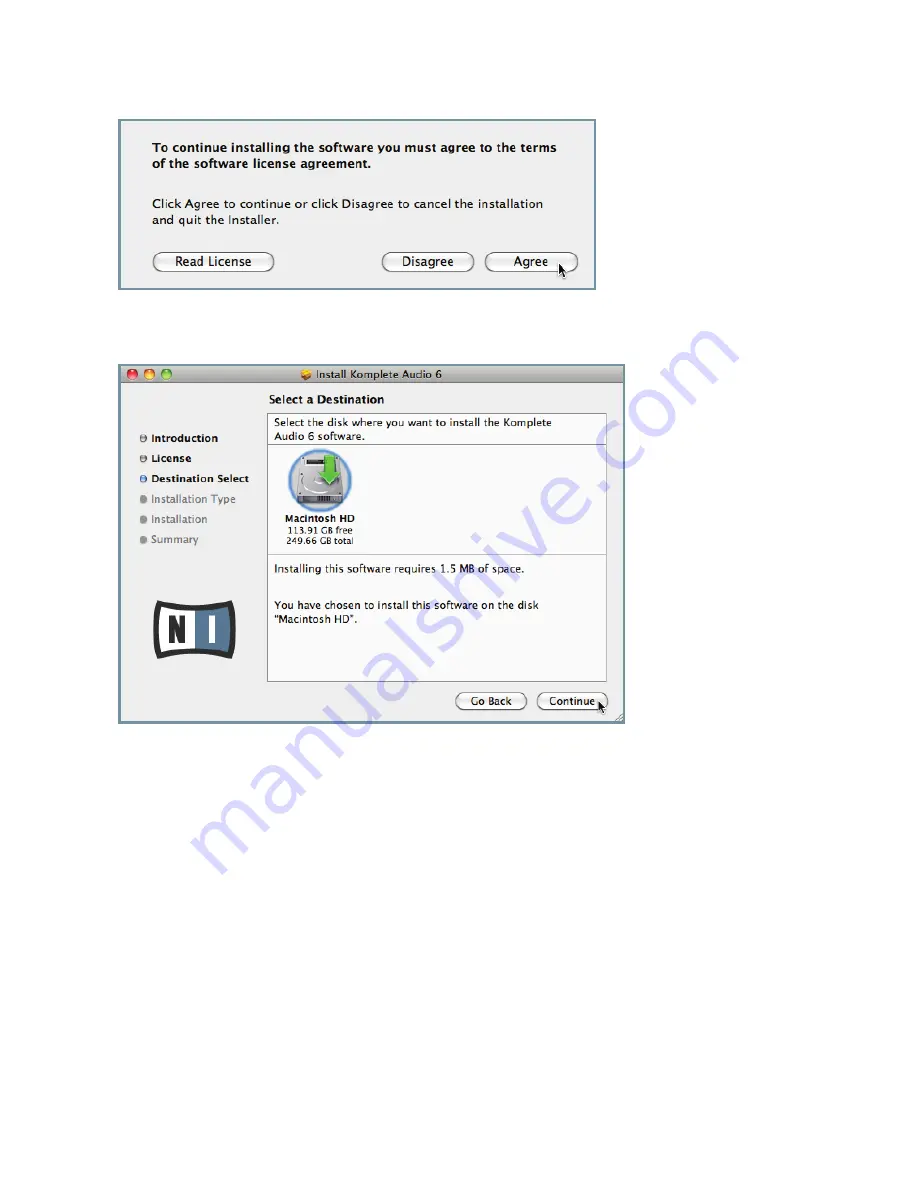
7.
If you agree to the Software License Agreement, click
Agree
to continue.
8.
Select the drive you want to install the KOMPLETE AUDIO 6 driver to and click
Continue
.
Page 1: ...Manual...
Page 2: ...ENGLISH KOMPLETE AUDIO 6 Manual...
Page 3: ...ystem s Default Audio Output Device 20 4 1 1 Windows XP 20 4 1 2 Windows Vista Windows 7 20 4 1 3 Mac OS X 21 4 2 Using the KOMPLETE AUDIO 6 as an Audio Output Device with Music Software 21 5 The Hard...
Page 4: ...are related Problems 50 8 2 How to Check Whether the KOMPLETE AUDIO 6 Drivers are Installed Correctly 50 8 3 USB Troubleshooting 51 8 3 1 USB 2 0 required 51 8 3 2 Try another USB cable 51 8 3 3 Using...
Page 5: ...face s connections ASIO and Core Audio low latency drivers 1 1 What is Included in the Box The packaging contains 1 x KOMPLETE AUDIO 6 audio interface 1 x USB 2 0 cable 1 x installation disc A softwar...
Page 6: ...en labels of buttons controls text next to check boxes etc is printed in light blue Whenever you see this formatting applied you will find the same text appearing somewhere on the screen Important nam...
Page 7: ...internal components If there appears to be a hardware malfunction immediately stop using the hardware and contact Native Instruments Do not expose the KOMPLETE AUDIO 6 to rain and do not use it near w...
Page 8: ...ligation to update existing units Nameplate location The nameplate is located on the bottom of the KOMPLETE AUDIO 6 hardware and lists the Production ID Copyright Native Instruments GmbH 2010 All righ...
Page 9: ...r with the installation procedure and the general configuration of USB driven audio devices on your computer you can skip this chapter and continue with registration chapter 3 3 3 1 System Requirement...
Page 10: ...anual 9 ENGLISH 4 In the installation welcome screen click Next 5 To continue you need to first accept the license agreement After you have read the license agreement click on the corresponding checkb...
Page 11: ...prompt you to begin the configuration Click Next to proceed 7 Once the installation has been performed successfully click Finish All software components are now installed and the KOMPLETE AUDIO 6 sho...
Page 12: ...fore the software installa tion process is finished To install the KOMPLETE AUDIO 6 on Windows XP Vista 1 Place the installation disc in your computer s CD DVD ROM drive 2 Use the Windows Explorer to...
Page 13: ...on the corresponding checkbox Then click Next 6 The InstallAware Wizard will prompt you to begin the configuration Click Next to proceed 7 During driver installation a Windows security warning will ap...
Page 14: ...E AUDIO 6 to a USB 2 0 port on your computer using the USB cable included in the package 10 Windows will identify the KOMPLETE AUDIO 6 and begin the final driver installation process 11 Choose No if W...
Page 15: ...er 3 3 3 2 3 Installing KOMPLETE AUDIO 6 on Mac OS X To install the KOMPLETE AUDIO 6 on Mac OS X 1 Connect the KOMPLETE AUDIO 6 to a USB 2 0 port on your computer using the USB cable provided in the K...
Page 16: ...KOMPLETE AUDIO 6 Manual 15 ENGLISH 5 Click Continue to proceed 6 Read the Software License Agreement and click Continue to proceed...
Page 17: ...16 KOMPLETE AUDIO 6 Manual 7 If you agree to the Software License Agreement click Agree to continue 8 Select the drive you want to install the KOMPLETE AUDIO 6 driver to and click Continue...
Page 18: ...ac OS X will prompt you to authenticate the installation Enter the name and corre sponding password of a user with administrator privileges and click OK Another screen will inform you that restarting...
Page 19: ...e installation procedure 12 Once the installation has been performed successfully you will be prompted to restart your Mac Click Restart to restart your computer All software components are now instal...
Page 20: ...ter your hardware if you register your KOMPLETE AUDIO 6 now you will addition ally be rewarded with a voucher for NI products so don t sleep on it To register your KOMPLETE AUDIO 6 on the Native Instr...
Page 21: ...ws XP 1 Open Start Control Panel Hardware and Sound Sound 2 In the Sounds and Audio Devices Properties window select the Audio tab 3 From the Default Device drop down list select one of the KOMPLETE A...
Page 22: ...now selected as the default audio output device 4 2 Using the KOMPLETE AUDIO 6 as an Audio Output Device with Music Software Before using the KOMPLETE AUDIO 6 with music production or DJ software you...
Page 23: ...e amount of signal going into the KOMPLETE AUDIO 6 The LINE INST toggle button selects either LINE mode for strong signaled inputs like a syn thesizer or the output of an electric piano or INST for we...
Page 24: ...D on the device s top panel stops lighting orange when phantom power is disabled 2 USB port The USB port socket connects the KOMPLETE AUDIO 6 device to your computer laptop or workstation via USB 2 0...
Page 25: ...Volume control knob MAIN VOLUME 1 2 The knob at the center of the top panel provides a master volume control for the main outputs MAIN 1 2 Status LEDs The status LEDs surrounding the Volume Control Kn...
Page 26: ...is outgoing signal on the headphone outputs 3 and 4 see 5 1 for headphone source settings MONITOR 1 2 Lights orange when direct monitoring is activated with outputs 1 2 selected see MONITOR section of...
Page 27: ...onfiguration settings on Mac OS X can be accessed from the Mac OS X Audio MIDI Setup Proceed with subchapter 6 2 If you experience problems with your setup please refer to the Audio Troubleshooting Gu...
Page 28: ...your audio interface It has two menus Sample Rate Choose a sample rate that is compatible with your music application and best suited to your computing power A higher sample rate improves the audio qu...
Page 29: ...n buffer size alone e g CPU speed and RAM size You should start off with a higher buffer size setting and gradually decrease the value until you find the perfect balance between playability and system...
Page 30: ...est fails the interface switches back to internal clock mode If the synchronization is successful the top panel s SPDIF SYNC lights see chapter 5 3 Direct Monitoring Section 6 5 The Direct Monitoring...
Page 31: ...bchapters for further information on these sections Drop Out Detection Section 6 7 The Drop Out Detection section in the Diagnostics page of the Control Panel The Drop Out Detection section provides f...
Page 32: ...ce Test Section 6 9 The System Performance Test section in the Diagnostics page of the Control Panel The System Performance Test section provides monitoring of the current DPC Deferred Proce dure Call...
Page 33: ...isplays information about driver and firmware and provides access to the Audio Troubleshooting Guide This section has two displays and a button Driver Version See the currently installed driver versio...
Page 34: ...ions Clock source In the Clock source drop down menu you can select whether the device uses its internal clock or gets synchronized to the clock of an external device This is rel evant when connecting...
Page 35: ...by DAT recorders and for DVD films recording 96000 Hz and higher rates are typical for DVD HD DVD and Blu ray Disc audio record ing You should be aware that a higher sample rate also causes higher CP...
Page 36: ...onitors Make sure the KOMPLETE AUDIO 6 is connected to your computer as described during the installation chapter chapter 3 and configured as your computer s main audio output device see chapter 4 To...
Page 37: ...r panel of the KOMPLETE AUDIO 6 to a pair of line inputs on your stereo amplifier mixer with stereo 1 4 to RCA phono cables or suitable adapters Connect the L output channel to the left line input cha...
Page 38: ...nstructions will assist you in using the KOMPLETE AUDIO 6 in a recording situation for capturing audio to your computer and monitoring the input and result over your speakers or headphones In most cas...
Page 39: ...pment The greater the distance between a microphone and speakers means this effect is less likely to occur To use the KOMPLETE AUDIO 6 in a recording setup with a condenser microphone 1 Turn the Volum...
Page 40: ...are for information on how to configure the audio device setup 6 While singing playing an instrument into the microphone adjust the input signal by turning the relevant input channel s GAIN knob gradu...
Page 41: ...r the distance between a microphone and speakers means this effect is less likely to occur Be aware that phantom power can cause serious damage to ribbon microphones Check your microphone s manual to...
Page 42: ...ording software for information on how to configure the audio device setup 5 While singing playing an instrument into the microphone adjust the input signal by turning the relevant input channel s GAI...
Page 43: ...f this manual To use the KOMPLETE AUDIO 6 in a recording setup with a guitar bass guitar 1 Turn the Volume Control knob MAIN VOLUME 1 2 on the top panel of the KOMPLETE AUDIO 6 to the left end stop to...
Page 44: ...levant input channel s GAIN knob gradually to the right Check the input LEDs INPUT 1 and 2 LEDs on the top panel of the KOMPLETE AUDIO 6 to make sure your input signal does not clip adjust the input l...
Page 45: ...s your computer s main audio output device see chapter 4 See chapter 7 1 for instructions on how to connect speakers active and passive to your KOMPLETE AUDIO 6 To use the KOMPLETE AUDIO 6 in a setup...
Page 46: ...until you reach a good listening level You can also use INPUT 1 and INPUT 2 on the front panel of the KOMPLETE AUDIO 6 to connect a line level device with a stereo output The LINE INST buttons adjace...
Page 47: ...audio workstation software and activate the MIDI input and the MIDI output channel of your KOMPLETE AUDIO 6 For information on where to find the relevant dialog and how to apply the settings please re...
Page 48: ...s The signal transferred is digital data and gets translated to sound waveforms via S PDIF For this connection a digital RCA cable should be used although it is also possible to use standard RCA phono...
Page 49: ...ks for availability of external syncing sources If the synchronization request fails the interface switches back to internal clock mode If synchronization is possible the top panel s SPDIF SYNC lights...
Page 50: ...ource to the External S PDIF 5 6 setting The KOMPLETE AUDIO 6 checks for availability of external syncing sources If the synchronization request fails the interface switches back to internal clock mod...
Page 51: ...hnical Support team The contact informa tion is available under the following URL http www native instruments com contactinfo In case the KOMPLETE AUDIO 6 needs to be returned the Technical Support te...
Page 52: ...If the icon is missing here the driver is probably not installed If the driver is not installed you can install it as described in chapter 3 If the device is not recognized check your USB 2 0 connecti...
Page 53: ...age on our website http www native instruments com KA6 8 4 How to avoid Ground Loops Ground loops are a common problem within any environment where multiple electrical de vices are connected to the sa...
Page 54: ...ground lifting is sup ported on your device On laptops low quality power supplies often lead to ground loop noise Run your laptop on its battery to see if the ground loop disappears In case the groun...
Page 55: ...ormation about your hardware and software environment to better facilitate our support team In your communi cation with the support team you should offer as much information as possible about your har...
Page 56: ...tal and vice versa the audio driver needs to store the data in buffer packages audio buffers which are then sent to and processed by the CPU of your computer The higher the buffer size the longer it t...
Page 57: ...nd sample rate settings you might also check your system for DPC latency problems see the System Performance Test section of chapter 6 1 2 for more info on DPC latency using the DPC Latency Checker pr...
Page 58: ...countries Windows Windows Vista and DirectSound are registered trademarks of Microsoft Corpora tion in the United States and or other countries Intel and Pentium are registered trademarks of Intel Cor...