background image

GUITAR RIG SESSION – 10

3  The SESSION I/O Hardware

This section will give you an overview of the SESSION I/O hardware.

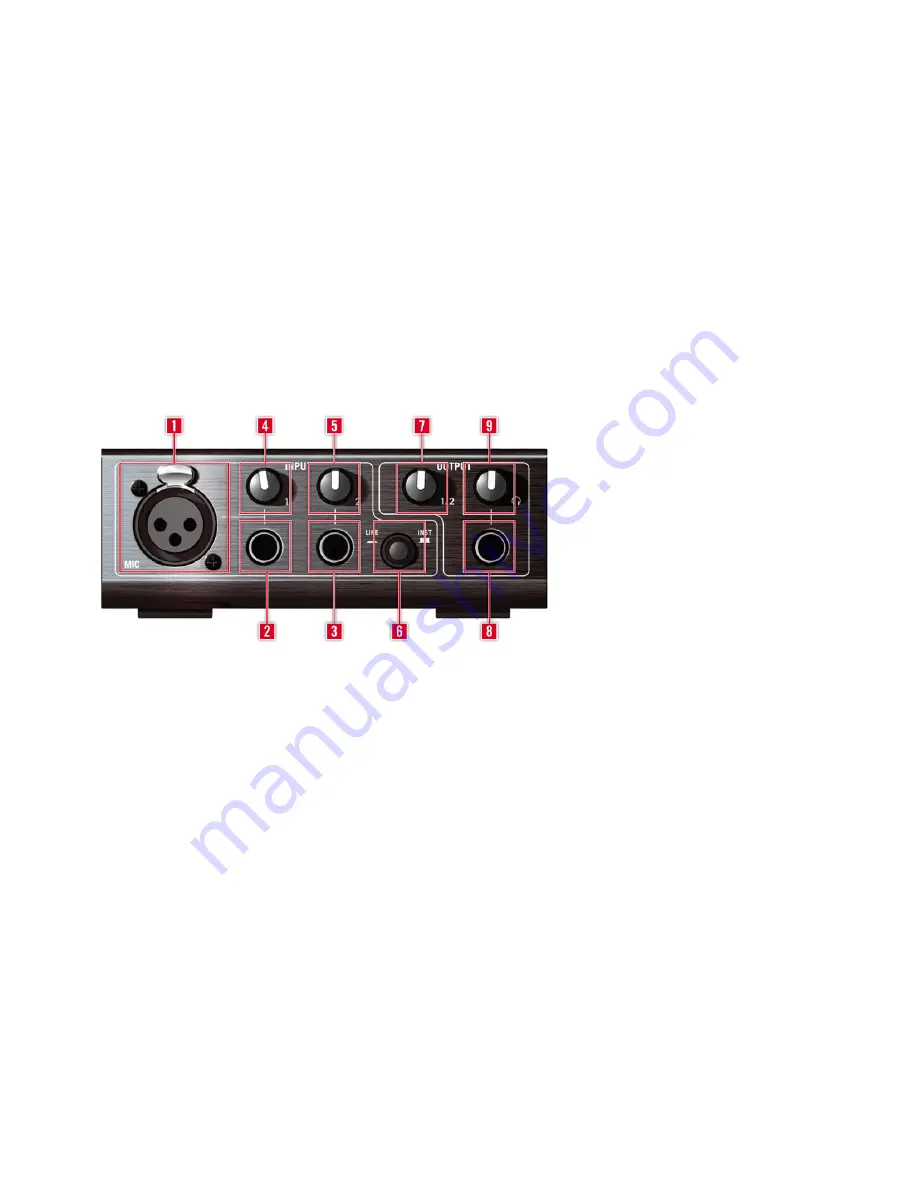
3.1  Front Panel

The Mic input accommodates XLR plugs (balanced). It connects your microphone to the 
unit’s preamp for Input 1. Please enable phantom power for condenser microphones.

The socket for Input 1 (¼” jack, TRS balanced) will accept line level or instrument level 
signals, depending on the position of the Line/Inst switch. Connect a guitar, bass guitar, 
keyboard or the left channel of a stereo device.

The socket for Input 2 (¼” jack, TRS balanced) will accept line level or instrument level 
signals, depending on the position of the Line/Inst switch. Connect a guitar, bass guitar, 
keyboard or the right channel of a stereo device.

Note that this input has priority over the XLR input (1). When in use, the XLR input is 
automatically disabled.

Summary of Contents for Guitar Rig Session

Page 1: ...HARDWARE REFERENCE...

Page 2: ...tion may be copied reproduced or otherwise transmitted or recorded for any purpose without prior written permission by Native Instruments GmbH hereinafter referred to as Native Instruments All product...

Page 3: ...rlin Germany info native instruments de www native instruments de USA Native Instruments North America Inc 5631 Hollywood Boulevard Los Angeles CA 90028 USA sales native instruments com www native ins...

Page 4: ...Installation under Windows XP Windows Vista 13 4 1 Software Installation 13 4 2 Hardware Installation 16 4 3 Configuration 18 4 3 1 Configuring GUITAR RIG 4 19 4 3 2 Using the SESSION I O as your Def...

Page 5: ...Troubleshooting 37 6 1 Audio Issues 38 6 1 1 No Sound or Low Volume 38 6 1 2 Distorted Signal 38 6 1 3 Noise 38 6 1 4 Ground Loops 39 6 2 Hardware Related Problems 39 6 2 1 Driver Issues 39 6 2 2 USB...

Page 6: ...use with GUITAR RIG 4 It is a professional soundcard featuring a microphone preamplifier with phantom power and two inputs for connecting electric guitars and basses as well as line level sources A tw...

Page 7: ...duct disc 2 2 Using the Unit Safely Please read the following instructions thoroughly to prevent from health risks and damaging the product 2 2 1 Warning To prevent hearing damage always follow these...

Page 8: ...or near heat generating equipment or high levels of vibra tion Do not place the GUITAR RIG SESSION I O in an unstable position where it is possible the unit could accidentally fall Remove all connecte...

Page 9: ...ained in this manual is believed to be correct at the time of printing or digital release However Native Instruments reserves the right to make changes to the speci fications at any time without notic...

Page 10: ...ck TRS balanced will accept line level or instrument level signals depending on the position of the Line Inst switch Connect a guitar bass guitar keyboard or the left channel of a stereo device 3 The...

Page 11: ...such as a guitar or bass when pressed line level signals are accepted The selected input type is also indicated on the unit s top 7 This knob adjusts the level for Output 1 2 8 The headphones jack co...

Page 12: ...nsington compatible security cable lock Use this to secure your unit from theft 3 The USB port connects the unit to your computer Your computer must support USB 2 0 in order to work with GUITAR RIG SE...

Page 13: ...it on the product CD or in the GUITAR RIG 4 menu under Help Open Manual Your Language 4 1 Software Installation Make sure that you are logged in with administrator privileges Don t connect the GUITAR...

Page 14: ...a plug in is just use the standard setting 5 You will be asked if you want to install drivers for the GUITAR RIG audio interfaces Select Session I O and click on Continue 6 During installation of the...

Page 15: ...plug in formats Native Instruments Service Center this application handles product activation as well as update management Please refer to the Setup Guide for details The drivers for the GUITAR RIG SE...

Page 16: ...website 4 2 Hardware Installation Use the supplied USB cable to connect the SESSION I O directly to a USB 2 0 port on your computer The SESSION I O is powered via USB Operation is guaranteed only with...

Page 17: ...on again as explained above Several driver modules will be assigned to the SESSION I O now each one causing a pop up window in which you are asked how you want to install the new device 1 Choose not t...

Page 18: ...ed at the driver assignment process starts again if this happens just follow the steps described above If at any time the computer does not seem to recognize the SESSION I O disconnect the USB cable w...

Page 19: ...settings To access these settings later on select File Audio and MIDI Settings from the program menu 2 On the Audio tab choose ASIO as the Driver interface 3 Select SESSION I O from the Device dropdo...

Page 20: ...her they define the system s latency i e the time that passes from the moment an audio signal is sent into the SESSION I O hardware until the moment you hear it in your headphones or your speakers The...

Page 21: ...her latency values will reduce the probability of audio dropouts 4 3 2 Using the SESSION I O as your Default Audio Interface If you want to use the SESSION I O for playback of all audio applications o...

Page 22: ...Open Start Control Panel Hardware and Sound Sound 2 Select the Playback tab 3 In the device list select SESSION I O and click on Set Default 4 Select the Recording tab 5 In the device list select SESS...

Page 23: ...sting the Input Level 1 Turn down the volume on your monitoring system to prevent hearing damages 2 Make sure the input selector is set to Instrument button not depressed except if you are using a pre...

Page 24: ...hannel you are using 1 Turn up the according input level knob just until the red Clipping LED is lit when you play 2 At that point slightly turn the knob down until the Clipping LED is always off even...

Page 25: ...ware Please adjust it to achieve the highest possible level for your signal without clipping This is indicated by the Level Meter getting close to the red zone without actually hitting it If only one...

Page 26: ...ct them to the output jack and put them on with the headphone level fully turned down 3 Go to the Preset Browser and select any of the presets by clicking on it Start playing and carefully turn up the...

Page 27: ...the product disc or in the GUITAR RIG 4 menu under Help Open Manual Your Language 5 1 Software Installation Make sure that you are logged in with administrator privileges Don t connect the SESSION I...

Page 28: ...plication handles product activation as well as update management Please refer to the Setup Guide for details The drivers for the SESSION I O audio interface If you have never owned a Native Instrumen...

Page 29: ...wait a few seconds then re connect it If this does not solve the problem restart your computer with the interface connected 5 3 Configuration This chapter explains how to use the SESSION I O audio in...

Page 30: ...explained in section 5 1 The audio interface allows to be configured by the following parameters Sample Rate Choose a sample rate that is compatible with your music application and suited to your com...

Page 31: ...em This is done by gradually reducing the buffer size Drag the latency slider to the left while playing something Once you begin to hear crackles or dropouts carefully drag the latency slider to the r...

Page 32: ...s both on the hardware and on the software side of your setup Please start GUITAR RIG 4 before you proceed 5 4 1 Connecting your Instrument and Adjusting the Input Level 1 Turn down the volume on your...

Page 33: ...iently power ful signal you need to carefully adjust the input level of the SESSION I O The Input LEDs help you by indicating the level of the incoming signal for each channel LED Status Meaning LED i...

Page 34: ...t the same level line or instrument Just plug the cable of your second instrument into the other input jack and set the right input level as described in the previous section For instruments generatin...

Page 35: ...th input channels L R are activated so one of the input channels remains mute To change this deactivate the channel you are not using Click on the appropriate but ton L or R on the left hand side of t...

Page 36: ...el fully turned down 3 Go to the Preset Browser and select any of the presets by clicking on it Start playing and carefully turn up the output or headphone level of the SESSION I O to the desired leve...

Page 37: ...on please check the Driver Control Panel On Windows computers you find it in the GUITAR RIG 4 application folder in the Start menu The information is shown after you click on About On Mac OS X compute...

Page 38: ...l Your instrument s volume is turned down Turn up the volume knob 6 1 2 Distorted Signal If the audio signal sounds distorted and no distortion is being added by the GUITAR RIG 4 software then this is...

Page 39: ...sec tion 5 4 Mac OS X of this manual 6 1 4 Ground Loops Ground loops usually perceived as a hum or buzz are a common problem when multiple electrical devices are connected to the same power circuit Th...

Page 40: ...supply the necessary amount of bus power try connecting your SESSION I O to a USB 2 0 hub with external power supply Avoid connecting other devices to the hub as every bus powered device will diminis...

Page 41: ...not recommended to use laptops with shared memory graphic cards You will need all the memory and processing power available for your audio project There are some steps to optimize your laptop s audio...

Page 42: ...and Sockets 2 input jacks In 1 In 2 for mono jacks 6 3mm plugs 2 output jacks Out 1 Out 2 for 6 3mm mono unbalanced or TRS tip ring sleeve balanced plugs 1 Headphones jack for stereo 6 3mm jack 1 USB...

Page 43: ...46 dBu Maximum Input Level 0 dBu THD N 0 008 Frequency Response 10 40000 Hz 1 dB Line Input Input Impedance 44 k unbalanced balanced Full Scale Level at Max Gain 2 19 dBu Maximum Input Level 15 dB un...

Page 44: ...alanced Full Scale Level at Max Gain 8 3 dBu Maximum Input Level 9 dB unbalanced SNR weighted 95 9 dB THD N 0 008 Frequency Response 10 40000 Hz 1 dB Audio Outputs D A Channels 2 Sample Rate 44 1 48 8...

Page 45: ...0 ohms balanced Maximum Output Level 6 dBu SNR weighted 100 dBu THD N 0 008 Frequency Response 10 45000 Hz 0 5 dB Headphone Output Load Impedance 8 600 ohms Maximum Output Level 1 67 V eff 100 ohms SN...

Page 46: ...is guaranteed only when SESSION I O is used as a single device with a USB 2 0 controller or with a self powered USB 2 0 hub 7 4 Dimensions and Weight 121 x 115 x 40 mm 4 76 x 4 53 x 1 57 in 0 56 kg 1...

Page 47: ...t Intel Pentium or AMD Athlon XP 1 4 GHz 1024 MB RAM USB 2 0 Mac OS X 10 5 Intel Core Duo 1 66 GHz 1024 MB RAM USB 2 0 7 6 2 Supported Driver Formats Mac OS X Core Audio Windows ASIO recommended Direc...

Reviews: