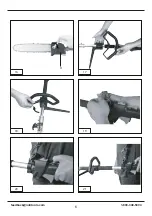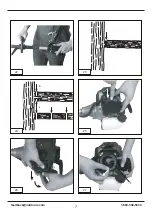
instructions.
• Ne
v
er cut with the upper edge or the tip of the
cutt
er ba
r.
hand
s.
C
utting wood which is under
t
ension
S
pe
ci
a
l c
a
r
e is
r
eq
uir
ed when
cutt
ing w
oo
d wh
ic
h
is under
t
ension.
C
utting wood which is under
t
ension can
r
elease the
t
ension, causing the
wood
to r
ea
c
t out of
control. I
n the worst case
this can
r
esult in se
v
e
r
e and e
v
en fatal inju
r
ie
s.
T
his
t
ype of w
or
k must be pe
r
f
or
med only b
y
specially t
r
ained person
s.
9. Maintenance
9.1 Replacing the chain and cutter bar
T
he cut
t
er bar needs
t
o be
r
epla
c
ed if • the guide
g
roov
e of the cut
t
er bar is w
orn.
Proc
eed as desc
r
ibed in the se
ction „F
itting the
cutt
er bar and the chain
“.
9.2 Checking the automatic chain lubrication
Y
ou should check the operation of the au
tom
a
tic
chain lub
ric
a
tion syst
em on a
r
egular basis in
or
der
t
o gua
r
d against
ov
e
r
heating and the
damage this can cause
t
o the cut
t
er bar and the
chain.
Poin
t the tip of the cut
t
er bar at a smooth su
r
fa
c
e
(a boa
r
d or a cut t
r
ee fa
c
e) and all
o
w the
chainsaw
to run. I
f
y
ou see a g
ro
wing oil stain
on the smooth su
r
fa
c
e, the au
tom
atic chain
lub
ric
a
tion syst
em is w
ork
ing p
r
ope
rly. I
f
the
r
e is no clear oil stain, please
r
efer
t
o the
corr
esponding instru
c
tions in the se
ction
„Tr
oubleshooting
“. I
f the inf
orm
a
tion
con
tained the
r
e still fails
to r
emedy the
situ
ation, please
con
ta
c
t our se
rvic
e depa
r
tme
nt
I
mpo
r
ta
nt! Do no
t a
c
tua
lly touc
h
t
he su
r
fa
c
e with
the tip of the cut
t
er bar when pe
r
f
or
ming this
t
es
t.
Keep a safe distan
c
e (app
ro
x. 20 cm).
9.3 Sharpening the chain
possible if the chain is in good
c
ondition and
sha
r
p
.
T
his also
r
edu
c
es the
r
isk of
kick
bac
k.
T
he chain can be
r
e-sha
r
pened by a
n
y deale
r. Do
not
a
tt
empt
t
o sha
r
pen the chain
y
ourself unless
y
ou ha
v
e the ne
c
essa
r
y special
t
ools and
expe
r
ien
c
e
.
supplying
t
oo little air
t
o the ca
r
bu
r
e
tor. R
egular
should be checked af
t
er e
v
e
r
y 25 hours of use
and cleaned if ne
c
essa
ry. I
f the air
con
tains a
f
r
eque
ntly.
out.
4. A
ssemble in
r
e
v
erse o
r
de
r.
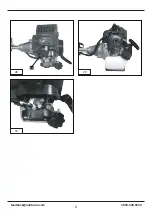
9.5 Maintenance of the spark plug (Fig. 27)
Spa
r
k plug spa
rk
ing gap = 0.6mm.
T
igh
t
en the
spa
r
k plug with a
tor
que of 12
t
o 15 Nm. Check
the spa
r
k pl
u
g f
or
d
ir
t and
g
rim
e af
t
e
r
10 h
ours o
f
ope
r
ation and if ne
c
essa
r
y clean it with a
c
opper
wi
r
e brush.
T
he
r
eaf
t
e
r
se
rvic
e the
s
pa
rk
plug af
t
er
e
v
e
r
y 50 hours of ope
r
a
tion.
1.
P
ull out the spa
r
k boot plug (
Fi
g. 28).
2. R
em
ov
e the spa
r
k plug (
Fi
g. 28) with the
supplied
multifun
ction tool (It
em 24).
3. A
ssemble in
r
e
v
erse o
r
de
r.
9.6 Applying grease to the gear unit
A
f
t
er e
v
e
r
y 20 hours of use add a little gear
g
r
ease (app
ro
x. 10 g.) at the lub
ric
ation nipple
(Fi
g
. 4/It
em 25).
10. Cleaning, storage, transport
10.1 Cleaning
•
R
egula
r
ly clean the
t
ensioning mechanism
by bl
o
wing it out with
c
omp
r
essed air or
cleaning it with a brush.
D
o not use a
ny tools
1-800-348-5004
15
Summary of Contents for BlueMAX 53542
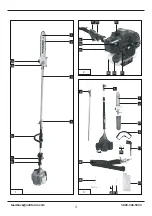
Page 4: ...4 5 4 3a 3b 25 4 6 8 5 K I N G R G H 7 9 1 800 348 5004 feedback natitools com 4...
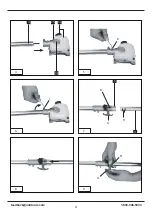
Page 5: ...2 mm 10 12 14 11 13 15 1 2 L S L P S O M 1 800 348 5004 feedback natitools com 5...
Page 6: ...16 18 20 17 19 21 O 1 800 348 5004 feedback natitools com 6...
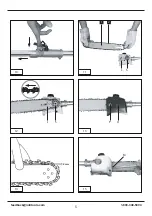
Page 7: ...23 25 27 24 26 a b T 22 1 800 348 5004 feedback natitools com 7...
Page 8: ...29 28 30 13 1 800 348 5004 feedback natitools com 8...


