W415-1472 / 04.21.15
32
EN
8.0 OPERATING INSTRUCTIONS
8.1 PROPER PELLET LOADING
8.2 START UP CYCLE
Before loading pellets into the hopper fi rst transfer the pellets from it’s original plastic bag to a metal bucket.
Keep in mind that the auger stops when the lid is opened. If the lid is opened for several minutes, the fi re may
extinguish.
NOTE: If the pellets are kept in the plastic bag, the bag may come in contact with the appliance causing
the bag to melt and the pellets to spill.
DO NOT load pellets into the hopper if they have been exposed to moisture. Moisture can cause pellets
to swell and cause blockage in the feed system. Thoroughly dry pellets before placing into hopper.
47.10
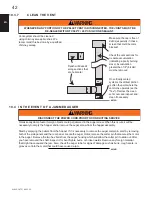
Your appliance can be lit manually without using the automatic igniter by following the procedure below.
•
Press the ON / OFF button.
•
Place a “handful” of pellets into the burn pot.
•
Cover with a small amount of approved (non-volatile) fi re starter gel.
• Light
fi re starter with a match and close the viewing door.
47.11
APPLIANCE MAY BE HOT.
OTHER THAN PLACING A HANDFUL OF PELLETS IN THE BURN POT FOR LIGHTING MANUALLY,
NEVER FEED PELLETS THROUGH THE GLASS VIEWING DOOR. AN "OVERFIRE" CONDITION
COULD OCCUR, IF MORE PELLETS ENTER THE FIREBOX THAN WHAT THE FEED TUBE CAN
DELIVER. PELLETS MUST ONLY BE BURNED WITHIN THE BURN POT.
NEVER USE GASOLINE TYPE LANTERN FUEL, KEROSENE, CHARCOAL LIGHTER FLUID, OR
SIMILAR LIQUIDS TO START OR ‘FRESHEN UP’ A FIRE IN THIS APPLIANCE. KEEP ALL SUCH
LIQUIDS WELL AWAY FROM THE APPLIANCE WHILE IT IS IN USE.
!
WARNING
Before installing this appliance we recommend a “PRE-BURN” inspection to help burn off the odours that are
associated with the fi rst burn. If possible, move the appliance outside and add approximately 5 lbs of pellets
into the hopper. Plug the power cord into a typical wall receptacle.
The appliance is equipped with a control board that has been shipped in manual mode.
When fi rst starting a new pellet appliance, or when you completely empty the hopper of pellets you can press
and hold the prime button to get the pellets into the burn pot quicker.
A.
Press the ON/OFF button:
B.
The "POWER" light will come on, indicating that the start-up cycle has begun. The "HEAT" light will
come on.
C.
The auger comes on and runs for approximately 3 minutes.
D.
The igniter comes on and will stay on until the proof of fi re determined by the temperature of the
appliance.
E.
The convection blower will not operate until the proof of fi re is determined by the temperature of the
appliance.
NOTE: Flame should appear in the burn pot within 3 to 7 minutes from commencing the start-up cycle.
The start-up cycle should end in approximately 12 to 15 minutes. At that point, the power light will go
from red to green and then adjustments to the feed rate can be made or the appliance will revert to the
previous setting. If proof of fi re is not established in 15 minutes, the appliance will shut down and will
need to be turned back on again.
If the appliance shuts down, empty the pellets from the burn pot and restart.
8.3 LIGHTING APPLIANCE MANUALLY
Summary of Contents for NPI45
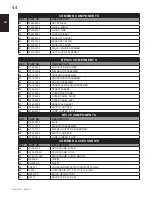
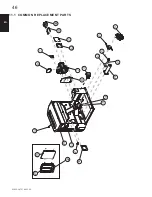
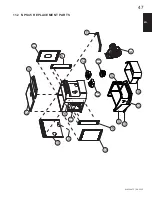
Page 48: ...W415 1472 04 21 15 48 EN 67 20 29 58 41 38 43 44 63 57 60 6 11 3 NPI45 REPLACEMENT PARTS...
Page 54: ...W415 1472 04 21 15 54 EN 14 0 SERVICE HISTORY 43 1...
Page 55: ...W415 1472 04 21 15 55 EN 15 0 NOTES 44 1...
Page 106: ...106 W415 1472 04 22 15 FR 67 20 29 58 41 38 43 44 63 57 60 6 11 3 PI CES DE RECHANGE DU NPI45...
Page 114: ...114 W415 1472 04 22 15 FR 15 0 NOTES 44 1...
Page 115: ...115 W415 1472 04 22 15 FR 44 1...


