background image

JuLI™Stage, Real-Time Cell History Recorder

8

9

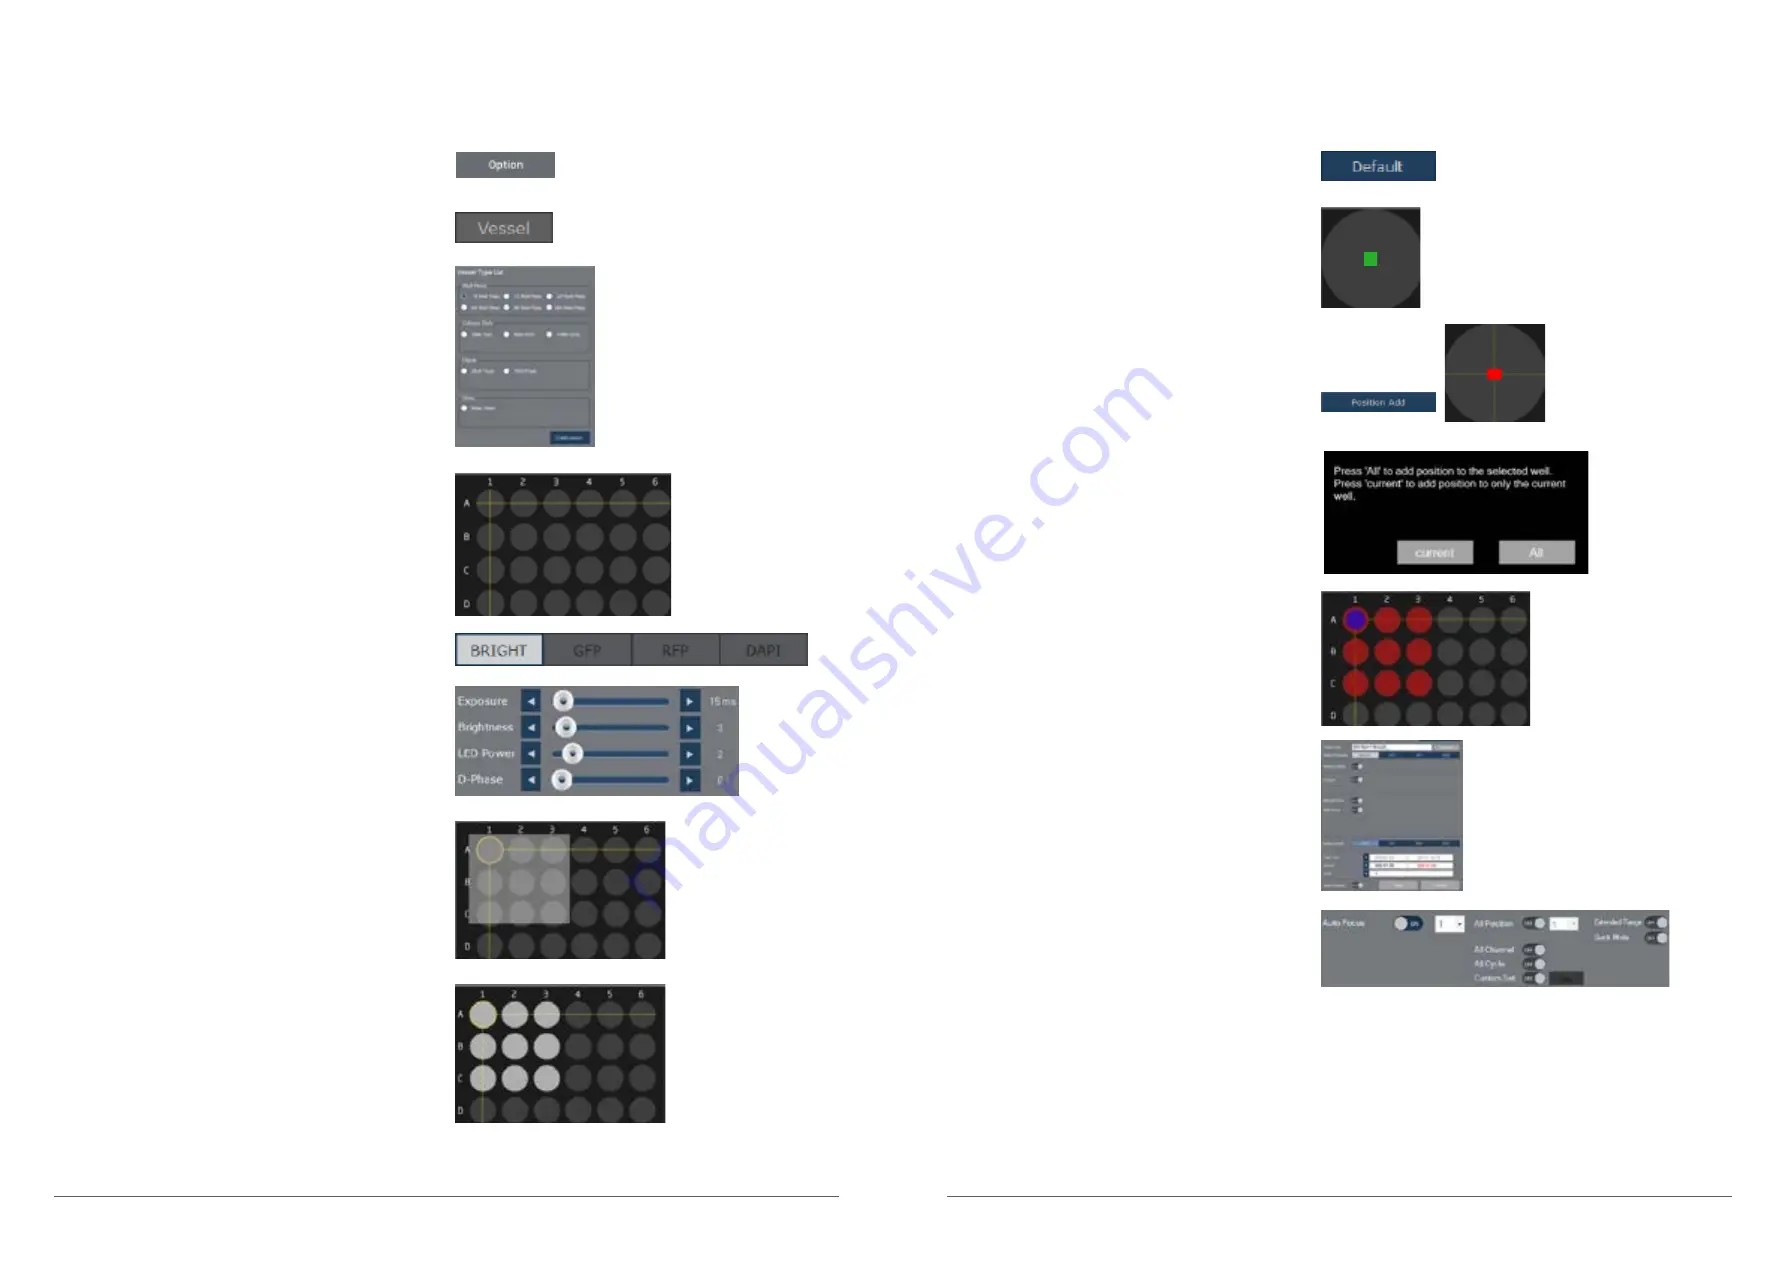
9. Press the Default button to equally capture 
    central position of all wells. 

10. The assigned position is marked by green square 
       on navigation window.

11. Press the Position Add button to complete setting
       - the green square is changed to Red.

12. Press the All button when pop-up window appears.

13. Once the wells are finally confirmed, they are 
       changed to Red color.

15. Turn on the Auto focus toggle button.
       There are four additional options of
       auto focus function; All Position, All Channel,
       Custom AF and All Cycle AF.

14. Enter the detail setting information. 
       (Please refer to the previous page)


Refer to the detail in the manual. (User manual Page. 22~27)


Refer to the detail options of Monitoring option

       tap in the Option menu (User manual page. 36)

Operation type-1

(for selecting multiple samples and using the Auto focus)

Operation type-1

(for selecting multiple samples and using the Auto focus)

1. Select the Option menu.

2. Press the Vessel button.

3. Select the Vessel type according to your
     sample when well type list appears.

4. Check the Selected Vessel type and press
    Vessel button again to finish setting.

5. Select the LED channel.

6. Adjust Exposure, Brightness, LED Power and
    D-Phase
, as neccessary.

7. Select areas you want to capture by dragging with 
    left mouse button. To select the entire well,   
    press Select All button.

8. The selected wells are changed to Grey color.

Summary of Contents for Juli

Page 1: ...eong si Gyeonggi do 18531 Korea Tel 82 2 6220 7940 Fax 82 2 6220 7999 NanoEnTek Inc USA 240 Bear Hill Road Suite 101 Waltham MA 02451 USA Tel 1 781 472 2558 Fax 1 781 790 5649 www julistage com sales...

Page 2: ...ial foam from the box 2 Carefully lift the instrument out of the box using the handholds in the bottom of the base 3 Place the instrument on a flat level surface table or incubator 4 Unscrew the filte...

Page 3: ...ed condition press Check A01 or B02 button one more time 4 Press the Move to B02 or C03 Well number can be changed by vessel type Basically it is expressed in the end well of the relevant vessel type...

Page 4: ...first well to end well Image capture Save and overlay 8 Find optional focus adjusting the Focus bar and buttons 9 Press the Capture button to start capturing images 10 Press the Save button to save t...

Page 5: ...lease refer to the previous page Refer to the detail in the manual User manual Page 22 27 Refer to the detail options of Monitoring option tap in the Option menu User manual page 36 Operation type 1 f...

Page 6: ...tion menu User manual page 36 Operation type 2 for selecting Individual samples using the Manual focus 1 Click a well you want to capture using the Right mouse button 2 Once the well is selected stage...

Page 7: ...yeonggi do 18531 Korea NanoEnTek Inc USA 240 Bear Hill Road Suite 101 Waltham MA 02451 USA Email Website Tel 1 781 472 2558 Fax 1 781 790 5649 sales nanoentek com www julistage com www nanoentek com N...

Reviews: