background image


- 34 - 

10.  Fit the lay shaft with the lay shaft third and top gear pinions 

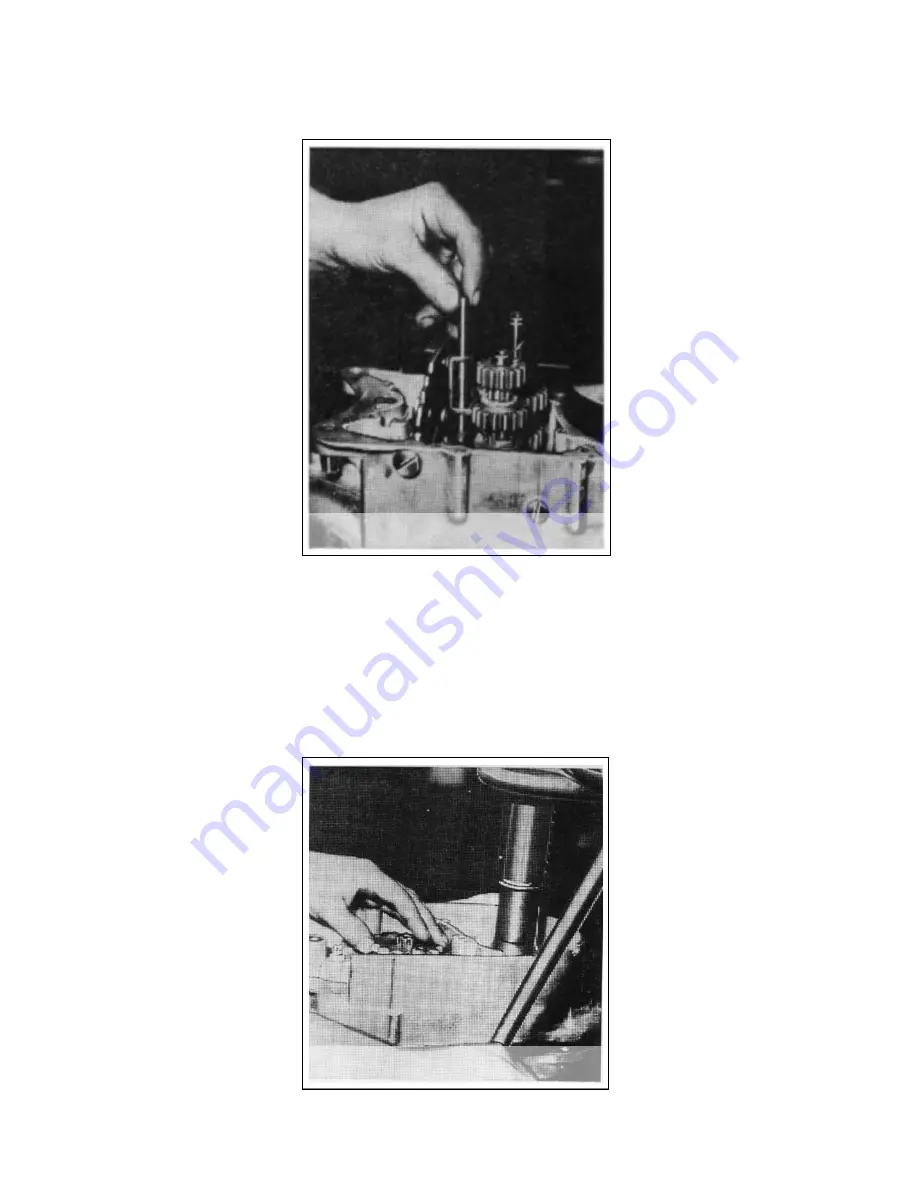
11.  Insert the rod into the selector forks and tighten the securing screw. Fig.23. 


12.  Press the driving gear with hub into the R.H. crankcase half. 

13.  Turn the crankcase over and press in the sealing ring with the spacer. 

14.  Knock the gear box sprocket on, fit the securing washer and tighten the nut. 

15.  Provide  both  crankcase  halves  with  a  coat  of  sealing  compound  knock  in  the 

dowel  bushes  using  drift  S-2  and  tighten  fast.  For  tightening  make  use  of  the 

gearbox sprocket turning it round. Fig.24. 


Fig 23 

Fig 24 

Summary of Contents for 501/01

Page 1: ...orkshop anual This manual covers all Cezeta and N Zeta models M W ...

Page 2: ... Removal 13 Piston 14 Piston Grading According To Diameter D2 Model 502 15 Piston Grading According To Diameter D2 Model 501 15 Cylinder 16 Assembly Table For Models 501 01 03 05 16 Assembly Table For Models 502 00 01 16 Gudgeon Pin Bush For Models 501 01 03 05 17 For Models 502 01 00 17 Fitting The Piston 17 Fitting The Cylinder Barrel And Cylinder Head 18 Cooling Fan 18 Setting The Ignition Adva...

Page 3: ...moval Of The Suspension Damper 39 Model 502 Dismantling The Rear And Front Suspension Units 39 Chain Case Removal 39 To Dismantle The Pivoted Rear Arm 40 Model 502 Dismantling The Pivoted Rear Fork 40 Dismantling The Headlamp 41 To Dismantle The Fuel Tank 41 Luggage Compartment Removal 41 Removing The Bodywork And Its Accessories 41 To Dismantle The Choke Device 42 Dismantling The Fuel Tap Control...

Page 4: ...actor Technical Data And Setting 48 Regulator With Contactor Mechanical Checking 49 Operation Checking 49 PAL 02 9490 60 Dynastart Technical Data 50 Dynastart Mechanical Checking 50 Operation Checking 50 Lights 51 Electric Horn 51 Leads 51 ...

Page 5: ...he crankshaft and connecting rod mechanism and electrical equipment is provided Because the maintenance and repairs of the cycle part are due to the NZETA scooter monocoque bodywork restricted to the minimum and are well described in the Owner Handbook only the most essential matters shall be discussed here It is necessary to warn NZETA scooter owners that they should consider their mechanical abi...

Page 6: ...ttor defects which may occur in operation should be remedied by repairing or replacing of its parts This applies to the throttle valve which in case of excessive play in the mixing chamber should be replaced with a new one or in the case of seizure should be repaired using fine emery cloth or sharpening stone One should never omit to wash the throttle valve in petrol after it has been repaired to ...

Page 7: ...main jet 19 is located in the float chamber It is accessible after removal of the float chamber top 20 To Dismantle The Float Chamber Proceed As Follows Close the fuel tap first and remove the fuel supply pipe After unscrewing the four screws 32 remove the float chamber top together with the gasket 21 and float 31 To assemble proceed in the reverse manner The throttle valve needle 7 is located in ...

Page 8: ...le carefully these parts in order not to damage the float stop which would alter the fuel level To Set The Carburettor According To The Manufacturers Specifications Proceed As Follows First check the throttle valve needle position how to assemble the throttle valve has been described in the preceding paragraph slacken the lock nut 10 screw the cable guide 9 into the mixing chamber top 8 thus freei...

Page 9: ...ning in and it has to be reset after the first 2000 km 1200miles to the following values Main Jet 100 to 102 to Solex Idling Jet 55 to Solex Needle position 3 rd notch from the top Pilot air screw slacken by of a turn from tight anticlockwise Fig 1 ...

Page 10: ...e mixing chamber top 7 has been first removed After compressing the spring 6 free the control cable from the throttle valve 3 notch and thereby the spring resting against the needle circlip 5 and the throttle valve The circlip 5 secures the correct position of the needle 4 To assemble proceed in the reverse manner The idling jet 26 the pilot air screw 27 and the throttle stop screw 29 are located ...

Page 11: ...ke up the throttle cable play unscrew the cable guide 9 and secure the guide with the lock nut 8 The carburettor is set in the Works for running in and it has to be reset after the first 2000 km 1200miles to the following values 2429 S 11 Carburettor on the 501 03 to 05 models Main Jet 105 to Solex Idling Jet 55 to Solex Needle position 2nd notch from the top Pilot air screw slacken by of a turn f...

Page 12: ... 11 Fig 2 ...

Page 13: ... connecting the induction silencer to the carburettor does not become distorted or damage to prevent dirt entering the engine The drain hole in the sleeve must always face downwards A loose silencer top will manifest as a roaring noise when the engine is running In such a case the element may fall out resulting in dirt entering the engine as well as the mixture becoming lean and the engine loosing...

Page 14: ...e chain replacement and adjusting of the clutch and gear change mechanism removal of the cooling fan Cylinder Head and Cylinder Barrel Removal First remove the luggage compartment this job is described in the Bodywork chapter Dismantle the cooling fan this job is described in the next chapter For the 501 model unscrew the two exhaust pipe nuts for the 502 model unscrew the bolt fastening the exhau...

Page 15: ...original piston with the pressed in gudgeon pin scooters 501 01 03 up to engine Nº 132252 puller S 38 should be used for extracting the gudgeon pin For the new piston with floating pin model 501 05 and 502 00 01 use the locating pins S 3 and push out the gudgeon pin with light pressure by hand When dismantling the piston first remove the two circlips securing the gudgeon pin Never drive out the gu...

Page 16: ...80 450 12 028 3rd rebore 58 610 58 620 58 630 450 12 029 4th Rebore 58 860 58 870 58 880 450 12 030 Piston Grading According To Diameter D2 Model 501 Fig 6 A 0 01 B 0 01 C 0 01 Nº Standard 57 875 57 885 57 895 356 12 241 1st rebore 58 125 58 135 58 145 356 12 242 2 nd rebore 58 375 58 385 58 395 356 12 243 3rd rebore 58 625 58 635 58 645 356 12 244 4 th Rebore 58 875 58 885 58 895 356 12 245 Fig 6...

Page 17: ...58 03 0 01 356 12 241 1st rebore 58 26 0 01 58 27 0 01 58 28 0 01 356 12 242 2 nd rebore 58 51 0 01 58 52 0 01 58 53 0 01 356 12 243 3rd rebore 58 76 0 01 58 77 0 01 58 78 0 01 356 12 244 4 th rebore 59 01 0 01 59 02 0 01 59 03 0 01 356 12 245 Assembly Table For Models 502 00 01 A B C N º Standard 58 01 0 01 58 02 0 01 58 03 0 01 502 12 020 1 st rebore 58 26 0 01 58 27 0 01 58 28 0 01 502 12 021 2...

Page 18: ...bodywork it is necessary to cover the crankcase very well to prevent bronze chips from entering the engine Before fitting the bush it is advisable to heat the connecting rod small end to about 80 ºC 176 ºF using a blowtorch or similar This causes the hole into which the bush is to be fitted to become slightly expanded and the bush will be more easily pressed in To fit and remove the gudgeon pin an...

Page 19: ...ng care not to damage the gasket and then screw the studs into the crankcase in the reverse manner to their removal Place preferably a new gasket under the cylinder head and do not omit to fit the washer under each cylinder head nut It is easy to locate them by sliding them down a screwdriver or suitable sized piece of rod Tighten the cylinder head nuts sequentially Cooling Fan Fig 7 The method of...

Page 20: ... 19 Fig 7 ...

Page 21: ...should only be removed for replacement after part drilling the riveted end and pressing it out The new shaft can be secured in place once it is pressed in by riveting the hollowed end using a suitable tool with a 90 º tapered end Care must be taken not to damage the cylindrical end of the shaft during this operation and the shaft must be inserted perpendicular to the fan body plane By unscrewing t...

Page 22: ... fits over the bolt Retighten the bolts and recheck the tension of the Vee belt These inserts are supplied with each scooter two per set Setting The Ignition Advance The ignition advance should be set or checked always when the cylinder head is being removed As a matter of routine ignition advance setting however is done without removing the cylinder head But if the cylinder head has been removed ...

Page 23: ...om under the luggage compartment securing the rear suspension unit to the bodywork into the hole in the centre of the rotor Turn the bolt while holding the rotor with the other hand until the rotor slides off the shaft To reassemble proceed in reverse manner To Dismantle The Clutch Operating Bracket Remove the RH crankcase side cover Free the clutch cable after that Unscrew the three bolts and rem...

Page 24: ... chain after that Using puller S 24 pull off the sprocket To refit proceed in the reverse manner To Dismantle The Clutch And Primary Drive is the same for both models Unscrew the draining plug on the crankcase bottom and drain the oil To gain easier access to the engine remove the batteries from their holders and lay the scooter on its RH side Remove the gear change rod the gear change pedal and t...

Page 25: ... the engine sprocket and the clutch drum securing the drum against rotation Locate the securing plate S 11 between the clutch drum and the hub complete thus securing the clutch Now slacken the clutch nut Fig 14 and the engine sprocket nut with the box spanner The engine sprocket of scooters with cooling fans will already be freed when the fan pulley was removed After that take out the clutch hub L...

Page 26: ...he whole quadrant clockwise To Dismantle The Gear Change Shaft The gear change shaft can be removed after the RH crankcase side cover and the clutch operating bracket have been taken off Using the punch S 44 drive out the cam securing pin from below Fig 15 and remove the cam Take care of the shims between the crankcase and the cam From the clutch side put the pawl securer S 51 Fig 16 onto the gear...

Page 27: ...k and to the ignition coil remove the spark plug lead and further disconnect the speedometer drive the rear wheel brake cable from the brake pedal the gear change rod from the gear change pedal the clutch cable in the engine the fuel pipe the throttle cable and the choke cable the exhaust pipe with the exhaust silencer In the case of the 501 model first unscrew the four front engine plate bolts th...

Page 28: ...gine side cover has already been removed and as described in the respective paragraph the dynastarter has now to be taken out Remove on the LH side of the engine the gear change pedal the kick starter pedal model 501 the extension model 502 Unscrew the oil draining plug And drain the oil into a suitable container Remove the LH side cover dismantle the clutch and primary drive as described in the r...

Page 29: ... a pressure of 3 500kg to 5 000kg 7 700lb to 11 000lb pressure a measuring table with centres and indicator dials The job should be entrusted to an experienced engineer When pressing the crankshaft apart care has to be taken not to damage the left thread on the pin Care should also be taken not to alter the position that the pins were pressed together Of particular importance is the position of th...

Page 30: ...mm Measuring is done on the side of the crank web along its circumference Eccentricity on the crank web circumference may not exceed 0 03 mm Deflection from the perpendicular will be easily remedied by striking the crank web in the spot of the maximum deflection with a wooden hammer Radial eccentricity along the circumference cannot be remedied It is not permitted to attempt adjustment by lathe ma...

Page 31: ...V II II II Connecting rod Crank pin 4 4 2 10 10 8 16 16 14 V III III V III III V III III Connecting rod Crank pin 3 1 9 7 15 13 IV IV IV IV IV IV Connecting rod Crank pin 2 8 14 V V V Connecting Rod Rollers Crank Pin Fig 19 Crankshaft Assembly 356 Assembly Table For The 501 Model Crankshaft Assembly According To Graded Groups 502 Model Rollers Connecting Rod Groups Arabic numeral Crank Pin Groups ...

Page 32: ... 0 002 3 29 904 0 002 C 3 998 0 002 III 21 897 0 002 4 29 906 0 002 D 3 996 0 002 IV 21 895 0 002 5 29 908 0 002 E 3 994 0 002 V 21 893 0 002 6 29 910 0 002 F 3 982 0 002 7 29 860 0 002 G 3 980 0 002 8 29 862 0 002 H 3 978 0 002 9 29 864 0 002 I 3 976 0 002 10 29 866 0 002 J 3 974 0 002 11 29 868 0 002 K 4 027 0 002 12 29 870 0 002 L 4 025 0 002 13 29 950 0 002 M 4 023 0 002 14 29 952 0 002 N 4 02...

Page 33: ...ced because they are machined together and made to match Before assembly put the individual parts on a clean piece of paper on the work table All moving parts such as pins shafts pinions etc should be provided with a coat of oil Proceed as follows 1 Only the bushes are pressed in the two crankcase halves 2 Fit the bearing circlips into the L H crankcase half 3 Heat both crankcase halves in an oil ...

Page 34: ...o the L H crankcase half for model 502 do not omit to secure the second gear pinion with the spring ring Fig 21 8 Insert the bottom selector fork into the third gear pinion and the cam plate 9 Locate the lay shaft bottom gear pinion into the crankcase and after that the lay shaft second gear pinion with the selector fork insert the selector fork into the cam plate Fig 22 Fig 21 Fig 22 ...

Page 35: ...into the R H crankcase half 13 Turn the crankcase over and press in the sealing ring with the spacer 14 Knock the gear box sprocket on fit the securing washer and tighten the nut 15 Provide both crankcase halves with a coat of sealing compound knock in the dowel bushes using drift S 2 and tighten fast For tightening make use of the gearbox sprocket turning it round Fig 24 Fig 23 Fig 24 ...

Page 36: ... 35 The assembly of the clutch and L H side cover the dynastarter the clutch operating bracket and the L H side cover has been described in the preceding paragraphs ...

Page 37: ...and the rear chain disconnected the description of the procedure will be found below Unscrewing the nut on the sprocket spindle will free the sprocket which can then be taken out of the fork Drive out the sprocket spindle remove the seal using the circlip pliers remove the circlip and finally drive out the bearing To assemble proceed as follows first fit the circlip into the groove inside the hub ...

Page 38: ...ng in this manner the dog clutch with the sprocket After that slacken the chain adjuster front nuts on the rear wheel spindle and then the rear adjusting nuts as well Rotate the rear wheel to bring the connecting link on to the sprocket and release the connecting link clip with pliers or a screwdriver By removing the connecting link the chain will be disconnected To the chain in the chain case con...

Page 39: ...scribed first Slacken the bolts fastening the oil damper and the bolts fastening the rubber blocks and the mudguard to the fork After unscrewing the bolts remove the suspension rocker Take out the rocker pins and drive the bushes out of the pivoted arm using puller S 20 Drive out the rubber bushes with a press using drift S 18 Fig 25 Unscrew the grub screw securing the rubber buffers and remove th...

Page 40: ... reassemble the damper To reassemble reverse the procedure Screw the protecting cap S 41 on the piston rod to avoid damaging the seal Correct operation of the oil damper depends on the accuracy of assembling the bottom and top valve parts Model 502 Dismantling The Rear And Front Suspension Units The 502 model employs substantially the same front and rear suspension units Different is the fixing of...

Page 41: ...he two arm halves Model 502 Dismantling The Pivoted Rear Fork To dismantle the pivoted rear fork of the 502 model proceed as follows remove the rear wheel first take off the chain case and chain Now remove the dog cutch with chain wheel Fig 27 Do not omit to free the rear suspension units by unscrewing two bolts After unscrewing the two pivoted rear fork bolts and removing them together with the w...

Page 42: ...fuel tank cap Now slacken four nuts and remove the fuel tank with seal To reassemble proceed in reverse manner Luggage Compartment Removal This has to be done when dismantling the cylinder the procedure being the same for both models Free the batteries first and remove them For the 501 model the voltage regulator has to be disconnected as well After slackening the six nuts Fig 28 and removing the ...

Page 43: ...oving the cotter pin take the taper extension off Model 502 remove the cotter pin first then hold the extension with one spanner and slacken the lock nut with another spanner Screw the extension off together with the nut and after that take the lever out of the bodywork Reverse the procedure for reassembling When fitting the lever with extension to the fuel tap it is necessary to ensure the correc...

Page 44: ...ushing out the joint remove the gear change pedal To reassemble proceed in reverse manner To adjust the gear change pedal position slacken the rod lock nuts and either screw the rod into or out of the socket ...

Page 45: ...r resistance the winding of one of the field coils is shorted on the stator frame if there is no current coming through the winding or interconnection of the field coils has been cut the field coils have to be disconnected s and the faulty one replaced The dynamo rotor winding outlets are soldered to the commutator plates Check the field coil outlet connection to the commutator and whether there i...

Page 46: ...aragraph Dynastart Mechanical check of the regulator with contactor Checking the charging by voltmeter connected to the dynamo terminal 61 and the machine frame with the fuse removed and the ignition key in position 5 switch box with ampere meter or position 1 car type switchbox At approx 1200 r p m the regulator armature will connect voltage 6 5 0 3V At 4500 to 5000 r p m voltage 7 8 0 3V This va...

Page 47: ...ator are well dimensioned and ensure reliable operation On the dynastart stator are located four holders for the carbon brushes two of which operate the dynamo and the other two operate the starter The terminals of two of the carbon brushes connect to the stator frame The base plate with contact breaker and condenser on the stator face serves as ignition circuit contact breaker PAL 12V Regulator W...

Page 48: ...is flows electric current from the batteries into the stator starting winding from there to one collector into the rotor winding and through the machine frame back to the terminal of the battery In this way the dynastart is connected as a series DC motor with a powerful engagement torque at rest The stator and rotor windings are series connected The rotation of the armature is transmitted to the e...

Page 49: ...tance R of 10 Ohm value the dynamo excitement will drop and the current again decrease to the prescribed value At maximum engine r p m the regulator armature is alternately completely attracted to the coil whereby contacts RK 2 and RK 3 are connected and the stator winding is without current or is again disconnected and the winding is excited via the resistance The voltage fluctuates about the max...

Page 50: ...m minimum If the fault is not in the winding of the voltage and current coil and the dynamo supplies current of correct values and there is no connection fault or fault in the resistance 10 Ohms it will as a rule be possible to remedy the defect by mechanical checking and setting Operation Checking Setting the prescribed values on the regulator should be carried out with the dynastart in operation...

Page 51: ...ls of min between starts Dynastart Mechanical Checking A Carbon brushes have to move freely in their holders and sit with at least their face on the rotor commutator B Arms with springs have to press the carbon brushes on to the commutator C Rotor commutator may not he out of true by more than 0 05 mm D The commutator has to be clean free of carbon brush dust the individual grooves between the com...

Page 52: ...ected with one lead to terminal 30 on the switch box the second lead goes into the handlebars to the push button Model 502 has the horn located under the bodywork on the RH side of the partition Leads Automotive varnished leads of various sections corresponding to the current load serve to connect the accessories The leads are contained in a harness fastened inside the bodywork by metal clips The ...

Page 53: ...ranslation of the CEZETA Workshop Manual and as such some parts may not apply to NZETA models as supplied Ian s Bike Museum has attempted to change some of the grammar to make the document more easily understood If a photo copy of the original manual is required one can be obtained from Ian s Bike Museum P O Box 54 Balclutha 9240 New Zealand ...

Reviews: