background image

Design Considerations

5

Design Considerations

Failing to plan is planning to fail. Although the myPV CommsSafe is very simple to 
design for and incorporate into your project design, there are aspects of the equipment 
that should be considered in the initial design to avoid unnecessary costs and difficulties 
during construction.

Installation Location 

The installation location for the myPV CommsSafe is easy to locate on the solar site. A 
concrete pad with a standard unistrut is built on site during initial construction - and is 
designed to be the installation location for the myPV CommsSafe.

The auxiliary power available from the site will be either 120 volt AC or 480 volt 3 phase 
power. In the event that AUX power is not always available - the 1.5kV DC is an option 
for powering up off of the array. Further details are provided in our Quick Start Guide.

Summary of Contents for CommsSafe AC-1

Page 1: ...User Manual 1 myPV CommsSafe User Manual Resources Design Considerations Receiving Network Integration Pre Energization Checks Initial Energization Commercial Operation Spare Parts Torque Schedules T...

Page 2: ...Technical Documents page by registering on our Support Resources page Product Line Specifications The myPV CommsSafe product line is available in three 3 options of power supply that are determined by...

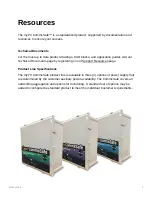
Page 3: ...Resources 2 Example myPV CommsSafe 2021 AC 1 Shown...

Page 4: ...customized to meet your needs the frame sizing and design layouts are arranged in the same manner The following photos provide a visual reference for some common locations of common features Standard...

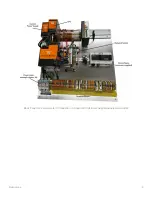
Page 5: ...Resources 4 Back Panel for CommsSafe in Production Shown with Customer Supplied Equipment Added...

Page 6: ...Installation Location The installation location for the myPV CommsSafe is easy to locate on the solar site A concrete pad with a standard unistrut is built on site during initial construction and is...

Page 7: ...date myPV CommsSafe mechanical drawings Electrical Isolation AUX Power There is a fuse disconnect between the auxiliary power terminated by the EPC and the control cabinet The CommsSafe is able to ru...

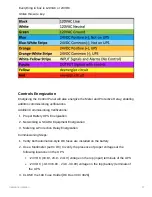
Page 8: ...with the terminal block a There is a color coded system for our whips i The brown wire connects to the 24V ii The white wire connects to the 24V iii The blue wire connects to the D1 iv The black wire...

Page 9: ...r receiving and unloading of all equipment deliveries The myPV CommsSafe will arrive in a sealed box and is ready for installation as soon as the package is opened Whenever possible your Solar Ops Acc...

Page 10: ...attach your myPV CommsSafe to the Unistrut utilizing the predrilled feet on the back of the cabinet install your sensors and successfully and safely terminate the power Do not modify the cabinet to mo...

Page 11: ...be accessed via MODBUS TCP IP Web Hosted Interface or Vendor Provided Software By default the myPV CommsSafe has a 8 port Fast Ethernet unmanaged switch Using only standard features the included netw...

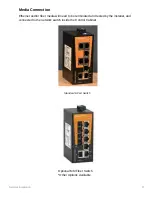
Page 12: ...Connection Ethernet and or fiber media will need to be terminated and tested by the installer and connected to the network switch inside the Control Cabinet Optional MM Fiber Switch Other Options Avai...

Page 13: ...en IT reporting requirements Communications Options Device Purpose Default IP Address Media Accessibility RV50X Cellular Modem 198 162 1 100 RJ45 Admin Web HMI 9191 Edge CPU myPV IQ Remote Interface 1...

Page 14: ...llowing tools Insulated flathead Screwdriver 0 6x3 5mm Ground Resistance Tester Multimeter w resistance testing Control Panel Preparation Prior to energization preparation of the Control Panel is inte...

Page 15: ...not installed Verify both battery fuses for continuity Install both battery fuses leave installed Three 3 spare AC fuses are included in the orange envelope mounted on the back of the Control Panel s...

Page 16: ...t of the AC control power terminations 2 Perform a gentle control wiring pull test of the sensor connectors from the Heyco s Control Panel Wiring Pull Test Locations Once operational please contact ou...

Page 17: ...mmsSafe set forth at the completion of the Pre Energization Checks we strongly recommend performing the Pre Energization Checks before proceeding The following steps will require authorized and qualif...

Page 18: ...Metering Protection Relay Energization Commissioning Steps 1 Verify both automotive style DC fuses are installed on the battery 2 Use a Multimeter set to DC to verify the presence of proper voltages...

Page 19: ...Initial Energization 18 24V DC 0 1V 23 9 24 1V voltage on the top input terminals of the UPS...

Page 20: ...Initial Energization 19 24V DC 0 1V 6 0V 23 9 30 0V voltage on the top battery terminals of the UPS...

Page 21: ...sion Inspect the external and internal metal surfaces for signs of corrosion If corrosion is found brush clean affected areas to remove oxidation and debris prime and paint with an outdoor rated paint...

Page 22: ...arts Spare Parts The myPV CommsSafe is designed with high quality industrial grade components that are intended to provide reliable operation throughout the commercial operating lifespan of your facil...

Page 23: ...nal tightening torques COURSE THREAD TORQUE FINE THREAD TORQUE 1 1 4 20 49 0 in lb5 5 N m 1 4 20 55 0 in lb6 2 N m 5 16 18 101 0 in lb11 4 N m 5 16 18 112 0 in lb12 7 N m 3 8 16 180 0 in lb20 3 N m 3...

Page 24: ...could be difficult to spot If the fuses are not blown check for a loss of auxiliary power A loss of auxiliary power would show as having no AC power If the auxiliary power and the fuses are not the is...

Page 25: ...Troubleshooting 24 A fully seated fuse that is not blown in the AC block...

Page 26: ...ttery could be fully dead and needs to recharge If a battery is allowed to fully die as in 20V or lower upon restoring the Power Supply the battery will need to charge The UPS alarm will stay on until...

Page 27: ...oubleshooting 26 JUMPERS If the fuses are not the issue verify that all jumpers are in their terminal blocks and seated securely A Fuse Terminal block that is fully connected to the rest of the AC Blo...

Page 28: ...s and the fuses there is a small chance that the power supply itself might be dead Contact the myPV Support Team if you believe this to be the concern or can not identify the issue No Ethernet Comms J...

Page 29: ...that the surge arrestors have blown In the event that a surge arrestor has blown bypass the surge arrestor and contact our support team BAD PORT OR SWITCH If you believe the issue to be a bad port in...

Page 30: ...re in their correct places and terminated correctly and all device ids are accurate there are several potential issues that could be occurring the best way to resolve any issues is to contact the supp...

Reviews: