Design Considerations
7
Whip installation is easy - our whips come pre-terminated; however in the event
that they are not or you need to do some troubleshooting, follow these steps.
1.
Separate the different wire colors in the whip - to make sure you can see them
all in front of you.
2.
Line up the appropriate wire with the terminal block.
a.
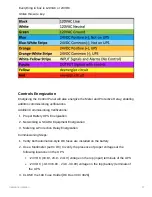
There is a color coded system for our whips.
i.
The brown wire connects to the 24V +
ii.
The white wire connects to the 24V -
iii.
The blue wire connects to the D1 +
iv.
The black wire connects to the D1 -
v.
The grey wire is our grounding wire.
3.
Securely tighten the wires into their terminal blocks.
Whip Installation Diagram with Color-Coded Key and Wire Example.
All default Device IDs and Default IP Addresses will be communicated to you as the
user in a concise and easy to reference manner.


