


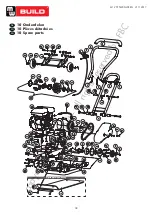
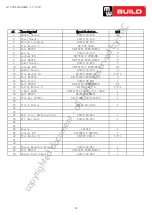


32
M1.2.TPT820.NLFREN 21112017
EN
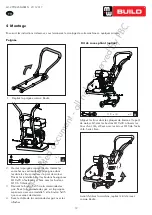
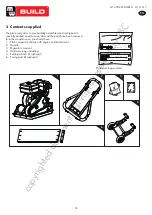
Paving pad kit (optional)
The transparent rubber paving pad allows to compact concrete slabs,
stones, bricks and blocks silently and gently.
Attach the paving pad onto the base plate as shown. Align the holes in
the base plate, paving pad and clamp plate, and secure it with 2 bolts,
washers and nuts.
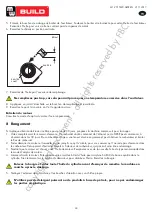
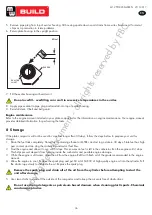
Engine oil
Add oil.
WARNING!
Oil has been drained for shipping.
Failure to fill engine sump with oil before starting
engine will result in permanent damage and will void
engine warranty.
WARNING!
Machine may fall and cause damage or injury if lifted incorrectly. Lift using handles at base of
plate.
6 Operation
Adding fuel
Fill the fuel tank.
Starting engine
1. Move the fuel valve lever to the ON position
2. To start a cold engine, move the choke to the CLOSE position.
To restart a warm engine, leave the choke lever in the OPEN position.
3. Move the throttle lever away from the SLOW position, about 1/3 of the way toward the FAST position.
4. Turn the engine switch to the ON position.
5. Operate the starter.
5 Lifting and transporting
Engine maintenance
Refer to the
Engine Manual
included in your plate
compactor for the information on engine
maintenance. Your engine manual provides detailed
information for performing the tasks.
1. Drain the fuel tank completely. Stored fuel
containing ethanol or MTBE can start to go stale
in 30 days. Stale fuel has high gum content and
can clog the carburetor and restrict fuel flow.
2. Start the engine and allo
w
it to run until it stops.
This ensures no fuel is left in the carburetor. Run
the engine until it stops. This helps prevent
deposits from forming inside the carburetor and
possible engine damage.
3. While the engine is still
w
arm, drain the oil from
the engine. R
efil
l
wit
h fresh oil of the grade
recommended in the Engine Manual.
4. Allo
w
the engine to cool. Remove the spark plug
and put 60 ml of SAE-30 of high quality motor
oil into the cylinder. Pull the starter rope
slow
ly
to distribute the oil. Replace the spark plug.
STORAGE
If the plate compactor
wil
l not be used for a period
longer than 30 days,
followi
ng the steps belo
w
to
prepare your unit for storage.
5. Use clean cloths to clean off the outside of the
compactor and to keep the air vents free of
obstructions.
6. Carefully fold the upper handle
down
. Do not
allo
w
control cables to become pinched or bent.
Remove the spark plug and drain all of
the oil from the cylinder before
attempting to start the unit after storage.
Do not use strong detergents or
petroleum
based
cleaners when
cleaning plastic parts. Chemicals can
damage plastics.
13
Vibratory Plate Compactor
7. Store your plate compactor in upright position
in a clean, dry building that has good ventilation.
Do not store compactor with fuel in a
non-ventilated area where fuel fumes
may reach
fl
ame, sparks, pilot lights
or any ignition sources .
Use only approved fuel containers.
8.
8.
See technical data for the
wei
ght of the machine.
To avoid burns or
fir
e hazards, let engine cool
before lifting / transporting machine or storing
indoors.
LIFTING / TRANSPORTING
Apply pipe sealant to pipe plug and reinstall
into top of exciter housing.
Reinstall deck, V-belt(s) and belt guard.
Do not over
fil
l – over
fil
ling can result
in excessive temperatures in the exciter.
9.
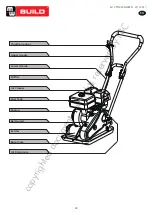
The unit can be lifted by the handles in front and
back of the unit as shown.
See technical data for the weight of the machine.
To avoid burns or fire hazards, let engine cool before lifting/
transporting machine or storing indoors.
The unit can be lifted by the handles in front and back of the unit as
shown.
The unit must be transported in the upright position to prevent fuel
from spilling. Do not lay machine on its side or top.
Secure or tie down unit using the lifting handle to prevent machine
from sliding or tipping over.
Add oil according to
Engine
Manual packed
separately with your compactor.
Engine oil
Oil has been drained for shipping.
Failure t
o fill engine
sump with oil
before starting engine will result in
permanent damage and will void
engine warranty.
7
Vibratory Plate Compactor
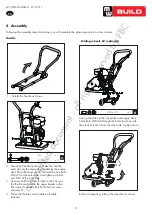
Paving Pad Kit (Optional)
The transparent rubber Paving Pad allows to
compact concrete paving slabs, stones, bricks and
blocks silently and gently.
Attach the Paving Pad onto the Base Plate as
shown. Align the holes in the Base Plate, Paving
Pad and Clamp Plates, and secure it with 3 bolts
and lock washers. (Only 2 bolts, lock washers and
nuts for #29140.)
C
M10 x 30 (29140) x2
M10 x 20 (29142) x3
M10 x 25 (29155) x3
M10x30 x 2
copyrighted
document
- all
rights
reserved
by
FBC