


19
M1.2.TPT820.NLFREN 21112017
FR
4 Montage
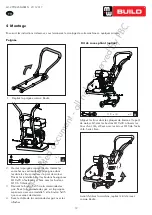
En suivant les instructions ci-dessous, vous terminerez le montage de votre machine en quelques minutes.
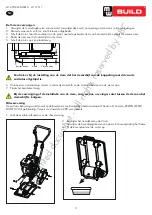
Handle
6
Vibratory Plate Compactor
Unfold the Handle as shown.
1.
Mount the Handle as shown. Make the Handle
Ends slot into the channels provided by the
Engine Deck. Place
fl
at washers 10, followed by
hex bolts M10x70 at the outer side, and tighten
with lock nuts M10 at the inner side.
2.
Unscrew bolt 5X35 from throttle control.
Secure the Throttle Control onto the Upper
Handle with a
fl
at washer 5 and the bolt 5X35
that just were unscrewed.
3.
Fasten the Throttle Control cable with cable
fasteners.
4.
Folding Wheels Kit (Optional)
Line up the holes in the Link Plates and Engine
Deck. Slide bolts M10x30 through the holes from
one side, then lock nuts M10 from the other side.
Tighten down.
1
M10 70
A
2
M5
2
B
M10 30
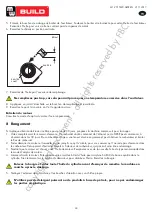
Before compacting, fold up the Wheel Kit as shown.
Handle
6
Vibratory Plate Compactor
Unfold the Handle as shown.
1.
Mount the Handle as shown. Make the Handle
Ends slot into the channels provided by the
Engine Deck. Place
fl
at washers 10, followed by
hex bolts M10x70 at the outer side, and tighten
with lock nuts M10 at the inner side.
2.
Unscrew bolt 5X35 from throttle control.
Secure the Throttle Control onto the Upper
Handle with a
fl
at washer 5 and the bolt 5X35
that just were unscrewed.
3.
Fasten the Throttle Control cable with cable
fasteners.
4.
Folding Wheels Kit (Optional)
Line up the holes in the Link Plates and Engine
Deck. Slide bolts M10x30 through the holes from
one side, then lock nuts M10 from the other side.
Tighten down.
1
M10 70
A
2
M5
2
B
M10 30
Before compacting, fold up the Wheel Kit as shown.
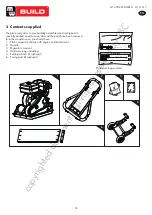
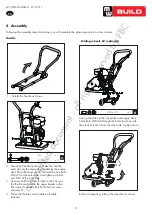
1. Dépliez la poignée comme illustré
2. Montez la poignée comme illustré. Insérez les
encoches aux extrémités de la poignée dans
les dans les trous prévus sur le pont du moteur.
Placez les rondelles 10 et les boulons hexagonaux
M10x70 à l’extérieur, et fixez avec les boulons
M10 à l’intérieur.
3. Dévissez le boulon 5x35 de la commande des
gaz. Fixez la commande des gaz sur la poignée
supérieure avec une rondelle 5 et le boulon 5x35
que vous venez de dévisser.
4. Fixez le câble de la commande des gaz avec les
attaches.
Alignez les trous dans les plaques de liaison et le pont
du moteur. Glissez les boulons M10x30 à travers les
trous d’un côté, et fixez avec les écrous M10 de l’autre
côté. Serrez bien.
Avant d’utilisez la machine, repliez le kit de roues
comme illustré.
Poignée
Kit de roues pliant (option)
copyrighted
document
- all
rights
reserved
by
FBC