background image

Scanning

_ 49

Color Mode

: Adjusts the color options of the scan output. If the 

original is color and you want to scan in color, press 

Color Mode

(See "Color Mode" on page 54.)

Darkness

: Adjusts the degree of darkness of the scan output. Use 

left/right arrow to adjust the values. (See "Darkness" on page 54.)

Erase Background

: Erases backgrounds like paper patterns. (See 

"Erase Background" on page 54.)

Scan to Edge

: Scans originals from edge-to-edge. (See "Scan to 

Edge" on page 55.)

Back

: Returns to the previous screen.

Output tab

Quality

: Adjusts the display quality of the scan output. (See 

"Quality" on page 55.)

File Format

: Selects the file format of the scan output. (See "File 

Format" on page 55.)

Scan Preset

: Automatically changes some scan options such as file 

format, resolution, and more. You can adjust options to fit each 
specific purpose. (See "Scan Preset" on page 55.)

Back

: Returns to the previous screen.

SCANNING ORIGINALS AND SENDING 
THROUGH EMAIL (SCAN TO EMAIL)

You can scan the originals and email the scanned image to several 
destinations from the machine by email.

Sending a scanned image to several destinations as 
an email attachment

1.

Place the originals face up in the DADF. Or you can use the scanner 
glass for one sheet of paper.


2.

Press 

Scan

 from the 

Main

 screen.

3.

Press 

Scan to Email

.

4.

Set the scan features in the 

Advanced

Image

, or 

Output

 tabs. (See 

"Advanced tab" on page 48.)

5.

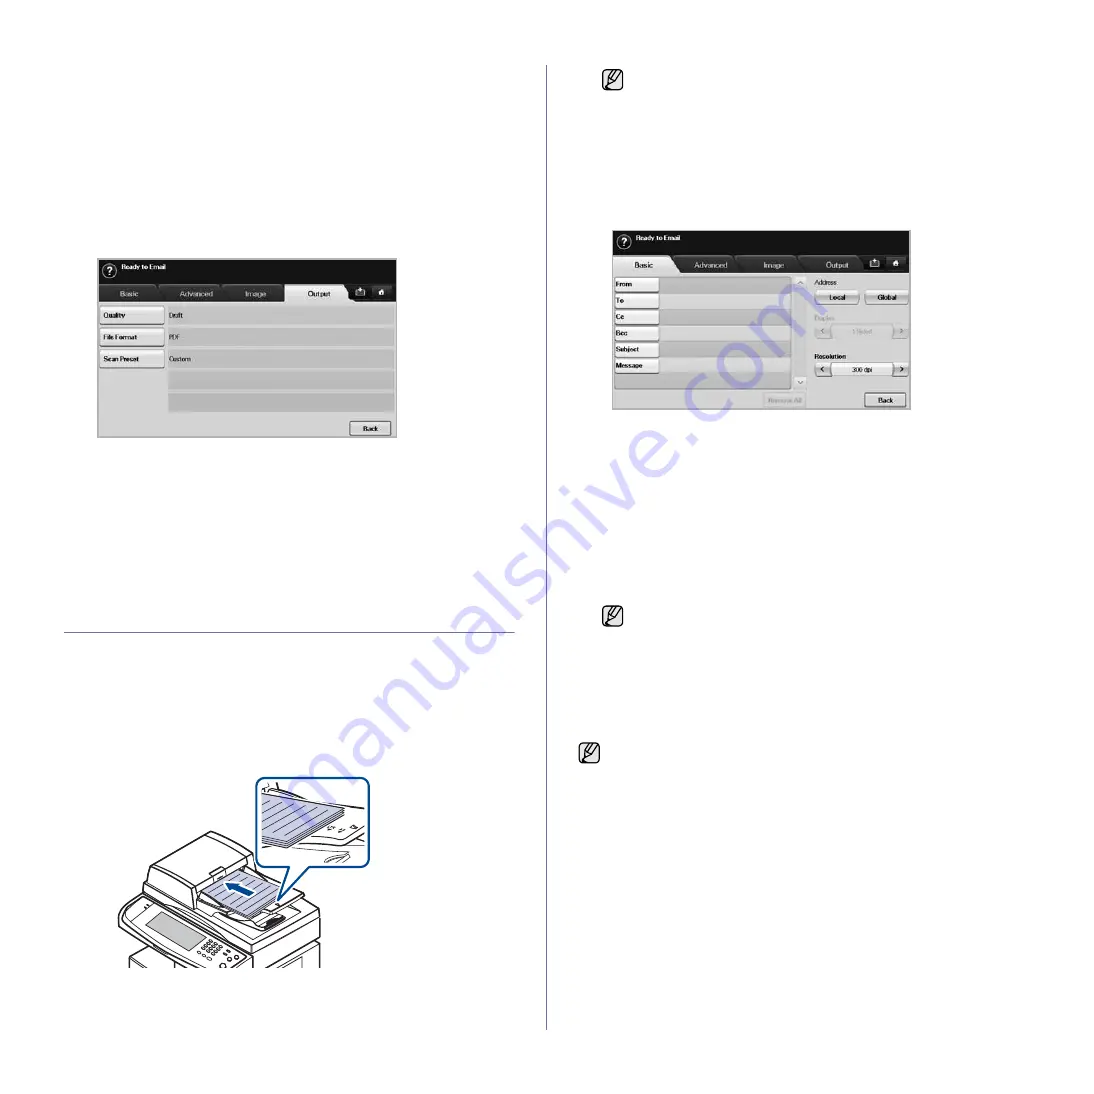
Press the 

Basic

 tab to enter the email address.

From

: Sender's address. Touch 

From

 and then the keyboard pops 

up on the screen. Use the pop up keyboard to enter your email 
addresses. Or you can use 

Local

 and 

Global

 to enter the addresses 

easily. (See "Global" on page 50.)

To

/

Cc

/

Bcc

: Recipient's email address manually with the pop up 

keyboard, or by pressing 

Local

 or 

Global

Local

 or 

Global


addresses are pre-loaded address lists from your computer or the 
LDAP server which is configured at Web UI. (See "Global" on 
page 50.)

Subject

: Title of email.

Message

: Enters the text which will be as the contents of the email. 

The maximum size is 1KB.

6.

Set the scan quality by 

Duplex

 and 

Resolution

.

Duplex

: Sets this option for originals that are printed on one side 

only, or on both sides.

Resolution

: Sets the scanning resolution by pressing left/right 

arrows.

7.

Press the 

Start

 button to scan and send the file. 

Storing email addresses

There are two kinds of email addresses - 

Local

 on your machine's memory 

and 

Global

 on the LDAP server - which differ depending on where they are 

stored. 

Local

 is that email addresses are stored in the machine's memory, 

and 

Global

 is that email addresses are stored in the certain (LDAP) server.

Through the 

SyncThru Web Service

, you can easily enter and store email 

addresses from your computer.

Individual

1.

Turn your networked computer on and open the web browser. 

2.

Enter your machine's IP address as the URL in a browser.

3.

Click 

Go

 to access the 

SyncThru Web Service

.

If the authentication message shows, enter User Name and 
Password. This message shows only when the network 
administrator has set the authentication in 

SyncThru Web 

Service

. (See "Managing your machine from the website" on 

page 85.)

To delete previously entered contents, press 

Remove All

.

While the machine is sending an email, you cannot do the copy job 
either sending a fax.

Summary of Contents for M F X - 5 5 5 5

Page 1: ...M F X 4 5 5 5 5 5 5 5 P r o f e s s i o n a l E d i t i o n U s e r s G u i d e D E PLOY DUPLICATE DIGIT IZE DELIVER...

Page 2: ...Installing a memory DIMM on page 109 A Network interface enables network printing Your machine comes with a built in network interface 10 100 1000 Base TX Some features are optional Please check the...

Page 3: ...ent Feeder Hard Disk Network Interface Enthernet 10 100 1000 Base TX wired LAN Duplex 2 sided printing FAX O CONVENTION DESCRIPTION EXAMPLE Bold Used for texts on the display or actual prints on the m...

Page 4: ...for using your machine s full features and contains information for maintaining your machine troubleshooting and installing accessories This user s guide also contains Software section to provide you...

Page 5: ...rstood the operating instruction If you cannot resolve the conflict contact your sales or service representative for assistance 5 Unplug the machine from the AC wall socket and or telephone jack befor...

Page 6: ...ting cable is damaged or frayed If liquid has been spilled into the machine If the machine has been exposed to rain or water If the machine does not operate properly after instructions have been follo...

Page 7: ...ms This marking shown on the product or its literature indicates that it should not be disposed with other household wastes at the end of its working life To prevent possible harm to the environment o...

Page 8: ...mitted page or on the first page of the transmission the following information 1 the date and time of transmission 2 identification of either business business entity or individual sending the message...

Page 9: ...e 13 amp plug is the most widely used type in the UK and should be suitable However some buildings mainly old ones do not have normal 13 amp plug sockets You need to buy a suitable plug adaptor Do not...

Page 10: ...e in source and binary forms with or without modification are permitted provided that the following conditions are met 1 Redistributions of source code must retain the above copyright notice this list...

Page 11: ...following disclaimer in the documentation and or other materials provided with the distribution 3 All advertising materials mentioning features or use of this software must display the following ackno...

Page 12: ...11...

Page 13: ...ents 26 Windows 26 Macintosh 27 Linux 27 Installing the software 28 Machine s basic settings 28 Altitude adjustment 28 Setting the authentication password 28 Setting the date and time 28 Changing the...

Page 14: ...y copying 46 Auto crop copying 46 Multi Bin SCANNING 47 47 Scanning basics 47 Understanding the Scan screen 48 Basic tab 48 Advanced tab 48 Image tab 49 Output tab 49 Scanning originals and sending th...

Page 15: ...g mode 61 Receiving faxes in memory 61 Adjusting the document settings 61 Duplex 61 Resolution 61 Original Type 61 Darkness 61 Erase Background 61 Color Mode 61 Setting up a fax phonebook 62 Storing i...

Page 16: ...Color Mode 70 Darkness 70 Erase Background 70 Scan to Edge 70 Quality 70 Scan Preset 70 File Format 70 File Policy 71 Printing from a USB memory device 71 To print a document from a USB memory device...

Page 17: ...urpose tray 92 In the fuser area or around the toner cartridge 92 In the paper exit area 93 In the duplex unit area 93 In the stacker finisher 94 Understanding display messages 97 Solving other proble...

Page 18: ...ECIFICATIONS 112 112 General specifications 112 Printer specifications 113 Copier specifications 113 Scanner specifications 113 Facsimile specifications optional GLOSSARY 114 INDEX 118 CONTACT SAMSUNG...

Page 19: ...Optional traya 15 Multi purpose tray paper width guides 6 Standa 16 Scanner lock switch 7 DADF document input tray 17 Scanner glass 8 DADF document output tray 18 toner cartridge 9 scanner lid 19 imag...

Page 20: ...s in the edit area 7 Redial Pause In standby mode redials the last number or in edit mode inserts a pause into a fax number 8 On Hook Dial Engages the telephone line 9 Interrupt Stops a job in process...

Page 21: ...r size and type Job Status button When you press this button the screen shows the lists of currently running jobs queued jobs and completed jobs Current Job tab Shows the list of jobs in progress and...

Page 22: ...machine is on line and can be used Red Blinking A minor error has occurred and the machine is waiting the error to be cleared Check the display message When the problem is cleared the machine resumes...

Page 23: ...arkness Erase Background Color Mode Scan Scan to Email Basic tab Page 48 Advanced tab Page 48 Image tab Page 48 Output tab Page 49 NetScan Scan to Server Basic tab Page 48 Advanced tab Page 48 Image t...

Page 24: ...Date Time Default Settings Measurement Timers Language Power Saver Tray Management Altitude Adjustment Output Option Contention Management Sound Supplies Management Machine Test On Demand Overwrite HD...

Page 25: ...u to print PDF files directly SetIP Use this program to set your machine s TCP IP addresses IPv6 is not supported by this program Linux Postscript Printer Description PPD file Use this file to run you...

Page 26: ...G UP THE NETWORK You need to set up the network protocols on the machine to use it as your network printer You can set up the basic network settings with the machine s touch screen Supported operating...

Page 27: ...ork devices and lets you remotely monitor and troubleshoot network machines from any site with corporate internet access SyncThru Web Service Web server embedded on your network print server which all...

Page 28: ...click Next 5 The list of machines available on the network appears Select the printer you want to install from the list and then click Next If you do not see your machine on the list click Update to...

Page 29: ...then confirm the new password 7 Press OK Setting the date and time When you set the time and date they are used in Delay fax and Delay Print also they are printed on reports If however they are not co...

Page 30: ...email scan and paper all at once 1 Press Machine Setup on the control panel 2 Press Admin Setting 3 When the login message appears enter password with number keypad and press OK See Setting the authen...

Page 31: ...to enter characters and the keyboard pops up on the screen The keyboard below is the default showing the lowercase letters When you enter the MAC address enter it without a colon 1 Left Right Moves t...

Page 32: ...han 174 x 128 mm 5 6 x 5 8 inches or larger than 218 x 356 mm 8 5 x 14 inches Do not attempt to load the following types of paper carbon paper or carbon backed paper coated paper onion skin or thin pa...

Page 33: ...e are described later in this section Desired outcome The print media you choose should be appropriate for your project Brightness Some print media are whiter than others and produce sharper more vibr...

Page 34: ...lope Monarch 98 x 191 mm 3 87 x 7 5 inches Envelope No 10 105 x 241 mm 4 12 x 9 5 inches Envelope DL 110 x 220 mm 4 33 x 8 66 inches Envelope C5 162 x 229 mm 6 37 x 9 01 inches Envelope C6 114 x 162 m...

Page 35: ...with less than 6 mm curl and should not contain air Condition Envelopes should not be wrinkled nicked or otherwise damaged Temperature You should use envelopes that are compatible with the heat and pr...

Page 36: ...s jams Curl Prior to printing labels must lie flat with no more than 13 mm of curl in any direction Condition Do not use labels with wrinkles bub bles or other indications of separation Make sure that...

Page 37: ...lies on page 107 1 To load paper pull and open the paper tray and place paper with the side you want to print facing down 2 After loading paper set the paper type and size for the tray 1 See Setting t...

Page 38: ...e tray first and be placed in the center of the tray Always load only the specified print media to avoid paper jams and print quality problems See Selecting print media on page 32 Flatten any curl on...

Page 39: ...ine Setup on the control panel 2 Press Admin Setting 3 When the login message appears enter password with number keypad and press OK See Setting the authentication password on page 28 4 Press the Gene...

Page 40: ...ness level to make a copy that is easier to read when the original contains faint markings and dark images See Changing the darkness on page 42 Paper Supply Selects the paper supply tray Advanced tab...

Page 41: ...o Automatically detects the size of originals but this option supports only when originals are Legal Letter or A5 sized If the originals is mixed sized then the machine detects the largest original si...

Page 42: ...iginals and prints them on both sides of a paper But the machine reverses the print out order of the originals The machine prints the second original first which means the firstly input original is pr...

Page 43: ...prints one side of the original on the upper half of the paper and the other side on the lower half without reducing the size of the original This feature is helpful for copying a small sized item su...

Page 44: ...template list table 8 Press and select Copy 9 Press the Advanced tab ID Copy Mamual ID Copy Setup 10 Press the template you have saved from the template list 11 Press the Start button on the control p...

Page 45: ...Main screen 3 Press the Advanced tab Book Copy 4 Select the binding option Off Disables this feature Left Page Prints left page of the book Right Page Prints right page of the book Both Page Prints bo...

Page 46: ...ut any edges or margins 1 Place a single original face down on the scanner glass Or load the originals face up in the DADF See Loading originals on page 31 2 Press Copy from the Main screen 3 Press th...

Page 47: ...iginal face down on the scanner glass See Loading originals and print media on page 31 2 Press Copy from the Main screen 3 Select the tray in Paper Supply 4 Press the Advanced tab Overlay 5 Press List...

Page 48: ...ure can be used via the local connection or the network connection See Software section WIA WIA stands for Windows Images Acquisition To use this feature your computer must be connected directly to th...

Page 49: ...the authentication for network appears you have to enter user name and password to enter the NetScan screen No Lists the number in order for application programs Application Shows the available appli...

Page 50: ...eyboard to enter your email addresses Or you can use Local and Global to enter the addresses easily See Global on page 50 To Cc Bcc Recipient s email address manually with the pop up keyboard or by pr...

Page 51: ...on the right side 5 Enter IP Address or Host Name or Host Name and LDAP server and Port 6 Enter optional information 7 Click Apply Entering email addresses by the address book Once you have stored the...

Page 52: ...can destination Register as an authorized user for scanning to email FTP or SMB Set up the SMTP server for scanning to email Set up the FTP servers for scanning to FTP Set up the SMB servers for scann...

Page 53: ...the FTP servers using SyncThru Web Service 1 Enter your machine s IP address as the URL in a browser and click Go to access the web site of your machine 2 Click Machine Settings and FTP Setup 3 Click...

Page 54: ...ress Start on the control panel The machine begins scanning and then sends the scanned image to the specified server CHANGING THE SCAN FEATURE SETTINGS This part explains how to adjust the document se...

Page 55: ...an image 24 bits per pixel 8 bits for each RGB is used for 1 pixel Gray Uses the black gradation to display an image 8 bits per pixel Mono Displays an image in black and white 1 bit per pixel Darknes...

Page 56: ...Scans originals in TIFF Tagged Image File Format but several originals are scanned as one file Multi Page TIFF Scans the originals in TIFF Tagged Image File Format and several originals are scanned as...

Page 57: ...waiting in a print queue or print spooler such as the printer group in Windows delete the job as follows 1 Click the Windows Start menu 2 For Windows 2000 select Settings and then Printers For Windows...

Page 58: ...tting up a fax phonebook using SyncThru Web Service on page 62 You cannot use this machine as a fax via the internet phone For more information ask the internet service provider You may experience res...

Page 59: ...er patterns as in newspaper originals See Erase Background on page 61 Color Mode Selects whether the user sends the fax in mono or color See Color Mode on page 61 Back Returns to the Basic tab SENDING...

Page 60: ...he control panel to show ten recent fax numbers 5 Select a fax number in the list and press OK The machine automatically begins to send Delaying a fax transmission You can set your machine to send a f...

Page 61: ...f your machine detects a fax tone on the line it automatically starts to receive the fax Receiving faxes manually using an extension telephone This feature works best when you are using an extension t...

Page 62: ...s that are continuous tone photographs Darkness You can select the degree of darkness of the original document Press Fax the Image tab Darkness Press the right arrow to enhance the darkness degree and...

Page 63: ...s OK 6 Select an entry from Speed Dial List and press Add Repeat this step until you added entries you need Make sure the selected Speed Dial List is copied to the left pane Group list 7 Press OK to s...

Page 64: ...ress the Advanced tab Polling Poll from Remote 3 Enter Passcode and Destination Fax No using the number keypad on the control panel You have to be informed Passcode from sender with the remote fax mac...

Page 65: ...3 Adjust the document settings in the Image tab and the Basic tab 4 Press the Advanced tab Mailbox Store 5 Enter Mailbox No and Passcode which are set from Creating Mailbox in page 63 6 Press OK Faxi...

Page 66: ...K ADDING DOCUMENTS TO A RESERVED DELAY FAX JOB You can add additional documents to the delayed fax job which is saved in memory 1 Press Machine Setup on the control panel 2 Press Admin Setting When th...

Page 67: ...8 3 Press the Setup tab Fax Setup 4 Press down arrow on the right side 5 Press Fax Forward Settings Forward to Email Setting Receive Forward 6 Press Forward and enter the From and Destination Email op...

Page 68: ...menu press to go to the Main screen Press USB Format USB Print or Scan to USB USB Format You can delete image files stored on an USB memory device one by one or all at once by reformatting the device...

Page 69: ...Sided both sides of the paper 2 Sided or both sides of paper but back is rotated 180 degrees 2 Sided Rotate Side 2 Resolution Selects the scanning resolution value File Name Names a file before you s...

Page 70: ...olution Press USB Scan to USB the Basic tab Resolution Use left right arrows to toggle the values The higher value you select the clear result you get But the scanning time may take longer Original Si...

Page 71: ...s USB Scan to USB the Output tab Scan Preset Sharing and Printing Produces a small sized file for normal quality documents High Quality Printing Set this option for high quality output with the larges...

Page 72: ...ument will be saved as a PRN file rather than printed on paper Only PRN files created in this fashion can be printed directly from USB memory See Software section to learn how to create a PRN file BMP...

Page 73: ...on the amount of printouts depending on the paper size and type Machine Status screen Press Machine Setup on the control panel and press Machine Status Supplies Life tab Displays the remainders or the...

Page 74: ...he sub options available are Service Center Registration and Contact Info You may enter information on service center and purchasing point Date Time You can set the date and time See Setting the date...

Page 75: ...t Out The machine does an asked job in order Sound You can adjust the loudness of the machine sound Press Fault to adjust the machine s error sound Select Conflict if you pressed the wrong option Pres...

Page 76: ...ur machine You can receive a fax from someone you are talking to on the extension telephone without going to the fax machine See Receiving faxes manually using an extension telephone on page 60 Error...

Page 77: ...On Hook Dial to send a fax you can hear a specific tone To adjust the tone volume you can use this feature Value 1 is the lowest volume Use left right arrows to adjust the value Mailbox Setup Documen...

Page 78: ...lt the network administrator IPv6 Machine supports IPv6 addresses for network printing and managements IPv6 Activate When you select On the Host Name and Link Local Address will automatically be enter...

Page 79: ...ing job the machine includes jammed paper in the count and the cost of printing Image Counter Depends on whether the machine counts blank white pages Change Admin Password You can change the password...

Page 80: ...nsmission report On is to print every time you send a fax the machine prints a confirmation report With On Error only when the transmission error occurred the report will be printed out Fax Send Repor...

Page 81: ...alert you that the life of the imaging unit is almost over and needs to be reordered 1 Press Machine Setup on the control panel 2 Press Admin Setting When the login message pops up then enter password...

Page 82: ...lity problems occur Cleaning the outside Clean the machine cabinet with a soft lint free cloth You can dampen the cloth slightly with water but be careful not to let any water drip onto or into the ma...

Page 83: ...ng period of time An environment where corrosive gases are present An environment with salty air Handling instructions Do not touch the surface of the photosensitive drum in the cartridge Do not expos...

Page 84: ...80 000 pages The screen displays Imaging unit is worn Replace with new one when the life of the imaging unit is almost ended Approximately 6 000 more pages can be made after the warning message relate...

Page 85: ...he carefully pull the seal tape out of the cartridge 8 Thoroughly shake the imaging unit side to side five or six times 9 Unpack the new imaging unit and slide it into place making sure not to touch t...

Page 86: ...SyncThru Web Service an embedded web server Use SyncThru Web Service to View the machine s device information and check its current status Change TCP IP parameters and set up other network parameters...

Page 87: ...the paper size and type on page 38 Ensure that the recommended side of the print media is facing down in the tray or facing down in the multi purpose tray If paper jams occur frequently when you prin...

Page 88: ...ADF cover and the document input tray Then place the documents back in the DADF Roller misfeed 1 Open the scanner lid 2 Grasp the misfeed paper and remove the paper from the feed area by carefully pul...

Page 89: ...4 Paper Jam in MP tray In the paper feed area tray 1 optional tray or multi purpose tray See In the multi purpose tray on page 92 See In the optional tray on page 89 See In the optional high capacity...

Page 90: ...n tray 2 2 Open the inner cover of tray 2 3 Pull the jammed paper out in the direction shown To avoid tearing the paper pull it out gently and slowly If the paper does not move when you pull or if you...

Page 91: ...er does not move when you pull or if you do not see the paper in this area stop and go to step 6 6 Remove the paper in the direction shown To avoid tearing the paper pull it out gently and slowly 7 In...

Page 92: ...tional high capacity feeder 5 Lift the front part of the tray slightly up to release the tray from the machine If the paper does not move when you pull or if you do not see the paper in this area stop...

Page 93: ...ly resumes In the fuser area or around the toner cartridge 1 Open the side cover 2 Remove the jammed paper in the direction shown 3 Close the side cover In the paper exit area 1 Open the side cover 2...

Page 94: ...r In the stacker finisher Paper jam in front of finisher 1 Open the stacker front cover 2 Press the right part of lever 1c and hold still then push the stacker to the left to release the stacker 3 Rem...

Page 95: ...he supplies MESSAGE MEANING SUGGESTED SOLUTIONS yyy is worn Replace with new one The life of the part expires totally Replace the part with a new one Call for service DC motor does not operate zzz Ple...

Page 96: ...f the document failed to actuate the scan sensor within the correct time after actuating the registration sensor Open the DADF cover and remove jammed original See Clearing document jams on page 86 ME...

Page 97: ...MESSAGE MEANING SUGGESTED SOLUTIONS System error zzz Please turn off then on There is a problem in the system operation Turn the machine off and turn it on again If the problem persists please call f...

Page 98: ...not feed into the machine Remove any obstructions from inside the machine Paper has not been loaded correctly Remove paper from the tray and reload it correctly There is too much paper in the tray Re...

Page 99: ...a system error Contact a service representative The machine does not print Continued The document size is so big that the hard disk space of the computer is not enough to access the print job Get more...

Page 100: ...printing CONDITION POSSIBLE CAUSE SUGGESTED SOLUTIONS CONDITION SUGGESTED SOLUTIONS Light or faded print If a vertical white streak or faded area appears on the page The toner supply is low You may be...

Page 101: ...s The imaging unit may be damaged If a repetitive mark occurs on the page run a cleaning sheet through several times to clean the cartridge contact a service representative After the printout if you s...

Page 102: ...ion of transparencies some character voids are normal You may be printing on the wrong surface of the paper Remove the paper and turn it around The paper may not meet paper specifications See Specific...

Page 103: ...slowly Check if the machine is printing received data If so scan the document after the received data has been printed Graphics are scanned more slowly than text Communication speed slows in scan mod...

Page 104: ...ou sent Check your scan unit for marks and clean it See Cleaning the scan unit on page 81 The machine dials a number but the connection with the other fax machine fails The other fax machine may be tu...

Page 105: ...rd to set up your device Check if the printer is started Open Printers configuration and select your machine on the printers list Look at the description in the Selected printer pane If its status con...

Page 106: ...n try to restart the job from the beginning Since Unified Linux Driver locks port while printing the abrupt termination of the driver keeps the port locked and therefore unavailable for subsequent pri...

Page 107: ...ase you should wait for completion of the current job or should press Release port button if you are sure that the present port s owner is not functioning properly Refer to Linux User s Guide that cam...

Page 108: ...Extends your machine s memory capacity 4555256MEM This machine comes with 256 MB DIMM To expand the memory of your machine you must remove the existing DIMM and purchase a larger one Optional tray 2...

Page 109: ...ted device or a card reader Those devices allow the pay for print service on your machine SCX KIT10F 4 Bin Mailbox You can load up to 100 sheets of paper in each stacker To use 4 Bin Mailbox you need...

Page 110: ...h as the metal back plate on any device plugged into a grounded power source If you walk around before finishing the installation repeat this procedure to discharge any static electricity again INSTAL...

Page 111: ...2003 select Printers and Faxes For Windows Vista select Control Panel Hardware and Sound Printers 4 Select the Muratec MFX 4555 Series PS printer 5 Click the right mouse button on the printer icon an...

Page 112: ...this function 1 Press Machine Setup on the control panel 2 Press Admin Setting 3 When the login message appears enter password with number keypad and press OK See Setting the authentication password...

Page 113: ...than 35 seconds from sleep mode The boot up time will be longer if data volume is a lot in the HDD Operating environment Temperature 10 C to 32 C Humidity 20 to 80 RH Display wVGA 800 x 480 x RGV col...

Page 114: ...x 4 800 dpi by software enhancement WIA standard Up to 600 x 600 dpi Scan to USB NetScan 100 200 300 dpi Scan to E mail Scan to Server 100 200 300 400 600 dpi Network Scan File format PDF TIFF JPEGb...

Page 115: ...A Duplex Automatic Document Feeder DADF is a mechanism that will automatically feed and flip over an original sheet of paper so that the machine can scan on both sides of the paper Default The value...

Page 116: ...1284 B refers to a specific connector type on the end of the parallel cable that attaches to the peripheral for example a printer Intranet A private network that uses Internet Protocols network conne...

Page 117: ...n ISO for communications OSI offers a standard modular approach to network design that divides the required set of complex functions into manageable self contained functional layers The layers are fro...

Page 118: ...An industry standard for scanners and software By using a TWAIN compliant scanner with a TWAIN compliant program a scan can be initiated from within the program an image capture API for Microsoft Win...

Page 119: ...etting a fax header 58 sound 74 supplies management 74 system timeout 73 tray management 74 tray setting 29 driver installation 27 duplex copying 41 faxing 61 scanning 53 69 E email address entering e...

Page 120: ...ng 109 ordering 107 message on the display screen 94 Mono 54 69 multi purpose tray 18 N NetScan 51 network setting up 25 77 notification receiving a fax in Mailbox 64 N up copy 43 O OCR 55 70 On Hook...

Page 121: ...uality 55 70 resolution 53 69 scan preset 55 sending it via email 49 sending it via FTP 53 sending it via Network Scan Manager 51 sending it via SMB 53 solving scanning problems 102 USB flash memory 6...

Page 122: ...he Muratec logo are trademarks of Muratec America Inc PCL and PCL 6 are trademarks of Hewlett Packard Company Microsoft Windows and Windows Vista are either registered trademarks or trademarks of Micr...

Reviews: