background image

© Munters Corporation , May 2017

12

QM1044r5

Cabling

Chapter 3

Step 8

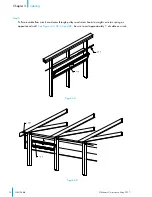
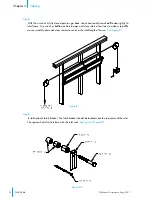
With the winch at its fully closed position, go back, check and readjust each baffle door tightly to 

inlet frame.  Use winch or baffle machine to open and close inlets a few times to make sure baffle 
moves smoothly and each door remains even over the total length of house.  

See Figure 8.

Figure 8

Step 9

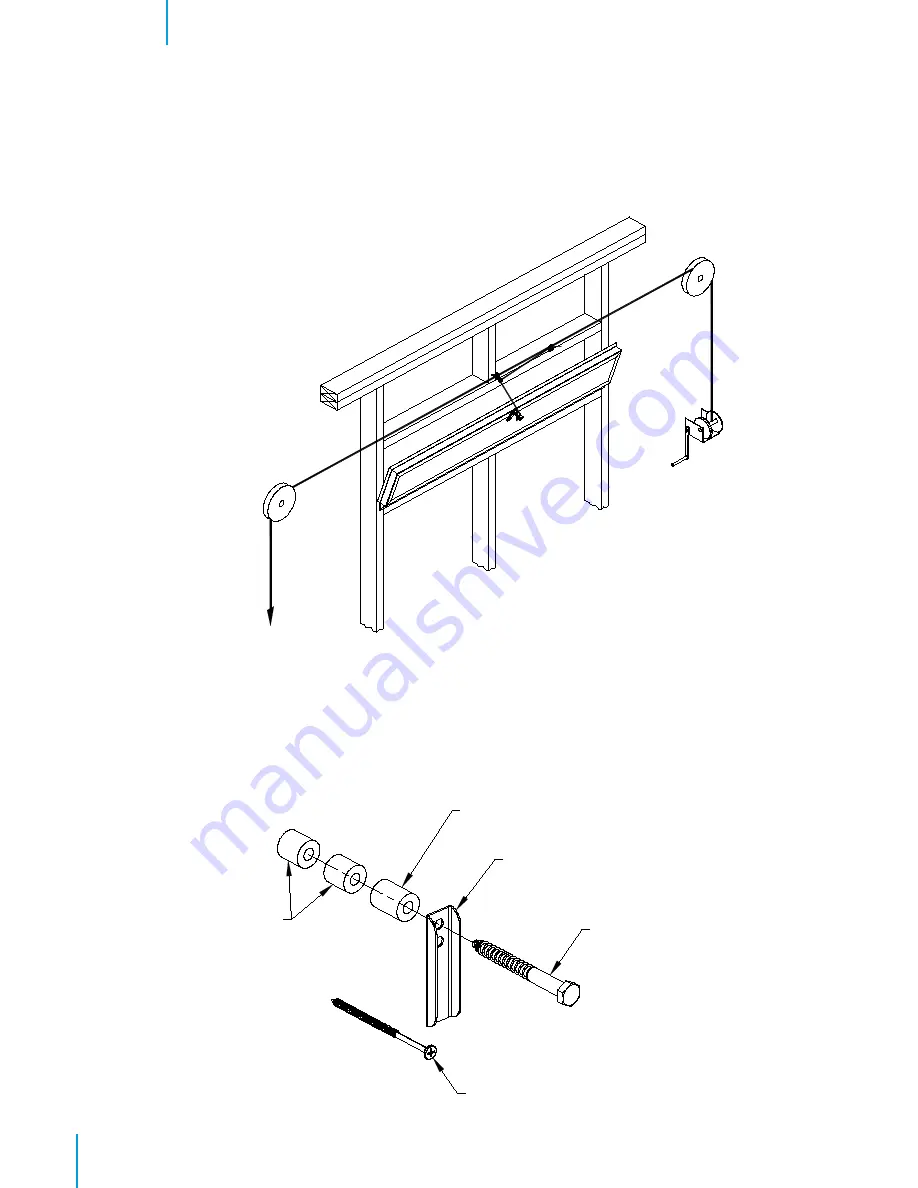
Install optional Latch Bracket. The latch bracket should be located near the top center of the inlet. 

The spacer should not interfere with the inlet seal.  

See Figure 9A and 9B.


!

"

#

$

%

&

'

(

)

"

*

#

+

,

%

-

&

.

(

)

"

/


#

%

$

0

&

1

(

2

$

#

3


#

%

$

0

&

4

(

5

6

7


!

"

#

$

%

&

8

(

Figure 9A

9

:

;

$

<

/

+

*

=

:

%

>

$

*

?

%

@


!

%

<

@

/

Summary of Contents for PI0848

Page 1: ...1 Munters Corporation May 2017 QM1044r5 Instruction Manual Plastic Inlet Models PI0848 PI1248 PI1548 Plastic Inlet ...

Page 2: ...nstructions carefully before beginning installation Warranty For Warranty claims information see the Warranty Claims and Return Policy form QM1021 available from the Munters Corporation office at 1 800 227 2376 or by e mail at aghort info munters com Conditions and Limitations Products and Systems involved in a warranty claim under the Warranty Claims and Return Policy shall have been properly ins...

Page 3: ...3 Munters Corporation May 2017 QM1044r5 Index Chapters Page 1 Unpacking the Equipment 4 1 1 Parts List 1 2 Inlet Dimensions 2 Installation Instructions 5 3 Cabling 9 ...

Page 4: ...age HP1222 8 48 12 71 2 H x 47 W 111 2 H x 47 W 141 2 H x 47 W WALL OPENING I D framed HP1222 for PB Inlets ID Qty Cat No Description A 1 FA1199 2 Lift Bracket B 2 KS1066 1 4 x21 4 Hex Bolt SS C 2 KN0702 1 4 Flange Nut SS D 2 KW3002 1 4 Flat Washer SS Optional Latch Kits AC1558 E 1 KS2465 1 4 x 3 5 Lag Screw SS F 1 KS2125 10 x 3 5 Deck Screw Ceramic CTD G 1 FH2732 Latch Arm H 1 KX1256 3 4 O D x 1 ...

Page 5: ...the Wall Opening listed in chart on previous page A minimum of 10 12 from ceiling to the top inside of the stud See Figure 1A and 1B Installation Instructions 2 0 1 2 3 4 5 2 6 4 7 8 9 A B 9 8 9 C D E F G H I J K L M N K O P O Q R S T U V W X Y Z Z _ a b c d Frame Construction Figure 1A Post Construction Figure 1B ...

Page 6: ...l m n h o p q u v h o w q x k y z n j o q j i t h o i q Step 2 Using Lift Bracket A as a guide mark and drill 2 9 32 holes in Vent Door and install Lift Bracket A flush with the top edge of baffle door and centered on the length using 2 Bolts B Nuts C and Washers D provided Top bolt should go through top extrusion See Figure 2 Front View ...

Page 7: ...ructions Chapter 2 Step 3 Install Screw Hooks L centered on length of PB inlet and 2 above top framed opening See Figure 3A and 3B For post frame construction also install a screw hook on each post near the ceiling See Figure 3C Figure 3A Figure 3B Figure 3C ...

Page 8: ...ctions Chapter 2 Figure 4A Step 4 Install inlet onto opening by folding hinge upward and aligning rigid part of hinge with bottom of opening as shown in Figure 4A Lag screws not provided should be installed at 3 5 O C See Figure 4B and 4C ª Figure 4B ª Figure 4C ...

Page 9: ... Ý Þ ß Á à º º Á á Ë Ê Å â ã À Á È Â Á à º Ä ã À Æ ã º Æ Æ Ë Á Ä È Æ ä Ê Ë À Á È ä Á Ê Ä å Ä ã æ ç Â Á à º Â º Á á Ë Ê Å µ º º º À Á Â Ã Ä Å è Â Ê Ê Ë º º Ä Æ Â º Æ À È À Ä Æ Ã Ë Â Á à º º å Ä ã À Æ È Å º È Ì Á º º º ß é Á ä ê À Ä À Ê Ë À ë Á Ê Ä Ê Ë À Ä Æ Ê Ä È å Ä ã º Á Ê Â À å Æ À à Æ º Ä Á È Ä Å â À Ê Ê Ý Þ Æ À Ý µ µ Á à º è ì í î â ï í ì ð í ñ å Ä ã à Á ä ê ä º º Â º Æ Ê È Á È Â Á à º Ë º º È...

Page 10: ... 3 Figure 6A Step 6 Pull main cable from winch or actuator through pulleys and screw hooks to weights or return spring on opposite end wall See Figures 5A 5B 6A and 6B Be sure to coil approximately 1 of cable on winch õ ö ø ù ú û ü ø õ ö ø ù ú û ü ø Figure 6B ...

Page 11: ...sing 1 Cable Clamp N Lift line should be attached 14 back from hook toward the winch end Run each lift line through the adjacent Nylon Guide Link M and attach Azuma Bolt and Nut K See Figure 7A 7B and 7C ý þ ÿ ý þ ÿ ý þ ý þ þ ý þ ý þ ÿ ý þ ÿ ý þ ý þ ý þ þ Figure 7B Figure 7A Note If optional kit Lift Package FA1500 was purchased hardware mentioned below in Step 7 is included If not purchased hardw...

Page 12: ...nch or baffle machine to open and close inlets a few times to make sure baffle moves smoothly and each door remains even over the total length of house See Figure 8 Figure 8 Step 9 Install optional Latch Bracket The latch bracket should be located near the top center of the inlet The spacer should not interfere with the inlet seal See Figure 9A and 9B 0 1 2 3 0 4 5 6 7 8 Figure 9A 9 ...

Page 13: ...ng Chapter 3 A B C D E F G H I J D K L M N O P J D Q F G R J S T T F A G D H U L F R K V M S J H I W H F J X K Q M A B C D E F G H I J D K L M S T T F S J H I W H F J X K Q M N O P J D Q F G R J A G D H U L F R K V M Y Z _ a b c d e e c Z f _ a b c d e e c Z ...

Page 14: ...818 739 235 Italy Munters Italy S p A Chiusavecchia Phone 39 0183 52 11 Japan Munters K K Phone 81 3 5970 0021 Korea Munters Korea Co Ltd Phone 82 2 761 8701 Mexico Munters Mexico Phone 52 818 262 54 00 Russia Munters AB Phone 7 812 448 5740 Singapore Munters Pte Ltd Phone 65 744 6828 South Africa and Sub Sahara Countries Munters Pty Ltd Phone 27 11 997 2000 Spain Munters Spain S A Phone 34 91 640...

Reviews: