Chapter 2 – Installation
Multi-Tech RouteFinder RF650VPN User Guide
20
Software Configuration
The RouteFinder software is pre-installed on your RF650VPN. Initial configuration is required in order for
you to run the WebAdmin program and begin operation. The browser-based interface eases VPN
configuration and management. The VPN functionality is based on IPSec and PPTP protocols and uses
Triple DES 168-bit encryption to ensure that your information remains private.
Note: Read the legal information and license agreement at the beginning of the installation.
Caution: Use a safe Password! Your first name spelled backwards is not a sufficiently safe password; a
password such as xfT35$4 is better.
Software Configuration Procedure
1.
Connect a workstation to the RF650VPN's
LAN
port via Ethernet.
2.
Set the workstation IP address to
192.168.2.x
subnet.
3.
Connect to the Internet at the RF650VPN
WAN
port.
4.
Make an Internet PUBLIC IP address so it can be assigned to the
WAN
port.
5.
Turn on power to the RouteFinder. If you hear a continuous beep, cycle RouteFinder power, connect
an external monitor (refer to Chapter 5 of this manual), run BIOS and check for the hard drive. If you
hear 5 beeps, continue with step 6.
6.
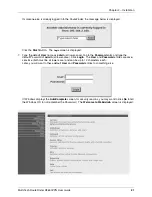
Bring up your web browser on the workstation. At the web browser's address line, type the default
Gateway address of
https://192.168.2.1
and hit the Enter key. In some environments, one or more
Security Alert screen(s) display.
At the initial Security Alert screen, click Yes and follow any additional on-screen prompts. (This step
is eliminated when you have generated a CA certificate at System|User Authentication|WebAdmin
Site Certificate, described in Chapter 3 of this manual.)

