background image

Software/Driver Installation (Windows NT)

26

MultiModemISI Hybrid Series, ISIHP-2S/2U/4S/4U/4SD

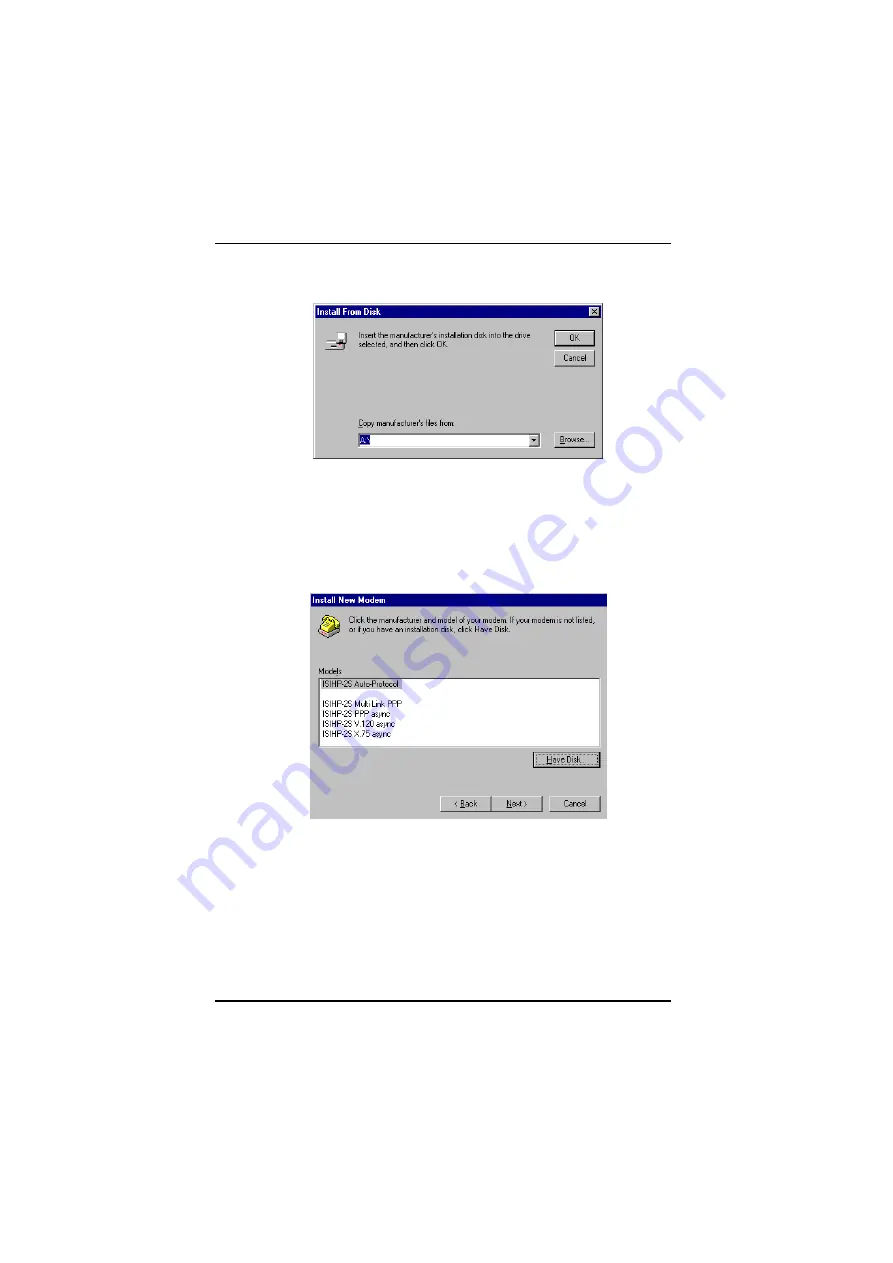
5. The 

Install From Disk

 dialog box appears. Click 

OK 

(diskette

should still be in drive).

6. The 

Install New Modem

 dialog box appears. From the 

Models

list, select an ISDN protocol (Auto-Protocol, ML-PPP, PPP, V.120,

or X.75, depending on your application).  ( See description of

protocols in the 

Introduction 

chapter of this manual.)  Then click

Next

.

7. The 

Install New Modem

 dialog box appears. Select the ports that

correspond to the first four ports of the ISIHP-2S/2U card, OR the

first eight  ports of  the ISIHP-4S/4U . Any ports that existed prior

to installing the ISIHP appear first in the list of available COM

ports. Click 

Next

. The terminal adapters (screen displays 

modems

)

install to the selected COM ports.

All manuals and user guides at all-guides.com

all-guides.com

Summary of Contents for MultiModem ISIHP-2S

Page 1: ...MultiModemISI Hybrid Series Models ISIHP 2S 2U 4S 4U 4SD User Guide All manuals and user guides at all guides com a l l g u i d e s c o m ...

Page 2: ...of such revisions or changes Record of Revisions Revision Description A Manual released Preliminary beta release 3 15 99 B Data for 4S 4U versions added 11 30 99 Patents This product is covered by one or more of the following U S Patent Numbers 5 301 274 5 309 562 5 355 365 5 355 653 5 452 289 5 453 986 Other patents Pending Trademarks The Multi Tech logo is a registered trademark of Multi Tech Sy...

Page 3: ... in Windows NT 3 51 4 0 33 Installing the ISIHP in Windows 95 and Windows 98 34 Windows 95 Installation 34 To Remove the ISIHP Card and Drivers in Windows 95 36 Windows 98 Installation 36 To Remove the ISIHP Card Drivers in Windows 98 39 To Remove the ISIHP Card 39 To Remove the Drivers 39 Installing TAs Modems to COM Ports in Windows 95 98 40 Removing the Driver Windows 95 only 49 Configuring the...

Page 4: ... 4S 4U models S models use the ISDN S interface U models use the ISDN U interface The ISIHP 2S 2U contains two terminal adapters and four V 90 K56flex modems The ISIHP 2S 2U uses two ISDN BRI lines each offering two B channels to connect to the telco and these connect to its two built in terminal adapters In addition to handling ISDN calls each terminal adapter can detect analog modem and fax call...

Page 5: ...r ISDN BRI lines each offering two B channels it supports eight independent digital data connections Each terminal adapter appears as two ports to the server PC using the ISIHP card ISIHP cards also support dial out applications via their modems or terminal adapters The ISIHP 2S 2U card offers eight RAS ports using two Basic Rate Interface BRI ISDN lines the ISIHP 4S 4U has 16 ports using four BRI...

Page 6: ...gure 1 1 Modems and Terminal Adapters of ISIHP 2S 2U 3456 RJ 45 Jack TA Modem Modem 9 1 2 10 3456 RJ 45 Jack TA Modem Modem 11 3 4 12 3456 RJ 45 Jack TA Modem Modem 13 5 6 14 3456 RJ 45 Jack TA Modem Modem 15 7 8 16 Figure 1 2 Modems and Terminal Adapters of ISIHP 4S 4U for ISIHP 4SD no modems are present All manuals and user guides at all guides com a l l g u i d e s c o m ...

Page 7: ...of ports and devices 2S 2U Port Device ISDN Line Number 1 TA 1 2 TA 1 3 TA 2 4 TA 2 5 Modem 1 6 Modem 1 7 Modem 2 8 Modem 2 From the perspective of the server PC the ISIHP 4S 4U is an sixteen port serial card with sixteen devices permanently attached to the serial ports Figure 1 2 The first eight ports are the four terminal adapters each of which appear as two ports The remaining eight ports are t...

Page 8: ... basic operations as logging in and file editing are not included Peripiheral Component Interconnect PCI First developed by companies such as IntelTM AT TTM and Digital Equipment CorporationTM the Peripheral Component Interconnect PCI bus used by your ISIHP card provides high performance and is easy to use Because PCI devices contain registers with the device information required for configuration...

Page 9: ...ync This protocol allows the functional bundling together of three WAN ports so they function as a single high bandwidth data pipeline using only one IP address Bundling occurs on demand when the needed bandwidth exceeds that available on a single circuit PPP async Point to Point Protocol asynchronous Protocol allowing computers a dial up connection to the Internet PPP includes error detection dat...

Page 10: ...Introduction 10 MultiModemISI Hybrid Series ISIHP 2S 2U 4S 4U 4SD All manuals and user guides at all guides com ...

Page 11: ...MultiModemISI Hybrid Series ISIHP 2S 2U 4S 4U 4SD 11 Hardware Installation Hardware Installation All manuals and user guides at all guides com a l l g u i d e s c o m ...

Page 12: ... bytes for Novell Shipping Contents ISIHP card RJ 45 ISDN cords 2 for ISIHP 2S 2U 4 for ISIHP 4S 4U ISIHP Driver Disk set ISDN TA Configuration Wizard disk Quick Start Guide User Guide this online manual on CD ROM Safety Warnings Never install telephone wiring during a lightning storm Never install telephone jacks in wet locations unless the jacks are specifically designed for wet locations Never ...

Page 13: ...ischarge any static in your body by touching a piece of grounded metal such as the computer chassis 2 Carefully remove the ISIHP card from its antistatic bag handling it only by the mounting bracket and edges Do not touch the gold plated connectors along the bottom edge You may want to save packaging for possible future use 3 Visually inspect the ISIHP 2S 2U 4S 4U 4SD The 2S and 4SD models have on...

Page 14: ...rd is not present 4 To avoid damaging the ISIHP 2S 2U and your PC make sure your computer and any peripheral equipment connected to it are turned off The ISIHP 2S 2U can be installed in a Pentium equivalent PCI bus computer 5 Remove the cover of your computer as instructed in your computer s documentation 6 Locate the unused PCI slot you will be using for your ISIHP 2S 2U card and remove the slot ...

Page 15: ... jack near your computer you should install one or have one installed by your telephone company In the US installation kits and adapters are available wherever telephones are sold Note If S T interface ISDN network connection cable is used the ISDN phone cord should be connected between the ISDN network connection cable and the NT1 device If the S T interface model ISIHP 2S 4S or 4SD is used then ...

Page 16: ...EDs one LED per BRI Flashes between OFF and RED to indicate that neither SPID for that ISDN line has been verified Flashes between RED and GREEN to indicate that one SPID is correct A solid GREEN display indicates that both SPIDs are correct ISIHP 4S 4SD LEDs one LED per BRI Solid GREEN indicates normal operation Flashes between RED and GREEN to indicate that the device has been reset Line 1 1 3 L...

Page 17: ...ardware Installation LINE 2 B2 B1 LINE 1 B2 B1 ISIHP 2S LED Indicators B1 LED Indicator When lit indicates active or voice connection on B channel 1 When lit indicates active or voice connection on B channel 2 All manuals and user guides at all guides com ...

Page 18: ...NOT active LED remains off Flashes 8 times second 8 Hz U interface is attempting to activate Flashes once second 1 Hz U interface is active S T interface is not fully active Lit not flashing Both U and S T interfaces are active D LED Indicator Lights when the ISIHP 2S 2U is turned on Flashes until SPIDs are verified with the central office switch then remains lit without flashing Indicates data li...

Page 19: ...Software Driver Installation MultiModemISI Hybrid Series ISIHP 2S 2U 4S 4U 4SD 19 Software Installation All manuals and user guides at all guides com ...

Page 20: ...s Service RAS server and other communications fax server type applications These procedures refer to both 3 51 and 4 0 1 Install the ISIHP in an available PCI slot as described in the installation section of this manual 2 Turn on the computer 3 Click Start Settings Control Panel and then double click Network In the Network dialog box click the Adapters tab Then click Add 4 The Select Network Adapt...

Page 21: ... Series ISIHP 2S 2U 4S 4U 4SD 21 5 The Insert Disk dialog box appears Insert the MultiModem ISI Driver for Windows NT diskette and click OK 6 The Select OEM Option dialog box appears Click OK All manuals and user guides at all guides com a l l g u i d e s c o m ...

Page 22: ... 4U 4SD A transient dialog box will appear while the setup program is loaded from the diskette to the PC hard drive 7 The ISI Cards dialog box appears Click Add 8 Then this ISI Cards dialog box appears Select the starting port usually port 3 All manuals and user guides at all guides com ...

Page 23: ...ybrid Series ISIHP 2S 2U 4S 4U 4SD 23 9 The ISI Cards dialog box appears again showing the port assignment Click Add to add additional cards and repeat step 8 After the last ISIHP card has been added click Close All manuals and user guides at all guides com ...

Page 24: ... Adapters box Click Close 11 When this dialog box appears click Yes to reboot your system The ISIHP 2S 2U now is installed in Windows NT Installing TAs Modems to COM Ports in Windows NT To install terminal adapters 1 In the Control Panel double click the Modems icon 2 The Modem Properties dialog box appears Click Add All manuals and user guides at all guides com ...

Page 25: ...ries ISIHP 2S 2U 4S 4U 4SD 25 3 The Install New Modem dialog box appears Check the box marked Don t detect my modem I will select it from a list and click Next 4 The Install New Modem dialog box appears Click Have Disk All manuals and user guides at all guides com ...

Page 26: ...pplication See description of protocols in the Introduction chapter of this manual Then click Next 7 The Install New Modem dialog box appears Select the ports that correspond to the first four ports of the ISIHP 2S 2U card OR the first eight ports of the ISIHP 4S 4U Any ports that existed prior to installing the ISIHP appear first in the list of available COM ports Click Next The terminal adapters...

Page 27: ...8 After the terminal adapters install click Finish to return to the General tab to view COM port assignments and make changes if necessary Now you are ready to install the modems To install modems does not apply to 4SD 1 In the General tab click Add All manuals and user guides at all guides com ...

Page 28: ...The Install New Modem dialog box appears Check the box marked Don t detect my modem I will select it from a list Then click Next 3 The Install New Modem dialog box appears From the Models list select Central Site Modems for the modems Then click Next All manuals and user guides at all guides com ...

Page 29: ...the ports that correspond to the last four ports of the ISIHP 2S 2U card OR the last eight ports of the ISIHP 4S 4U card Click Next The modems install to the selected COM ports 5 After the modems install to the ports click Finish to return to the General tab All manuals and user guides at all guides com ...

Page 30: ... 2U 4S 4U 4SD 6 To view COM port assignments and make necessary changes use the Modem Properties dialog box 7 Close the Modems Properties dialog box The message below appears asking if you want to configure dial up networking Click Yes All manuals and user guides at all guides com ...

Page 31: ...s Click Add 9 Each COM port appears in a separate Add RAS Device dialog box To add the highlighted device click OK 10 The Remote Access Setup dialog box displays again Repeat steps 7 and 8 until all devices are added 11 When all devices have been added click Continue All manuals and user guides at all guides com a l l g u i d e s c o m ...

Page 32: ...onfiguring the Terminal Adapter on page 49 I O Addresses and IRQ Codes Unlike many modem products the ISIHP has no DIP switch for I O addresses and no jumper to determine the IRQ code The input output address and the interrupt request code IRQ for the ISIHP are assigned automatically during driver installation During any subsequent re cofiguring of your PC you may need to know the assigned I O add...

Page 33: ...e top of the Device Manager window The Computer Properties dialog box will appear In the View Resources tab click on either the Interrupt Request IRQ or Input Output I O radio buttons to view lists of both the IRQs and I O memory addresses in use in the computer and what devices are currently using these resources Removing ISIHP Card and Driver in Windows NT 3 51 4 0 1 Click Start Settings Control...

Page 34: ...llation 1 After installing the ISIHP in an available PCI slot turn on the computer 2 Windows 95 automatically detects the ISIHP card A dialog box appears saying that Windows has found the new hardware and is locating the software for it 3 The Update Device Driver dialog box appears Insert the ISIHP Windows 95 driver diskette and click Next 4 Windows 95 automatically searches for the unknown device...

Page 35: ...S 4U 4SD 35 5 To view the COM ports click Control Panel and double click System In the System Properties dialog box in Device Manager the MultiTech PCI ISI Card appears under Multi Port To view ports click Ports COM LPT Click OK to close All manuals and user guides at all guides com ...

Page 36: ...e the drivers 1 Click Start Settings Control Panel and then double click Add Remove Programs 2 Select MultiTech ISI Card and then click Add Remove Note To complete an uninstall reboot your system Windows 98 Installation 1 After installing the ISIHP card in an available PCI slot turn on the computer 2 Windows 98 automatically detects the ISIHP card A dialog box appears saying that Windows has found...

Page 37: ... dialog box select Search for the best driver for your device Recommended Then click Next 5 In the next Wizard dialog box make sure Floppy disk drives is checked Insert the MultiModem ISI Driver for Windows 95 98 diskette Then click Next and the system locates the file All manuals and user guides at all guides com ...

Page 38: ...ox appears click Finish Windows 98 will now detect and create COM ports for ISIHP 2S 2U 4SD 8 ports are made for ISIHP 4S 4U 16 ports are made 8 After the COM parts have been created you must re boot your PC remove the diskette from the floppy drive before re booting 9 To view the COM ports click Control Panel and double click System The System Properties dialog box appears All manuals and user gu...

Page 39: ...Drivers in Windows 98 To remove the ISIHP card 1 Re boot your computer 2 Click Start Settings Control Panel and then System 3 The System Properties dialog box appears Click the Device Manager tab 4 Click Multi Port Adapter and select MultiTech ISIHP 2S 2U 2BRI 4 56K Hybrid Card Then click Remove To remove the drivers 1 Click Start Settings Control Panel and then double click Add Remove Programs Al...

Page 40: ... To install terminal adapters 1 Click Start Settings Control Panel and then double click the Modems icon 2 If no modems are currently installed the Install New Modem dialog box appears Check the box marked Don t detect my modem I will select it from a list Then click Next If other modems have been installed the Modems Properties dialog box will appear All manuals and user guides at all guides com ...

Page 41: ... Modem dialog box will appear Check the box marked Don t detect my modem I will select it from a list Then click Next 3 The Install New Modem dialog box appears Insert diskette labeled MultiModem ISI Driver for Windows 95 Netware AIO and click Have Disk All manuals and user guides at all guides com a l l g u i d e s c o m ...

Page 42: ...ars Select a protocol depending on your application from the Models list then click Next 6 The Install New Modem dialog box appears Select the port that corresponds to the lowest numbered port of the ISIHP card Any ports that had been installed before installing the ISIHP card are numbered lower than the ports of the ISIHP card Click Next All manuals and user guides at all guides com ...

Page 43: ...Software Driver Installation Windows 98 MultiModemISI Hybrid Series ISIHP 2S 2U 4S 4U 4SD 43 7 Windows will install the first terminal adapter Click Next All manuals and user guides at all guides com ...

Page 44: ...eneral tab to view COM port assignments and make changes if necessary 9 Click Add and repeat installation steps 2 8 to install terminal adapters to the first four ports of the ISIHP 2S 2U OR the first eight ports of the ISIHP 4S 4U 4SD After the terminal adaptershave been installed you are ready to install the modems All manuals and user guides at all guides com ...

Page 45: ... 2U 4S 4U 4SD 45 To install modems Windows 95 98 not applicable to 4SD 1 In the General tab click Add 2 The Install New Modem dialog box appears Check the box marked Don t detect my modem I will select it from a list Then click Next All manuals and user guides at all guides com ...

Page 46: ...s Insert the driver diskette labeled MultiModem ISI Driver for Windows NT Then click Have Disk 4 The Install from Disk dialog box appears Click OK 5 The Install New Modem dialog box appears From the Models list select Central Site Modems for the modems Then click Next All manuals and user guides at all guides com a l l g u i d e s c o m ...

Page 47: ...S 2U 4S 4U 4SD 47 6 The Install New Modem dialog box appears Select the numbered port corresponding to the first modem of the ISIHP card Click Next The modem installs to the COM port 7 After the modem installs to the port click Finish All manuals and user guides at all guides com ...

Page 48: ...eral tab to view COM port assignments and make changes if necessary 9 Click Add and repeat installation steps 2 8 to install modems to the last three ports of the ISIHP 2S 2U OR the last seven ports of the ISIHP 4S 4U Now you are ready to configure the terminal adapters All manuals and user guides at all guides com ...

Page 49: ...ing page You can configure the terminal adapters with the ISDN TA Configuration utility ConfigMenu or with AT commands Instructions for all three are provided in this section ISDN TA Configuration Utility recommended for computers with Windows 95 98 and Windows NT ConfigMenu recommended for computers with DOS or Windows 3 x and a VT100 ANSI compatible terminal or data communication program that in...

Page 50: ...ork for most telephone lines in Europe If you want to customize settings refer to the Optional Settings below Optional Settings Data TEI _____________________________ The Data TEI is the TEI terminal endpoint identifier assigned to the data channel You can select Auto TEI a fixed TEI or Disable A TEI is a number used by the central office switch to uniquely identify each device that is connected t...

Page 51: ...nd S0 Dialing Method ________________________ Select either the Enbloc or the Overlap dialing method for use when establishing a data call Your ISDN provider determines the dialing method The enbloc method is used for most ISDN dialing however you can select the overlap method if you are working with a private network AT command A97 Data Protocol _________________________ The data protocol also kn...

Page 52: ... and then Administrative Tools Common Then click Remote Access Admin and click Server which will indicate whether or not RAS is running If it is running click Stop Remote Access Service 2 Insert the Config Utility diskette into the floppy drive 3 From the main desktop of your PC select Start Settings Control Panel Click on the Add Remove Programs icon Click Install 4 The dialog box Install Program...

Page 53: ...Software Driver Installation MultiModemISI Hybrid Series ISIHP 2S 2U 4S 4U 4SD 53 10 The Welcome dialog box appears Click Next All manuals and user guides at all guides com ...

Page 54: ...ching for TA dialog box appears Click Next The next dialog box specifies the TA that has been identified 12 The Configuration dialog box appears If you have questions about choices click Help After entering information in each dialog box click Next All manuals and user guides at all guides com ...

Page 55: ...demISI Hybrid Series ISIHP 2S 2U 4S 4U 4SD 55 13 The SPID dialog box appears North America only Referring to your network configuration notes enter the appropriate informa tion then click Next All manuals and user guides at all guides com ...

Page 56: ...Protocol Setup dialog box appears Referring to your network configuration notes enter the appropriate information then click Next 15 In the Save Configuration dialog box enter a name to store the configuration Then click Next All manuals and user guides at all guides com a l l g u i d e s c o m ...

Page 57: ...on MultiModemISI Hybrid Series ISIHP 2S 2U 4S 4U 4SD 57 16 To load the configuration click Next in the Load Configuration dialog box 17 Then click Finish in the Configured dialog box All manuals and user guides at all guides com ...

Page 58: ... the ISDN TA Configuration utility ConfigMenu Configuration Utility The ConfigMenu configuration utility can be used as another means of configuring the TA ConfigMenu is installed in the TAs as part of the firmware To use ConfigMenu 1 Start a data communication program and select the COM port where the TA is connected 2 In the communication program dialog box type AT CONFIG and press ENTER ConfigM...

Page 59: ...ores up to ten phone numbers maximum of 20 characters each Stored number 0 is the phone number that will be dialed if persistent DTR dialing is enabled Port Control Configuration Menu configures TA s serial port including how TA responds to control signals on the serial interface Help Menu provides assistance in navigating through the TA menu system or viewing the ISIHP s firmware version numbers ...

Page 60: ...u finish use the W command to save your new configuration and to select it to load automatically when the ISIHP is turned on 4 Close the data communications program For more information see the chapter on AT Commands and S Registers in this manual All manuals and user guides at all guides com ...

Page 61: ...rver from a workstation on the network To copy you can use the following command COPY A NOVELL AIOISIX NLM F SYSTEM To load the driver go to the system or PC console where the ISIHP 2S 2U is installed and enter the following at the prompt LOAD AIOISIX port W int X name Y note Z To install the ISIHP scripts copy aiomdms mdc to f system aio directory Click Yes to overwrite the existing aiomdms mdc f...

Page 62: ...main menu displays a list of options Press ENTER to select the highlighted item default Install 4 Select From comsco and press ENTER Comsco is a sample server name 5 Make sure the driver diskette is in the floppy diskette drive and then press ENTER to select the highlighted item default Floppy Disk Drive 0 The following message appears Examining media Please wait 6 The system recognizes that you a...

Page 63: ... the ISI cards 2 The following text appears on the screen Multi_View is a utility which will allow you to have multiple sessions on terminals that have multiple pages of physical memory In order for this utility to work with MultiTech s serial cards pseudo devices have to be created in your dev directory These devices are system wide resources Enter the number of pseudo devices to be created for t...

Page 64: ... name to a new device then the existing device will be deleted when the ISI port using its name is created a To use a non default base name type N and then enter a basename having less than five characters The base name you select will be used for all ports on each card you install ISI port designations will have this form basename prefix board number port letter basename Length is one to four cha...

Page 65: ...Y a series of messages displays while the driver is being installed and the kernel rebuilt After the terminals have been added to the Terminal Control database and when the display says Press Enter to continue then press ENTER When Installation complete displays press ENTER again 5 Select Host and press ENTER Remove the diskette from the drive 6 Select Exit and press ENTER 7 To reboot the system r...

Page 66: ...ntrol for each port you want to enable Example ttyl2A denotes the second ISI card 2 and the first port on that card A The port status can be altered later but one setting must be selected at this time The ACU line would read as follows ACU ttylbX 9600 dialer name Replace b X and dialer name with appropriate values 3 Repeat this process for each port on each board you have installed Record the sett...

Page 67: ...figuration utility e g custom for SCO Open Server 5 and follow instructions to remove the entire driver and rebuild the kernel without the ISI driver If it is necessary to reinstall the driver due to I O address or IRQ overlap remove the driver first Note Remove the driver before permanently removing the ISI card from the computer All manuals and user guides at all guides com ...

Page 68: ...f you don t specify the folder the destination folder default is usr local ISICOM case sensitive This also creates device files for the ISI cards normal and callout ports in the dev folder 9 To load the driver manually use the ISIHP installation configuration stored in the ISICOMStart file in the destination folder Or you can include the configuration in the appropriate start up script stored in t...

Page 69: ...a p for 16 port cards Normal ports ttyM are configured for dial in connections Callout ports cum are used for dial out connections To view busy I O address space on your system enter cat proc ioports To view busy IRQs enter cat proc interrupts To load the driver manually use insmod Example To load two ISI cards configured with base I O addresses 0x210 and 0x200 and IRQs 5 and 10 enter the followin...

Page 70: ...Software Driver Installation 70 MultiModemISI Hybrid Series ISIHP 2S 2U 4S 4U 4SD All manuals and user guides at all guides com ...

Page 71: ...rectory ISI Cards Service Multi Tech has an excellent technical support staff available to help you get the most out of your Multi Tech product If you have any questions about the operation of this product call Technical Support at 612 717 5863 Model and serial numbers are located on the Multi Tech label on the component side of the ISIHP To display the firmware version type ATI1 in terminal mode ...

Page 72: ...ter or power surges or which have been neglected altered abused used for a purpose other than the one for which they were manufactured repaired by the customer or any party without MTS s written authorization or used in any manner inconsistent with MTS s instructions MTS s entire obligation under this warranty shall be limited at MTS s option to repair or replacement of any products which prove to...

Page 73: ...ds and S Registers Contents Modem AT Commands 74 Modem S Registers 94 Modem Result Codes 101 Terminal Adapter AT Commands 104 TerminalAdapter S Registers 126 Terminal Adapter Result Codes 135 Using AT Commands to Operate the Terminal Adapter 136 All manuals and user guides at all guides com ...

Page 74: ... s operational modes and shows you how to use each modem AT commands These commands and responses are compatible with all systems and with all data communications software using the AT command set Modes of Operation The modem operates in two basic functional modes command mode and online mode There is also an in between state wait for carrier in which the modem is out of command mode but not yet o...

Page 75: ...xample is the same as E0 You can issue several commands on a single line a command string as long as the line does not exceed 40 characters Note Each character in a command counts toward the 40 character command line maximum Example Q1 is a single command but it counts as two characters in the command line Each command has a valid range of parameters For example S can have only 0 or 1 as a paramet...

Page 76: ...he 40 character command line maximum You may use spaces for increased readability when typing a command Spaces are not stored in the command buffer and they do not count towards the 40 character command line maximum Special characters such as hyphens and parentheses are not allowed If you exceed the 40 character limit or type invalid characters the command buffer is automatically erased and an ERR...

Page 77: ... Select stored con figuration on power up Modem Responses Result Codes p 82 E Echo command mode characters Q Result codes enable disable V Result codes verbose terse V Protocol result code X Result codes and call progress Q Select asynchronous communications mode Online Connection p 84 B Answer tone C Carrier control F Echo online data characters G Guard tones C Data calling tone N Modulation hand...

Page 78: ...led C1 Data compression enabled Immediate Action p 89 A Repeat last command I Information request B V 32 auto retrain V View current configuration Flow Control p 90 M0 Asynchronous mode K0 or Q0 Flow control disabled K3 or Q3 Hardware flow control K4 or Q1 XON XOFF flow control X0 XON XOFF no pass through J Auxiliary relay control J Enable data buffer control G Modem port flow control K Set break ...

Page 79: ... brings the line off hook just as if you had picked up the telephone handset It is not necessary to use the H1 command to bring the line off hook when using the D command The modem automatically goes off hook when you press ENTER at the end of the dial command Dial Modifier Commands ISIHP 2S 2U 4S 4U modems rely on the terminal adapters on the card for dialing For backwards compatibility the follo...

Page 80: ...1212 is stored at memory location N2 by typing Z2 16125551212 and pressing ENTER DSn Dial a Stored Number n 0 1 2 or 3 Default none You can automatically dial a telephone number that is stored in the modem s number memory by typing ATDSn where n 0 through 3 For example you can dial a number stored at N2 by typing ATDS2 in terminal mode and pressing ENTER Configuration Storage and Recall Commands T...

Page 81: ...ad Default Configuration n 0 Default F0 ISIHP 2S 2U modems store factory default AT command settings and S register values in read only memory ROM they store your custom AT command and S register values in nonvolatile random access memory NVRAM The F0 or F command resets modem to the factory default values stored in ROM Zn Reset Modem n 0 or 1 Default none The Z command resets the modem to the con...

Page 82: ...yboard the modem echoes the characters back to the computer or terminal which displays them on the monitor Use the E command to turn this feature off and on E0 disables the echo E1 enables the echo Qn Result Codes Enable Disable n 0 or 1 Default Q0 Use the Q command to enable or disable result codes for applications such as computer controlled auto dialing Q0 or Q enables result codes Q1 disables ...

Page 83: ... the modem to blind dial In addition to the basic CONNECT code it provides extended codes consisting of the word CONNECT and the speed of the connection CONNECT 14400 or CONNECT 28800 for example In this mode the modem does not recognize or respond to dial tones or busy signals X2 causes the modem to wait for a dial tone before dialing If it does not detect a dial tone within the time set by S6 th...

Page 84: ...m does not respond to busy signals Qn Asynchronous Communications Mode n 0 5 or 6 Default Q5 Allows you to select the type of asynchronous communications mode for your modem Note These commands are the same as several of the Nn commands described later in this chapter Q0 selects asynchronous mode with data buffering This is the same as N0 nonerror correction mode with data buffering Q5 selects err...

Page 85: ... of a certain frequency and cadence as specified in the V 25 standards which identifies whether it is remote data fax or voice The frequency is 1300 Hz with a cadence of 5 s on and 2 s off C0 disables the V 25 data calling tone C1 enables the V 25 data calling tone F Dummy command Gn Guard Tones n 0 1 or 2 Default G0 models outside U K or G2 U K models only Controls the presence or absence of guar...

Page 86: ...ivity timer specifies the length of time in minutes that the modem waits before disconnecting when no data is sent or received This timer is specified in register S30 The T0 command disables the inactivity timer Yn Long Space Disconnect n 0 1 Default Y0 When two modems are connected in reliable mode a link disconnect request packet is sent to request a disconnect In non error correction mode there...

Page 87: ...lows CD to act normally to go high when the modem detects a carrier and to drop when it loses the carrier Dn Data Terminal Ready Control n 0 1 2 or 3 Default D2 The Data Terminal Ready DTR signal on pin 20 of the RS 232 V 24 interface must be high or on in order for the modem to operate A high DTR signal tells the modem that the computer it is connected to is ready to communicate through the modem...

Page 88: ...nd the modem functions as a non error correction modem with data buffering This is the same as Q6 described earlier in this chapter N1 causes the modem to function in direct mode N2 enables reliable mode in which the modem uses its V 42 error correction capabilities for all transmissions In reliable mode the modem must be connected to a modem with the V 42 MNP protocol N3 enables auto reliable mod...

Page 89: ...dures at the start of the online connection the modem queries whether the other modem is using V 42 error correction If the modem determines that the other modem is using V 42 it switches itself into reliable V 42 mode and enables error correction If it determines that the other modem is not using V 42 the modem remains in non error correction mode This is the same as N3 and N5 Cn Data Compression...

Page 90: ...low control in both directions When the modem halts the flow of data it is called flow control When the computer halts the flow it is called pacing Kn Local Flow Control Selection n 0 3 or 4 Default K3 Allows you disable flow control and enable hardware or software flow control K0 completely disables data flow control initiated by the modem Same as Q0 K3 enables modem s use of Clear to Send CTS si...

Page 91: ...letely disables data flow control initiated by the modem This is the same as K0 Q1 enables XON XOFF software flow control XON XOFF flow control is an in band method of data flow regulation In band data regulation means that the XON Q and XOFF S characters are inserted into the stream of data rather than using separate control lines When an XOFF character is detected the data stream is suspended un...

Page 92: ...ations link to the remote modem thereby pacing the remote modem as well X0 causes the modem to respond to and discard the XON and XOFF characters default X1 causes the modem to respond to and pass on the XON and XOFF characters Jn Data Buffer Control n 0 Default J0 J0 disables force line rate less than or equal to DTE rate J1 enables force line rate less than or equal to DTE rate Kn Set Break Cont...

Page 93: ...when in command mode to immediately bring your modem off hook out of command mode into online answer mode and to cause it to transmit its carrier signal over the phone line If no responding carrier tone is received by your modem within 45 seconds or by the time you specified in register S7 your modem stops transmitting its tone hangs up and goes back into command mode On Go Back Online n 0 1 or 3 ...

Page 94: ...dem can only answer via the ATA command Set the S0 register value to one to cause the modem to answer the call immediately after the first ring Maximum number of rings that can be configured is 255 S1 Ring Count Unit 1 ring Range 0 255 Default 0 Counts number of rings that have occurred It is a read type of register and is seldom used in typical operation Each time an incoming ring signal is detec...

Page 95: ...acter Note If you change the S3 value you must make corresponding changes in your data communications software S4 Line Feed Character Unit Decimal Range 0 127 Default 10 J Defines the line feed character by its decimal ASCII code Default setting is J decimal 10 the code for the line feed key on most keyboards that have such a key Can be set for any ASCII character S5 Backspace Character Unit Decim...

Page 96: ...m waits for a carrier signal for up to 50 or 55 seconds and if none is detected terminates the call Maximum S7 value is 255 seconds for the US model 45 seconds for Canadian and International models and 55 seconds for the UK model S7 also determines the wait for silence time for the dial modifier S8 Pause Time for Comma Unit 1 second Range 0 65 North America 4 255 International 4 7 UK Default 2 Nor...

Page 97: ...nits for domestic models and 80 units for Canadian and International models where each unit is one ms In other words for domestic modems each tone is sustained for 95 ms followed by a 95 ms pause The minimum S11 value allowed is 50 ms 50 units The maximum S11 value is 150 ms 150 units S28 Enable Disable V 34 Modulation Unit decimal Range 0 1 255 Default 1 enabled Enables or disables V 34 modulatio...

Page 98: ...e rate if you need to artificially retain a lower modem speed 0 maximum modem speed 13 19200 bps 1 reserved 14 21600 bps 2 1200 75 bps 15 2400 bps 3 300 bps 16 26400 bps 4 reserved 17 28800 bps 5 1200 bps 18 31200 bps 6 2400 bps 19 33600 bps 7 4800 bps 8 7200 bps 9 9600 bps 10 12000 bps 11 14400 bps 12 16800 bps S42 Enable Disable Auto Rate Unit decimal Range 0 1 Default 1 enabled Enables and disa...

Page 99: ...in off line command mode before going into standby mode Setting S89 to zero 0 prevents the modem from ever entering standby mode Setting S89 to any value between zero and five 1 4 effectively sets the value to five because five seconds is the minimum possible wait time S108 Line Code Control Unit Decimal Range 0 1 Default 1 Controls the line coding used by the modem S108 0 mu law S108 1 A law defa...

Page 100: ...ter S8 The modem now pauses five seconds for every comma in a dial command 2 You want to configure your modem to answer incoming calls after the fourth ring instead of after the first ring To configure register S0 with a value of 4 type ATS0 4 and press ENTER 3 You are calling long distance to another country code and it is taking a long time to connect The register S7 time to wait for carrier fac...

Page 101: ...tion you can change the command parameters and S register values in active memory and save the new values with the W command The W0 or W command stores all current AT command and S register values into nonvolatile random access memory NVRAM and configures the modem so that it reads your custom settings in NVRAM when the modem is turned on or when it is reset with the Z command The F reset command ...

Page 102: ...er at 9600 bps and gone online 13 CONNECT 14400 Modem detected carrier at 14400 bps and gone online 14 CONNECT 19200 Modem detected carrier at 19200 bps and gone online 24 CONNECT 7200 Modem detected carrier at 7200 bps and gone online 25 CONNECT 12000 Modem detected carrier at 12000 bps and gone online 86 CONNECT 16800 Modem detected carrier at 16800 bps and gone online 40 CONNECT 300 Modem detec...

Page 103: ... 56000 Modem detected carrier at 56000 bps and gone online 88 DELAYED Delay is in effect for the dialed number 89 BLACKLISTED The dialed number is blacklisted 90 BLACKLIST FULL The blacklist is full Extended Result Codes If the extended result codes configuration option is enabled EC is added to the following result codes 5 CONNECT 1200 10 CONNECT 2400 11 CONNECT 4800 12 CONNECT 9600 13 CONNECT 14...

Page 104: ...ause with only a few exceptions each command string begins with the characters AT Using AT commands you can read and set parameters and perform actions such as dialing Entering AT Commands You can send AT commands to the TA by typing them on the keyboard by typing them in the terminal window of a data communications program such as HyperTerminal or indirectly by configuring your data communication...

Page 105: ...e character by changing the value in register S2 You can send the break signal in the out of band escape sequence only from software not by pressing SHIFT BREAK on your keyboard When it detects the escape sequence the TA enters online command mode in which it responds to commands while maintaining the connection with the remote device The TA s command buffer can store 80 characters including space...

Page 106: ... Analyzer N1 N2 DN1 DN2 EN1 EN2 Data DN MSN N1 N2 DN1 DN2 EN1 EN2 Modem DN MSN Z n Rate adaptation protocol Serial Port Configuration p 114 En Command mode echo L List telephone numbers L5 List current operating parameters L6 List S register values L8 Display low level ISDN status Qn Status displays Sr n Set S register Sr Read S register Vn Terse verbose result codes Xn Connect messages Z Restore ...

Page 107: ...To Send control Sn DSR Data Set Ready control V View port configuration Wn Store active profile Zn Store telephone number DSn Dial a Stored telephone number Dn Persistent DTR dialing En Escape sequence options P3 Parity P4 Data bits P6 Stop bits MBn V 110 Network Rate Data Call Commands p 124 A Answer D Dial H Hang up In Display product information O Return online Config Start ConfigMenu All manua...

Page 108: ...ault escape code is three characters followed by AT up to 80 command characters and a RETURN press ENTER The TA escapes to command mode executes any commands in the string and then remains in command mode Use the S2 z command to change the escape character break AT cr Out of Band Escape Code Values n a Default n a Places the TA in command mode while remaining online Enter a break signal the letter...

Page 109: ... 0 En bloc sending during call SETUP A97 1Overlap sending during call SETUP C0 n Network Switch Type Values n 0 1 2 or 5 Default C0 2 International NET3 C0 5 USA US N1 1 Selects one of the network switch types supported by the ISIHP 2S 2U International factory default setting is C0 1 Northern Telecom DMS 100 Default for USA is C0 5 USA US N1 1 C0 0 AT T 5ESS C0 1 Northern Telecom DMS 100 C0 2 NET3...

Page 110: ...ssigns a TEI each time the TA connects to the network If your ISDN service provider assigned a fixed TEI at subscription time you must configure the TA with the fixed TEI number You can also use D3 to disable the data channel which may be useful when multiple TAs are attached to a network terminator bus D3 0 63 Sets the TEI to a fixed value from 0 through 63 D3 240 Sets the data channel for dynami...

Page 111: ... channel and DTE DCE interface The Embedded Protocol Analyzer is useful as a diagnostic tool in that essential data messages display which enables you to observe interactive operations of the TA Central Exchange and remote communications equipment D0 Displays B channel traffic decoded as V 120 D1 Displays D channel traffic decoding layers 2 and 3 Q 921 and Q 931 D2 Displays D channel traffic decod...

Page 112: ...g Default null string Description Data DN MSN 1 can be set to the same value as Data DN MSN 2 and it can also be set to the same value as Modem DN MSN 1 and or 2 A call accepted by Data DN MSN 1 will be routed to TA port 1 Usage N2 n Function Data DN MSN 2 Values n 25 character string Default null string Description Data DN MSN 2 can be set to the same value as Data DN MSN 1 and it can also be set...

Page 113: ...r The Modem DN MSN is a string of up to 25 characters valid characters are 0 9 the character and the character If used as an MSN a subaddress can be added to the number if one is needed by using the character followed by the subaddress number N1 n sets the Modem DN MSN for port 1 N2 n sets the Modem DN MSN for port 2 Usage N1 n Function Modem DN MSN 1 Values n 25 character string Default null stri...

Page 114: ...e modem calls This is useful for applications where a specific port is for dial out only Usage ENn Function Enable Modem DN MSN n Values n 1 enable Modem DN MSN 1 n 2 enable Modem DN MSN 2 Default All ports are enabled by default Description ENn enables a Modem DN MSN which will put it back in service for accepting and originating modem calls Z n Rate Adaptation Protocol Values n 5 6 9 or 12 Defau...

Page 115: ...ult none Lists current operating parameters of the TA This information is useful when changing communications software or when changing default settings ATL5 lists AT command parameters and ATL6 lists values currently stored in the S Registers L8 Lists Low Level ISDN Status Qn Enable Disable Result Codes Values n 0 1 or 2 Default Q0 Enable result codes Controls whether the TA sends result codes to...

Page 116: ...sable the display of result codes V0 Enable terse result codes V1 Enable verbose result codes Xn Connect Messages Values n 0 5 Default X2 Enable all messages and Disable printing CLI with CONNECT message Selects the result code messages that the TA sends to the computer X0 Enables messages OK CONNECT RING NO CARRIER and ERROR terse result codes 0 4 X1 Enables all messages except BUSY terse result ...

Page 117: ...y itself ATZ Note that whereas the F0 reset command always restores the factory default profile the Z reset command restores either the factory default or the stored profile depending on how the W command is set Cn DCD Control Values n 0 1 or 2 Default C1 DCD normal Controls behavior of the DCD Data Carrier Detect signal Normally the DCD goes high when the TA establishes a connection and drops whe...

Page 118: ...wering a data call If DTR is low when an incoming data call is present the TA will answer the call If DTR goes high during that call nothing will happen However if DTR goes high and then drops for the minimum time specified by S25 then the call will be disconnected just as it would with D1 D4 is the same as D1 except that D4 can answer a data call without DTR and DTR can remain low for the duratio...

Page 119: ...are flow control cannot be enabled unless an error correction protocol is selected E5 XON XOFF flow control This is an in band method where the XON and XOFF characters Q and S respectively are inserted into the data stream rather than using separate control lines When an XOFF character is detected the data stream is suspended until an XON character is detected The drawback to this method is that s...

Page 120: ...ed after buffer reaches the full level Fn Load Quick Setup Profile Values n 0 4 Default F0 For quick setup the TA includes Quick Setup Profiles Each contains configuration parameters for a specific type of port operation To load a Quick Setup Profile into active memory use the command Fn where n is the number of the profile you want to load You then can customize the profile and store it with the ...

Page 121: ...rface A high DSR signal indicates to the computer that the TA is ready to transmit data S0 DSR is always high S1 DSR acts normally that is it follows the state of the CD signal which goes high when the ISIHP 2S 2U detects a carrier signal and goes low when the carrier signal is lost S2 DSR is always high except on disconnect when it drops for the period of time set by S10 and then goes high again ...

Page 122: ...OM W1 Erases your custom settings in NVRAM the next time the TA is turned off or reset causing the TA to read the factory default settings in ROM whenever it is turned on or reset Zn x Store Telephone Number Values n 0 9 x dial string Default n a Allows you to store a telephone number in a memory register for faster dialing To store a number type Z the register number 0 9 where you want to store t...

Page 123: ...istent DTR dialing PDD PDD causes the terminal adapter to automatically and continually redial stored telephone number 0 when the port has no active calls and DTR is high MBn En Escape Sequence Options Values n 0 5 Default E1 and E4 By default the modem responds only to the escape method However you can use the E command to set the modem to respond only to the break method to respond to either or ...

Page 124: ...4 None P4 n Data Bits Values n 7 or 8 Default P4 8 8 data bits Use only to set the number of data bits the TA uses when turned on Once the TA receives an AT command from the computer it automatically adjusts to the number of data bits the computer is using P4 7 7 data bits P4 8 8 data bits P6 n Stop Bits Values n 1 or 2 Default P6 1 1 stop bit Use only to set the number of stop bits the TA uses wh...

Page 125: ...alues n 0 or 1 Default H0 Forces TA to go off hook take control of the telephone line or go on hook hang up Since TA goes off hook automatically when it dials H command normally is used only to hang up To hang up first escape to command mode AT cr then type ATH or ATH0 cr Or include the hang up command in the escape sequence ATH cr H0 Go on hook hang up H1 Go off hook In Display Product Informatio...

Page 126: ...ter the command while in terminal mode Terminal Adapter S Registers S registers are sections of memory in which values are stored that affect how the TA operates S registers are so called because each has a name that begins with the character S Use the S command to assign a value to or to read the current value of an S register To assign a value to an S register use the command Sr n in which r is ...

Page 127: ...ge 0 255 Default 1 Sets the number of rings the TA waits for before it answers and begins its connect sequence S0 0 turns off the ability to automatically answer a call S0 1 causes the TA to automatically answer after 1 ring Note that if the S0 value is set too high the calling device may time out before the TA answers the call For autoanswer S0 must have a nonzero value DTR must be high D command...

Page 128: ...kspace Character Unit Decimal ASCII code Range 0 32 127 Default 8 H Specifies the character used by the TA to delete the previous character in command line S7 Wait for Connection Abort Timer Unit 1 second Range 0 255 Default 45 Sets Abort Timer delay time which is the length of time TA waits for a connection after dialing If no connection is established during the specified time the TA ends the ca...

Page 129: ...sconnect n 1 255 Default 0 does not disconnect Makes the TA disconnect a data connection if no data is transmitted or received for the specified time It will NOT cause a POTS call voice modem fax to disconnect The timer restarts any time a data character passes through the serial port either sent or received Disable the inactivity timer by setting S30 0 which is the factory default setting S30 cur...

Page 130: ...nce RING messages only appear for ISDN data calls the CLI feature does not define a means of conveying Calling Party information to the terminal for ISDN voice calls The CLI information is only included with the first RING message for a given incoming call and appears as follows RING FM 5552000 TO 5551000 If the Calling Party Number information is not included in the incoming SETUP message the RIN...

Page 131: ...hen the software performs callback Callback calls should be made with the same protocol that was used by the client so Detect and Select enables this possibility However if an initialization string or Fn command is given to the TA that changes the protocol after the disconnection then Detect and Select will not be effective Make sure no commands are given to the TA that will change the data protoc...

Page 132: ...2 switch type only Unit decimal ASCII code Range 128 Disable Type of Number 0 Unknown 16 International 32 National 48 Network specific 64 Subscriber 96 Abbreviated Numbering Plan 0 Unknown 1 ISDN telephony 3 Data 4 Telex 8 National standard 9 Private Default 128 disabled Modifies the value of Octet 3 of the Calling Party Number Information Element that is sent within the SETUP message for data and...

Page 133: ...a data call and within each INFORMATION message that is sent when dialing from the POTS port To set a specific number type and numbering plan select an option from the Type of Number section above and add its value to the value of an option in the Numbering Plan section above For example a National ISDN Called Party Number IE would be S57 33 where 32 National 1 ISDN telephony 33 National ISDN By d...

Page 134: ... or Auto Sync on Answer Default 2 use MB S76 or Auto Sync on Answer The Network Rate for an originated V 110 call will be determined by S76 MB for both S77 1 and S77 2 If the Network Rate of the originated call does not match that of the peer device then the connection will fail if the peer does not support automatic rate synchronization If the terminal adapter answers a V 110 call and if S77 1 th...

Page 135: ...se response messages or result codes which can be displayed on your monitor or intercepted and used by your communications software Using the V command you can select whether the result codes are terse numbers or verbose words The TA s result codes are listed in the following table Note that the speed of an ISDN channel is always either 56 Kbps or 64 Kbps CONNECT messages indicate the speed of the...

Page 136: ...SSED 64X CONNECT 64000 X 75 64XC CONNECT 64000 X 75 COMPRESSED 65 CONNECT MODEM Using AT Commands to Operate the Terminal Adapter You can configure and operate the Terminal Adapter entirely with AT commands if you want Remember you can issue AT commands only from a terminal or from a computer running a communications program in terminal mode This section describes how to use AT commands for basic ...

Page 137: ...nce AT cr To return to data mode from online command mode type ATO cr Making a Call Before you can place a data call you must configure the TA for the local switch type serial port speed and the data type of the ISDN device you want to call Dialing To dial a number using AT commands you must first start a data communications program In the program s terminal mode type ATDxxxxxxx cr where xxxxxxx i...

Page 138: ...number is stored For example type AT Z5 cr to display the telephone number in memory register 5 To list all ten telephone numbers stored in memory type ATL cr Answering a Call You can answer incoming calls to the TA either manually or automatically When the TA detects an incoming call it turns on the RI signal on the V 24 interface and sends a RING result code to the computer or terminal after eac...

Page 139: ...e steered to another available port if that port s DN MSN matches or is blank Otherwise if a port is busy and there is no other available port or no other port that matches the called number then the TA will report a busy Data DN MSN 1 will steer calls to the first Data TA port Data DN MSN 2 will steer calls to the second Data TA port Modem DN MSN 1 will steer calls to the first Modem port Modem D...

Page 140: ...140 MultiModemISI Hybrid Series ISIHP 2S 2U 4S 4U 4SD Terminal Adapter AT Commands S Registers All manuals and user guides at all guides com ...

Page 141: ...Troubleshooting MultiModemISI Hybrid Series ISIHP 2S 2U 4S 4U 4SD 141 Troubleshooting All manuals and user guides at all guides com a l l g u i d e s c o m ...

Page 142: ...dem cannot connect when answering File transfer appears slower than it should be Data is being lost There are garbage characters on the monitor If you experience problems please check the following possibilities before calling Tech Support see Chapter 6 The terminal adapter does not respond to commands Make sure you issue commands from the data communications software either automatically or manua...

Page 143: ...ct Mouse COM Ports and IRQ Status and note the addresses and IRQs that are in use If you find an IRQ conflict note which IRQs are not being used then change one of the conflicting devices to use one of the unused IRQs If you find an address conflict change the address of one of the conflicting devices To change a port address or IRQ in Windows 3 1x double click the Control Panel icon and then the ...

Page 144: ...the other end A faulty communications device computer or software at the other end Incompatibility between communications devices An improperly configured ISIHP 2S 2U 4S 4U TA Narrow the list of possibilities by using extended result codes To enable them enter ATV1X2 and press ENTER while in terminal mode or include V1X2 in the TA s initialization string V1X2 is enabled by default When you dial ag...

Page 145: ... be made on two B channels by default You may be using the wrong bundling dial modifier e g ATD7853500 7853502 cr The ampersand in this command string is correct Note other valid characters joining two telephone numbers include a Plus Sign and an exclamation Mark Note In Windows 95 if the Use Country Code and Area Code box is checked in the Properties window for dial up connection the bundling mod...

Page 146: ...age of the UART s speed Check the serial port baud rate in your communications software and make sure it is set as high as your UART allows Data is being lost Your UART may not be reliable at serial port speeds over 9600 bps or 19 200 bps Reset your serial port speed to a lower rate or replace your serial port with a faster one Check the serial port baud rate in your communications software and ma...

Page 147: ...MultiModemISI Hybrid Series ISIHP 2S 2U 4S 4U 4SD 147 Regulatory Information Regulatory Information All manuals and user guides at all guides com ...

Page 148: ...n instructions for details 4 If this equipment causes harm to the telephone network the telephone company will notify you in advance that temporary discontinuanace of service may be required If advance notice is not practical the telelphone company will notify the customer as soon as possible 5 The telephone company may make changes in its facilities equipment operation or procedures that could af...

Page 149: ...evice pursuant to Part 15 of the FCC rules These limits are designed to provide reasonable protection against harmful interference when the equipment is operated in a commercial environment This equipment generates uses and can radiate radio frequency energy and if not installed and used in accordance with the instruction manual may cause harmful interference to radio communications Operation of t...

Page 150: ... electronic device including fax machines to send any message unless such message clearly contains the following information Date and time the message is sent Identification of the business or other entity or other individual sending the message Telephone number of the sending machine or such business other entity or individual This information is to appear in a margin at the top or bottom of each...

Page 151: ... to the facilities of the local telecommunications company The equipment must also be installed using an acceptable method of connection The customer should be aware that compliance with the above conditions may not prevent degradation of service in some situations Repairs to certified equipment should be made by an authorized Canadian maintenance facility designated by the supplier Any repairs or...

Page 152: ...proximation of the laws of Member States relating to electromagnetic compatibility and Council Directive 73 23 EEC of 19 February 1973 on the harmonization of the laws of Member States relating to electrical equipment designed for use within certain voltage limits and Council Directive 98 13 EC of 12 March 1998 on the approximation of the laws of Member States concerning telecommunications termina...

Page 153: ...MultiModemISI Hybrid Series ISIHP 2S 2U 4S 4U 4SD 153 Regulatory Information All manuals and user guides at all guides com ...

Page 154: ...dware installation introduction 12 I I O address 32 installation activating ports in SCO Open Server 5 65 hardware 13 modems to COM ports in Windows 95 98 40 in Windows NT 24 software drivers in SCO Open Server 5 62 Linux 68 NetWare Connect 61 terminal adapters to COM ports in Windows 95 98 40 in Windows NT 24 installing software driver in Windows 95 98 34 in Windows 98 36 in Windows NT 20 IRQ Cod...

Page 155: ...Windows 95 36 in Windows 98 39 in Windows NT 33 S S T interface 15 safety warnings 12 SCO Open Server 5 62 service 71 shipping contents 12 software driver installation in Windows 95 34 in Windows 98 36 in Windows NT 20 T terminal adapter configuring 49 52 U upgrades 71 W warranty 72 All manuals and user guides at all guides com ...

Reviews: