background image

PAGE 26 — STOW CUTTER 1 CE — OPERATION MANUAL — REV. #2 (12/20/07)

STOW CUTTER 1 CE SAW — MAINTENANCE

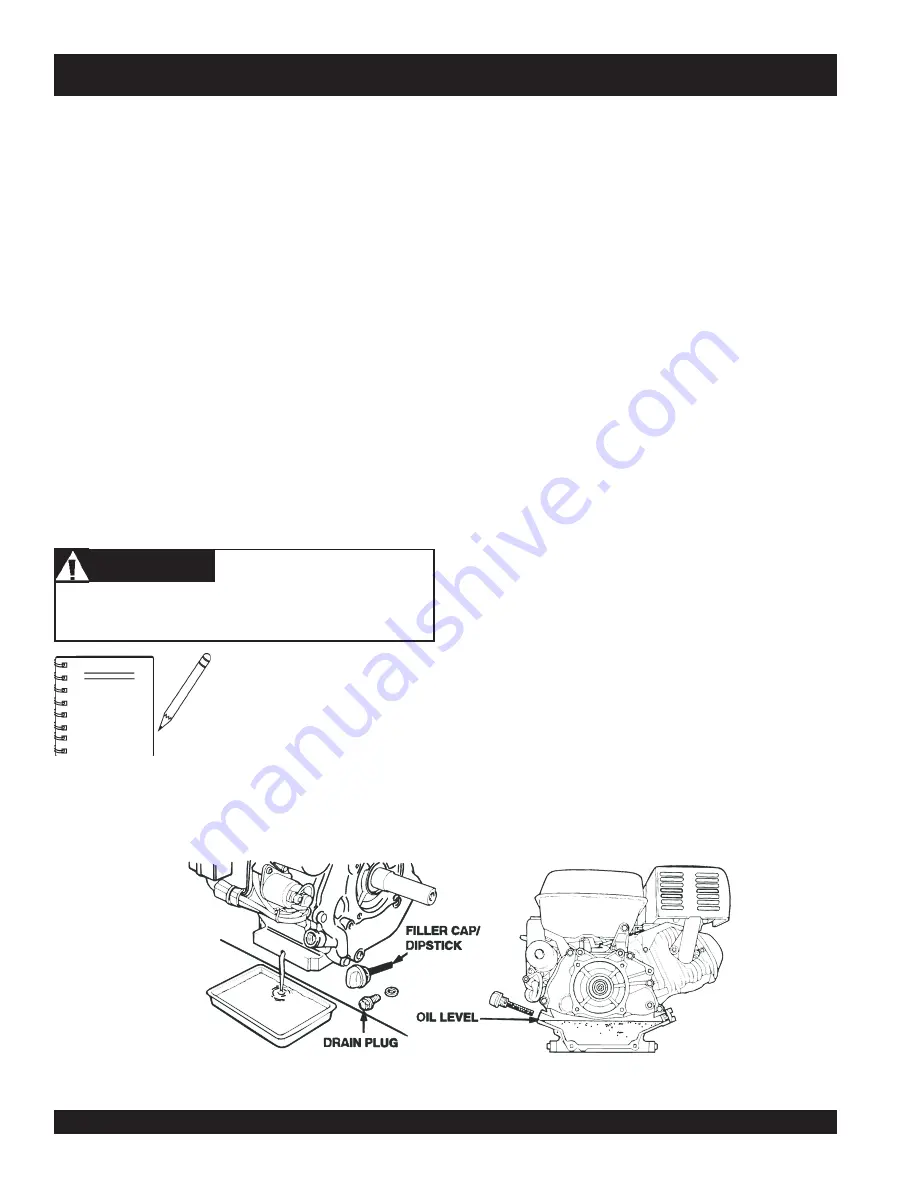
Figure 23.  Engine Oil Change

Dispose of used oil properly.  

DO NOT

pour used oil on the ground, down a
drain, or throw in the trash.  Used oil
can generally be taken to  your local
recycling center or service station for
reclamation.  Follow all required

environmental rules and regulations required in your area
concerning the disposal of hazardous waste such as used oil and
oil filters.


NOTE

4. Make sure the engine is in a level position and fill to the outer

edge of the oil filler hole with the recommended oil.  (See
Table 3.)  Engine oil capacity is 1.16 US quart (1.1 liter).

Running the engine with a low oil level can cause engine
damage.

5. Screw in the filler cap/dipstick securely.

1. Place an oil pan or suitable container below the engine drain

plug to catch the used oil.

2. Remove the filler cap/dipstick and the drain plug.

3. Drain the oil completely and reinstall the drain plug.  Ensure

the drain plug is tightened securely.

Drain the used oil while the engine is warm by the following
method:

Refer to Figure 23.

CAUTION

Engine oil change

:

Change engine oil the first month or 20 hours of operation. Then
every 3 months/or 50 HOURS of operation. See Engine Owner’s
Manual for detailed information.

3. Adjust the front pointer wheel so it just touches the side of the

straight-edge or level.

4. Remove the straight-edge or level.

5. Position the front pointer and blade directly over the chalk

line.

6. Start the saw and lower the blade onto the chalk line.

7. Begin cutting and make sure the blade follows the chalk line

as closely as possible.

8. The pointer should follow the chalk line as well. If it does not,

adjust the pointer by loosening then tightening the jam nuts
on the pointer until the pointer follows the same path as the
blade.

1. Chalk out a straight line on the prepared slab or cutting

surface.

2. Use a straight-edge or level by placing it flat against the blade.

Front Pointer Adjustment

The front pointer wheel has been set at the factory.  Use these
procedures only if the pointer is suspect of being out of alignment.

Engine tank & strainer

:

Clean every year/or 300 hours.

Fuel line:

Replace every two years/or as necessary.

Spark plug

:

Clean/adjust every 6 months/or 100 hours. Replace every
year/ or 300 hours.

Summary of Contents for CD6CE13H18

Page 1: ...ANUAL MUST ACCOMPANYTHE EQUIPMENT AT ALLTIMES To find the latest revision of this publication visit our website at www stowmfg com Revision 2 12 20 07 CUTTER 1 CE SERIES MODEL CD6CE13H18 CONCRETE ASPHALT SAW HONDA GX390 GASOLINE ENGINE ...

Page 2: ... State Some examples of these chemicals are Leadfromlead basedpaints Crystallinesilicafrombricks Cementandothermasonryproducts Arsenicandchromiumfromchemically treatedlumber Your risk from these exposures varies dependingonhowoftenyoudothistype of work To reduce your exposure to these chemicals work in a ALWAYS well ventilated area and work with approved safety equipment such as dust masks that ar...

Page 3: ...h defects or other reproductive harm If you are unfamiliar with the risks associated with the particular process and or material being cut or the composition of the tool being used review the material safety data sheet and or consult your employer the material manufacturer supplier governmental agencies such as OSHA and NIOSH and other sources on hazardous materials California and some other autho...

Page 4: ...ecifications Engine 11 General Information 12 Controls Components 13 Basic Engine 14 Preparation Pre Inspection 15 16 Blades 17 Blade Placement 18 19 Raise Lower Depth Stop 20 Initial Start Up 21 22 Operation 23 24 Maintenance 25 26 Optional Water Tank 27 28 Troubleshooting Saw 29 Troubleshooting Engine 30 31 Specifications and part numbers are subject to change withoutnotice NOTE Terms and Condit...

Page 5: ...TER 1 CE operation will be referenced with Hazard Symbols which appear throughout this manual and will be referenced in conjunction with Safety Message Alert Symbols HAZARD SYMBOLS Burn Hazards Engine components can generate extreme heat To prevent burns DO NOT touch these areas while the engine is running or immediately after operations NEVER operate the engine with heat shields or heat guards re...

Page 6: ... Respiratory Hazard ALWAYS wear approved respiratory protection ALWAYS wear approved eye and hearing protection Sight and Hearing hazard Equipment Damage Messages Other important messages are provided throughout this manual to help prevent damage to your concrete saw other property or the surrounding environment STOW CUTTER 1 CE SAW SAFETY MESSAGE ALERT SYMBOLS Thisconcrete asphaltsaw otherpropert...

Page 7: ...es STOW CUTTER 1 CE SAW RULES FOR SAFE OPERATION RULES FOR SAFE OPERATION ALWAYS check the saw for loosened hardware such as nuts and bolts before starting Replace nameplate operation and safety decals when they become difficult to read NEVER use accessories or attachments which are not recommended by the manufacturer for this equipment Damage to the equipment and or injury to user may result Manu...

Page 8: ...s familiar with proper safety precautions and operating techniques before using the saw NEVER leave the machine unattended while running Apply the brakes when leaving or when using on a slope Maintain this equipment in a safe operating condition at all times ALWAYS stop the engine before servicing adding fuel and oil NEVER run the engine without the air filter Severe engine damage could occur ALWA...

Page 9: ...EAR WARNING When Larger Blade and Guard is Installed Belt Drive MUST Be Changed to Proper Size See Owners Manual S M I MASONRY AND CONCRETE SAW MANUFACTURER S INSTITUTE CAUTION FAILURE TO COMPLY WITH THE C C AH JADV EEE AV EEA OIEJGGVCBVVZ P N 25249 001 P N 23330 001 P N 25250 001 P N 11246 Sheet Intl Stds Engine exhaust and some of its constituents and some dust created of California to cause can...

Page 10: ...a R r e t n i o P t n o r F h t g n e L m c 0 8 n I 0 2 3 C d e r e w o L r e t n i o P t n o r F h t g n e L m u m i x a M m c 8 3 1 n I 5 4 5 D h t d i W m c 5 5 n I 5 1 2 E e s a B l e e h W r a e R m c 0 4 n I 0 7 1 F e s a B l e e h W t n o r F m c 4 5 2 n I 0 0 1 G h t d i W r a B e l d n a H m c 5 5 n I 5 1 2 M P R e l d n i p S m u m i x a M M P R 6 3 8 2 e z i S r o b r A m c 4 5 2 0 1 h ...

Page 11: ... p s i D c c 9 8 3 n i u c 7 3 2 t u p t u O x a M S P 3 1 W k 6 9 p h b 9 2 1 M P R 0 0 6 3 y t i c a p a C k n a T l e u F s n o l l a G S U 2 7 1 x o r p p A s r e t i L 5 6 l e u F e n i l o s a G e l i b o m o t u A d e d a e l n U r e h g i h r o e n a t c O 6 8 y t i c a p a C l i O e b u L r e t i l 1 1 t q S U 6 1 1 l o r t n o C d e e p S d o h t e M e p y T t h g i e w y l F l a g u f i...

Page 12: ... The basic watersystemprovidesavalvethat connectstoastandard garden hose Thewaterisdelivered viaahose tothesawblade Awater tankdeliverysystemisoptional Power Plants The CUTTER 1 CE saw is classified in the industry as a low poweredsaw Thisclassificationisparticularlyusefulwhenselecting theproperdiamondbladeforanapplication The CUTTER 1 CE saw is powered by a HONDA GX 390 air cooled 4 stroke single...

Page 13: ...cutting concrete or asphalt 9 Blade Guard Covers saw blade and flips up to allow blade to be changed CONTROLS COMPONENTS Figure 3 CUTTER 1 CE Components 10 BeltTension Adjuster Adjusts belt tension 11 Front Pointer Front pointer wheel assists in straight tracking 12 FrontPointerArm Stowsupforstorageandpivotsdown for use 13 Cutting Depth Adjuster turn operating crank clockwise orcounter clockwiseto...

Page 14: ... the ignition system Clean spark plug once a month 9 Muffler Used to reduce noise and emissions DANGER WARNING STOW CUTTER 1 CE SAW BASIC ENGINE Adding fuel to the tank should be done only whentheengineisstoppedandhashadan opportunity to cool down In the event of a fuelspill DONOTattempttostarttheengine until the fuel residue has been completely wiped up and the area surrounding the engineisdry 2 ...

Page 15: ...he sawonsecurelevel ground with the engine stopped The frame platform must be level to accurately check the engine oil 2 Remove the filler dipstick from the engine oil filler hole Figure 5 and wipe it clean Figure 6 Engine Oil Dipstick Oil Level Motor fuels are highly flammable and can be dangerous if mishandled DO NOT smoke while refueling DO NOT attempt to refuel the saw if the engine is hot or ...

Page 16: ...s until equally aligned NOTE V belt alignment must be rechecked after adjusting belt tension STOW CUTTER 1 CE SAW PREPARATION PRE INSPECTION NEVER operate the saw without blade guards and covers in place DO NOT operate with the front of the blade guard raised The blade exposure cannot exceed 180 degrees during operation Adhere to the safety guidelines or other applicable local regulations WARNING ...

Page 17: ...erly on the spindle for sawing Reference the directional arrow on the blade and place it so the direction of rotation downcuts with the turn of the shaft 5 Diamond Segment or Rim Ensure there are no cracks dings or missing portions of the diamond segment rim DO NOT use a blade that is missing a segment or a portion of the rim Damaged and or missing segments rims may cause damage to your saw and in...

Page 18: ...BLADE PLACEMENT Diamond Blades Selecting the diamond blade TYPE and GRADE defines how the blade will perform both in cutting speed and blade life Selection of the proper diamond blade consists of z Material to be Cut z Type of Saw Being Used z Horsepower of Saw z Hardness Characteristics of the Material z Performance Expectations Factors for sawing economy z Type of Blade z Depth of Cut z Sawing S...

Page 19: ...el working surface 3 Ensurethebladeisraisedandtheraise lowercrankislocked into position When removing or installing a diamond blade please note that the bladeretainingnutsareleftandright hand threaded NOTE 4 Lift up the blade guard cover to gain access to the blade WARNING Incorrectly installed blades can cause damage to the blade or equipment or cause injury due to breakage Figure 11 Tool Blade P...

Page 20: ...13 Figure 13 Cutting Depth Raise Lower System 1 AdjustingHandCrankAssembly 2 Raise LowerAcmeScrew 3 JackArm 4 WheelBaseAssembly 5 JackshaftPin 6 LockPositions Setting the Depth Stop 1 Lift the Adjusting Hand Crank to unlock disengage the DepthStop 2 Rotate the crank to raise or lower the blade to the desired depth 3 Lower the crank into one of the lock position holes Item 6 Locked Position Unlocke...

Page 21: ...that does not provide ample free flow of air INITIAL START UP Ensuretheworkareaisclearoftool debris andunauthorized people NOTE TheEngineStopSwitchlocatedonthe handlebar Figure14 servesbothas an Emergency Engine Shut Off and as the primary ON OFF switch This allows the operator to shutdown the sawsafelyawayfrommovingparts Figure 17 Engine ON OFF Switch On Engine NEVER place hands or feet inside th...

Page 22: ...hrottlelever Figure20 halfwaybetweenfast andslowforstarting Allsawingisdoneatfullthrottle The engine governor speed is factory set to ensure optimum blade operating speeds Figure 20 Throttle Lever 8 If the engine has started slowly return the choke lever Figure 20 to the OPEN position If the engine has not startedrepeatsteps1through7 The engine speed has been set at the factory Changing the govern...

Page 23: ...onsole to lower the rotating blade allowing it to cut to the preset depth OPERATION 1 Starttheengineasdescribedintheprevioussection Rotate thethrottlelever Figure20 towardfullthrottle Ensurewater supplysystemisinoperation Turnvalvetostartflowofwater For water tank option see page 29 NOTE Markthecuttinglineclearlyandalways sawina STRAIGHTLINEONLY Ensure the cutting area is clear of tools debris and...

Page 24: ... that saw The only acceptable method for freeing a stuck blade is to remove the saw from the stuck or pinched blade DO NOT try to get the blade unstuck using the Raise Lower system or by lifting the saw by the lifting bale etc CAUTION Cutting Close to aVertical Surface Follow the following procedures when cutting up to a vertical surface wall steps etc Use EXTREME CAUTION when performing the the f...

Page 25: ...ed ensure that lubrication is accom plished AFTER steam cleaning operations Engine check Check daily for any oil and or fuel leakage thread nut bolt tightness and overall cleanliness ALWAYS ensure that both ENGINE ON OFF switches on the handlebar and on the engine are in the OFF position and that the spindle has COMPLETELY STOPPED ROTATING before performing any of the the following operations CAUT...

Page 26: ...sed oil while the engine is warm by the following method Refer to Figure 23 CAUTION Engine oil change Change engine oil the first month or 20 hours of operation Then every3months or50HOURSofoperation SeeEngineOwner s Manual for detailed information 3 Adjustthefrontpointerwheelsoitjusttouchesthesideofthe straight edgeorlevel 4 Removethestraight edgeorlevel 5 Position the front pointer and blade dir...

Page 27: ...ing steps are instructions for the assembly of the kit onto your CUTTER 1 CE Saw Make certain all bolts securing the kit to the saw are tight before operating the saw CAUTION DO NOT use a water tank larger than 5 gallons 18 95 liters with this kit CAUTION NOTE While the optional water tank kit is excellent for short run cutting operations theuseofapressurized continual water source may be preferre...

Page 28: ...anymoving part CAUTION Figure 26 WaterTank Position 14 5 4 Decommissioning Saw Components Decommissioningisacontrolledprocessusedtosafelyretirea pieceofequipmentthatisnolongerserviceable Iftheequipment poses an unacceptable and unrepairable safety risk due to wear or damage or is no longer cost effective to maintain beyond life cycle reliability and is to be decommissioned demolition and dismantle...

Page 29: ... e f e c a f r u s e d a l b e r u s n E 0 0 0 6 y l e t a m i x o r p p a r o b r a n o d e t n u o m y l r e p o r p m i e d a l B s e g n a l f d n a s r e d l u o h s t f a h s e d a l b e h t n o d e x i f f a y l r e p o r p s i e d a l b e r u s n E e l i h w e d a l b o t d e i l p p a e c r o f e v i s s e c x E g n i t t u c T O N O D d n a w o l s a y l p p A t u c e h t n i e d a l b e...

Page 30: ... p k r a p S g u l p k r a p s e v i t c e f e d e c a l p e R g n i r i w k r a p s e l b a l i a v a s i l e u f t r a t s o t t l u c i f f i D l a m r o n s i n o i s s e r p m o c d n a t n e s e r p s i e p y t l e u f g n o r W e c a l p e r d n a m e t s y s l e u f h s u l F l e u f f o e p y t t c e r r o c h t i w m e t s y s l e u f n i t s u d r o r e t a W m e t s y s l e u f h s u l...

Page 31: ...i t c e f e d l i o c n o i t i n g I l i o c n o i t i n g i e c a l p e R g u l p k r a p s y t r i D g u l p k r a p s e c a l p e r r o n a e l C s t a e h r e v o e n i g n E e p y t l e u f g n o r W e c a l p e r d n a m e t s y s l e u f h s u l F l e u f f o e p y t t c e r r o c h t i w r e p o r p m i e u l a v t a e h g u l p k r a p S f o e p y t t c e r r o c h t i w e c a l p e R g ...

Page 32: ... STOW personnel must personally deliver the equipment or parts to the carrier RETURNED GOODS POLICY Return shipments may be accepted and credit allowed subject to the following provisions 1 A Returned Material Authorization RMA must be approved by STOW prior to shipment Approvals for returned goods must be with just cause and are at the sole discretion of STOW A copy of the Authorization must acco...

Page 33: ...STOW CUTTER 1 CE OPERATION MANUAL REV 2 12 20 07 PAGE 33 NOTE PAGE ...

Page 34: ...nding Multiquip Inc reserves the right to discontinue or change specifications design or the information published in this publication at any time without notice and without incurring any obligations HERE S HOW TO GET HELP PLEASE HAVE THE MODEL AND SERIAL NUMBER ON HAND WHEN CALLING PARTSDEPARTMENT 800 427 1244 FAX 800 672 7877 310 537 3700 FAX 310 637 3284 SERVICEDEPARTMENT 800 478 1244 FAX 310 5...

Reviews: