6 of 9
Part Number 020006402 12/2014
Air Compressor Kits
7. Locate the three foot (0.91 m) length of tubing supplied
with air compressor. Neatly route and attach this line
from the air compressor tank compression elbow to the
shutoff valve compression fitting located on top of the
dump valve. Trim tubing to correct length.
8. Locate the eight foot (2.44 m) length of tubing supplied
with air compressor. Route and connect this line from
the 1/4" (6.35 mm) barb elbow of the dump valve to a
floor drain. Place the shut-off valve handle in the open
position. (See Installation figure)
9. Connect the air pump to the outlet box, following the
electrical instructions below.
NSTALLATON OF MODEL 44KX REFRGERATON UNT
1. Shut off main CO
2
supply to refrigeration unit.
2. Locate the air/CO
2
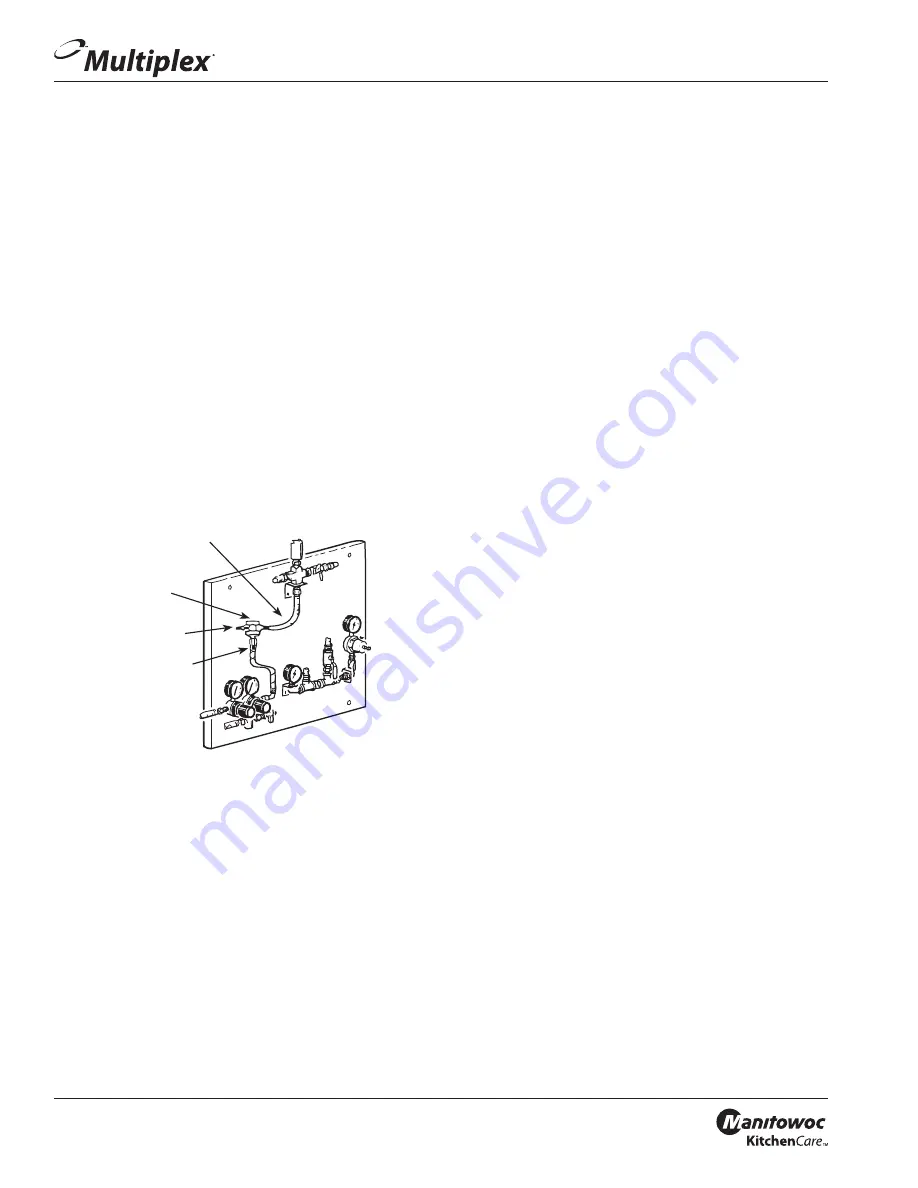
change-over valve assembly
supplied with kit P.N. 212506. Align the mounting
bracket of the change-over valve over the mounting
holes on control panel (Location for changeover valve
will be marked “Air/CO
2
Change-over Valve”). Mount the
air/CO
2
change-over valve to the panel with the #10-32
screws provided in kit. (See figure below)
To CO
2
Supply
Manifold
Air/ CO
2
Changeover
Valve
To Outlet Fitting
of Air Pump
To Syrup
Tank Supply
Manifold
Mpdel 44KX Mtaifplds
3. Locate the 1/4" (6.35 mm) EVA line connected at the
CO
2
supply manifold and syrup tank manifold. Remove
and discard the line.
4. Connect the 1/4" (6.35 mm) line assembly provided in
kit P.N. 212506 to the flair fitting on the right side of
the air/CO
2
change-over valve. Route the other end of
the tubing to the CO
2
supply manifold. Trim excess line
and connect swivel nut adapter to the remaining end
of line assembly. Secure with tab clamps. Connect this
line assembly to the CO
2
supply manifold. (See figure
above)
5. Locate the 4-1/2" (11.4 cm) section of 1/4" (6.35 mm)
tubing and connect to the bottom side of the air/CO
2
change-over valve. Route and connect the remaining
end of tubing to the syrup tank supply manifold. (See
figure above)
6. Locate the 12' x 1/4" (3.66 m x 6.35 mm) EVA line
assembly provided in kit P.N. 212506. Attach the end
of this line assembly, with the swivel nut, to the outlet
fitting of the air compressor tank. Neatly route tubing
under the stand top and to the left side of the control
panel. Connect the line assembly with 1/4" (6.35 mm)
elbow x barb (provided in kit P.N. 212506) to the 1/4"
(6.35 mm) male flare fitting of the air/CO
2
change-over
valve. (See figure above)
7. Locate the dump valve supplied with kit. Mount the
dump valve with #10-32 self-tapping screws provided
with kit to lower left cross channel of support stand.
Use holes provided in channel. (See Installation figure)
8. Locate the six foot (1.83 m) length of tubing supplied
with kit. Neatly route and attach this line from the air
compressor tank compression elbow to the shutoff
valve compression fitting located at top of the dump
valve. Trim tubing to correct length. (See Installation
figure)
9. Locate the eight foot (2.44 m) length of tubing supplied
with kit. Route and connect this line from the 1/4"
(6.35 mm) barb elbow of the dump valve to a floor
drain. Place the shutoff valve handle in the open
position. (See Installation figure)
10. Connect the cord to the stand outlet box or the wall
outlet, following the appropriate steps listed below.
ELECTRCAL CONNECTONS (FOR BOTH MODELS 37KX
AND 44KX)
This air pump kit is designed to easily connect to the high
stand that supports the refrigeration unit Model 44KX
or 37KX. The stand comes with an electrical outlet box
mounted to it. However, should the pump be used with
another type of stand, the power cord must be modified by
adding a plug that is accepted by the local electric outlet.


