mtf TRANSPORT SYSTEM BackBox Manual Download Page 17

30 

31

1

2

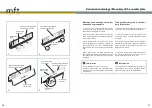
Schloss

lock

Sicherungshebel

securing lever

Bügel

clip

3  4.

5.

Tragemodul XT

carrying module XT

2.

1

2

Vorsicht!

Die euro-select box nur in horizontaler Lage und
eingerastet entladen.

Information

Die  Demontage  der  euro-select  box  erfolgt  in
umgekehrter  Reihenfolge  wie  die  Montage.
Entfernen Sie vor der Demontage die komplette
Ladung der euro-select box .

Euro-select box demontieren

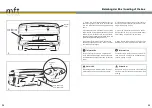
1.  Klappen  Sie  die  euro-select  box  ab.  (Siehe
S.18/19)

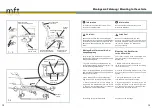
2.  Den  Elektrostecker  mit  einer  Viertelumdre-
hung  nach  links  entriegeln  und  aus  der  Fahr-
zeugsteckdose ziehen. Stecken Sie diesen an-
schließend in die dafür vorgesehene Halterung.
Bringen  Sie  die  euro-select  box  wieder  in  die
horizontale Lage.

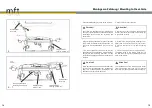
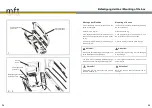
3.  Die  Schlösser  der  Sicherungshebel  (11)  am
Tragemodul  XT  mit  dem  Schlüssel A (14)  auf-
schließen. (Siehe S.17)

4.  Die  Sicherungshebel  (11)  drücken  und  an-
schließend gedrückt haltend um 90° der Kenn-
zeichnung entsprechend nach unten drehen.

5. Den Bügel (12) des Tragemoduls XT  bis zum
Anschlag nach hinten ziehen.

Information

Die euro-select box darf nur unbeladen demon-
tiert werden. Das Tragemodul XT niemals ohne
die euro-select box am Fahrzeug belassen.

Attention!

Unload the euro-select box only in a horizontal
position and when it is locked in place.

Information

The  removal  of  the  euro-select  box  is  done  in
reverse  order  of  mounting.  Remove  the  com-
plete  loading  of  the  euro-select  box  before  re-
moving from the vehicle.

Removing the euro-select box

1. Fold the euroselect box. (See page 18/19)

2.  Unlock  the  electrical  plug  by  turning  it  one
quarter  to  the  left. Then  unplug  it  from  the  ve-
hicle  socket  and  put  it  into  the  provided  hold-
ing device. Bring the euro-select box again into
horizontal position.

3.  Unlock  the  locks of  the  securing  levers (11)
on the carrying module XT with the key A (14).
(See page 17)

4. Press the securing levers (11) and simultane-
ously turn them 90° upwards in the direction of
the arrows.

5.  Pull  the  clip  (12)  of  the  carrying  module  XT
backwards until it stops.

Information

Remove  the  euro-select  box  only  when  it  is
empty. Never use the carrying module XT with-
out the euro-select box .

Demontage / Removal from the vehicle

Demontage / Removal from the vehicle

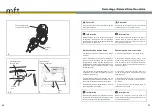
Fahrzeugsteckdose

vehicle power socket

Stecker

plug

Summary of Contents for BackBox

Page 1: ...Das variable Hecktragesystem variable rear mounted carrier systems...

Page 2: ...eichenmontage Mounting of the number plate 10 11 Montage am Fahrzeug Mounting to the vehicle 12 15 Befestigung der Box Mounting of the box 16 25 Beladung der Box Loading of the box 26 29 Demontage vom...

Page 3: ...e note the bearing load of the trailer hitch Weight of the euroselect box 20 kg Maximum load of the euro select box 57 kg Item number 1500 Forbidden are Leuchte links F hrungsschiene beidseitig Einsat...

Page 4: ...astening hand wheel 9 Clamp 10 Lever lock 11 Securing lever on both sides Clip Folding crank 8 9 10 11 12 12 12 Weitere Bestandteile 14 Schl ssel A BackCarrier 15 Schl ssel B BackBox Schl ssel C Kennz...

Page 5: ...bei der Montage oder Bedienung Fragen ergeben wenden Sie sich bitte an eine quali zierte Fachwerkstatt nderungen von technischen Details gegen ber Abbildungen der Montageanleitung sind vorbehalten Jed...

Page 6: ...nahmen w hrend der Fahrt Beobachten Sie die BackBox w hrend der Fahrt regelm ig durch den R ckspiegel Bei einer erkennbaren Ver nderung der euro select box sofort anhalten nach der Ursache suchen und...

Page 7: ...Kennzeichen am Rand entlang in die Kennzeichengrundplatte 7 eindr cken und mit dem Schl ssel C 16 die unteren Sicherungen verriegeln Information An der BackBox muss ein mit dem po lizeilichen Kennzei...

Page 8: ...alten 4 Durch leichten Druck auf die Klappe 9 bringen Sie die Halbschalen links und rechts in Position Der Schlie hebel 10 schwenkt selbstst ndig in die Schlie position Fortsetzung auf der n chsten Se...

Page 9: ...hebel 10 beim Schlie en nicht ohne Widerstand nach unten dr cken die Klappe 9 nochmals auf korrekten Sitz berpr fen 6 Das Sicherungshandrad 8 ganz eindrehen und mit dem Schl ssel A 14 abschlie en um...

Page 10: ...leichzeitigem Drehen um 90 zur ck in die Ausgangsposition 6 Anschlie end die Schl sser der Sicherungs hebel 11 abschlie en und den Schl ssel A 14 sicher verwahren Information It is necessary to have a...

Page 11: ...ende nicht verloren geht 4 Die euroselect box weiterhin festhalten und anschlie end langsam nach unten kippen Attention Open the boot only when the euro select box is folded down Be careful with autom...

Page 12: ...gliche Teile regelm ig berpr fen und nach Bedarf nachziehen Auch bei Fahrten ohne Ladung m ssen alle Schl sser abgeschlossen werden Electrical connection 1 Take the plug out of the holder which is at...

Page 13: ...den Attention Never open the lever lock 10 Returning the euro select box in its original position 1 Push the euro select box upwards in the di rection of the vehicle until it snaps audibly in the carr...

Page 14: ...careful during mounting to avoid damages to the sealings 3 Then tighten the fastening screws on the guide rails 2 Attention Never use the euro select box without the in serts 3 Montage der Eins tze V...

Page 15: ...t Es d rfen keine Tiere Personen Asche Sand leicht Ent ammbares oder Explosives scharfe Gegenst nde sowie schwere Metallgegenst n de oder tzende Fl ssigkeiten transportiert werden Siehe S 2 Correct lo...

Page 16: ...len wir Ihnen Schaumstoffeinlagen Diese k nnen Sie als zus tzliches Zubeh r erwerben Artikel Nr 1599 Vorsicht Die Ladung darf die St tzlast sowie die maxi male Ladung von 57 kg nicht berschreiten 3 Ti...

Page 17: ...euro select box darf nur unbeladen demon tiert werden Das Tragemodul XT niemals ohne die euro select box am Fahrzeug belassen Attention Unload the euro select box only in a horizontal position and whe...

Page 18: ...s ohne die euro select box am Fahrzeug verwenden 6 Tilt the euro select box slightly backwards and remove it from the carrying module XT Removing the carrying module XT 7 Unscrew the folding crank 13...

Page 19: ...es Carrying module XT item no 1201 Foam inserts item no 1599 Box Support item no 1508 Conversion kit for second folded down process Mft transport systems im Internet www mftgmbh de Auf unserer Webseit...

Page 20: ...mft transport systems GmbH Almarstra e 9 74532 Ilshofen tel 49 7904 9444 780 fax 49 7904 9444 7844 www mftgmbh de info mftgmbh de...

Reviews: