background image

8

OIL AND PETROL INFORMATION

NOTE: Dispose of the old petrol/oil mix in accordance to

Federal, State and Local regulations.

OIL AND PETROL MIXING INSTRUCTIONS

Old and/or improperly mixed fuel are the main reasons
for the unit not running properly. Be sure to use fresh,
clean unleaded petrol. Follow the instructions carefully
for the proper petrol/oil mixture.

Definition of Blended Petrols

Today's petrols are often a blend of petrol and
oxygenates such as ethanol, methanol, or MTBE (ether).
Alcohol-blended petrol absorbs water. As little as 1%
water in the petrol can make petrol and oil separate. It
forms acids when stored. When using alcohol-blended
petrol, use fresh petrol (less than 60 days old).

Using Blended Petrols

If you choose to use a blended petrol, or its use is
unavoidable, follow recommended precautions:

• Always use the fresh fuel mix explained in your

operator's manual

• Always agitate the fuel mix before fueling the unit

• Drain the tank and run the engine dry before storing

the unit

Using Fuel Additives

The bottle of 2-cycle oil that came with your unit
contains a fuel additive which will help inhibit corrosion
and minimize the formation of gum deposits. It is
recommended that you use our 2-cycle oil with this unit. 

If unavailable, use a good 2-cycle oil designed for
air-cooled engines along with a fuel additive, such as
STA-BIL

®

Petrol Stabilizer or an equivalent. Add 23 ml

(0.8 oz) of fuel additive per gallon of fuel according to the
instructions on the container. NEVER add fuel additives
directly to the unit's fuel tank.

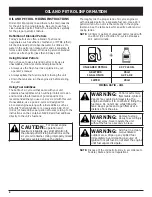
Thoroughly mix the proper ratio of 2-cycle engine oil
with unleaded petrol in a separate fuel can. Use a 40:1
petrol/oil ratio. Do not mix them directly in the engine
fuel tank. See the table below for specific petrol and oil
mixing ratios.

NOTE: 3.8 liters (1 gallon) of unleaded petrol mixed with

one 95 ml (3.2 oz) bottle of 2-cycle oil makes a
40:1 petrol/oil ratio.

UNLEADED PETROL

2 CYCLE OIL

3.8 LITERS

1 GALLON US

95 ml

3.2 FL. OZ 

1 LITER

25 ml

+

MIXING RATIO - 40:1

Add fuel in a clean,
well ventilated

outdoor area. Wipe up any spilled fuel
immediately. Avoid creating a source of
ignition for spilt fuel. Do not start the engine
until fuel vapors dissipate.

WARNING:

Petrol is extremely
flammable. Ignited

Vapors may explode. Always stop the
engine and allow it to cool before filling the
fuel tank. Do not smoke while filling the
tank. Keep sparks and open flames at a
distance from the area.

WARNING:

Remove fuel cap
slowly to avoid injury

from fuel spray. Never operate the unit
without the fuel cap securely in place.

WARNING:

For proper engine
operation and

maximum reliability, pay strict attention to
the oil and petrol mixing instructions on the
2-cycle oil container. Using improperly mixed
fuel can severely damage the engine.

CAUTION:

Summary of Contents for Yard Machines LT31S

Page 1: ...Operator s Manual LT31S 2 Cycle Petrol Trimmer IMPORTANT READ SAFETY RULES AND INSTRUCTIONS CAREFULLY P N 769 01661 2 05 ...

Page 2: ...AND SPECIFICATIONS All information illustrations and specifications in this manual are based on the latest product information available at the time of printing We reserve the right to make changes at any time without notice Copyright 2005 MTD SOUTHWEST INC All Rights Reserved SERVICE INFORMATION Service on this unit both within and after the warranty period should be performed only by an authoriz...

Page 3: ...ing attachment parts that are cracked chipped or damaged in any way Make sure the cutting attachment is properly installed and securely fastened Be sure that the cutting attachment shield is properly attached and positioned as recommended Failure to do so can result in personal injury to the operator and bystanders as well as damage to the unit Use only 2 03 mm 0 080 inch diameter original equipme...

Page 4: ...tended purpose Do not overreach Always keep proper footing and balance Always hold the unit with both hands when operating Keep a firm grip on both handles or grips Keep hands face and feet at a distance from all moving parts Do not touch or try to stop the cutting attachment when it rotates Do not touch the engine gear housing or muffler These parts get extremely hot from operation even after the...

Page 5: ...ry and hearing loss Wear eye protection meeting ANSI Z87 1 1989 standards and ear protection when operating this unit Use a full face shield when needed KEEP BYSTANDERS AWAY WARNING Keep all bystanders especially children and pets at least 50 feet 15 m from the operating area UNLEADED FUEL Always use clean fresh unleaded fuel SYMBOL MEANING THROWN OBJECTS AND ROTATING CUTTER CAN CAUSE SEVERE INJUR...

Page 6: ... Decorative trimming around trees fences etc KNOW YOUR UNIT Fuel Cap Throttle Control D Handle Shaft Grip Primer Bulb Blue Choke Lever Air Filter Muffler Cover Shaft Tube Starter Rope Grip Line Cutting Blade Muffler On Off Stop Control Cutting Attachment Cutting Attachment Shield ...

Page 7: ...5 24 cm 6 inches Shaft Housing INSTALL THE CUTTING ATTACHMENT SHIELD Use the following instructions if the cutting attachment shield on your unit is not installed 1 Slide the cutting attachment shield into the shield mount on the cutting attachment Align the screw holes in the shield mount with the holes in the cutting attachment Fig 3 2 Place one of the three 3 supplied hex lock nuts into one of ...

Page 8: ...r cooled engines along with a fuel additive such as STA BIL Petrol Stabilizer or an equivalent Add 23 ml 0 8 oz of fuel additive per gallon of fuel according to the instructions on the container NEVER add fuel additives directly to the unit s fuel tank Thoroughly mix the proper ratio of 2 cycle engine oil with unleaded petrol in a separate fuel can Use a 40 1 petrol oil ratio Do not mix them direc...

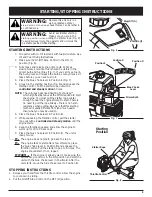
Page 9: ...lever in Position 1 Fig 7 5 Crouch in the starting position Fig 8 and squeeze the throttle control Pull the starter rope out with a controlled and steady motion 5 times NOTE The unit uses Advanced Starting Technology which significantly reduces the effort required to start the engine You must pull the starter rope out far enough to hear the engine attempt to start There is no need to pull the rope...

Page 10: ...ng eye protection and proper clothing With a slightly bent right arm the operator s right hand is holding the shaft grip The operator s left arm is straight the left hand holding the D handle The unit is at waist level The cutting attachment is parallel to the ground and easily contacts the grass without the need to bend over ADJUSTING TRIMMING LINE LENGTH The Bump Head cutting attachment allows y...

Page 11: ...y 25 hours Check and clean spark arrestor Check spark plug condition and gap Page 14 Page 15 Every 50 hours Inspect spark arrestor screen for clogging or obstruction to assure maximum performance levels Page 14 LINE INSTALLATION This section covers both SplitLine and standard single line installation Always use original equipment manufacturer 2 03 mm 0 080 in replacement line Line other than the s...

Page 12: ...f the line through one of the two holes in the inner reel Fig 18 Pull the line through the inner reel until only about 4 inches is left out 9 Insert the end of the line into the open hole in the inner reel and pull the line tight to make the loop as small as possible Fig 18 10 Before winding split the line back about 6 inches 11 Wind the line in tight even layers in the direction indicated on the ...

Page 13: ... by turning clockwise Tighten securely Cleaning the Air Filter Clean and re oil the air filter every 10 hours of operation It is an important item to maintain Failure to maintain your air filter properly can result in poor performance or can cause permanent damage to your engine 1 Remove air filter muffler cover Refer to Removing the Air Filter Muffler Cover 2 Turn cover over and look inside to lo...

Page 14: ...de screwdriver carefully pry up the spark arrestor screen from the recessed hole taking care to notice that the raised part of the spark arrestor screen is inside the recessed hole Remove the spark arrestor screen from the muffler 4 Clean the spark arrestor screen with a wire brush Replace it if it is damaged or if you are unable to clean it thoroughly 5 Reinstall the spark arrestor screen by putt...

Page 15: ...nd all of the following are true the engine will not idle the engine hesitates or stalls on acceleration there is a loss of engine power Have the carburetor adjusted by an authorized service dealer REPLACING THE SPARK PLUG Use a Champion RDJ7Y spark plug or equivalent The correct air gap is 0 5 mm 0 020 inch Remove the plug after every 25 hours of operation and check its condition 1 Stop the engin...

Page 16: ...ored for more than 60 days Dispose of the old fuel oil mix in accordance to Federal State and Local regulations TRANSPORTING Allow the engine to cool before transporting Drain fuel from unit Tighten fuel cap before transporting Secure the unit while transporting To avoid serious personal injury always turn your trimmer off and allow it to cool before you clean or service it WARNING 2 Start the eng...

Page 17: ... and slowly 10 times Engine is flooded Squeeze the trigger and pull the starter rope Old or improperly mixed fuel Drain petrol tank and add fresh fuel mixture Fouled spark plug Replace or clean the spark plug Plugged spark arrestor Clean or replace spark arrestor On Off Control in OFF O position Move switch to ON I ENGINE WILL NOT START ENGINE WILL NOT IDLE ENGINE WILL NOT ACCELERATE ENGINE LACKS ...

Page 18: ...r Diaphragm All Position Starter Auto Rewind with AST Muffler Baffled with Guard Throttle Manual Spring Return Fuel Tank Capacity 444 ml 15 oz Drive Shaft Housing Steel Tube Throttle Control Finger Tip Trigger Unit Weight No fuel with cutting attachment shield and D handle 11 lbs 5 kg Cutting Mechanism Bump Head Shoulder Strap Optional Line Spool Diameter 76 2 mm 3 in Trimming Line Diameter 2 03 m...

Page 19: ...19 NOTES ...

Page 20: ...20 NOTES ...

Reviews: