17
S
ection
4 — P
roduct
c
are
Parking Brake
WARNING
Never attempt to adjust the brakes while the engine is running.
Always disengage PTO, move shift lever into neutral position,
stop engine and remove key to prevent unintended starting.
If the riding mower does not come to a complete
stop when the brake pedal is completely
depressed, or if the riding mower’s rear wheels can
roll with the parking brake applied, the brake is
in need of adjustment. See an authorized service
dealer to have your brakes properly adjusted.
Deck
Note: Check the riding mower’s tire pressure before
performing any deck leveling adjustments. Refer
to Tires, in the Assembly & Set-Up section for more
information regarding tire pressure.
Front-to-Rear Levelling
It is possible to adjust the pitch of the cutting deck.
The front of the deck should be between 0” (level)
and 1/4” lower than the rear of the deck. Adjust if
necessary as follows:
1.
With the riding mower parked on a firm,
level surface, place the deck lift lever in the
middle position and rotate the blade so that
it is aligned with the front and rear of the
riding mower.
2.
Measure the distance from the front of
the blade tip to the ground and the rear
of the blade tip to the ground. The first
measurement taken should be between
0” (level) and 1/4” less than the second
measurement. Determine the approximate
distance necessary for proper adjustment
and proceed, if necessary, to the next step.
3.
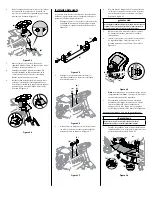
Locate the flange lock nut (a) on the front
end of the PTO lift rod (b). See Figure 4-4.
(a)
(b)
Figure 4-4
•
Tighten the flange lock nut (a) to
raise the front of the deck.
•
Loosen the flange lock nut (a) to
lower the front of the deck.
Tires
Refer to the Assembly & Set-Up section for more
information regarding tire pressure.
Off Season Storage
WARNING
Never store riding mower with fuel in tank indoors or in poorly
ventilated areas where fuel fumes may reach an open flame,
spark, or pilot light as on a furnace, water heater, clothes dryer,
or gas appliance.
Engine
Important: Fuel left in the fuel tank during warm
weather deteriorates and will cause serious
starting problems.
To prevent gum deposits from forming inside
the engine’s carburetor and causing possible
malfunction of the engine, the fuel system must be
either completely emptied, or the gasoline must be
treated with a stabilizer to prevent deterioration.
1.
If using a fuel stabilizer:
•
Read the product manufacturer’s
instructions and recommendations.
•
Add to clean, fresh gasoline the
correct amount of stabilizer for the
capacity of the fuel system.
•
Fill the fuel tank with treated fuel
and run the engine for 2-3 minutes
to get stabilized fuel into the
carburetor.
2.
If emptying the fuel system:
WARNING
Gasoline is extremely flammable and can be explosive
under certain conditions. Drain gasoline before storing the
equipment for extended periods. Drain fuel only into an
approved container outdoors, away from an open flame.
Allow engine to cool. Extinguish cigarettes, cigars, pipes,
and other sources of ignition prior to draining fuel. Store
gasoline in an approved container in safe location.
•
Do not drain fuel when the engine is
hot. Allow the engine adequate time
to cool. Drain fuel into an approved
container outdoors, away from open
flame.
•
Drain any large volume of fuel from
the tank by disconnecting the fuel
line from the in-line fuel filter near the
engine. See the complete instructions
for Draining the Fuel in this section.
•
Reconnect the fuel line and run
the engine until it starts to falter,
then use the choke to keep the
engine running until all fuel in the
carburetor has been exhausted.
•
Disconnect the fuel line and drain any
remaining gasoline from the system.
WARNING
Gasoline is a toxic substance. Dispose of gasoline properly.
Contact your local authorities for approved disposal methods.
•
Remove the spark plug and pour one
ounce of engine oil through the spark
plug hole into the cylinder. Crank the
engine several times to distribute the
oil. Replace the spark plug.
Draining the Fuel
1.
Locate the fuel filter, it may be attached to
the engine with a tie strap.
2.
Cut the tie strap, if present, then pinch the
in-line clamp on the fuel filter with a pair of
pliers, slide the clamp up the fuel line.
3.
Pull the fuel line free from the filter and
place the open end of the line into an
approved container to drain the fuel.
Preparing the Riding Mower
1.
Clean and lubricate riding mower thoroughly
as described in the Lubrication section.
2.
Do not use a pressure washer or garden
hose to clean your riding mower.
3.
Store riding mower in a dry, clean area. Do
not store next to corrosive materials, such
as fertilizer.
Service
Cutting Deck Removal
To remove the cutting deck, proceed as follows:
1.
Place the PTO lever in the disengaged (OFF)
position and engage the parking brake.
2.
Lower the deck by moving the deck lift lever
into the bottom notch on the right fender.
3.
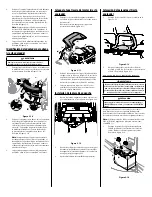
Remove the bow-tie cotter pin (a) and flat
washer (b) from the deck lift assembly, and
retain for reinstallation later. See Figure 4-5.
(a)
(b)
Figure 4-5
4.
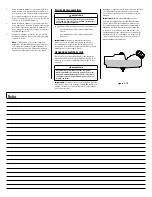
Remove the belt from around the tractor’s
PTO pulley. See Figure 4-6.
Figure 4-6
Summary of Contents for 769-11837A
Page 20: ...Notes 4 ...
Page 40: ...Notas 20 ...


