background image

Getting Started 

1.3 Package Contents


When removing the contents of the package, please inspect all items to ensure no 
damage was sustained during shipping. The following items should be included in the 
package:  
 

  TV @nywhere A/D  

  PAL to NTSC Converter (country dependant) 

 A/V-Cable 

 Remote 

control 

  IR sensor cable 

  Software Pack CD** 

 User 

Manual 

 Portable 

antenna* 

 FM 

antenna 


The enclosed antenna is a free gift for outdoor use only.  The performance may vary or be limited 
according to your location and signal coverage.  For indoor use, a good quality roof antenna is highly 
recommended for better signal strength. 


**

  Includes MAGIX Goya Base software.  Goya Base is XP, MCE 2005 and Vista compatible.  Some 

functions are unavailable; please upgrade to MAGIX Goya Multimedia for more functions. 


1.4 System Requirements 


To successfully use the 

TV@nywhere A/D 

solution, please ensure that your system 

meets the following requirements: 
 

 Pentium

®

 4 or AMD Athlon 2.0 GHz or faster, 2.4GHz or faster recommended 

  256 MB RAM (minimum), 512 MB RAM recommended  

 Microsoft 

Windows

®

 XP SP2/MCE2005/Vista 

  100 MB available hard disk space for installation, additional space required for 

recording or TimeShifting 

  CD-ROM or DVD drive   

  VGA chipset with full DirectX 9.0 support 

  DirectX 9.0c or higher installed 

  Available slot  

  TV antenna or cable for digital TV 

  TV antenna or cable for analog TV 


*

  When using the TV@nywhere A/D with Windows Media Center in Windows XP MCE 2005, you must 

install a 3rd party MPEG-2 decoder (such as Power DVD 6 or WinDVD6 or NVIDIA MPEG-2 decoder) 
in order to use the TV@nywhere A/D with Windows Media Center. 


Summary of Contents for TV@nywhere A/D

Page 1: ...TV nywhere A D User Manual ...

Page 2: ......

Page 3: ...tify any person or organization of such revision or change In no event shall Micro Star International be liable to you or any third party for any consequential incidental direct indirect special punitive or other damages including without limitation damages for loss of profits interruptions loss of information pecuniary loss etc even if Micro Star International has been advised of the possibility ...

Page 4: ...n 6 3 6 Installation of MAGIX Goya Base 7 3 7 Setup of Media Center MCE 2005 8 3 8 Setup Media Center Vista Premium Users 11 4 DTV 13 4 1 DTV Interface Overview 13 4 2 Scanning for TV Channels Digital 14 4 3 Scanning and editing channels Analog 16 4 4 Scanning for stations FM Radio 17 4 5 Choosing your source 18 4 6 Channel list 19 4 7 Volume controls 19 4 8 Signal Strength Meter 19 4 9 Teletext 2...

Page 5: ...7 2 The TimeShift Button 32 7 3 Schedule Recording 33 7 4 Snapshots 34 7 5 Play Mode 34 8 The Remote Control and Keyboard Shortcuts 35 8 1 Remote Control optional 35 8 2 Keyboard Shortcuts 36 ...

Page 6: ......

Page 7: ...V nywhere A D provides you with a high quality TV viewing experience with true stereo sound 1 2 Features Antenna ready DVB T Silicon Tuner Universal Analog TV Silicon Tuner S Video composite video inputs PIP Picture in Picture Real time recording from Digital TV Analog TV and Analog inputs Watch both digital TV and input analog video simultaneously Watch TV in a resizable window or full screen Tim...

Page 8: ...ons are unavailable please upgrade to MAGIX Goya Multimedia for more functions 1 4 System Requirements To successfully use the TV nywhere A D solution please ensure that your system meets the following requirements Pentium 4 or AMD Athlon 2 0 GHz or faster 2 4GHz or faster recommended 256 MB RAM minimum 512 MB RAM recommended Microsoft Windows XP SP2 MCE2005 Vista 100 MB available hard disk space ...

Page 9: ...home antenna or cable for Analog TV FM Connects to FM antenna AV Cable Connect the A V Cable to the 9 pin connector of the TV nywhere A D S Video S Video input for external devices like VCRs or camcorders Composite Video Composite video input for external devices like VCRs or camcorders Audio R Connects to the right audio channel of an external audio device Audio L Connects to the left audio chann...

Page 10: ... on Windows XP MCE 2005 If you use Windows Vista click on Windows Vista If the Autostart program does not appear automatically when you insert your Installation CD start it manually by running the InstallCD exe file located on the Installation CD or by clicking the Start button choosing Run and typing in D InstallCD exe if D is your CD ROM drive 3 1 DirectX XP users only Click on DirectX 9 0 and f...

Page 11: ...ashes during operation This is usually the PCI slot closest to the AGP slot but always check your mainboard manual 5 Carefully remove the card from its packaging and pick it up by the edges with one hand while your other hand is touching a metal part of the PC This will ensure that your body is completely discharged via your computer without damaging the TV card 6 Align the holder at the rear of t...

Page 12: ...nd Vista Premium users Install the MCE encoder required to run Windows Media Center by clicking on MCE Encoder then selecting 32 bit or 64 bit based on your version of Windows Just follow the prompts to install the software 3 5 Installation of the TV application Install the TV software by clicking on Application Setup Just follow the prompts to install the software VISTA XP VISTA XP VISTA XP ...

Page 13: ...Installation 7 3 6 Installation of MAGIX Goya Base Click on MAGIX Goya Base to install the software Just follow the prompts to complete installation VISTA XP ...

Page 14: ...sktop to start Media Center Click on Settings Now click on TV Click on Set Up TV Signal A warning message will appear Click Yes Click Next Select Yes use this region to configure TV services if your current region is displayed If not select No I want to select a different region Click Next ...

Page 15: ...circle next to Set Up Guide Settings and click Next Click on Next If you want to use the Media Center Guide select Yes and follow the onscreen prompts If not select No Click Next Click Start Scan to begin a channel scan Windows MCE will now scan for available channels in your area This may take a few minutes ...

Page 16: ... decoder also known as a DVD decoder in order to watch and record TV in Windows MCE This DVD decoder is not included on the installation CD To install a DVD decoder you can install software such as CyberLink PowerDVD InterVideo XPack Sonic CinePlayer nVidia DVD Decoder or other such product that includes a DVD decoder If you are unable to scan any channels or configure both tuners make sure you ha...

Page 17: ...ions to set up Media Center 4 When you reach the Optional Setup screen select Configure tuner TV signal and Guide and click Next 5 If you are in the currently displayed region select Yes use this region to configure TV services and click Next Otherwise click No I want to select a different region click Next and choose your region from the list that appears then click Next 6 Here select your TV sig...

Page 18: ... finish then click Next after it finishes 9 Here select Yes if you want to use Media Center s Guide feature or No if not Click Next 10 This completes setup of your TV card with Media Center You can continue to set up the rest of the options or you can select I am finished and Next to finish setup ...

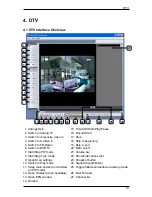
Page 19: ...h to DVB TV 20 Mute on off 7 Start Stop PIP mode 21 Volume bar 8 Start Stop Twin mode 22 Show hide channel list 9 Open Scan settings 23 Snapshot button 10 Switch to Play mode 24 Signal Strength Meter 11 Swap main and second window in PIP mode 25 Toggle fullscreen windowed viewing mode 12 Open Teletext when available 26 Fast Forward 13 Open EPG window 27 Channel list 14 Rewind 27 1 2 3 4 5 X 7 8 9 ...

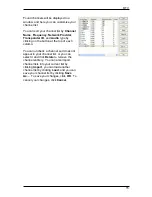
Page 20: ...o You can change this setting in DVB Settings in Chapter 5 1 3 Services Information This shows information about the currently selected channel when available During a scan this will show information on the status of the scan Channel Scan There are two ways to scan for available channels Auto Scan and Transponder Scan 1 Auto Scan Select Auto Scan then select your country from the drop down box and...

Page 21: ...e button at the top of each column You can uncheck a channel so it does not appear in your channel list or you can select it and click Delete to remove the channel entirely You can also import channel lists into your current list by clicking Import you can load another channel list by clicking Load and you can save your channel list by clicking Save As To save your changes click OK To cancel your ...

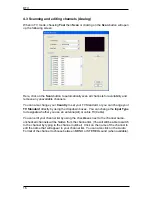
Page 22: ...TV Standard directly by using the dropdown boxes You can change the Input Type to designate whether you use an antenna Air or cable TV Cable You can edit your channel list by using the checkboxes next to the channel name unchecked channels will be hidden from the channel list You will still be able to switch to the channel by typing in the channel number Click on the name of the channel to edit th...

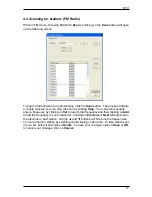
Page 23: ...op You can also manually enter a frequency by clicking on Set to tune to that frequency and then clicking on Add to add the frequency to your station list Clicking on Previous or Next will autoscan to the previous or next station and the and buttons will fine tune the frequencies You can rename a station by selecting it and clicking on its name To take stations out of your list select it and click...

Page 24: ... FM Radio reception Switches to Digital Terrestrial TV selected by default Turns on and off PIP Mode which lets you watch both digital TV and an analog input S Video or AV in at the same time in separate windows Turns on and off Twin Mode which lets you watch digital TV and an analog input S Video or AV in at the same time side by side Brings up the Scan Settings dialog Enters Play Mode and lets y...

Page 25: ...t clicking on a channel will give you the option to sort the list by Name Frequency Network Provider or Transponder ID 4 7 Volume controls At the bottom of the interface is the volume bar Click on the bar to set the volume to that level or press the I or J arrow keys to decrease or increase the volume Click on the speaker icon to mute the audio 4 8 Signal Strength Meter The signal strength meter i...

Page 26: ...e since it is constantly transferred along with the TV picture via the so called vertical blanking interval of the picture signal Surfing through the pages is conveniently easy thanks to the preloaded text tables Use the arrow buttons on the software interface the PC keyboard or the remote control to navigate from one page to another or enter a page number directly You can also click a page refere...

Page 27: ...r in the day and record them Click the EPG button to open the EPG window Click on Update to update the EPG information Date start time duration and program name will appear in the table Selecting an entry will show extended information about the program if available Clicking on Rec will schedule a recording of that program automatically using the EPG information you can use this to easily schedule...

Page 28: ...path or click Browse go to the folder you want and click OK Capture Size Setting When checked this will split recorded files into parts at the size entered as the File split size This is useful if you want to save long recordings in more manageable files For example setting the file split size to 650 MB would make the files easy to burn to CDs Always on top You can also choose to always have the D...

Page 29: ...PIP Picture In Picture 23 5 1 2 Schedule Recording Here you find programs scheduled to be recorded Please refer to Chapter 7 3 for a description how to use Scheduled Recording ...

Page 30: ...teristics like Brightness Contrast Hue Saturation and Sharpness Clicking on Default will put the settings back to the factory default 5 2 2 Record Settings Record Settings let you adjust how you record files from the AV in and S Video sources Record MPEG Here you can define whether you want to record at Good Better or Best quality according to predefined settings When you choose Customized you can...

Page 31: ...new profile Modify an existing one Duplicate a profile and Remove one or all of the existing profiles Create Profile General Here enter a name for the profile and a comment to help identify it Select MPEG 1 or MPEG 2 to use with the profile System Depending on the Mode selected in General select what Bitstream mode you want to use with the profile ...

Page 32: ...ate Sample Rate and how many Channels to use for recorded audio 1 mono 2 stereo Record SYSTEM By selecting SYSTEM in the Record Setting window you can access the codecs already installed in your system Depending on the codec you can access the properties of the codec and modify their settings by clicking on the Property button not available with all codecs You can download free codecs from the int...

Page 33: ... want to save long recordings in more manageable files For example setting the file split size to 650 MB would make the files easy to burn to CDs Always on top You can also choose to always have the DTV window on top of other applications by checking Always on top VGA hardware acceleration This enables VGA hardware acceleration Please note that not all graphics cards support this feature 5 2 4 Sch...

Page 34: ...me analog TV settings Select your country and TV standard to get proper reception in your area You can also select whether to receive Mono or Stereo for the currently selected channel and what Language you wish to receive for multi language broadcasts when available ...

Page 35: ...the left When you click on the PIP Button you will see a second live stream at the bottom right When you are in PIP Mode you can switch between S Video and AV in depending on which connection you want to view in the second window You can move the window anywhere on the desktop and resize it by dragging it on its edges ...

Page 36: ... will be locked and cannot be individually resized or moved Clicking on the Swap button will swap the main and second windows so digital TV will be in the second window and your analog source will be in the main window To end PIP mode click on the PIP button again to return to normal viewing You cannot TimeShift or record when in PIP mode ...

Page 37: ... have specified in Record Settings Chapter 5 2 2 In FM Radio mode you record to a standard WAV file In all modes recorded files will be saved to the working directory which can be specified in Directory Settings Chapter 5 1 1 and Chapter 5 2 3 You can watch the movies you have recorded by entering Play Mode Chapter 7 5 When recording from DVB you can view listen to another input AV in S Video FM w...

Page 38: ...video Clicking it again will begin playback right where you left it You will see a green bar at the bottom of the screen with a slider that shows your current position You can rewind or fast forward by using the buttons at the left and right side of the bar or by dragging the slider left and right You can also click on the Skip to Beginning button to go to the beginning of the TimeShifted file and...

Page 39: ... from the right side of the screen Click One time if this is a one time only recording To make a weekly recording click on the days you want the program to record on Select the Source you want to record from then the Channel Select the Date if this is a one time recording Enter the Start Time and Duration of the program you want to record Finally enter a File Name for the recorded file if this is ...

Page 40: ...Mode Chapter 7 5 7 5 Play Mode You can see the files you have already recorded by clicking on Play on the left side of the interface Here you can select the file you wish to view on the right and it will display in the main window If the file is an image it will be displayed If the file is a movie clip it will begin to play You can pause play or stop the movie using the Pause Play and Stop buttons...

Page 41: ...P Mode and to switch between the main and second window 12 Source Switch between the different sources DVB TV AV In S Video 13 Record Pause Starts and stops the recording of the current program 14 Swap Swaps main and secondary windows when in PIP mode 15 TimeShift Pause Starts and pauses the TimeShifting of the current program 16 Rewind Rewinds current TimeShift or recorded video 17 Play Pause Res...

Page 42: ...ackSpace Recall Previous Channel M Mute on off T Switch between TV Radio reception A Switch to Second Audio Language Channel Up ª Channel Down Volume Up Volume Down Enter NumPad Enter Enter Confirm P Enable disables PIP mode I Input Source DVB TV AV in S Video in Ctrl R Start Recording S Swaps main and secondary windows during PIP mode Ctrl T Start Pause TimeShift W Rewind Space Play Pause E Fast ...

Page 43: ......

Page 44: ......

Reviews: