


INSTALLATION (continued)
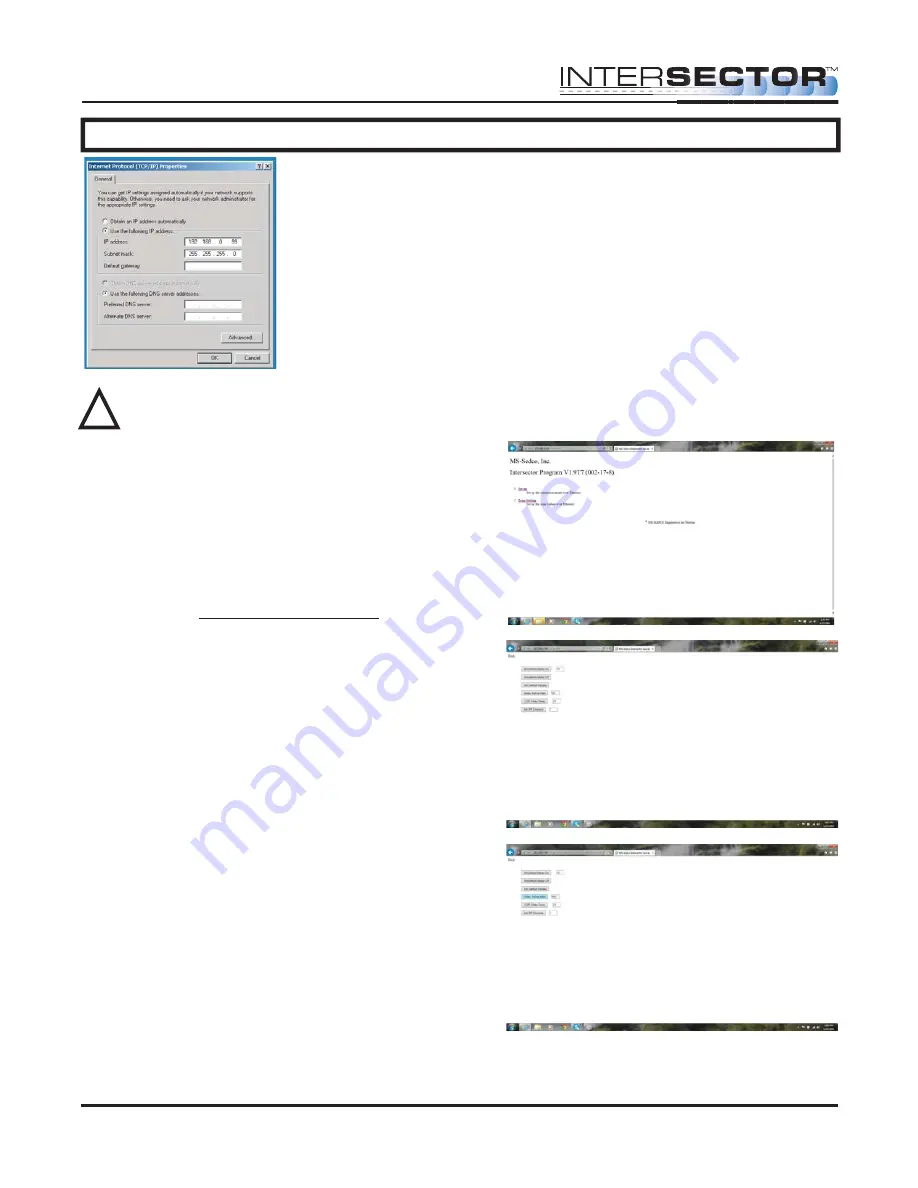
7. Select Use the following IP address.
8. For IP address, enter the following: 192.168.0.99
9. For Subnet Mask enter the following: 255.255.255.0
(NOTE: When you are finished installing the
INTERSECTOR, it will be necessary to return to
Properties and select “Obtain an IP address
automatically” to restore default port settings.)
Click OK to save changes and close the network window.
WARNING: DO NOT REFRESH
your internet browser after entering
IP Address. Always enter the IP
Address manually.
Programming The INTERSECTOR:
On your computer, open an Internet browser
(Internet Explorer version 7 or greater is
preferred). In the Address bar of the internet
browser type HTTP://192.168.0.100. This should
connect the computer to the sensor. You will be
prompted for a password. The default password
is “password”. After the password is accepted
the start page for sensor setup will be displayed.
If you wish to change DELAY BEFORE MAX or
OZP/MAX TIME from the default settings,
choose SETUP. Default time for DELAY BEFORE
MAX is 120 seconds. Default time for OZP/MAX
Time is NULL (No value).
Enter the desired value (0 - 960 seconds) in the
window next to DELAY BEFORE MAX. Click on
DELAY BEFORE MAX time to store the RF
Channel Value. Repeat this process for
OZP/MAX TIME. Click BACK to exit the Setup
menu.
To assign an RF Channel to the INTERSECTOR,
enter a number 1-7, then click “Set RF Channel”.
It is recommended that a separate channel
number be assigned to each sensor at an intersection.
INTER
SECTOR
Microwave Motion and
Presence Sensor Installation Instructions
MS Sedco INTERSECTOR Installation Instructions
Page 14
INTERSECTOR-1.9Uv092717
!