background image

OnCell G2100 Series User’s Manual 

Using Short Message Services


6-4

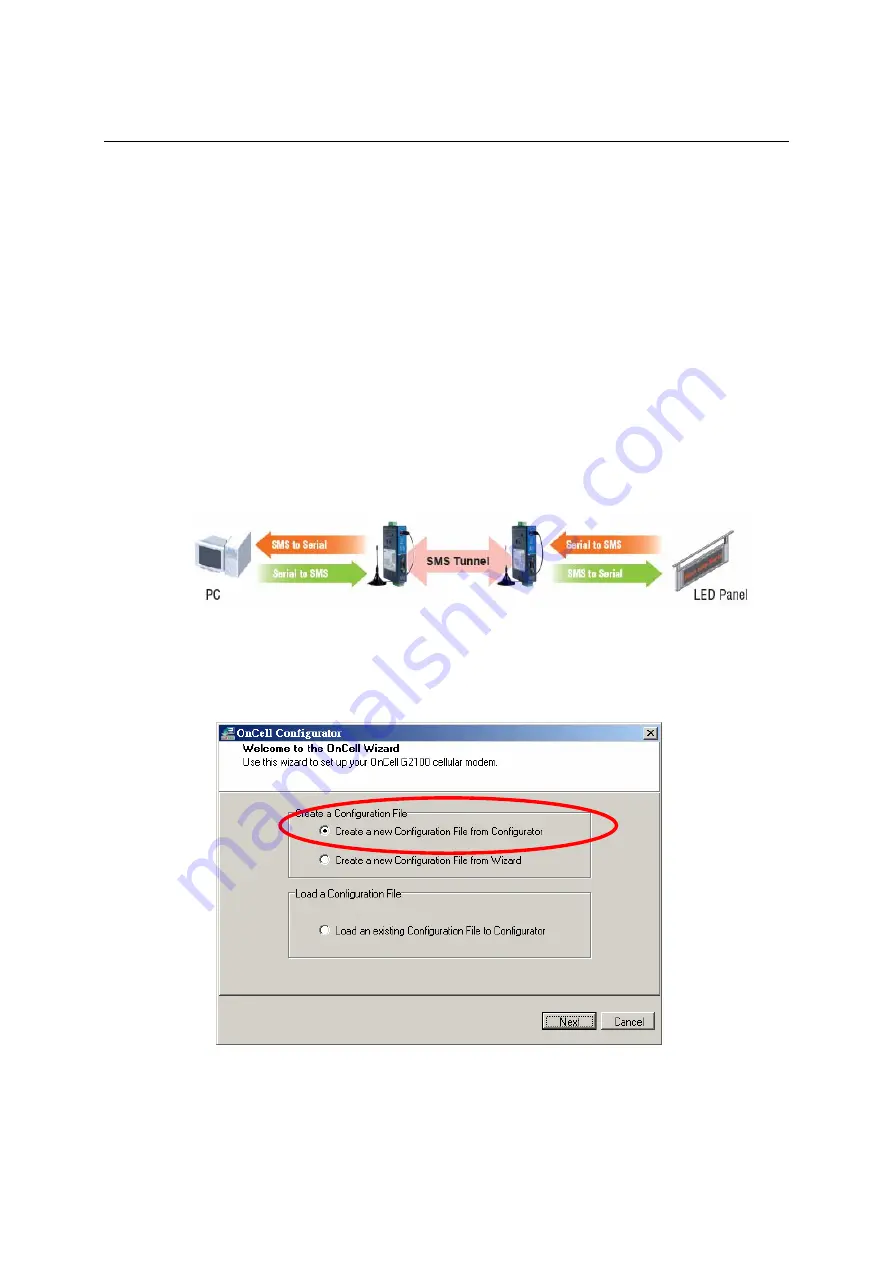
SMS Tunnel Mode   

A major benefit of GSM technology is that it supports short messages (SMS) for easy 
communication over the mobile network. Moxa’s proprietary SMS Tunnel Mode allows you to 
expand your applications and reduce cost. For example, SMS Tunnel Mode can be used to update 
the message on a highway display panel, place refill orders for vending machines, or handle 
maintenance for remote rental equipment. SMS Tunnel Mode can even generate SMS alarms by 
converting text, binary, or Unicode data from a legacy device to short messages without the use of 
AT commands. SMS Tunnel Mode is particularly suitable for devices that communicate 
infrequently or lack access to the local network. SMS Tunnel Mode converts both ASCII and 
binary data to short messages transparently and bidirectionally. In addition, caller ID (phone 
number) can be used to block messages from uncertified users, broadcast messages, and unwanted 
SMS advertisements. 

SMS Tunnel Mode has the following features: 

z


Transparently converts serial data to short message or vise versa without using AT 
Commands. 

z


Text, binary, and Unicode formats are supported. 

z


Verification of Incoming Caller ID is implemented to block uncertified users. 

z


The configuration profile can be easily stored and copied to other modems. 


The following instructions explain how to use Configurator to configure SMS Tunnel Mode. 

1.


Connect the RS-232 port of the OnCell G2100 Series modem to a host PC. On the OnCell 
G2150I, make sure the RS-232 port is connected and DIP switch 1 is set to ON. 

2.


Start OnCell Configurator and select the 

Create a new Configuration File from 

Configurator

 option. 


Summary of Contents for oncell G2100 Series

Page 1: ...Manual Fourth Edition November 2007 www moxa com product Moxa Technologies Co Ltd Tel 886 2 8919 1230 Fax 886 2 8919 1231 Web www moxa com Moxa Technical Support Worldwide support moxa com The Americas support usa moxa com ...

Page 2: ...commitment on the part of Moxa Moxa provides this document as is without warranty of any kind either expressed or implied including but not limited to its particular purpose Moxa reserves the right to make improvements and or changes to this manual or to the products and or the programs described in this manual at any time Information provided in this manual is intended to be accurate and reliable...

Page 3: ...aunching OnCell Configurator 3 8 Configuring Serial Connection and Device Name 3 10 Configuring the PIN Setting 3 13 Configuring the Radio Band 3 15 Initial Strings 3 17 Saving the Configuration Profile 3 18 Applying Modem Settings 3 20 Retrieving the Modem Settings 3 23 Loading a Profile 3 26 Signal Strength Monitor 3 30 Upgrading the Firmware 3 32 Setting Modem Defaults 3 36 Chapter 4 AT Command...

Page 4: ...ing Short Message Services 6 1 Sending Short Messages 6 2 Reading Short Messages 6 2 Deleting Short Messages 6 3 SMS Tunnel Mode 6 4 Chapter 7 GPRS Connection 7 1 GPRS Overview 7 2 Windows GPRS Access 7 2 Installing Modem Driver 7 3 Modem Diagnostics 7 8 Setting up the APN 7 10 Adding Windows DUN Entry 7 12 Appendix A GPRS with UC 7110 UC 7112 A 1 Appendix B Federal Communication Commission Interf...

Page 5: ... industrial GSM GPRS modems provide an easy way to connect your remote RS 232 or RS 422 485 serial devices to GSM and GPRS mobile networks The following topics are covered in this chapter Overview Package Checklist Features Specifications Pin Assignments ...

Page 6: ...ing temperature y OnCell G2150I industrial GSM GPRS modem RS 232 and RS 422 485 2 5 KV RMS isolation protection Package Checklist Product y OnCell G2100 Series industrial GSM GPRS modem Standard Accessories y Document Software CD y 0 dBi magnetic mount SMA antenna y Terminal block adaptor for power jack connector y Warranty statement y Quick Installation Guide NOTE Please notify your sales represe...

Page 7: ...ted MT Cell Broadcast in accordance with GSM 07 05 SIM Control 3V 1 8V interface Antenna Connector SMA Antenna 0 dBi 10 cm magnetic mount SMA 3 meters GSM 850 EGSM 900 Frequency RX 869 to 894 MHz 925 to 960 MHz Frequency TX 824 to 849 MHz 880 to 915 MHz RF Power Stand 2W at 12 5 duty cycle 2W at 12 5 duty cycle Impedance 50 Ω VSWR 2 Typical Radiated Gain 0 dBi on azimuth plane GSM 1800 GSM 1900 Fr...

Page 8: ...KV RMS for 1 minute on all serial signals OnCell G2150I only Serial Line Protection 15 KV ESD Power Requirements Power Input 12 to 48 VDC Power Consumption 50 mA 12V when idle 300 to 900 mA peak 12V during data link Mechanical Specifications Material PC ABS IP30 rating Dimensions 27 123 79 mm Weight 150 5g Environment Operating Temperature 20 to 55 C 32 to 131 F 5 to 95 RH 30 to 75 C 32 to 167 F 5...

Page 9: ... 54321 9 6 87 DB9 Female for RS 232 1 5 Terminal Block for RS 422 485 Pin RS 232 RS 422 RS 485 4 wire RS 485 2 wire 1 DCD TxD TxD 2 TxD TxD TxD 3 RxD RxD RxD Data B 4 DSR RxD RxD Data A 5 GND 6 DTR 7 CTS 8 RTS RS 422 and RS 485 are available on the OnCell G2150I only ...

Page 10: ...0 Series modem The following topics are covered in this chapter Product Characteristics Dimensions OnCell G2150I OnCell G2110 G2110 T Connecting the Hardware Wiring Requirements SIM Card Installation DIN Rail Mounting Connecting the Antenna Connecting Power Connecting a Serial Device LED Indicators ...

Page 11: ...ton 3 SMA Antenna Connector 9 DIN Wall Mount Kit 10 Protected SIM Cover 11 Antenna 4 Cellular Signal Level LED 5 PWR GSM GPRS Data LED 6 Isolated RS 232Port 7 6 pin DIP Switch 8 Isolated RS 422 485 Port G2150I only Dimensions OnCell G2150I 27 00 1 063 76 00 2 992 3 4 8 4 0 0 3 2 1 1 7 5 5 0 5 1 4 1 89 30 3 516 ON DP 1 6 ...

Page 12: ...OnCell G2100 Series User s Manual Getting Started 2 3 OnCell G2110 G2110 T 76 00 2 992 123 00 4 843 89 30 3 516 27 00 1 063 ...

Page 13: ...hen handling the device When plugged in the device s internal components generate heat and the casing may feel hot to the touch You should also pay attention to the following guidelines y Use separate paths to route wiring for power and devices If power wiring and device wiring paths must cross make sure the wires are perpendicular at the intersection point NOTE Do not run signal or communication ...

Page 14: ... the outer SIM card cover ATTENTION The SIGNAL LEDs on the front panel provide a convenient way of checking if the SIM card is installed properly One of the three SIGNAL LEDs should remain on as long as the antenna is installed and the network is operating normally If none of the SIGNAL LEDs are on then the SIM card may not be installed properly Since the PIN code is stored on the SIM card the mod...

Page 15: ...l the bottom mounting appendage out It should snap into place STEP 2 Hook the modem over the top edge of the DIN rail as shown STEP 3 Place the modem flush against the DIN rail as shown STEP 4 Slide the bottom mounting appendage back in It should snap into place over the bottom edge of the DIN rail ...

Page 16: ...ath the bottom mounting appendage is another grounding point For DIN rail mounted units Ground the DIN rail itself The modem s grounding point under the mounting appendage will be in direct contact with the rail Be sure to ground the DIN rail before connecting the modem to the DIN rail For wall or panel mounted units Run a ground wire from the right most pin of the terminal block connector Be sure...

Page 17: ...EP 1 Remove the 3 pin power terminal block For the OnCell G2150I also remove the 5 pin RS 422 485 terminal block STEP 2 Use a flat blade screw driver to pull out both the top and bottom mounting appendages STEP 3 Use screws and the mounting appendages to mount the unit onto the wall STEP 4 Reattach the terminal block s to the modem Wall Wall ...

Page 18: ... The OnCell G2100 Series modem may present a hazard for inadequately protected personal medical devices such as hearing aids and pacemakers Consult the manufacturer of the medical device to determine if it is adequately protected The OnCell G2100 Series modem may cause interference for inadequately protected electronic equipment Observe any warning signs and manufacturers recommendations All OnCel...

Page 19: ...xa s CBL F9M9 150 100 cm or CBL F9M9 20 20 cm Meter Meter Meter RS 485 Multi dropped devices CBL F9M9 150 or CBL F9M9 20 PC or RS 232 Devices For OnCell G2150I Only A separate 5 pin terminal block connector on the bottom panel is used for RS 422 2 wire RS 485 and 4 wire RS 485 connections A built in 120 Ω terminal resistor can be activated by DIP switch if required Pull high low resistor adjustmen...

Page 20: ...Name Color Function SIGNAL 3 LEDS Green Signal level data transmission requires at least 2 bars PWR Green DC power connection GSM Amber Steady GSM CSD connected Blinking SMS Tunnel is enabled registered to a carrier GPRS Amber GPRS connected DATA Green Serial Tx Rx Signal LEDs Function None No signal or SIM card not installed properly 1 bar Weak or insufficient signal SMS only 2 bars Average signa...

Page 21: ... chapter covers the following topics Overview Installing OnCell Configurator Launching OnCell Configurator Configuring Serial Connection and Device Name Configuring the PIN Setting Configuring the Radio Band Initial Strings Saving the Configuration Profile Applying Modem Settings Retrieving the Modem Settings Loading a Profile Signal Strength Monitor Upgrading the Firmware Setting Modem Defaults ...

Page 22: ...general settings modes and dial out parameters without any knowledge of the associated AT commands It is much more convenient than traditional methods of configuration that require users to search through a thick AT command reference manual OnCell Configurator also makes it more convenient to implement mass deployment or pre configuration z An installation wizard provides step by step configuratio...

Page 23: ... Configurator Wizard and Terminal Emulator for further operations ATTENTION OnCell Configurator supports Windows 2000 XP 2003 and Vista 1 Find the installation file on the Document and Software CD The installation file will be located in the Configurator directory and will be named OnCell_Configurator_Install_1 1 exe or something similar 2 Double click the installation file 3 Click Next to proceed...

Page 24: ...OnCell G2100 SeriesI User s Manual OnCell Configurator 3 4 4 Choose I accept the agreement and click Next 5 Click Next to proceed ...

Page 25: ...OnCell G2100 SeriesI User s Manual OnCell Configurator 3 5 6 Click Next or browse to a proper folder to proceed 7 Click Next to proceed ...

Page 26: ...OnCell G2100 SeriesI User s Manual OnCell Configurator 3 6 8 Click Next to proceed 9 Click Install to start the software installation ...

Page 27: ...OnCell G2100 SeriesI User s Manual OnCell Configurator 3 7 10 Wait until the installation is complete 11 Click Next to proceed ...

Page 28: ...OnCell G2100 SeriesI User s Manual OnCell Configurator 3 8 12 Click Finish Launching OnCell Configurator 1 Start OnCell Configurator from the Windows Start menu ...

Page 29: ...00 SeriesI User s Manual OnCell Configurator 3 9 2 Select one of the three options 3 Whether you use the Configurator or the Wizard any modifications to the settings will not go into effect until you click Apply ...

Page 30: ...ng Configurator 1 Connect the RS 232 port of the OnCell G2100 Series modem to a host PC On the OnCell G2150I make sure the RS 232 port is connected and DIP switch 1 is set to ON 2 Start OnCell Configurator and select Create a new Configuration File from Configurator 3 On the Basic Setting tab click Modify and configure the serial interface as necessary Enter the device name in the text input box ...

Page 31: ...op bits can only be set to 2 only when parity is set to none The default parameters are 115200 8n1 and RTS CTS flow control The following instructions explain how to configure the serial communication parameters using Wizard 1 Connect the RS 232 port of the OnCell G2100 Series modem to a host PC On the OnCell G2150I make sure the RS 232 port is connected and DIP switch 1 is set to ON 2 Start OnCel...

Page 32: ...OnCell G2100 SeriesI User s Manual OnCell Configurator 3 12 3 On the Configure the Serial Interface page click Modify and configure the serial device settings Enter the device name in the text input box ...

Page 33: ...using Configurator 1 Connect the RS 232 port of the OnCell G2100 Series modem to a host PC On the OnCell G2150I make sure the RS 232 port is connected and DIP switch 1 is set to ON 2 Start OnCell Configurator and select the Create a new Configuration File from Configurator option 3 On the Basic Setting tab and enter the correct PIN in the text input box ...

Page 34: ... be deactivated To activate the Automatic PIN Entry function again use the AT CPIN command or OnCell Configurator to enter the correct PIN To disable the Automatic PIN Entry use the AT USEPIN 0 command Please refer to the OnCell G2100 Series AT Commands Set which can be found on the Document and Software CD The following instructions show how to configure the PIN code using Wizard 1 Connect the RS...

Page 35: ...he Radio Band The following instructions illustrate how to configure the radio band using Configurator 1 Connect the RS 232 port of the OnCell G2100 Series modem to a host PC On the OnCell G2150I make sure the RS 232 port is connected and DIP switch 1 is set to ON 2 Start OnCell Configurator and select the Create a new Configuration File from Configurator ...

Page 36: ...e following instructions illustrate how to configure the radio band using the Wizard 1 Connect the RS 232 port of the OnCell G2100 Series modem to a host PC On the OnCell G2150I make sure the RS 232 port is connected and DIP switch 1 is set to ON 2 Start OnCell Configurator and select the Create a new Configuration File from Wizard option ...

Page 37: ...rings The following instructions illustrate how to configure the initial strings using Configurator 1 Connect the RS 232 port of the OnCell G2100 Series modem to a host PC On the OnCell G2150I make sure the RS 232 port is connected and DIP switch 1 is set to ON 2 Start OnCell Configurator and select the Create a new Configuration File from Configurator option ...

Page 38: ...string Saving the Configuration Profile The following instructions illustrate how to configure the serial communication parameters using Configurator 1 Connect the RS 232 port of the OnCell G2100 Series modem to a host PC On the OnCell G2150I make sure the RS 232 port is connected and DIP switch 1 is set to ON 2 Start OnCell Configurator and select Create a new Configuration File from Configurator...

Page 39: ...OnCell G2100 SeriesI User s Manual OnCell Configurator 3 19 3 Select Save File from the File menu 4 Select a folder and enter the file name for the profile Click Save ...

Page 40: ...P switch 1 is set to ON ATTENTION The RS 232 connector uses the standard pinouts A direct male DB9 to female DB9 cable such as Moxa s CBL F9M9 150 100 cm or CBL F9M9 20 20 cm can be used to connect to a PC s serial port If you use a USB to serial product to configure the OnCell G2100 Series modem we strongly recommend using Moxa s UPort 1110 Other USB to serial products may cause unexpected errors...

Page 41: ...on parameters you should use please select the Auto Detect Serial Settings option and follow the onscreen instructions The procedure may take few minutes to complete When using the Auto Detect Serial Settings function if the GSM or the GPRS LED is ON or blinking you must remove the SIM card or use the escape command on the terminal to disconnect the current connection The default parameters are 11...

Page 42: ...OnCell G2100 SeriesI User s Manual OnCell Configurator 3 22 5 Wait a few moments for the settings to be applied Click OK to finish ...

Page 43: ...DIP switch 1 is set to ON ATTENTION The RS 232 connector uses the standard pinouts A direct male DB9 to female DB9 cable such as Moxa s CBL F9M9 150 100 cm or CBL F9M9 20 20 cm can be used to connect to a PC s serial port If you use a USB to serial product to configure the OnCell G2100 Series modem we strongly recommend using Moxa s UPort 1110 Other USB to serial products may cause unexpected erro...

Page 44: ...ot sure which communication parameters you should use please select the Auto Detect Serial Settings option and follow the onscreen instructions The procedure may take few minutes to complete When using the Auto Detect Serial Settings function if the GSM or the GPRS LED is ON or blinking you must remove the SIM card or use the escape command on the terminal to disconnect the current connection The ...

Page 45: ...er s Manual OnCell Configurator 3 25 5 Wait a few moments for the settings to be retrieved Click OK when prompted 6 The settings will be displayed in the Configurator window The current firmware version will also be displayed ...

Page 46: ... profile using Configurator 1 Connect the RS 232 port of the OnCell G2100 Series modem to a host PC On the OnCell G2150I make sure the RS 232 port is connected and DIP switch 1 is set to ON 2 Start OnCell Configurator and select the Create a new Configuration File from Configurator option 3 In the File menu select Load File from ...

Page 47: ...odem configuration stored in the profile will be displayed in Configurator The following instructions illustrate how to load a profile using the Wizard 1 Connect the RS 232 port of the OnCell G2100 Series modem to a host PC On the OnCell G2150I make sure the RS 232 port is connected and DIP switch 1 is set to ON ...

Page 48: ...Cell G2100 SeriesI User s Manual OnCell Configurator 3 28 2 Start OnCell Configurator and select the Load an existing Configuration file to Configurator option 3 Select a folder and profile and click Open ...

Page 49: ...OnCell G2100 SeriesI User s Manual OnCell Configurator 3 29 4 The modem configuration stored in the profile will be displayed in Configurator ...

Page 50: ...h 1 is set to ON ATTENTION The RS 232 connector uses the standard pinouts A direct male DB9 to female DB9 cable such as Moxa s CBL F9M9 150 100 cm or CBL F9M9 20 20 cm can be used to connect to a PC s serial port If you use a USB to serial product to configure the OnCell G2100 Series modem we strongly recommend using Moxa s UPort 1110 Other USB to serial products may cause unexpected errors when c...

Page 51: ... not sure which communication parameters you should use please select the Auto Detect Serial Settings option and follow the onscreen instructions The procedure may take few minutes to complete When using the Auto Detect Serial Settings function if the GSM or the GPRS LED is ON or blinking you must remove the SIM card or use the escape command on the terminal to disconnect the current connection Th...

Page 52: ...te how to use Configurator to upgrade the firmware of an OnCell G2100 Series 1 Connect the RS 232 port of the OnCell G2100 Series modem to a host PC On the OnCell G2150I make sure the RS 232 port is connected and DIP switch 1 is set to ON ATTENTION The RS 232 connector uses the standard pinouts A direct male DB9 to female DB9 cable such as Moxa s CBL F9M9 150 100 cm or CBL F9M9 20 20 cm can be use...

Page 53: ...or and select Create a new Configuration File from Configurator 3 Click Upgrade FW on the right side of the window 4 Upgrading the firmware will clear all current configuration settings in the OnCell G2100 Series modem To exit and save the current settings click NO To proceed click Yes ...

Page 54: ... proceed ATTENTION Be sure to use the right firmware image file for your model The OnCell G2110 and OnCell G2110 T both use the same firmware image file The OnCell G2150I uses a different firmware image file 6 Select the appropriate COM port and communication parameters for connecting to the modem Click OK to proceed ...

Page 55: ...s The procedure may take few minutes to complete When using the Auto Detect Serial Settings function if the GSM or the GPRS LED is ON or blinking you must remove the SIM card or use the escape command on the terminal to disconnect the current connection The default parameters are 115200 8n1 and RTS CTS flow control 7 Wait a few moments for the firmware to be downloaded to the OnCell G2100 Series m...

Page 56: ...nd DIP switch 1 is set to ON ATTENTION The RS 232 connector uses the standard pinouts A direct male DB9 to female DB9 cable such as Moxa s CBL F9M9 150 100 cm or CBL F9M9 20 20 cm can be used to connect to a PC s serial port If you use a USB to serial product to configure the OnCell G2100 Series modem we strongly recommend using Moxa s UPort 1110 Other USB to serial products may cause unexpected e...

Page 57: ...sure which communication parameters you should use please select the Auto Detect Serial Settings option and follow the onscreen instructions The procedure may take few minutes to complete When using the Auto Detect Serial Settings function if the GSM or the GPRS LED is ON or blinking you must remove the SIM card or use the escape command on the terminal to disconnect the current connection The def...

Page 58: ...0 seconds and the modem will be reset to the factory default settings This feature is implemented on the following model revisions and later the OnCell G2150I Rev 1 3 OnCell G2110 Rev 1 1 and OnCell G2110 T Rev 1 1 RESET button The RESET button performs different operations depending on how long it is held down as follows Interval Action 1 to 3 sec Restart the system 3 to 10 sec GSM GPRS SMS Tunne...

Page 59: ...cludes information about the AT Command Set of the OnCell G2100 Series modem The following topics are covered in this chapter AT Command Set Introduction Starting Moxa Terminal Emulator AT Command Examples Radio Band Selection PIN Code Management Serial Line Settings 2 wire RS 485 Communication OnCell G2150I Only Additional Information ...

Page 60: ...ces that follow can be entered in upper case or lower case but the cases must not be mixed More than one command can be typed on one line and commands can be separated by spaces to make them easier to read The spaces are ignored by the modem s command interpreter The command line buffer accepts up to 39 characters including A and T Spaces carriage returns and line feed characters are not placed in...

Page 61: ...ations ATTENTION OnCell Terminal Emulator is designed for Windows 2000 XP 2003 and Vista If you are running Windows 98 ME or NT use PComm Lite V2 6 which can be downloaded on the Moxa website 1 Terminal Emulator is installed with OnCell Configurator Please refer to Chapter 3 for details 2 Start Terminal Emulator from the Windows Start menu 3 The PComm Terminal Emulator user interface will appear C...

Page 62: ...OnCell G2100 Series User s Manual AT Command Set 4 4 4 Select the target COM port and communication parameters Click OK to open the port 5 Terminal Emulator will connect to the target COM port ...

Page 63: ...host PC Start PComm Terminal Emulator with the current communication parameters default 115200 bps 8 data bits None parity 1 stop bits and no flow control Type AT and press Enter A modem response of OK indicates that the modem is ready Verify Signal Strength Connect the RS 232 port of the OnCell G2100 Series modem to a host PC Open PComm Terminal Emulator with the current communication parameters ...

Page 64: ... band industrial cellular modem such as the OnCell G2100 Series modem makes it relatively easy to prepare the product for shipment to different parts of the world The GSM GPRS band of OnCell G2100 Series is configured to 900 1800 MHz by default For users NOT in this service area follow the instructions below to set up the correct radio bands ATTENTION The following procedures can also be carried o...

Page 65: ...ter the PIN each time the modem is powered up The PUK is used to unlock a SIM card when an incorrect PIN code has been entered three times Query the Current PIN Status 1 Connect the RS 232 port of the OnCell G2100 Series modem to a host PC Start PComm Terminal Emulator with the current communication parameters default 115200 bps 8 data bits None parity 1 stop bit and no flow control 2 Type AT CPIN...

Page 66: ...rameter and this will be the new PIN code if PUK validation succeeds CHV1 will be enabled if PUK1 is correct Therefore the application uses the following command AT CPIN PUK NewPIN Note that users must apply for PUK codes from the mobile service provider Disable the Facility Lock Disabling the facility lock will allow the OnCell G2100 Series modem to operate without entering the PIN code each time...

Page 67: ...tomatic PIN Entry function This function will store the current PIN in its memory and enter it into the OnCell G2100 Series modem each time the system boots up If the SIM card does not match the current PIN the Automatic PIN Entry function will be deactivated To activate the Automatic PIN Entry function again use the AT CPIN command or OnCell Configurator to enter the correct PIN To disable Automa...

Page 68: ...on parameters are 115200 bps 8 data bits None parity RTS CTS flow control and 1 stop bit Before changing the settings first connect the RS 232 port of the OnCell G2100 Series modem to a host PC Open PComm Terminal Emulator with the current communication parameters Modifying Baudrate 1 Type AT IPR x and press Enter where x corresponds to one of the following baudrates 300 600 1200 2400 4800 9600 19...

Page 69: ...respond to the following parameters 1 8 data bits 2 stop bits 2 8 data bits 1 parity 1 stop bit 3 8 data bits 1 stop default 4 7 data bits 2 stop bits 5 7 data bits 1 parity 1 stop bit x Data bits stop bits 6 7 data bits 1 stop bit 0 Odd parity 1 Even parity 2 Mark parity 3 Space parity y Parity 4 None parity default For example type AT ICF 5 1 to change the parameters from 8n1 to e71 ...

Page 70: ...save the settings ATTENTION Changes to the serial communication parameters take effect immediately You will need to update your terminal settings to match any changes in the serial communication parameters Autobauding and escape command only work with 8n1 or e71 settings Using other settings will disable these functions 2 stop bits are only allowed with None parity ...

Page 71: ... any changes in the serial communication parameters XON XOFF flow control is not supported 2 wire RS 485 Communication OnCell G2150I Only 2 wire RS 485 is half duplex communication For this reason the modem s local echo should be disabled Follow these steps to disable local echo ATTENTION The local echo function can also be disabled using OnCell Configurator 1 On the bottom of the modem set DIP sw...

Page 72: ...ed the OnCell G2100 Series modem will respond with ERROR Modulation control error control and data compression commands are not recognized An ERROR string will be returned z GSM 07 05 recommendation 07 05 commands that are not described in this manual will not be implemented An ERROR string will be returned z GSM 07 07 recommendation 07 07 commands that are not described in this manual will not be...

Page 73: ...d Data Connection makes the wireless modem work in a manner similar to a regular analog modem You must have CSD service in order to make a CSD call This chapter covers the following topics Overview Initiating a CSD Connection Answering a CSD Connection ...

Page 74: ...iated using the OnCell G2100 Series modem and PComm Terminal Emulator 1 Start PComm Terminal Emulator with the current communication parameters default 115200 bps 8 data bits None parity 1 stop bit and no flow control ATTENTION Check the SIGNAL LED indicators on the front panel of the OnCell G2100 Series modem If the LEDs are all off then the SIM card is not installed properly or there is no signa...

Page 75: ...has been established successfully You can switch to data mode to proceed with data communication 4 To close the CSD connection type The modem will respond with OK to indicate that you have already switched back to the command mode 5 Type ATH and press Enter to disconnect ATTENTION is the escape sequence and ATH is the hang up command For international calls the local international prefix does not ...

Page 76: ...tically switch to data mode At this point you can proceed with data communication PComm Terminal Emulator can be used to configure the modem to answer CSD calls automatically 1 In the terminal window type ATS0 x and press Enter For x substitute the number of rings that the modem should receive before answering the call For example to answer after the first ring type ATS0 1 2 Type AT W and press En...

Page 77: ...ngs and enter the desired number of rings ATTENTION If you are answering a call from a PSTN dial up modem type AT CICB 0 to force the incoming call to be a data call Type AT CBST 7 0 1 to select bearer type to V 32 modem 9600 bps In addition type AT W to save the settings For further information please refer to the OnCell G2100 Series AT Commands Guide on the Document and Software CD This task can...

Page 78: ...S short message service as an easy way to communicate over the mobile network In this chapter we explain how to use SMS with the OnCell G2100 Series modem The following topics are covered in this chapter Sending Short Messages Reading Short Messages Deleting Short Messages SMS Tunnel Mode ...

Page 79: ...t the prompt 3 Press Ctrl Z to deliver the message ATTENTION AT CMGF 1 sets the SMS to Text mode Reading Short Messages Follow these instructions to read a short message that was sent to the OnCell 1 Type AT CMGF 1 and press Enter 2 When a short message is received the modem will respond with a storage number for the message The storage number will appear as CMTI SM x where x is the storage number...

Page 80: ...d messages STO UNSENT Shows stored unsent messages STO SENT Shows stored sent messages ALL Shows messages For n select one of the following options 0 Delete message at location include the index number 1 Delete all READ messages 2 Delete all READ and SENT messages 3 Delete all READ SENT and UNSENT messages 4 Delete ALL messages REC UNREAD Shows received unread messages 2 The following example show...

Page 81: ... network SMS Tunnel Mode converts both ASCII and binary data to short messages transparently and bidirectionally In addition caller ID phone number can be used to block messages from uncertified users broadcast messages and unwanted SMS advertisements SMS Tunnel Mode has the following features z Transparently converts serial data to short message or vise versa without using AT Commands z Text bina...

Page 82: ...hed serial device Select SMS OUT to transmit serial data from the attached serial device as SMS messages The Caller ID Verification phone number and Target Phone Number should be specified SMS Data Format Text ASCII 7 bits text format 160 bytes per packet Binary 8 bits binary 140 bytes per packet Unicode 16 bits Unicode UCS2 format 70 bytes per packet ...

Page 83: ... LED will start blinking The mode will be Data Mode which does not allow users to enter AT Commands If necessary use the escape command from the terminal to switch to Command Mode Command Mode allows the use of AT commands or OnCell Configurator SMS Tunnel Mode will disable auto answering and connections by GSM CSD and GPRS The timeout between characters is 0 5 seconds Messages that require a long...

Page 84: ...s the general functions of a GSM GPRS modem 4 On the SMS Tunnel Mode Settings page select SMS IN to forward incoming short messages to the attached serial device Select SMS OUT to transmit serial data from the attached serial device as SMS messages The Caller ID Verification phone number and Target Phone Number should be specified Click Next to proceed ...

Page 85: ...o be forwarded to the attached serial device This includes system broadcasts and advertisements Once the SMS Tunnel SMS OUT SMS IN or both is activated and the SIM has registered to a carrier the GSM LED will start blinking The mode will be Data Mode which does not allow users to enter AT Commands If necessary use the escape command from the terminal to switch to Command Mode Command Mode allows t...

Page 86: ...7 7 Chapter 7 GPRS Connection The following topics are covered in this chapter GPRS Overview Windows GPRS Access Installing Modem Driver Modem Diagnostics Setting up the APN Adding Windows DUN Entr ...

Page 87: ...ots plus 1 Tx timeslot or 3 Rx timeslots plus 1 Tx timeslot This requires that the provider support CS 1 to CS 4 coding schemes GPRS offers no guaranteed data rates or bandwidth The value assigned by the provider coding scheme and timeslots can change dynamically during a connection In general for the 1 Tx 4 Rx combination the Tx throughput is around 8 to 12 Kbps and the Rx throughput is around 32...

Page 88: ... Modem Options and go to the Modem tab Click Add to add a new modem ATTENTION The first time you access the Phone and Modem Options Windows will ask you to input the area code Enter the area code to proceed 2 When the Install Mode window opens select Don t detect my modem I will select it from a list and click Next ...

Page 89: ... Connection 7 4 3 Next click Have Disk 4 When the Install From Disk window opens click Browse 5 Select the OnCell_G2100_Series inf driver The file is located in the Win_Driver directory on the Document and Software CD Click Open to proceed ...

Page 90: ...OnCell G2100 Series User s Manual GPRS Connection 7 5 6 When the Install From Disk page opens click OK 7 Click Next ...

Page 91: ... Manual GPRS Connection 7 6 8 When the next window opens select the COM port that you are using and click Next 9 A message will appear stating that the driver has not passed Windows Logo testing Click Continue Anyway to proceed ...

Page 92: ...2100 Series User s Manual GPRS Connection 7 7 10 Click Finish to complete the installation procedure 11 At this point the OnCell G2100 Series driver should be listed in Phone and Modem Options on the Modems tab ...

Page 93: ...tions On the Modem tab click Properties ATTENTION Make sure that the RS 232 port of the OnCell G2100 Series modem is connected For the OnCell G2150I make sure DIP switch 1 is set to ON Make sure the SMS Tunnel Mode is disabled If the GSM LED is blinking that means that SMS Tunnel Mode is enabled and activated To switch back to Command Mode you must send the escape command using terminal software o...

Page 94: ...l G2100 Series User s Manual GPRS Connection 7 9 2 On the Diagnostics tab click Query Modem 3 If the query is successful you will be able to see commands that are sent to the modem and the modem s responses ...

Page 95: ... or the modem is not picking up a signal If only one bar lights up the signal is not strong enough for a GPRS connection Adjust the position of the antenna change the location of the installation or use an optional high gain antenna instead Make sure that your SIM card account supports GPRS service In most regions you will need to apply with your mobile service provider to activate the service Mak...

Page 96: ...se the correct service for your account as in this example AT CGDCONT 1 IP ISP CINGULAR ATTENTION The APN should be entered between the displayed brackets Remember that the APN is case sensitive Note that IP should be written in all capital letters For a list of APNs please refer to the APN List on the Document and Software CD 3 Click OK to close the Properties window ...

Page 97: ... instructions explain how to add a Windows Dial up Networking entry 1 In the Control Panel open Network Connections and click Create a new connection 2 When the New Connection Wizard window opens select Connect to the Internet and click Next 3 Select Set up my connection manually and click Next ...

Page 98: ...OnCell G2100 Series User s Manual GPRS Connection 7 13 4 Select Connect using a dial up modem and click Next 5 Enter the name of your service provider and click Next ...

Page 99: ...t ATTENTION The phone number 99 1 is a special phone number that is used globally to request GPRS IP service from the carrier DO NOT modify this phone number in any way The same number is used regardless of the country that you are located in 7 Enter the User name and Password as prompted and click Next ...

Page 100: ...GPRS Connection 7 15 ATTENTION For a list of User names and Passwords refer to APN List on the Document and Software CD or consult your service provider for further details 8 Click Finish 9 In the next window that opens click Properties ...

Page 101: ... Series User s Manual GPRS Connection 7 16 10 Verify that Use dialing rules on the General tab is NOT selected 11 On the Networking tab select Internet Protocol TCP IP and click Properties to set the DNS IP address ...

Page 102: ... IP address of the DNS server select Use the following DNS server addresses and enter the IP address es as prompted Click OK ATTENTION For detailed DNS information please refer to the APN List on the Document and Software or consult your service provider for further details ...

Page 103: ...OnCell G2100 Series User s Manual GPRS Connection 7 18 13 Click OK 14 In the next window that appears click Dial to establish the connection ...

Page 104: ... and power utilities However for some applications it is either inconvenient or impossible to connect to the embedded computers with a traditional landline In this case the OnCell G2100 Series modem is a great solution for providing GSM GPRS connectivity to the UC 7110 or UC 7112 You can refer to step by step installation guide and a reference script in the Linux folder on the Document and Softwar...

Page 105: ...nterference by one or more of the following measures Reorient or relocate the receiving antenna Increase the separation between the equipment and receiver Connect the equipment into an outlet on a circuit different from that to which the receiver is connected Consult the dealer or an experienced radio TV technician for help CAUTION Any changes or modifications not expressly approved by the grantee...

Reviews: