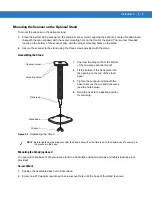
Installation
2 - 7
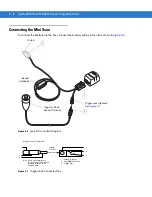
Connecting the Symbol MSXX07 via USB
Using a PC running Microsoft Windows:
1.
Connect the USB cable to the USB port on the host.
2.
Connect the other end of the USB cable to the scanner as indicated on the cable. The scanner powers up and
beeps.
3.
On the host, open a word processing program such as Microsoft Word.
4.
Present a bar code to the scanner. A beep indicates a decode, and the data appears on the host screen.
Location and Positioning
Using the MiniScan as an Embedded Scanner
You can mount the MiniScan read symbols that are automatically presented, or that are presented in a
pre-determined location. In these applications, MinScan positioning with respect to the symbol is critical. Failure to
properly position the MiniScan can result in unsatisfactory scanning performance. A thermal analysis is also
recommended.
Two methods of positioning the scanner are provided:
•
Use the
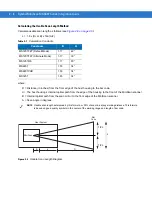
Calculating the Usable Scan Length Method on page 2-8
with consistently good quality symbols.
This provides a mathematical solution to find the usable scan length.
•
The
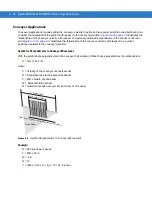
Testing the Usable Scan Length Method on page 2-9
uses real situation testing to adjust the usable scan
length to fit the application conditions.
CAUTION
The location and positioning guidelines provided do not consider unique application characteristics.
Motorola recommends that an opto-mechanical engineer perform an opto-mechanical analysis prior
to integration.
NOTE
Integrate the scanner in an environment no more extreme than the product’s specification, where the
scanner will not exceed its temperature range. For instance, do not mount the scanner onto or next to a
large heat source. When placing the scanner with another device, ensure there is proper convection or
venting for heat. Follow these suggestions to ensure product longevity, warranty, and overall satisfaction
with the scanner.
Summary of Contents for Symbol MiniScan MS1207FZY
Page 1: ...Symbol MiniScan MSXX07 Series Integration Guide ...
Page 2: ......
Page 3: ...Symbol MiniScan MSXX07 Series Integration Guide 72E 67135 04 Revision A May 2008 ...
Page 6: ...iv Symbol MiniScan MSXX07 Series Integration Guide ...
Page 14: ...xii Symbol MiniScan MSXX07 Series Integration Guide ...
Page 18: ...xvi Symbol MiniScan MSXX07 Series Integration Guide ...
Page 22: ...1 4 Symbol MiniScan MSXX07 Series Integration Guide ...
Page 46: ...3 8 Symbol MiniScan MSXX07 Series Integration Guide ...
Page 74: ...6 12 Symbol MiniScan MSXX07 Series Integration Guide ...
Page 86: ...7 12 Symbol MiniScan MSXX07 Series Integration Guide ...
Page 194: ...10 94 Symbol MiniScan MSXX07 Series Integration Guide Numeric Bar Codes continued 5 6 7 8 9 ...
Page 196: ...10 96 Symbol MiniScan MSXX07 Series Integration Guide ...
Page 214: ...11 18 Symbol MiniScan MSXX07 Series Integration Guide ...
Page 226: ...12 12 Symbol MiniScan MSXX07 Series Integration Guide ...
Page 249: ...Advanced Data Formatting 13 23 Numeric Keypad continued 7 8 9 Cancel ...
Page 293: ...Advanced Data Formatting 13 67 Send ALT Characters continued Send Alt Send Alt ...
Page 314: ...13 88 Symbol MiniScan MSXX07 Series Integration Guide Alphanumeric Keyboard Space Dash ...
Page 315: ...Advanced Data Formatting 13 89 Alphanumeric Keyboard continued ...
Page 316: ...13 90 Symbol MiniScan MSXX07 Series Integration Guide Alphanumeric Keyboard continued ...
Page 317: ...Advanced Data Formatting 13 91 Alphanumeric Keyboard continued _ Underscore ...
Page 319: ...Advanced Data Formatting 13 93 Alphanumeric Keyboard continued 6 7 8 9 A B C ...
Page 321: ...Advanced Data Formatting 13 95 Alphanumeric Keyboard continued K L M N O P Q ...
Page 325: ...Advanced Data Formatting 13 99 Alphanumeric Keyboard continued k l m n o p q ...
Page 327: ...Advanced Data Formatting13 101 Alphanumeric Keyboard continued y z ...
Page 328: ...13 102Symbol MiniScan MSXX07 Series Integration Guide ...
Page 346: ...A 16 Symbol MiniScan MSXX07 Series Integration Guide ...
Page 358: ...Glossary 12 Symbol MiniScan MSXX07 Series Integration Guide ...
Page 364: ...Index 6 Symbol MiniScan MSXX07 Series Integration Guide ...
Page 366: ......
Page 367: ......

