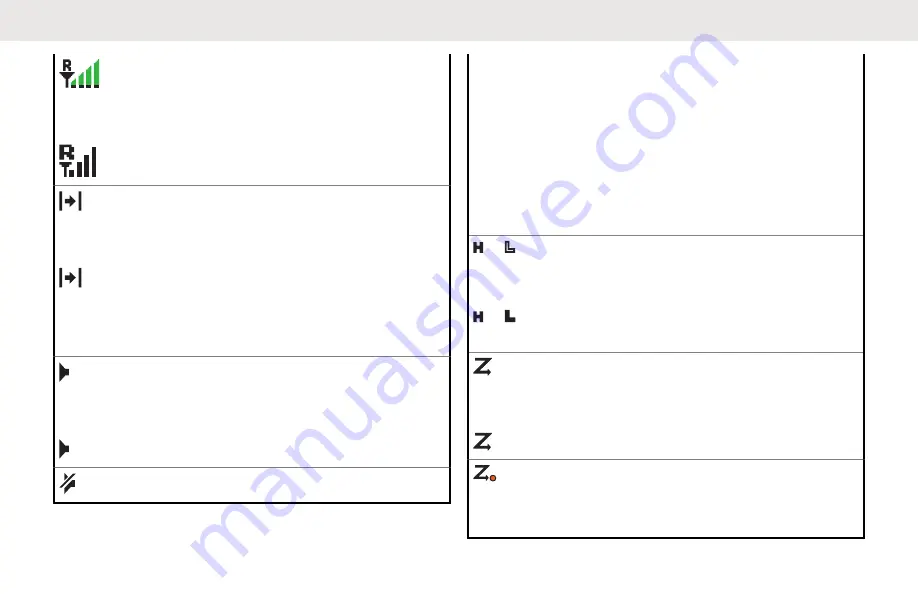
Motorola SRX 2200 MODEL 3.5 User Manual Download Page 57

Top Dis-
play:

Roaming

The radio has roamed to and is currently
registered to a foreign system.

Top Dis-
play:

Direct

On

Radio is currently configured for direct
radio-to-radio communication (during
conventional operation only).

Off

Radio is connected with other radios
through a repeater.

Top Dis-
play:

Monitor (Carrier Squelch)

Selected channel is being monitored
(during conventional operation only).

In-Call User Alert

On

The feature is enabled. Voice muting of
the affiliated trunking talkgroup or se-
lected conventional channel is activated.

Off

The feature is disabled. Voice muting of
the affiliated trunking talkgroup or se-
lected conventional channel is deactivat-
ed.

 or 

Top Dis-
play:

 or 

Power Level

L

Radio is set at Low power.

H

Radio is set at High power.

Top Dis-
play:

Scan

Radio is scanning a scan list.

Top Dis-
play:

Priority Channel Scan

English


57

Summary of Contents for SRX 2200 MODEL 3.5

Page 1: ...APX TWO WAY RADIOS SRX 2200 Model 3 5 USER GUIDE 68012005051 68012005051 FK DEC 2018 2018 Motorola Solutions Inc All rights reserved ...

Page 2: ...Battery Charge Status 29 Battery Recycling and Disposal 31 Additional Performance Enhancement 31 ASTRO 25 Enhanced Data 31 Dynamic System Resilience DSR 31 CrossTalk Prevention 31 Encrypted Integrated Data EID 32 SecureNet 32 P25 Digital Vehicular Repeater System DVRS 32 Conventional Talkgroup and Radio Scan Enhancements 32 What Your Dealer System Administrator Can Tell You 33 Preparing Your Radio...

Page 3: ...Indicators 61 TMS Status Icons 61 TMS Menu Options 62 Call Type Icons 63 LED Indicator 63 Intelligent Lighting Indicators 64 Alert Tones 66 Phone Call Displays and Alerts 70 Display Color Change On Channel 71 HAZLOC Battery Type Detection 71 Chapter 1 General Radio Operation 73 Selecting a Zone 73 Selecting a Radio Channel 74 Selecting a Channel by using Channel Search Button 74 Mode Select Featur...

Page 4: ...85 Talkgroup Call Feature Conventional Operation Only 86 Selecting a Talkgroup 86 Sending a Status Call 87 Making a Priority Dispatch Calls 88 Responding to the Dynamic Regrouping Feature Trunking Only 88 Requesting a Reprogram Trunking Only 89 Classification of Regrouped Radios 89 Dynamic Zone Programming DZP 90 Entering the Dynamic Zone to Select a Dynamic Channel 90 Saving a Channel in the Dyna...

Page 5: ...a Nuisance Channel 104 Restoring a Nuisance Channel 105 Call Alert Paging 105 Receiving a Call Alert Page 105 Sending a Call Alert Page 106 Quick Call II ASTRO P25 Digital Trunking and Conventional 107 Initiating a Quick Call II Transmission 108 Emergency Operation 108 Exiting Emergency 109 Exiting Emergency as Supervisor 109 Sending an Emergency Alarm 110 Sending an Emergency Call Trunking Only 1...

Page 6: ... 124 Accessing the Messaging Features 125 Composing and Sending a New Text Message 125 Sending a Quick Text Message 127 Priority Status and Request Reply of a New Text Message 128 Appending a Priority Status to a Text Message 128 Removing a Priority Status from a Text Message 129 Appending a Request Reply to a Text Message 129 Removing a Request Reply from a Text Message 130 Appending a Priority S...

Page 7: ...g Encryption 143 Loading an Encryption Key 143 Multikey Feature 144 Selecting an Encryption Key 144 Selecting a Keyset 145 Erasing the Selected Encryption Keys 146 Requesting an Over the Air Rekey ASTRO Conventional Only 147 MDC Over the Air Rekeying Page 147 Infinite UKEK Retention 147 Hear Clear 148 Security 148 Radio Lock 148 Unlocking Your Radio 148 Changing Your Password 149 Changing Your Tac...

Page 8: ...om a Saved Waypoint 162 Location Feature in Emergency Mode 162 Peer Location on the Display ASTRO Conventional only 163 Geofence ASTRO 25 Trunking System 164 Entering the Geofence Area 164 Mission Critical Geofence 165 Entering Mission Critical Geofence 166 Exiting Mission Critical Geofence 166 Trunking System Controls 167 Operating in Failsoft System 167 Out of Range Radio 167 Site Trunking Featu...

Page 9: ...from Bluetooth Audio Device 181 Viewing and Clearing the Bluetooth Device Information 181 Clearing All Bluetooth Devices Information 182 Editing the Bluetooth Friendly Name 183 Responder Alert Sensors 184 Holster Sensor 184 Weapon Fired Sensor 185 Vest Pierced Sensor 185 Disabling the Sensor 185 Over the Air Programming POP 25 ASTRO 25 and ASTRO Conventional 187 Responding to the Notification of U...

Page 10: ...the Radio Alias201 Selecting the Audio Speaker 202 Controlling the Display Backlight 203 Setting Up the Radio Display and Visual Indicators to Suit Night Vision Goggles 203 Locking and Unlocking the Keypad and Controls 204 Turning the Controls and Keypad Buttons Tones On or Off 205 Turning Voice Mute On or Off 205 Using the Time Out Timer 206 Time and Date Setup 206 Editing the Time and Date 207 U...

Page 11: ...ge 220 Special Channel Assignments 220 Emergency Channel 220 Non Commercial Call Channel 220 Operating Frequency Requirements 221 Declaration of Compliance for the Use of Distress and Safety Frequencies 223 Technical Parameters for Interfacing External Data Sources 223 Chapter 5 Glossary 224 Chapter 6 Limited Warranty 231 MOTOROLA SOLUTIONS COMMUNICATION PRODUCTS 231 I WHAT THIS WARRANTY COVERS AN...

Page 12: ...C CFR 47 Part 2 Section 2 1077 a Responsible Party Name Motorola Solutions Inc Address 1303 East Algonquin Road Schaumburg IL 60196 1078 U S A Phone Number 1 800 927 2744 Hereby declares that the product Model Name SRX 2200 conforms to the following regulations FCC Part 15 subpart B section 15 107 a 15 107 d and section 15 109 a Class B Digital Device English 12 ...

Page 13: ...his equipment gen erates uses and can radiate radio frequency energy and if not installed and used in accordance with the instructions may cause harmful interference to radio communications However there is no guarantee that interference will not occur in a particular installation If this equipment does cause harmful interference to radio or television reception which can be determined by turning ...

Page 14: ... Industry Canada regulations this radio transmitter may only operate using an antenna of a type and maximum or lesser gain approved for the transmitter by Industry Canada To reduce potential radio interference to other users the antenna type and its gain should be so chosen that the equivalent isotropically radiated power e i r p is not more than that necessary for successful communication This ra...

Page 15: ...e following conditions This device may not cause harmful interference This device must accept any interference received including interference that may cause undesired operation Changes or modifications made to this device not expressly approved by Motorola Solutions could void the authority of the user to operate this equipment English 15 ...

Page 16: ...ctions are supported by the software version R19 00 00 or later See Accessing the Radio Information on page 214 to determine the software version of your radio Check with your dealer or system administrator for more details of all the features supported English 16 ...

Page 17: ...er program Accordingly any copyrighted Motorola Solutions computer programs contained in the Motorola Solutions products described in this manual may not be copied reproduced modified reverse engineered or distributed in any manner without the express written permission of Motorola Solutions Furthermore the purchase of Motorola Solutions products shall not be deemed to grant either directly or by ...

Page 18: ...ereof shall take place without the express written permission of Motorola Solutions No part of this manual may be reproduced distributed or transmitted in any form or by any means electronic or mechanical for any purpose without the express written permission of Motorola Solutions English 18 ...

Page 19: ...cies Furthermore Motorola Solutions reserves the right to make changes to any products herein to improve readability function or design Motorola Solutions does not assume any liability arising out of the applications or use of any product or circuit described herein nor does it cover any license under its patent rights nor the rights of others English 19 ...

Page 20: ...e taken or observed WARNING An operational procedure practice or condition and so on which may result in injury or death if not carefully observed CAUTION An operational procedure practice or condition and so on which may result in damage to the equipment if not carefully observed NOTICE An operational procedure practice or condition and so on which is essential to emphasize The following special ...

Page 21: ... Your radio casting has a vent port that allows for pressure equalization in the radio Never poke this vent with any objects such as needles tweezers or screwdrivers This could create leak paths into the radio and the radio submergibility will be lost A Your radio is designed to be submerged to a maximum depth of 6 feet with a maximum submersion time of 2 hours Exceeding either maximum limit may r...

Page 22: ...o the radio side accessory connector if an accessory is not attached to the radio If the radio is submerged or exposed to a high force water spray such as from a hose remove the side accessory connector or accessory connector cover immediately and check to make sure no water was forced into the accessory connector radio interface Rinse and dry the area and re attach the accessory or accessory conn...

Page 23: ...f Otherwise the Man Down Alert and Emergency may be accidentally triggered Cleaning Your Radio CAUTION Do not use solvents to clean your radio as most chemicals may permanently damage the radio housing and textures Do not submerge the radio in the detergent solution To clean the external surfaces of your radio follow the procedure described next 1 Combine one teaspoon of mild dishwashing detergent...

Page 24: ... of water or 1 part recommended liquid detergent to 200 parts water water height must be at least 2 inches higher than radio height A small brush A toothbrush Source of running water Drying towel Washing The Radio 1 Submerge the radio with battery attached completely into the tap water while shaking it for approximately 20 seconds 2 Remove the radio from the water and perform the following Turn th...

Page 25: ...o completely into the detergent solution and repeat turning action for both knobs 3 Position A B C and the Secure Switch 4 Lightly scrub the plastic area front back bottom top and side planes of the radio with the small brush Take extra care around the Speaker Grill and Microphone port openings English 25 ...

Page 26: ...er and shake it to remove the detergent 7 After removing the radio from the water rinse the radio under running water to remove any excess detergent Take extra care to thoroughly rinse out any trapped detergent solution from the speaker grill area 8 Shake off excess water and pat dry the radio with a dry towel Take extra care to tap shake out any trapped water from the speaker grill area English 2...

Page 27: ...to brush the back and top of the battery Exercise caution to avoid scratching the battery contacts 4 Using the small brush scrub the latches thoroughly to remove any accumulated deposits between the latch and housing 5 Rinse the battery under running water to remove any excess detergent Washing the Universal Connector Cover 1 Dip the universal connector cover into tap water followed by the deterge...

Page 28: ...the niches of the top catch and thumb screw 4 Rinse the cover under running waer to wash off the detergent 5 Pat dry with a towel Radio Service and Repair Proper repair and maintenance procedures will assure efficient operation and long life for this product A Motorola Solutions maintenance agreement will provide expert English 28 ...

Page 29: ...ge the radio in detergent solution 1 Combine one teaspoon of mild diswashing detergent to one gallon of water 0 5 solution 2 Apply the solution sparingly with a stiff non metallic short bristled brush making sure excess detergent does not get entrapped near the connectors controls or crevices 3 Dry the radio thoroughly with a soft lint free cloth Battery Care This chapter provides information on t...

Page 30: ...n this case replace the battery with a fully charged one Gauge Battery Charge Top Display 76 to 100 full 1 Top Display 51 to 75 1 Gauge Battery Charge Top Display 26 to 50 1 Top Display 11 to 25 1 Top Display 10 or less at 10 the gauge begins blinking 1 These are for IMPRES battery operation only English 30 ...

Page 31: ... to handle different message sizes and variable update rates from different applications of the radio Add Enhanced Data to the Integrated Data system with a software installation to improve data channel efficiency and enable denser network traffic Dynamic System Resilience DSR DSR ensures the radio system is seamlessly switched to a backup master site dynamically in case of system failure DSR also...

Page 32: ... Conventional Talkgroup at the system These enhancements improve the Scan feature operation significantly when multiple agencies are using a single conventional radio frequency channel These enhancements allow users to use Selective Squelch to operate on only the subset of talkgroups that are relevant to the users rather than all talkgroups on the channel These Scan improvements have been made to ...

Page 33: ... C or more than 60 C You can consult your dealer or system administrator about the following Is your radio programmed with any preset conventional channels Which buttons have been programmed to access other features What optional accessories may suit your needs NOTICE Specifications may vary for different radio models Check with your dealer or system administrator for more information English 33 ...

Page 34: ...le for use with your radio see Accessories on page 219 NOTICE When charging a battery attached to a radio turn the radio off to ensure a full charge To charge the battery place the battery with or without the radio in a Motorola Solutions approved charger The LED on the charger indicates the charging progress see the Charger User Guide Attaching the Battery If your radio is preprogrammed with vola...

Page 35: ...hows Unknown Battry temporarily and battery indicator is not shown in the radio display Battery menu screen displays Unknown Battry permanently and IMPRES battery information is not shown on the radio display 1 Slide the battery into the radio frame until the side latches click into place 2 To remove the battery turn the radio off Squeeze the release latches at the bottom of the battery until the ...

Page 36: ... before attaching the antenna 1 Set the antenna in the receptacle 2 Turn the antenna clockwise to attach to the radio 3 To remove the antenna turn the antenna counterclockwise NOTICE When removing the antenna ensure that the radio is turned off English 36 ...

Page 37: ...e the thumbscrew counterclockwise until it disengages from the radio NOTICE If the thumbscrew is too tight use an Allen wrench at to loosen it first A B C 2 Rotate and lift the connector cover to disengage it from the radio 3 Slide the accessory connector cover over the antenna and position at the base of the antenna 4 To attach the accessory connector cover insert the hooked end of the cover into...

Page 38: ...arry Holder 1 Position the radio within the carry holder with the main speaker facing outward 2 Slide the radio down into the carry holder until it clicks in place 3 To remove the radio from the carry holder place the tip of your fingers on the ledge of the carry holder English 38 ...

Page 39: ...4 Push at the bottom of the radio until the radio is released from it Turning On the Radio 1 Rotate the On Off Volume Control Knob clockwise until you hear a click English 39 ...

Page 40: ...aler Codeplug Alias feature is enabled through Customer Programming Software CPS configuration to display the codeplug alias as a temporary text during power on 2 To turn off the radio rotate the On Off Volume Control Knob counterclockwise until you hear a click Adjusting the Volume Ensure the radio is powered on and the main speaker is pointed towards you for increased loudness and intelligibilit...

Page 41: ...A 2 To decrease the volume rotate this knob counterclockwise English 41 ...

Page 42: ...Identifying Radio Controls This chapter explains the buttons and functions to control the radio Radio Parts and Controls 9 10 11 12 13 14 4 3 2 1 5 6 7 8 English 42 ...

Page 43: ...utton 8 Battery Latch 9 Keypad 10 Data Feature Button 11 Menu Select Buttons 12 Main Display 13 3 Position A B C Switch2 14 2 Position Concentric Switch2 15 On Off Volume Control Knob 16 Top Side Select Button2 17 Push to Talk PTT Button 18 Side Button 12 19 Side Button 22 20 Battery 2 These radio controls buttons are programmable English 43 ...

Page 44: ... down Keeping the button pressed Assignable Radio Functions Bluetooth On Off Allows you to turn on off the Bluetooth Bluetooth Configuration Allows you to access to the Bluetooth menu Bluetooth Audio Reroute Allows you to toggle the audio route between radio speaker or Remote Speaker Microphone and Bluetooth headset Bluetooth Headset PTT Keys up the Bluetooth Headset microphone Bluetooth Data Devi...

Page 45: ... and status of the radio Location Determines the current location latitude longitude time and date and also the distance and bearing to another location or turns the GPS functionality on or off for all locations Man Down Clear Clears the Man Down mode alarm that is triggered when your radio achieves or passes a tilt angle threshold or a combination of the angle threshold and a motion sensitivity l...

Page 46: ... a different talkgroup Query Launches a list of predefined short text messages only after successfully logged in the two Factor Authentication Radio Profiles Allows easy access to a set of preprogrammed visual and audio settings of the radio Recent Calls Allows easy access to the list of calls recently received or made Rekey Request Notifies the dispatcher that a new encryption key is needed Repea...

Page 47: ...tional Only Toggles between using a repeater and communicating directly with another radio Talkgroup Conventional Only Allows a call from an individual radio to a group of radios Text Messaging Service TMS Selects the text messaging menu TMS Quick Text Selects a predefined message User Automatically registers the users to the server Zone Select Allows selection from a list of zones Basic Zone Bank...

Page 48: ...ute on or off Volume Set Tone Sets the volume set tone Accessing the Preprogrammed Functions You can access various radio functions through one of the following methods A short or long press of the relevant programmable buttons Use the Menu Select Button Use the Menu Select and Navigation buttons B C D E A A Softkeys B Menu Select Buttons C Data Feature Button D 4 Way Navigation Button E Home Butt...

Page 49: ...ited radio settings or information 4 Way Navigation Button Use the 4 Way Navigation Button to scroll up down left or right with one of the following methods Press and release one of the buttons to scroll from one entry to the next one Press and hold one of the buttons to have the radio toggles through the list automatically release the button to stop Data Feature Button Use Data Feature button to ...

Page 50: ...y Number of Times Key is Pressed 1 2 3 4 5 6 7 8 9 1 0 1 1 1 2 1 3 1 4 1 5 1 6 1 7 1 8 1 9 2 0 2 1 1 _ A B C D E F G H I J K L M N O P Q R S T U V W X Y Z Toggle between mixed case mode uppercase mode and lowercase mode Space English 50 ...

Page 51: ... 2 1 3 1 4 1 5 1 6 1 7 1 8 1 9 2 0 2 1 Toggle between numeric and letter mode Keypad Characters Lowercase Mode Key Number of Times Key is Pressed 1 2 3 4 5 6 7 8 9 1 0 1 1 1 2 1 3 1 4 1 5 1 6 1 7 1 8 1 9 2 0 2 1 1 _ a b c d e f g h i j k l m n o p q r s English 51 ...

Page 52: ...8 1 9 2 0 2 1 t u v w x y z Toggle between mixed case mode uppercase mode and lowercase mode Space Toggle between numeric and letter mode Keypad Characters Numeric Mode Key Number of Times Key is Pressed 1 2 3 4 5 6 7 8 9 1 0 1 1 1 2 1 3 1 4 1 5 1 6 1 7 1 8 1 9 2 0 2 1 1 _ 2 3 English 52 ...

Page 53: ...Key Number of Times Key is Pressed 1 2 3 4 5 6 7 8 9 1 0 1 1 1 2 1 3 1 4 1 5 1 6 1 7 1 8 1 9 2 0 2 1 4 5 6 7 8 9 0 Space Toggle between numeric and letter mode English 53 ...

Page 54: ...Keypad Characters Hexadecimal Mode Key Number of Times Key is Pressed 1 2 3 4 5 6 7 8 9 1 0 1 1 1 2 1 3 1 4 1 5 1 6 1 7 1 8 1 9 2 0 2 1 1 2 A B C 3 D E F 4 5 6 7 8 9 0 Not applicable English 54 ...

Page 55: ...basic purposes While a call is in progress the PTT button allows the radio to transmit to other radios in the call Press and hold down PTT button to talk Release the PTT button to listen The microphone is activated when the PTT button is pressed While a call is not in progress the PTT button is used to make a new call See Methods to Make a Radio Call on page 79 for more information English 55 ...

Page 56: ...s are for the front display screen unless indicated otherwise Top Dis play Receiving Radio is receiving a call or data Top Dis play Transmitting Radio is transmitting a call or data Call Received Radio has received an Individual Call Top Dis play Battery For IMPRES battery operation only the icon shown indicates the charge re maining in the battery For all battery operation the icon blinks when th...

Page 57: ...elected channel is being monitored during conventional operation only In Call User Alert On The feature is enabled Voice muting of the affiliated trunking talkgroup or se lected conventional channel is activated Off The feature is disabled Voice muting of the affiliated trunking talkgroup or se lected conventional channel is deactivat ed or Top Dis play or Power Level L Radio is set at Low power H...

Page 58: ...g Program mode Top Dis play Vote Scan Enabled The vote scan feature is enabled Top Dis play or or Basic Zone Bank 1 A Radio is in Zone 1 B Radio is in Zone 2 C Radio is in Zone 3 Top Dis play or or Basic Zone Bank 2 D Radio is in Zone 4 E Radio is in Zone 5 F Radio is in Zone 6 Top Dis play until or Enhanced Zone Bank A Contains Zone 1 Zone 2 and Zone 3 B Contains Zone 4 Zone 5 and Zone 6 C Contai...

Page 59: ...an encrypted voice call GPS Signal On Feature is enabled and signal is availa ble Off Feature is disabled Blinking Feature is enabled but no signal is available User Login Indicator IP Packet Data On User is currently associated with the ra dio Off User is currently not associated with the radio Blinking Device registration or user registration with the server failed due to an invalid username or ...

Page 60: ...ext entry is currently in lowercase mode Lowercase Predictive Indicates that the text entry is currently in lowercase and with predicted words shown at the bottom of the screen Mixedcase Predictive Indicates that the text entry is currently in mixed case and with predicted words shown at the bottom of the screen Uppercase Predictive Indicates that the text entry is currently in uppercase and with ...

Page 61: ...nd receive text messages Inbox Full The Inbox is full Message Sent The text message is sent successfully Message Unsent The text message cannot be sent Unread Message User receives a new message The selected text message in the Inbox has not been read Read Message The selected text message in the Inbox has been read Normal Message User is composing a message with normal priority and without a requ...

Page 62: ... status and a request for a reply Messages in the Inbox folder are flagged with Priority and Request Reply TMS Menu Options The following menu options appear on the radio display when you send and receive text messages Menu Option Description Function Back Brings you back to the previous screen Clr Deletes all messages Del Deletes a message or text Edit Brings you to the edit screen Exit Exits to ...

Page 63: ...ded to a Call List Mobile number Mobile number added to a Call List Landline phone number Landline phone number added to a Call List Incoming call or data Outgoing call or data Incoming emergency call LED Indicator The LED indicator shows the operational status of your radio A Solid red Radio is transmitting Blinking red Radio is transmitting at low battery condition Double blinking red Radio is i...

Page 64: ...nel while in the Scan List Programming mode Rapidly blinking green Radio is on a Priority One channel while in the Scan List Programming mode NOTICE No LED indication when the radio receives a clear non secured transmission in trunking Mode LED indication can be preprogramed by qualified technician to be permanently disabled Consult your dealer for further details if you want to disable it Intelli...

Page 65: ...erts The radio initiates an emergency alarm or call The radio receives an emergency alarm or call The radio initiates the Man Down Post Alert timer Green Call Alerts The radio receives a private call The radio receives a phone call The radio receives a call alert The radio receives a selective call The radio enters Geofence English 65 ...

Page 66: ...Call Warning Tone When radio is in an individual call for greater than six seconds without any activity Man Down Entry When radio initiates Man Down mode Long Low Pitched Tone Time Out Timer Timed Out After time out Talk Prohibit PTT Inhibit When PTT button is pressed transmissions are not allowed Lack of Voice PTT Time out When the radio ends your call after it detected there is lack of voice for...

Page 67: ...inning of a non coded communication Priority Channel Received When activity on a priority channel is received Emergency Alarm Call En try When entering the emergency state Central Echo When central controller has received a request from a radio Long Medi um Pitched Tone Volume Set When volume is changed on a quiet channel Emergency Exit When exiting the emergency state A Group of Medium Pitch ed T...

Page 68: ...reset threshold value Two High Pitched Tones GPS Fails When the GPS fails or loses signal Ringing Fast Ringing When system is searching for target of Private Call Enhanced Call Sent When waiting for target of Private Call to answer the call Phone Call Received When a land to mobile phone call is received Gurgle Dynamic Regrouping When PTT button is pressed a dynamic ID has been received Talk Permi...

Page 69: ...tooth accessory is disconnected from the radio A Group of Very High Pitched Tones Man Down Continuous Tone When radio is in Man Down mode and prepares to transmit Emer gency Alarm when the timer of this alarm ends Critical Man Down Contin uous Tone When radio is in Man Down Enhanced mode and prepares to transmit Emergency Alarm when the timer of this alarm ends Unique Low High Tone Enhanced Zone B...

Page 70: ...not available Press to hang up The radio returns to the Home screen Phone busy The phone system is busy Press to exit the phone mode and try your call later A Busy Tone Phone busy When a channel is not available The radio automatically connects when a channel opens No acknowl edge The call is not acknowl edged Press to hang up The radio returns to the Home screen A High Pitch ed Tone When you rele...

Page 71: ...eypad Mic changes to the preprogrammed color The radio backlight on top display changes to white and if connected to accessories the DRSM backlight changes to white and the keypad mic backlight changes to green for the following scenarios When changing to or powering up on an invalid channels such as unprogrammed channels receiver frequency error channel and blank channels The radio is in radio st...

Page 72: ...adio is connected to the charger when the radio and battery match or when the radio certification type is configured as None in Customer Programming Software CPS This feature is enabled through CPS configuration Check with your dealer or system administrator for more information English 72 ...

Page 73: ...transmit on the displayed zone channel Select a zone using the radio menu Zone a or to Zone and press the Menu Select button directly below Zone b or to the required zone or use the keypad to enter the zone number If the zone number entered is unprogrammed the display shows Invalid entry Repeat this step c Press the Menu Select button directly below Sel to confirm the displayed zone d Press the PT...

Page 74: ...annel or use the keypad to enter the channel number If the channel number entered is unprogrammed the display shows Invalid entry Repeat this step d Press the Menu Select button directly below Sel to confirm the selected channel e Press the PTT button to transmit on the displayed zone channel Select a channel using the radio menu Channel Up or Channel Down a or to ChUp or ChDn b Press the Menu Sel...

Page 75: ...the radio changes its transmission to the selected channel If the radio is triggered to search for an empty entry the display shows Invalid entry Repeat step 2 to search again If the entry does not match the display shows Channel name not found Repeat step 2 to search again or press or the Menu Select button directly below Exit to exit Mode Select Feature Mode Select allows a long press to save th...

Page 76: ...nel programmed in this softkey Saving a Zone and a Channel to a Button You can save the frequently used zone and channel to the programmable buttons and keypad digit 0 to 9 buttons 1 Toggle from your current zone and channel to the required zone and channel 2 Press and hold the button you desire to program You hear a short medium pitched tone when the zone and channel is saved NOTICE Repeat this p...

Page 77: ...e system your radio is configured to For ASTRO Conventional system the LED lights up solid yellow The display shows the talkgroup alias or ID and the caller alias or ID For Trunking system the display shows the caller alias or ID 1 Hold the radio vertically 1 to 2 inches 2 5 to 5 0 cm from your mouth 2 Press the PTT button to respond to the call The LED lights up solid red 3 Release the PTT button...

Page 78: ... ID 2 Press and hold the PTT button to talk Release the PTT button to listen 3 Press or the Call Response button to hang up and return to the Home screen See also Making a Private Call Trunking Only on page 80 for details on making a Private Call Receiving and Responding to a Telephone Call Trunking Only This feature allows you to receive calls similar to standard phone calls from a landline phone...

Page 79: ...re inactivity timer is enabled when the radio is left idle and the timer expires You will hear the Menu Inactive Exit Tone upon feature exit Making a Talkgroup Call To make a call to a group of users your radio must be configured as part of that talkgroup 1 Turn the 16 Position Select Channel Knob to select the channel with the desired talkgroup 2 Hold the radio vertically 1 to 2 inches 2 5 to 5 0...

Page 80: ...erform one of the following actions Press the Menu Select button directly below Cnts to scroll through and select the required ID Press the Menu Select button directly below LNum to go to the last number dialed or to the required ID Use the keypad to enter the required ID 3 Press the PTT button to initiate the Private Call The display shows Calling Number 4 Hold the radio vertically 1 to 2 inches ...

Page 81: ...erform one of the following actions Press the Menu Select button directly below Cnts to scroll through and select the required ID Press the Menu Select button directly below LNum to go to the last number dialed or to the required ID Use the keypad to enter the required ID 3 Press the PTT button to initiate the Private Call The display shows Calling Number 4 Hold the radio vertically 1 to 2 inches ...

Page 82: ...to scroll through and select the required ID Press the Menu Select button directly below LNum to go to the last number dialed or to the required phone number Use the keypad to enter the required phone number 3 Press the PTT button to dial the phone number 4 Hold the radio vertically 1 to 2 inches 2 5 to 5 0 cm from your mouth 5 When your call is answered press and hold the PTT button to talk Relea...

Page 83: ...when the users switch from analog to digital radios is not an indication that the radio is malfunctioning Digital technology quiets the transmission by removing the noise from the signal and allows only the clear voice or data information to be heard Monitoring a Channel Do one of the followings to monitor a channel You can use these options interchangeably depending on your preference and the pro...

Page 84: ...tton to transmit The LED lights up solid red e Release the PTT button to receive listen Monitoring Conventional Mode Your radio may be preprogrammed to receive Private Line PL calls 1 Momentarily press the Monitor button to listen for activity The Carrier Squelch indicator appears on the display 2 Press and hold the Monitor button to set continuous monitor operation The duration of the button pres...

Page 85: ...l The call received icons blinks and the display shows Call received The LED blinks solid green once to indicate the transmitting radio is pending to receive signal The speaker unmutes 1 Hold the radio vertically 1 to 2 inches 2 5 to 5 0 cm from your mouth 2 Press and hold the PTT button to talk Release the PTT button to listen Making a Selective Call Your radio must be preprogrammed for you to us...

Page 86: ...e PTT button to listen 6 Press to return to the Home screen Talkgroup Call Feature Conventional Operation Only This feature allows you to define a group of conventional system users so that they can share the use of a conventional channel NOTICE Encryption keys are associated to talkgroups When talkgroups are associated encryption keys are changed by changing the active talkgroup See Secure Operat...

Page 87: ...out a predefined status Each status can have up to a 14 character name A maximum of eight status conditions is possible NOTICE The radio automatically exits the feature if the feature inactivity timer is enabled You will hear the Menu Inactive Exit Tone upon feature exit 1 Perform one of the following actions Press the preprogrammed Status button or to Sts and press the Menu Select button directly...

Page 88: ... feature must be preprogrammed to use this feature Check with your dealer or system administrator for more information on dispatch console supporting this feature 1 Press the preprogrammed Priority Dispatch button A tone sounds and the radio enters Priority Dispatch mode The radio exits this mode when the Priority Dispatch Time Out Timer expires 2 Before the Priority Dispatch Time Out Timer expire...

Page 89: ...ou to notify the dispatcher when you want a new dynamic regrouping assignment Perform one of the following actions Press the preprogrammed Reprogram Request button to send reprogram request to the dispatcher or to Rpgm then press the Menu Select button directly below Rpgm to send reprogram request to the dispatcher The display shows Reprogram Rqst and Please wait If you hear five beeps the dispatc...

Page 90: ...mic channels in the radio This saves the time and effort from the regular navigation around the working zones and channels User can also delete or update the list in the Dynamic Zone Entering the Dynamic Zone to Select a Dynamic Channel 1 or to Zone then press the Menu Select button directly below Zone The display shows the Zone screen 2 or to Dynamic Zone Channels 3 3 Perform one of the following...

Page 91: ... or to the required zone Press the Menu Select button directly below Sel The display shows Select Chan screen 5 or to the required channel Press the Menu Select button directly below Sel The display shows Channel updated 6 Press the Menu Select button directly below Exit to return to Home screen Saving a Channel in the Dynamic Zone from Channel Name The radio must be in Dynamic Zone in order to pe...

Page 92: ...lay shows Invalid entry If the entry does not match the display shows Channel name not found Repeat from step 4 or step 5 to search again 6 Press to return to the Home screen Deleting a Channel in the Dynamic Zone The radio must be in Dynamic Zone in order to perform this operation 1 or to ZnPr then press the Menu Select button directly below ZnPr to enter Program Zone screen The display shows the...

Page 93: ...mpatible the radio displays Target radio connected Proceed to step 4 If the radio is not compatible the radio displays Target radio incompatible Press the Menu Select button directly below Ok and the radio returns to the previous screen Once connected the zone clone status is displayed on the right 4 Press the Menu Select button directly below Next to accept the source zones selection One of the f...

Page 94: ...TICE The target radio enters programming mode during cloning and resets after cloning is completed Contacts This feature provides address book capabilities on your radio Each entry corresponds to an alias name or ID number that you use to initiate a call Contact entries are alphabetically sorted according to entry alias Each alias can have up to five IDs of different call types associated with it ...

Page 95: ...alphabetically sorted 2 or to the required subscriber alias 3 Perform one of the following actions Press the Menu Select button directly below Optn and proceed to the next step or to scroll through the available IDs for the selected subscriber alias and proceed to step 6 4 or to Call and press the Menu Select button directly below Sel 5 or to select the call type 6 Hold the radio vertically 1 to 2...

Page 96: ... and press the Menu Select button directly below Sel 6 or to Number 1 and press the Menu Select button directly below Edit The display shows Edit Num 1 and a blinking cursor appears 7 Use the keypad to enter the number and press the Menu Select button directly below Ok once you have entered the number To cancel this operation press the Menu Select button directly below Cncl to return to the previo...

Page 97: ...ay shows Entry confirm del 4 Select the Menu Select button directly below Yes to delete the entry or No to cancel and return to the main screen of Contacts The display shows Entry deleted and the radio returns to the main screen of Contacts Adding a Contact to a Call List 1 or to Cnts and press the Menu Select button directly below Cnts The entries are alphabetically sorted 2 or to the entry you w...

Page 98: ...utton directly below Sel The display shows Remove Entry frm Call List 4 Press the Menu Select button directly below Yes to remove the entry from the Call List or No to cancel and return to the main display of Contacts The display shows Please wait momentarily before showing Entry removed from Call List confirming the removal of the contact from the list The radio returns to the main display of Con...

Page 99: ...elect button directly below Cnts The entries are alphabetically sorted 2 or to the entry you want to edit and press the Menu Select button directly below Optn 3 or to Edit and press the Menu Select button directly below Sel 4 or to the entry ID you wish to change and press the Menu Select button directly below Edit A blinking cursor appears 5 Use the keypad to edit the number and press the Menu Se...

Page 100: ...ess the Menu Select button directly below Cnts The entries are alphabetically sorted 2 or to the entry you want to view and press the Menu Select button directly below Optn 3 or to View and press the Menu Select button directly below Sel The display shows all the numbers associated with the entry Scan Lists Scan lists are created and assigned to individual channels groups Your radio scans for voic...

Page 101: ... Intelligent Priority Scan list radio scans for higher priority member within the same Trunking or Conventional system Viewing a Scan List 1 or to ScnL and press the Menu Select button directly below ScnL 2 or to view the members on the list 3 Press to exit the current display and return to the Home screen Editing the Scan List This feature allows you to change scan list members and priorities 1 P...

Page 102: ... channel 5 Perform one of the following actions Move the Scan List Programming switch out of programming position Press to exit scan list programming and return to the Home screen See Viewing and Changing the Priority Status on page 103 for more information on how to add and or change the priority of the currently displayed channel in the scan list Changing the Scan List Status 1 Perform one of th...

Page 103: ...ayed channel Press the Select button one or more times to toggle between different status of the Scan List status icon of the current displayed channel The radio shows one of following priority status icons and scenarios A Scan icon indicates that the current channel is in the scan list as a non priority channel The LED lights up solid green A Priority One Channel Scan icon indicates that the curr...

Page 104: ...c Priority Change Conventional Scan Only While the radio is scanning the dynamic priority change feature allows you to temporarily change any channel in a scan list except for the Priority One channel to the Priority Two channel This change remains in effect until scan is turned off Scan then reverts to the preprogrammed original setting Making a Dynamic Priority Change using the preprogrammed Dyn...

Page 105: ...rn it on again Nuisance mode delete can be disabled by the system administrator Call Alert Paging This feature allows your radio to work like a pager Even if other users are away from their radios or if they are unable to hear their radios you can send them an individual Call Alert page You can also verify if a radio is active on the system Depending on how your radio is programmed when you make a...

Page 106: ...rt Paging button to send a page to the preprogrammed ID The display shows Paging Number If the call alert page is sent successfully you hear a tone and the display shows Ack received The radio returns to the Home screen If the call alert page is not acknowledged you hear a low tone and the display shows No acknowledge Press the Menu Select button directly below Ok to return to the main screen for ...

Page 107: ...the display shows Ack received The radio returns to the Home screen If the call alert page is not acknowledged you hear a low tone and the display shows No acknowledge Press the Menu Select button directly below Ok to return to the main screen of Contacts Quick Call II ASTRO P25 Digital Trunking and Conventional This feature allows the user to broadcast a series of distinct recognizable tones befo...

Page 108: ...he selected tone and transmit with your vocal transmission You hear the radio sounds the selected tone You can begin your call after the tone ends 4 Release PTT to listen Emergency Operation The Emergency feature is used to indicate a critical situation If the Top Orange button is preprogrammed to send an emergency signal this signal overrides any other communication over the selected channel Your...

Page 109: ... When receiving an Emergency the radio displays EA received When receiving a Man Down alarm the radio displays MDown received The receiving radio mutes any incoming voice then sounds an emergency receiving tone The radio unmutes the voice after two seconds Distinguishing Emergency and Man Down feature is enabled through CPS configuration Check with your dealer or system administrator for more info...

Page 110: ...utton 1 and short press Emergen cy button Initiated by Supervisor Do one of the following Long press Emergency button Press and hold Side But ton 1 and short press Emergency button Wait for console to clear emergency NOTICE The following buttons combination are supported Radio Side Button 1 and Orange button Radio Side Button 1 and accessory Orange button Accessory 1 dot Button and radio Orange bu...

Page 111: ...ency Alarm mode If no acknowledgment is received the display shows No acknowledge The alarm ends when the timer expires and the radio exits the Emergency Alarm mode Sending an Emergency Call Trunking Only This feature gives your radio priority access to a talkgroup 1 Press the preprogrammed Emergency button One of the following scenarios occurs The display shows Emergency on the current zone and c...

Page 112: ...dio during the Emergency call For subsequent transmissions in the same Emergency call you must press the PTT button Follow the procedure to send Emergency Call with hot mic on your radio 1 Press the preprogrammed Emergency button One of the following scenarios occurs The display shows Emergency on the current zone and channel A tone sounds and the LED blinks red momentarily A tone sounds to indica...

Page 113: ...press the PTT button while in the Emergency Alarm mode If unsuccessful you hear the radio sounds a short low pitched tone to indicate the selected channel does not support emergency and rejects to launch emergency mode 2 Hold the radio vertically 1 to 2 inches 2 5 to 5 0 cm from your mouth 3 Press and hold the PTT button Speak clearly into the microphone 4 Release the PTT button to end the transmi...

Page 114: ...5 0 cm from your mouth 3 The microphone remains active for the hot mic time specified in your radio s codeplug programming 4 To exit Emergency Call press and hold the preprogrammed Emergency button Turning off the radio also cancels the emergency state Sending a Silent Emergency Alarm This feature allows you to send an Emergency Alarm to the system without triggering any audio or visual indicators...

Page 115: ...tions See Sending an Emergency Alarm on page 110 Sending an Emergency Call Trunking Only on page 111 Sending an Emergency Alarm with Emergency Call on page 113 or Sending a Silent Emergency Alarm on page 114 Emergency Find Me The Emergency Find Me EFM feature is an additional emergency feature providing information to nearby radios utilizing the Bluetooth Low Energy BT LE transmission from a radio...

Page 116: ...d receive radios are more than 8 to 10 meters in an open environment Man Down Man Down condition is determined based upon the radio tilt angle or a combination of radio tilt angle and the lack of radio motion Man Down feature is an alternate way to activate the Emergency feature if Emergency has been programmed in your radio NOTICE This feature could be preprogrammed for all channels that support ...

Page 117: ...n condition continues for the time duration defined in the Pre Alert Timer field At the end of this time the radio alerts the user on the Man Down status with an audible alert tone and Man Down text on the screen The Post Alert Timer also initiates at this point 3 Man Down condition continues for the time duration defined in the Post Alert Timer field Once the timer expires the Emergency alarm is ...

Page 118: ...t The Pre Alert timer reinitiates when the radio detects it is in the horizontal position or motionless again Post Alert Timer This timer sets the amount of time the radio needs to remain in the Man Down condition before the Emergency alarm is transmitted When the Post Alert Timer is initiated the radio alerts the user with an audible tone and displays the Man Down text See Exiting Man Down Featur...

Page 119: ... to be preprogrammed specifically to a zone and channel which supports Emergency feature The volume and repetition duration of Man Down Enhanced alert tone could be customized and preprogrammed to suite the required situation Consult your agent or qualified technician for more details When the radio initiates Man Down Enhanced you hear the Critical Man Down Continuous alert tone from the radio spe...

Page 120: ...f with the following operation Perform one of the following actions Repositioning the radio or shaking the radio when motion sensitivity is enabled Press the preprogrammed Man Down Clear button to exit Press the Menu Select button below Clr to exit Re Initiating Man Down After exiting the Emergency Operation when the radio is still in Man Down condition tilted achieving threshold angle or motionle...

Page 121: ...example Text Messaging Service TMS The ARS for the radio consists of two modes ARS Server Mode default mode ARS Non Server Mode NOTICE The default ARS mode can be changed by a qualified radio technician using the radio s programming software Selecting or Changing the ARS Mode The following methods are options on how to select or change the ARS Mode The result of all the methods is the same You can...

Page 122: ...ature only enables the recipient of your message to identify you as the sender by assigning a username to your message NOTICE A predefined username that is set more than the maximum allowed characters is an invalid name Logging In as a User 1 Perform one of the following actions Press the preprogrammed User Login button or to User and press the Menu Select button directly below User The display sh...

Page 123: ...on ARS enabled mode the display shows Offline with Logt and Exit One of the following scenarios occurs If the user name is invalid login fails and the user login failure indicator IP indicator icon blinks The display also shows momentary Login failed If the PIN is invalid login fails and the user login failure indicator IP indicator icon blinks The display also shows momentary Login failed Wait fo...

Page 124: ... data The display shows momentary Private data cleared Select No to keep your private data Text Messaging Service TMS This features allows you to quickly send and receive messages and run database queries directly from your radios The maximum length of characters for a text message is 200 The types of text messages available A new text message free form message A predefined message quick text mess...

Page 125: ...tly below TMS to access the TMS feature screen 4 or to scroll through the main menu options NOTICE The radio automatically exits the feature if the feature inactivity timer is enabled when the radio is left idle and the timer expires You will hear the Menu Inactive Exit Tone upon feature exit Press the Menu Select button directly below Back at any time to return to the previous screen Composing an...

Page 126: ...the message is composed 7 or to Send Message and press the Menu Select button directly below Sel 8 Perform one of the following actions or to scroll through the address list and select the required address or to Other Recpnt and press the Menu Select button below Edit When a blinking cursor appears in the Enter Address screen use the keypad to type the address entry 9 Press the Menu Select button ...

Page 127: ...access this feature using the preprogrammed button press the preprogrammed Quick Text button and proceed to step 4 To access this feature using the menu proceed to the next step 2 or to TMS and press the Menu Select button directly below TMS to access the TMS feature screen 3 Perform one of the following actions or to Compose and press the Menu Select button directly below Sel Press the Menu Selec...

Page 128: ...the Send Message screen and Sending msg If the message is sent you hear a tone and the display shows Msg sent If the message is not sent you hear a low tone the display shows Send failed and returns to the main TMS screen NOTICE You can append a priority status and or a request reply to your message See Priority Status and Request Reply of a New Text Message on page 128 for more information Priori...

Page 129: ...omposed to allow you to perform this procedure See Composing and Sending a New Text Message on page 125 for more information 1 Press the Menu Select button directly below Optn 2 or to Mark as Normal and press the Menu Select button directly below Sel to remove the priority status from the message The display shows the normal message icon on the label bar Appending a Request Reply to a Text Message...

Page 130: ...ng a New Text Message on page 125 for more information 1 Press the Menu Select button directly below Optn 2 or to Mark Important and press the Menu Select button directly below Sel to indicate the message is important 3 or to Req Reply and press the Menu Select button directly below Sel to request for a reply The priority status and request reply icons appear beside the normal message icon on the ...

Page 131: ... the preprogrammed Data Feature button or the TMS Feature button to access the Inbox Receiving a text message using the radio menu When the new message icon appears and the display shows momentary New msg press the Menu Select button directly below TMS to access the Inbox The display shows a list of aliases or IDs with the sender of the latest received message on top Viewing a Text Message from th...

Page 132: ... See Text Messaging Service TMS Indicators on page 61 for more information Replying to a Received Text Message NOTICE The original date and time stamp address and message content is automatically appended to the reply message 1 or to the required aliases or ID and press the Menu Select button below Sel to view the message 2 Press the Menu Select button directly below Rply to reply to a message 3 P...

Page 133: ...ee Priority Status and Request Reply of a New Text Message on page 128 for more information Accessing the Drafts Folder This folder stores the messages that were saved previously The Drafts folder can hold up to 10 messages The oldest draft in the folder is deleted when the 11th message comes in 1 or to TMS 2 Press the Menu Select button directly below TMS to access the TMS feature screen 3 or to ...

Page 134: ...ess the Menu Select button directly below TMS to access the TMS feature screen 2 or to Sent and press the Menu Select button below Sel The display shows a list of aliases or IDs with the recipient of latest sent message on top 3 or to the required aliases or ID and press the Menu Select button below Sel to view the message While on the view message screen press the Menu Select button directly belo...

Page 135: ...on to send the message The display shows the Send Message screen and Sending msg NOTICE Press the Menu Select button directly below Back at any time to return to the previous screen You can append a priority status and or a request reply to your message See Priority Status and Request Reply of a New Text Message on page 128 for more information Deleting a Text Message 1 From the Inbox Draft or Sen...

Page 136: ...nd State databases With this advance messaging solution you have the ability enable Two Factor Authentication With Query and Two Factor Authentication you can use a secure system log on to initiate and receive key information on people vehicles and properties when doing the regular security patrol You can access to local or external databases such as the National Crime Information Center NCIC for ...

Page 137: ...n occurs when the user intentionally powers off the radio power loss is when the battery dies or is removed from the unit Two Factor Authentication Two Factor Authentication is an extension of existing ARS and TMS operation This feature allows you to authenticate yourself with a username unit ID password and passcode This feature allows the sender of a text message to address a specific user of th...

Page 138: ...ed username has more than the maximum allowed characters or an invalid character in it the display shows momentary Invalid ID 3 For radio enabled with Unit ID perform one of the following actions or to UnitID Entry and press the Menu Select button directly below Edit A blinking cursor appears Use the keypad to type or edit a Unit ID Press the Menu Select button directly below Ok to submit or to sc...

Page 139: ... in status to indicate Two Factor Authentication complete Logging out of Two Factor Authentication NOTICE Private data refers to all messages in the text messaging Inbox Draft and Sent folder The next user is able to access the Inbox Draft and Sent messages if private data is not deleted Radio that is successfully logged in to the secured system receives advertisement from the server that the acce...

Page 140: ... user list in the CPS 1 Perform one of the following actions To access this feature using the preprogrammed button press the preprogrammed TMS Query button and proceed to step 5 To access this feature using the menu proceed to the next step 2 or to TMS and press the Menu Select button directly below TMS to access the TMS feature screen 3 Perform one of the following actions or to Compose and press...

Page 141: ...the display shows Send failed and returns to the main TMS screen NOTICE The server responds to your query with the required report in text messages You can append a priority status and or a request reply to your message See Priority Status and Request Reply of a New Text Message on page 128 for more information Receiving a Query The information requested is received in TMS format When you receive ...

Page 142: ...peration when you press the PTT button you hear an invalid mode tone and the display shows Clear TX only The radio does not transmit until you set the Secure Clear switch to the clear position If the Ignore Secure Clear Switch when Strapped programming option is enabled the radio transmits without displaying any messages in the strapped mode of operation regardless of the Secure Clear switch setti...

Page 143: ...ns the encryption feature on your radio Loading an Encryption Key NOTICE Refer to the key variable loader KVL manual for equipment connections and setup For first time usage turn on the radio for a minimum of 3 hours prior to removing the battery or else the radio may not be able to retain its key for 30 seconds 1 Attach the KVL to your radio The display shows Keyloading and all other radio functi...

Page 144: ...ional and trunked applications strap the encryption keys for trunking on a per talkgroup or announcement group basis In addition a different key can be strapped to other features such as dynamic regrouping failsoft or emergency talkgroup You can have operator selectable key erasure Selecting an Encryption Key 1 or to Key 2 Press the Menu Select button directly below Key The display shows the last ...

Page 145: ...uld automatically switch from one set of keys to the other Every channel to which one of the original keys was tied now has the equivalent new key instead 1 or to KSet and press the Menu Select button directly below KSet The display shows the last user selected and stored keyset and the available keyset menu selections 2 or to scroll through the keysets or use the keypad to enter the number of the...

Page 146: ...s d or to the required option and press the Menu Select button directly below Sel e Select Erase all keys or Erase single key by pressing the Menu Select button below Yes to erase the encryption key s in the radio You can return to the previous screen by pressing the Menu Select button below No Erasing the single key in radios with the single key option and erasing all keys in radios with the mult...

Page 147: ...mode If the rekey operation fails you hear a bad key tone and the display shows Rekey fail NOTICE The rekey operation failure indicates that your radio does not contain the USK MDC Over the Air Rekeying Page This feature allows you to view or define MDC Over the Air Rekeying OTAR features It is applied only when operating in secure encrypted mode and only for conventional communications In additio...

Page 148: ...nsmitting radio Expander Expands the speech while the noise flow remains the same at receiving radio Random FM Noise Canceller Flutter Fighter Reduces the unwanted effects of random FM noise pulses caused by channel fading under high Signal to Noise S N conditions such as in a moving transportation The fading effects heard as audio pops and clicks are canceled without affecting the desired audio s...

Page 149: ...incorrect passwords in a row the display shows Deadlock Turn the radio off and then on and begin again at step 1 IMPORTANT For Secure Radios Only After a total of 17 consecutive incorrect passwords turning the radio off and on does not reset this number the radio erases all of its encryption keys and shows Deadlock See a qualified radio technician If you forget the password enter to erase all keys...

Page 150: ...ccess this feature again until you turn the radio off and on Changing Your Tactical Inhibit Password 1 or to Pswd 2 Press the Menu Select button directly below Pswd The display shows Change Password screen 3 or to Tactical Inh Encode Pswd 4 Press the Menu Select button directly below Sel 5 Enter the old password 6 Press the Menu Select button directly below Ok 7 Enter the new password 8 Press the ...

Page 151: ...is enabled The display shows Pswd disabled indicating that the radio lock feature is disabled Radio Stun and Kill This chapter explains the radio stun and kill features Radio Stun This feature allows you to stun another radio by sending an over the air command using the menu on your radio This feature prevents an unauthorized user from using the radio Once the radio is stunned a password is requir...

Page 152: ...adio received the command its screen locked and request for password NOTICE To un stun a radio follow the procedure in Unlocking Your Radio on page 148 Radio Kill This feature allows you to render your radio or another radio inoperable if the radio is misplaced or lost When a radio is killed the display turns blank and all functions of the radio are not usable The killed radio can only be recovere...

Page 153: ...radio received the command its screen turns blank the killed radio is inoperable Using Direct Kill to Kill Your Own Radio Direct Kill allows you to make your own radio inoperable Press and hold the Top Side button then press the Orange button until the display turns blank and becomes inoperable Radio Inhibit This feature allows the system administrator to put a radio into a non functional state wh...

Page 154: ...ve not established a clear broad view of the sky Once GPS is enabled the radio displays the GPS icon on the screen The dispatcher can always request the system to determine the real time location coordinates of the radio GPS Operation The GPS technology uses radio signals from earth orbiting satellites to establish location coordinates Therefore maximizing your view of unobstructed sky is essentia...

Page 155: ...ncement Sometimes the GPS feature may be unable to complete a location calculation successfully You then see a message indicating that your radio cannot connect to enough visible satellites To maximize the ability of your radio to determine a fix take note of the following guidelines For your initial fix hold the radio in the face position Stay in the open The GPS feature works best where there is...

Page 156: ...is enabled You hear the Menu Inactive Exit Tone upon feature exit Military Grid Reference System MGRS Coordinates This feature can only be enabled through CPS configuration When the MGRS coordinate is enabled all location coordinates are displayed in MGRS format including the editable locations in GPS Accessing the Outdoor Location Feature NOTICE An ON radio menu may be present on the Location men...

Page 157: ...ion coordinates are fixed the display shows the current location along with the UTC Zulu time and date that the location fix was obtained The location coordinates are updated automatically every 5 seconds while the location signal is present If the radio fails to get a location fix the display shows No service and returns to the previous display 5 To return to the Home screen press the PTT button ...

Page 158: ... PTT button the preprogrammed GPS button or the Menu Select button directly below Exit Viewing a Saved Waypoint Ensure your radio shows the current location on the screen 1 Press the Menu Select button directly below Optn 2 or to Waypoints and press the Menu Select button directly below Sel The display shows a list of waypoints 3 Perform one of the following actions or to scroll through the list o...

Page 159: ...o edit the alias 6 Perform one of the following actions Press the Menu Select button directly below Ok once you are done Press the Menu Select button directly below Cncl to return to the Waypoints main screen 7 The display shows Waypoint name Updated and the radio returns to the Waypoints main screen 8 Perform one of the following actions Press the Menu Select button directly below Back to return ...

Page 160: ...o move to the previous number coordinates Press to move to the next number coordinates A blinking cursor appears in the Edit Location screen 6 Utilize the following control buttons or menu to change the number coordinates if required then press the Menu Select button directly below Ok once Press to move one space to the left Press to move one space to the right Press the Menu Select button directl...

Page 161: ...ctly below Del Press the Menu Select button directly below Del 4 The display shows Delete Waypoint name Confirm 5 Press the Menu Select button directly below Yes to delete the waypoint or press the Menu Select button directly below No to return to the Waypoints main screen The display shows Waypoint name deleted Deleting All Saved Waypoints Ensure your radio shows the current location on the scree...

Page 162: ...point and press the Menu Select button directly below Sel The display shows the distance and bearing from the current to the selected coordinates Location Feature in Emergency Mode When the Emergency feature is activated by pressing the emergency button the radio exits the Location menu and returns to the Home default screen so that you can see which channel the emergency signal is going out on Ho...

Page 163: ...annel or Scan Talkback channel Upon receiving a voice transmission with GPS coordinates enabled on the receiving radio the display shows the coordinates available in full or in short coordinates There are two different formats available Refer to the following list for the details shown in the Peer Location quick text Consult your agent to pick the best format to configure to your radio Full locati...

Page 164: ...ages received at Geofence shall have its content displayed immediately on the radio display NOTICE If the radio is set up in DVRS only mobile radio is supported for this feature Entering the Geofence Area The Voice Announcement and TMS display in this feature are optional They must be configured to enable you to hear and see these indicators When the radio enters a Geofence area the radio immediat...

Page 165: ...creen is refreshed to show the latest message The following procedure guides you to exit the text message received Press the Menu Select button below Exit or to return to Home screen The other operations are the same as normal dynamic regroup command When the radio exits the Geofence area your radio reverts to original channel or newly assigned talkgroup The radio display shows the new channel tog...

Page 166: ...age content without any user operation NOTICE Depending on how your radio is programmed you may or may not be alerted by Voice Announcement VA TMS display Intelligent Backlight and the Transmit Power Level The user will be alerted only if these indicators are configured in the radio The VA can be programmed to alert continuously or momentarily If Site Selectable Alert SSA is enabled the radio mute...

Page 167: ...tically leaves failsoft operation and returns to trunked operation To continue in Failsoft and to communicate with other talkgroups refer to the following procedure 1 Rotate the Mode Knob to change to a different repeater frequency 2 Press the PTT button to talk and release the button to listen Out of Range Radio When your radio goes out of the range of the system it can no longer lock onto a cont...

Page 168: ...tly below Site 3 Perform one of the following actions To lock the site press the Menu Select button directly below Lock The display shows Site locked To unlock the site press the Menu Select button directly below Unlk The display shows Site unlocked The radio saves the new site lock state and returns to the Home screen Site Display and Search Button The Site Display and Site Search button allows y...

Page 169: ...s as other Bluetooth devices may or may not meet the mission critical standard Your radio must be preprogrammed to allow you to use this feature The use of this feature requires the Full Feature expansion board together with the Bluetooth Software The default setting for Bluetooth enabled radio is Bluetooth on See Turning Off the Bluetooth on page 170 to turn off the Bluetooth Currently your radio...

Page 170: ... The display shows momentary Bluetooth on and appears If Bluetooth fails to launch the display shows Bluetooth on failed Turning Off the Bluetooth Do one of the following to turn off the Bluetooth You can use the options interchangeably depending on your preference and the programmed functions Turning off the Bluetooth using the radio menu BT a or to BT To access the Bluetooth feature screen press...

Page 171: ...airing Feature on page 174 Infinite For all Bluetooth devices When the radio and or device are turned off after pairing keys are not lost When the radio and the device are turned on again they can resume the Bluetooth connection without user intervention Re Pair Tim er Options Re Pair Timer Scenarios Immediate For MCW Accessories only When the radio is powered off pairing key is lost immediately a...

Page 172: ...ption Infinite For all Bluetooth de vices This Timer only applies to the acces sory The programmable timer choices are 0 15 minutes 2 hours 4 hours or 8 hours Do note there are exceptions for Op eration Critical Wireless OCW headset and PTT which are preprog rammed to 8 hours This timer is a stay alive timer where the accessory remains on without the device reconnecting be fore powering off The ra...

Page 173: ...r high degree of reliability Motorola Solutions recommends to NOT separate the radio and the accessory At the fringe areas of reception both voice and tone quality will start to sound garbled or broken To correct this problem simply position the accessory and radio closer to each other within the 10 meter defined range to re establish clear audio reception NOTICE Once a COTS headset is paired to y...

Page 174: ...vice Type alternating with disconnected If the Bluetooth device successfully re connects before the Bluetooth 10 second Re Connection Timer expires the display shows momentary Device Type connected and stops blinking or if the Bluetooth device fails to re connect within 10 seconds the blinking is replaced by a persistent Standard Pairing Feature NOTICE Bluetooth tones Bluetooth menu and preprogram...

Page 175: ...rby It is set to turn off by default 1 Perform one of the following actions Press the preprogrammed Bluetooth Search button or to BT Press the Menu Select button directly below BT to access the Bluetooth feature screen or to Search Devices and press the Menu Select button directly below On If successful the display shows Searching for BT devices followed by the names of Bluetooth devices found if ...

Page 176: ...y below BT to access the Bluetooth feature screen b or to Visibility and press the Menu Select button directly below On The status changes to Visible to all Visibility mode is enabled When the timer expires the status changes to Visibility failed Repeat the procedure to turn on Bluetooth visibility Turn on Bluetooth visibility using the preprogrammed button a Press the preprogrammed button to enab...

Page 177: ...button directly below BT to access the Bluetooth feature screen b or to Visibility and press the Menu Select button directly below Off The display shows Visibility Off When the timer expires the status changes to Visibility off failed Repeat this step to turn off Bluetooth visibility c To return to the Home screen press the Menu Select button directly below Exit To disable the Bluetooth visibility...

Page 178: ...process the display shows Compare PIN XXXXXX If you choose to reject the pairing process the display shows Cancel pairing in progress followed by Device Friendly Name pair canceled and return to Home screen 2 Perform one of the following actions when the display shows Compare PIN XXXXXX Press the Menu Select button below Ok if the PIN is correct Press the Menu Select button below Cncl to reject if...

Page 179: ...ton directly below Sel to initiate pairing Your radio only supports HSP DUN GAP PAN and SPP Bluetooth profiles If successful the display shows Pairing in progress followed by a randomly generated numeric PIN Compare PIN XXXXXX If unsuccessful the display shows BT profiles not supported The display returns to Available Dev screen 2 Press Ok to continue pairing the radio and the device The pairing p...

Page 180: ...ess the Menu Select button directly below Exit Turning on the Bluetooth audio using the preprogrammed button a To route the audio routing from the radio to the headset short press the preprogrammed button You hear a short medium pitched tone The display shows Headset on BT audio routing can be configured in CPS to route the audio to RSM or radio s internal speaker The audio routes to the radio s s...

Page 181: ...outing from the headset to the radio press the preprogrammed button You hear a short medium pitched tone The display shows Speaker on Adjusting the Volume of the Radio from Bluetooth Audio Device Ensure that the Bluetooth audio device is connected to the radio Your radio can only control the volume of MCW and OCW Bluetooth enabled audio device If the radio is paired with other Bluetooth enabled au...

Page 182: ...e name If Clr is selected the display shows Device Friendly Name clear 6 Press the Menu Select button directly below Yes or No to proceed delete the device or to exit this function and return to previous screen If the device is deleted successfully the display shows Device Friendly Name cleared to indicate clearing is successful If the device is not deleted successfully you hear the radio sounds a...

Page 183: ...ectly below Clr You hear a short medium pitched tone The display shows Clear all BT devices b Press the Menu Select button directly below Yes to proceed The display shows Please wait to indicate clearing is in progress If successful the display shows All BT devices cleared If unsuccessful you hear the radio sounds a short low pitched tone The display shows Clear all BT devices failed The display r...

Page 184: ...your radio is on and the radio supports Bluetooth Low Energy BT LE You can disable the holster and weapon fired sensors temporarily or permanently This feature allows you to prevent one or all events from being reported OTA This feature is enabled through Customer Programming Software CPS configuration Check with your dealer or system administrator for more information on the programming of this f...

Page 185: ...he vest is pierced due to various causes such as bullet shot or knife stabbing The feature allows the radio to send an emergency message and over the air OTA notification when a vest piercing event occurs The event is immediately sent to the system to alert the dispatcher of the vest pierced incident The receiving radio displays VPierced RCVD to indicate that the sender is in a Vest Pierced Emerge...

Page 186: ...the display If the preprogrammed Sensor button or the preprogrammed Menu Select button is long pressed the over the air OTA sensor notification is enabled Disabling the Sensor Permanently 1 Long press the preprogrammed Sensor button or the preprogrammed Menu Select button to permanently disable the sensors A tone sounds and the radio displays Sensor Off While in this state no events is reported ov...

Page 187: ...mmed by a qualified radio technician Check with your dealer or system administrator for more information Responding to the Notification of Upgrade 1 The display shows Upgrade and two short medium pitched tones sound every 30 seconds until the user makes a choice of either accepting delaying or rejecting the request 2 Perform one of the following actions Press the Menu Select button below Acpt to a...

Page 188: ...mized per customer requirements This is typically useful when the user is having difficulty reading the content shown on the display Each voice announcement is within a limit of three seconds maximum The sum duration of all different voice announcements in a radio shall be no more than 1000 seconds NOTICE This feature must be preprogrammed by a qualified radio technician Check with your agent if V...

Page 189: ...adios at a site or a few sites to notify the users when there is a special situation that they need to be aware of Your radio supports up to 250 site aliases Only authorized radios are enabled to send SSA Upon the activation of a SSA the receiving radios display the alert alias and generate the periodic alert tone NOTICE Alert alias alert tone and alert period can be preprogrammed Alert period is ...

Page 190: ...hows Req successful If the site is not available the display shows Site Alias not available If the site does not exist the display shows Site Alias does not exist 6 To return to the Home screen press the Menu Select button directly below Exit If you are at the site designated to receive this alert you can hear an alert tone repeated periodically The display shows the Alert Alias with the intellige...

Page 191: ... in a failsoft situation the display shows Req failed If the request is successful the display shows Req successful If the site is not available the display shows Site ID not available If the site does not exist the display shows Site ID does not exist 7 To return to the Home screen press the Menu Select button directly below Exit If you are at the site designated to receive this alert you can hea...

Page 192: ... at the site designated to receive this alert you can hear an alert tone repeated periodically The display shows the Alert Alias with the intelligent lighting at Home screen Sending SSA Notification to All Available Sites 1 or to SSA 2 Press the Menu Select button directly below SSA The display shows the Site Alert screen 3 or to Start Alert and press the Menu Select button directly below Sel The ...

Page 193: ...lect button directly below Sel The display shows the Select Site screen 4 or to select the desired Site Alias and press the Menu Select button directly below Send The display shows Sending req If radio is out of range roaming to a foreign system or in a failsoft situation the display shows Req failed If the request is successful the display shows Req successful If the site is not available the dis...

Page 194: ...d prompts to enter the Site ID again If a correct Site ID is entered the display shows Sending req If the request is successful the display shows Req successful If the single site is not available the display shows Site ID not available If the single site does not exist the display shows Site ID does not exist 6 To return to the Home screen press the Menu Select button directly below Exit The SSA ...

Page 195: ... stop Stopping SSA Notification of All Available Sites 1 or to SSA 2 Press the Menu Select button directly below SSA The display shows the Site Alert screen 3 or to Stop Alert and press the Menu Select button directly below Sel The display shows the Select Site screen 4 or to All Avail and press the Menu Select button directly below Send The display shows Sending req If radio is out of range roami...

Page 196: ...off using the preprogrammed button a To toggle the Wi Fi on or off press the preprogrammed Wi Fi button This button must be preprogrammed by a qualified radio technician Check with your dealer or system administrator for more information Turning Wi Fi on or off using the radio menu button a or to WiFi and press the Menu Select button directly below WiFi If the display shows WiFi Status being Off p...

Page 197: ...e selected network and the signal strength NOTICE The List and Rfsh buttons are not available when WiFi is searching or connecting to network Checking the Wi Fi Configuration and Status of the Radio 1 Perform one of the following actions Long press the preprogrammed Wi Fi button or to WiFi and press the Menu Select button directly below WiFi The display shows the current status of the Wi Fi as des...

Page 198: ...all Phone Call Outgoing Only Emergency Call Incoming Only NOTICE The radio can also be preprogrammed to log only the radio IDs associated with incoming Dispatch Calls Check with your dealer or system administrator for more information Do one of the following to view recent calls You can use the options interchangeably depending on your preference and the programmed functions Viewing recent calls u...

Page 199: ...must be preprogrammed to any side button or Top Orange button before you can use this feature This feature allows twice as many zones to be accessed from a switch doubling the amount of switch positions Use the preprogrammed Basic Zone Bank button to toggle the position between Bank 1 and Bank 2 The top display shows the status icons A B C D E or F or the zone name based on the bank and switch pos...

Page 200: ...udio settings of the radio The display backlight alert tones and audio settings are defined according to the preprogrammed radio settings of each radio profile Please refer to a qualified technician for more information NOTICE The radio automatically exits the feature if the feature inactivity timer is enabled when the radio is left idle and the timer expires You will hear the Menu Inactive Exit T...

Page 201: ... switch to select the first second or third zone in an EZB This feature allows user to navigate from up to 75 zones in 25 EZBs NOTICE The Zone Select feature must to be preprogrammed to the 3 position A B C switch while the Enhanced Zone Bank feature must be preprogrammed to any side button or Top Orange button before you can use this feature 1 Press the preprogrammed EZB Up or EZB Down button to ...

Page 202: ...reference and the programmed functions Select the audio speaker using the preprogrammed Profile button a Press the preprogrammed Profile button b or to scroll through the menu selections c Press the Menu Select button directly below Sel to select the radio profile with the required speaker routing or press the Menu Select button directly below Exit to exit the screen without making any changes The...

Page 203: ...ing actions To toggle the backlight on or off press the preprogrammed Light Flip button To turn the backlight on press any key of the keypad the Menu Select or Navigation button or any programmable radio controls or buttons Setting Up the Radio Display and Visual Indicators to Suit Night Vision Goggles During tactical nighttime operations of military entities worldwide the Night Vision Goggles NVG...

Page 204: ...without making any changes press the Menu Select button directly below Exit The radio returns to the Home screen with NVG display mode The profile name on the Home screen indicates the current selected radio profile Setting up the radio display and visual indicators using the radio menu Prfl a or to Prfl b To access the Profiles screen press the Menu Select button directly below Prfl c or to the d...

Page 205: ... or off using the radio menu a or to Mute b Press the Menu Select button directly below Mute The display shows momentary Tones off indicating that the tones are disabled or the display shows momentary Tones on and you hear a short tone indicating that the tones are enabled Turning Voice Mute On or Off You can enable and disable voice transmission if needed Do one of the following to turn Voice Mut...

Page 206: ...d at 60 seconds but it can be preprogrammed from 15 to 465 seconds in 15 second intervals or it can be disabled entirely for each radio mode by a qualified radio technician NOTICE You hear a brief low pitched warning tone four seconds before the transmission times out 1 Hold down the PTT button longer than the preprogrammed time You hear a continuous talk prohibit tone After four seconds the trans...

Page 207: ...times to move to an item you wish to change or to change the selected item Press the Menu Select button directly below Exit to exit the screen without making any changes and return to the Home screen 5 Perform one of the following actions Press the Menu Select button directly below Ok once you have finished to save your changes and return to the Home screen Press the Menu Select button directly be...

Page 208: ...er or system administrator for more information Option Result Digital Carrier Operated Squelch COS You hear any digital traf fic Normal Squelch You hear any digital traffic having the correct net work access code Selective Switch You hear any digital traffic having the correct net work access code and correct talkgroup Using the PL Defeat Feature This feature allows you to override any coded squel...

Page 209: ...hen smart PTT is enabled in your radio you cannot transmit on an active channel If you try to transmit on an active smart PTT channel you hear an alert tone and the transmission is inhibited The LED lights up solid yellow to indicate that the channel is busy The following table shows the variations of smart PTT Mode Description Transmit Inhibit on Busy Chan nel with Carrier You cannot transmit if ...

Page 210: ...this feature An environment is considered hazardous when the power emitted by the radio power amplifier could initiate an explosion or other dangerous reactions When the Transmit Inhibit feature is disabled the radio functions according to its normal operations The radio sounds alert tone when user enters or exits this feature and also when PTT is pressed NOTICE Acknowledgment of any messages requ...

Page 211: ...bit disabled position or to TxIn Press the Menu Select button below TxIn Press the Transmit Inhibit programmable button NOTICE If the user has disabled TX Inhibit using the softkey and then moves the switch to the position where TX Inhibit is enabled the new value overwrites the menu value The display shows Tx inhibit off You hear a sequence of short high low tone Transmit Inhibit Off tone to indi...

Page 212: ...Menu Select button directly below Back g To return to the Home screen press the Menu Select button directly below Exit Recent calls are lost after radio power cycle if the calls are not saved Playback the saved calls using the radio menu a Press the Menu Select button directly below Rcnt b or to Saved Convs and press the Menu Select button directly below Sel to view the recent conversations c or t...

Page 213: ...alls in chronological order Radio displays the playback status NOTICE Received call overwrites the ongoing record playback User can short press the programmable button within three seconds to continue the playback and ignore the receiving call User can short press the programmable button to trigger playback when the radio is receiving call to overwrite the receiving call Playback can be halted by ...

Page 214: ...Your radio contains information on the following Radio Information IP Display Control Assignments Soft ID If enabled NOTICE The radio automatically exits the feature if the feature inactivity timer is enabled when the radio is left idle and the timer expires You hear the Menu Inactive Exit Tone upon feature exit Accessing the Radio Information This feature displays the following radio information ...

Page 215: ... screen 3 Perform one of the following actions or to scroll through the various information To return to the previous screen press the Menu Select button directly below Back Press to return to the Home screen Viewing the IP Information This feature displays the device name IP address and status of your radio NOTICE The device name of your radio is preprogrammed Check with your dealer or system adm...

Page 216: ...ctions Press the preprogrammed Info button or to Info and press the Menu Select button directly below Info 2 or to Control map and press the Menu Select button directly below Sel The display shows the Control Map screen 3 Perform one of the following actions or to scroll through the various information Press the Menu Select button directly below Back to return to the previous screen Press to retur...

Page 217: ... return to the previous screen Press the Menu Select button directly below Cncl to return to the previous screen Front Panel Programming You are able to customize certain feature parameters in Front Panel Programming FPP to enhance the use of your radio Entering the Front Panel Programming Mode You can follow this procedure to enter the front panel programming FPP mode on your radio Federal 1 Pres...

Page 218: ...word screen 2 Enter the password and press the Menu Select button directly below Ok 3 Press or to select Zn Ch 4 Press or to select the required zone 5 Press or to select the required channel The display shows the radio parameter screen 6 Press or to select the required parameter to edit Editing FPP Mode Parameters Perform the following actions as required while navigating through the feature para...

Page 219: ... contact your sales representative for accessory compatibility http www motorolasolutions com NOTICE GPS only antenna is only used in either a single band UHF or 700 800 application where the Public Safety Microphone PSM is used with the corresponding PSM antenna This antenna is only for GPS reception and cannot be used for receive transmit operation at UHF VHF or 700 800 This antenna is never to ...

Page 220: ... help responders to locate you e g latitude and longitude bearing state whether you are using true or magnetic north distance to a well known landmark vessel course speed or destination 5 State the nature of the distress 6 Specify what kind of assistance you need 7 State the number of persons on board and the number needing medical attention if any 8 Mention any other information that would be hel...

Page 221: ...emiduplex mode on the two frequency channels specified in the table below NOTICE Simplex channels 3 21 23 61 64 81 82 and 83 cannot be lawfully used by the general public in US waters Additional information about operating requirements in the Maritime Services can be obtained from the full text of FCC Rule Part 80 and from the US Coast Guard Table 1 VHF Marine Channel List Channel Num ber Frequenc...

Page 222: ...0 161 950 28 157 400 162 000 60 156 025 160 625 156 075 160 675 62 156 125 160 725 63 156 175 160 775 156 225 160 825 65 156 275 160 875 66 156 325 160 925 67 156 375 156 375 68 156 425 156 425 69 156 475 156 475 71 156 575 156 575 72 156 625 73 156 675 156 675 74 156 725 156 725 75 76 77 156 875 78 156 925 161 525 79 156 975 161 575 80 157 025 161 625 157 075 161 675 157 125 161 725 157 175 161 7...

Page 223: ...transmit only Declaration of Compliance for the Use of Distress and Safety Frequencies The radio equipment does not employ a modulation other than the internationally adopted modulation for maritime use when it operates on the distress and safety frequencies specified in RSS 182 Section 7 3 Technical Parameters for Interfacing External Data Sources RS232 USB SB9600 Input Volt age Volts Peak to pea...

Page 224: ... digital trunked communications ASTRO conventional Motorola Solutions standard for wireless analog or digital conventional communications Autoscan A feature that allows the radio to automatically scan the members of a scan list Bluetooth Bluetooth is an open wireless technology standard for exchanging data over short distances from fixed and mobile devices with high levels of security Bluetooth Pa...

Page 225: ...de a continuous two way data communications path between the central controller and all radios on the system Conventional Typically refers to radio to radio communications sometimes through a repeater Frequencies are shared with other users without the aid of a central controller to assign communications channels Conventional Scan List A scan list that includes only conventional channels COTS Comm...

Page 226: ... A feature that allows the dispatcher to temporarily reassign selected radios to a single special channel so they can communicate with each other DSR Dynamic System Resilience EID Encrypted Integrated Data ESN Electrical Serial Number Failsoft A backup system that allows communication in a non trunked conventional mode if the trunked system fails FCC Federal Communications Commission Hang up Disco...

Page 227: ...feature is triggered the radio alerts the user with audio and visual alerts It can also trigger Emergency Alarm the Post Alert Timer is not cancelled MCW Mission Critical Wireless MDC Motorola Solutions Digital Communications Menu Entry A software activated feature shown at the bottom of the display Selection of a feature is controlled by the programming of the buttons on the side of the radio Mon...

Page 228: ...display messages Personality A set of unique features specific to a radio PIN Personal Identification Number PremierOne A software application which streamlines critical real time operations and simplifies system administration to deliver accurate consistent and integrated information remotely to the requestors Preprogrammed A software feature that has been activated by a qualified radio technicia...

Page 229: ...te the annoyance of having to listen to conversations of no interest to you selective switch Any digital P25 traffic having the correct Network Access Code and the correct talkgroup Squelch Muting of audio circuits when received signal levels fall below a pre determined value With carrier squelch all channel activity that exceeds the preset squelch level can be heard Synchronous Serial Interface S...

Page 230: ...versation Trunking Priority Monitor scan list A scan list that includes talkgroups that are all from the same trunking system USK Unique shadow key UTC Coordinated Universal Time The international time standard formerly Greenwich Mean Time or GMT Zero hours UTC is midnight in Greenwich England which is located at 0 degrees longitude Everything east of Greenwich up to 180 degrees is later in time e...

Page 231: ...price of the Product during the warranty period provided it is returned in accordance with the terms of this warranty Replaced parts or boards are warranted for the balance of the original applicable warranty period All replaced parts of Product shall become the property of MOTOROLA SOLUTIONS This express limited warranty is extended by MOTOROLA SOLUTIONS to the original end user purchaser only an...

Page 232: ...ices are not included MOTOROLA SOLUTIONS will pay the inbound shipping charges only with use of the MOTOROLA SOLUTIONS designated delivery service MOTOROLA SOLUTIONS will pay for outbound shipping via MOTOROLA SOLUTIONS S normal shipping methods SERVICE FROM THE START SfS LITE Provides extended hardware normal wear and tear repair coverage beginning AFTER MOTOROLA SOLUTIONS S standard Commercial W...

Page 233: ...liver or send the Product item transportation and insurance prepaid to an authorized warranty service location Warranty service will be provided by MOTOROLA SOLUTIONS through one of its authorized warranty service locations If you first contact the company which sold you the Product e g dealer or communication service provider it can facilitate your obtaining warranty service You can also call MOT...

Page 234: ...s not affect the operation of the Product 11 Normal and customary wear and tear VI PATENT AND SOFTWARE PROVISIONS MOTOROLA SOLUTIONS will defend at its own expense any suit brought against the end user purchaser to the extent that it is based on a claim that the Product or parts infringe a United States patent and MOTOROLA SOLUTIONS will pay those costs and damages finally awarded against the end ...

Page 235: ...OTOROLA SOLUTIONS software MOTOROLA SOLUTIONS software may be used in only the Product in which the software was originally embodied and such software in such Product may not be replaced copied distributed modified in any way or used to produce any derivative thereof No other use including without limitation alteration modification reproduction distribution or reverse engineering of such MOTOROLA ...

Page 236: ...ights and remedies you may have under the Australian Consumer Law If you have any queries please call Motorola Solutions Australia at 1800 457 439 You may also visit our website http www motorolasolutions com XA EN Pages Contact_Us for the most updated warranty terms English 236 ...

Reviews: