background image

350 SPORT YACHT

32

An oil reservoir, engine hydraulic pump, and a res-
ervoir at the helm allows easy system fill.  It is
important that the fluid level in the reservoirs is
checked frequently and maintained at or near the
maximum level.  Both reservoirs use the same hy-
draulic fluid.

Refer to the engine and steering system manu-
facturer owner’s manuals for specific information
on the operation and maintenance for the steer-
ing system.

Helm and Outdrives

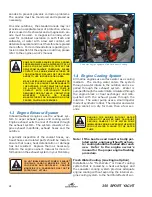
The steering wheel can be tilted to five different
positions by activating the tilt lock lever located
on the bottom side of the helm.  When the lever is
released, it automatically locks the steering wheel
at or close to that angle.

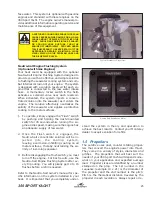
Dual engine sterndrive boats have two outdrives.
These are coupled together at the tiller arms or
the drives themselves by a tie bar.   Mercruiser
drives  are set parallel and Volvo drives are toed
in 1/2” at the aft end of the cavitation plates to
provide maximum stability on straight ahead runs
and proper tracking through corners.  Outdrive or
steering system damage may require the outdrives
to be realigned.

Please refer to the engine or steering system
owner’s manual or contact your dealer for infor-
mation on the power steering system.

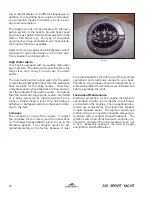
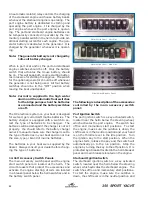
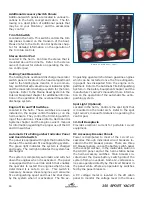
2.6 Trim Tabs

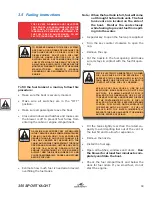
The trim tabs are mounted
to the hull on the transom
below the swim platform.
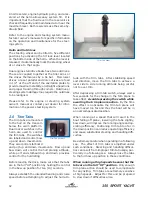
Dual rocker switches in the
helm are used to control
the trim tabs.  The switches
are labeled and control bow
up and down movements.
They also control starboard
and port up and down movements.  Bow up and
bow down will control the hull planing attitude,
while port and starboard up and down provides
control for the hull listing.

Before leaving the dock, make sure that the tabs
are in the full “UP” position by holding the control
in the bow up position for ten (10) seconds.

Always establish the intended heading and cruise
speed before attempting to adjust the hull atti-

tude with the trim tabs.  After stabilizing speed
and direction, move the trim tabs to achieve a
level side to side running attitude being careful
not to over trim.

After depressing a trim tab switch, always wait a
few seconds for the change in the trim plane to
take effect.

Avoid depressing the switch while

awaiting the trim plane reaction.


By the time

the effect is noticeable the trim tab plane will
have moved too far and thus the boat will be in
an overcompensated position.

When running at a speed that will result in the
boat falling off plane, lowering the tabs slightly,
bow down, will improve the running angle and op-
erating efficiency. Positioning trim tab too far in
the down position can reduce operating efficiency
and cause substantial steering and handling diffi-
culties.

Be extremely careful when operating in a following
sea.  The effect of trim tabs is amplified under
such conditions.  Steering and handling difficul-
ties can result from improper trim tab usage, par-
ticularly in a following sea.  Always raise the tabs
to the full bow up position in these conditions.

When running at high speeds be sure that the
tabs are in the full “UP” position. 

 Only enough

trim plane action should be used to compensate
for any listing.  Trim tabs are extremely sensitive
at high speeds.  Adjust for this and be prepared
to slow down if difficulties arise.

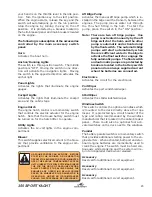
Trim Tab Plane

Trim Tab Switches

Summary of Contents for 350 Sport Yacht

Page 1: ......

Page 2: ...350 SPORT YACHT 2...

Page 3: ...ver every question you may have about your boat and boating in general We encourage you to contact your dealer ship for any additional information you might need If there is a question about your boat...

Page 4: ...manual This information will be important for you and Monterey service personnel to know if you may need to call them for technical assistance or service MAKE SERIAL MODEL BTU OUTPUT PHONE REPRESENTA...

Page 5: ...VE UP _____________________________________________ 23 58 42 cm DRAFT WITH DRIVE DOWN __________________________________________ 38 96 52 cm BRIDGE CLEARANCEWITH STANDARD OPTIONS _____________________...

Page 6: ...350 SPORT YACHT 6 THISPAGEWASLEFTBLANK INTENTIONALLY...

Page 7: ...Helm Instrumentation 26 Chapter 2 HELM CONTROL SYSTEMS 2 1 General 29 2 2 Engine Throttle and Shift Controls 29 2 3 Neutral Safety Switch 30 2 4 Outdrive Power Tilt and Trim 31 2 5 Steering System 31...

Page 8: ...Bilge Drainage 63 7 3 Cockpit and Deck Drains 64 7 4 Cabin Drains 65 7 5 Drainage System Maintenance 65 Chapter 8 VENTILATION SYSTEM 8 1 Cabin Ventilation 67 8 2 Carbon Monoxide and Proper Ventilatio...

Page 9: ...Your Boat 101 12 5 Docking Anchoring and Mooring 102 12 6 Controls Steering or Propulsion System Failure 104 12 7 Collision 104 12 8 Grounding Towing and Rendering Assistance 104 12 9 Flooding or Cap...

Page 10: ...ard Switch Panel 139 Port Ignition Panel 140 Breaker Panel 141 Helm Harness 142 Helm Instrument Harness 143 Helm Harness 144 AC DC Deck Harness 145 AC DC Deck Harness 146 AC DC Deck Harness 220V 147 A...

Page 11: ...l Engine Fuel System 166 Air Conditioning 167 Water System 168 Bilge and Drain 1 169 Bilge and Drain 2 170 Waste System 171 Proper Cradle Support 172 Appendix B GENERAL MAINTENANCE SCHEDULE AND LOG 17...

Page 12: ...ntification Number Port Engine Serial Number Starboard Engine Serial Number Intended Design Category Ocean Inshore Offshore ShelteredWaters Weight and Maximum Capacities Unladen Weight Kilograms Pound...

Page 13: ...is pro vided at the beginning of this manual This infor mation will be important for you and service per sonnel to know if and when you may need ser vice or technical information The boat warranty re...

Page 14: ...uipment speci fications and models If you have questions about the equipment on your Monterey please contact the Monterey Boats Customer Service Department Service All warranty repairs must be perform...

Page 15: ...le fiberglass molded shell and integral fiberglass structural components attached to the hull flange This warranty may be transferred to subsequent purchasers hereinafter new owner provided the new ow...

Page 16: ...t installed by MONTEREY BOATS This warranty is further subject to the exclusions limitations conditions and provisions noted below LIMITED WARRANTY FOR NON STRUCTURAL PARTS AND COMPONENTS MONTEREY BOA...

Page 17: ...pairs performed by a repair shop not PRE AUTHORIZED by a MONTEREY BOATS Customer Service Manager MONTEREY BOATS does not authorize any person to create or assume for it any other obligation or liabili...

Page 18: ...350 SPORT YACHT 18 THISPAGEWASLEFTBLANK INTENTIONALLY...

Page 19: ...AL INJURY OR DEATH HAZARDS OR UNSAFE PRACTICES WHICH COULD RESULT IN MINOR PERSONAL INJURY OR PRODUCT AND PROPERTY DAMAGE All instructions given in this book are as seen from the stern looking toward...

Page 20: ...cident If you need additional information regarding accident reporting please call the Boat ing Safety Hotline 800 368 5647 Education If you are not an experienced boater we recom mend that the boat o...

Page 21: ...ice maker Generator Operation components secure Bilge Blower s Wipers Shore power AC Tables Plumbing Hose Clamps Battery Polarity Voltage Tight Connections Battery Switch es Operation ENGINE BEFORE S...

Page 22: ...350 SPORT YACHT 22 THISPAGEWASLEFTBLANK INTENTIONALLY...

Page 23: ...ac turer and have specific lubrication and mainte nance requirements Proper engine alignment is very important This was done by the factory when the engines were installed and should be checked once p...

Page 24: ...tion of the coolant hoses ex haust hoses and related parts should be made to ensure that leaks heat deterioration or damage has not resulted Replace them as necessary Refer to the engine owner s manua...

Page 25: ...ge the Flush switch by pushing and holding the dash mounted switch for 45 seconds while running the en gine at idle speed making sure the engine has an adequate supply of raw water 2 Once the Flush sw...

Page 26: ...sonal water craft additional coolers etc will cause additional load on the engines Consequently different propellers may be required If the boat ran in the required RPM range when it was new and you h...

Page 27: ...nd the engine owner s manual for more information on the operation of the outdrive power tilt and trim Trim Tab Indicator Gauges Monitors the position of the trim tabs The trim tabs should always be r...

Page 28: ...be that the automatic bilge pump system has failed or is being overcome by incoming water from a loose or broken hose a loose thru hull fitting a defective or damaged outdrive component or dam age to...

Page 29: ...a bin nacle style control with a single lever for each engine that operates as a gear shift and a throttle General operation will include a position for neu tral straight up and down a forward positio...

Page 30: ...tion before using your boat ALWAYS RETURNTHE ENGINE THROTTLE LEVER TO THE EXTREME LOW SPEED POSITION BEFORE SHIFTING NEVER SHIFT THE UNIT WHILE ENGINE SPEED IS ABOVE IDLE RPM During most operations of...

Page 31: ...ce of the power tilt and trim please refer to the engine owner s manual EXCESSIVE TRIM FOR THE OPERATING CONDITIONS EITHER TRIM UP OR DOWN CAN CAUSE BOAT INSTABILITY PROPELLER CAVITATION OR MAKE STEER...

Page 32: ...control the hull planing attitude while port and starboard up and down provides control for the hull listing Before leaving the dock make sure that the tabs are in the full UP position by holding the...

Page 33: ...must be free to move slightly to activate the valve Hard or erratic steering is an indication that the steering cable is not moving freely Generally periodic lubrication of all moving parts and connec...

Page 34: ...350 SPORT YACHT 34 THISPAGEWASLEFTBLANK INTENTIONALLY...

Page 35: ...ve is labeled NORMAL and STBD FUEL TANK The labels refer to the fuel tank the valve selects with NORMAL being the port tank on the port engine valve and the starboard tank on the star board engine val...

Page 36: ...ASOLINE OR DIESEL FUEL IS ACCIDENTALLY PUMPED INTO THE WATER OR WASTE TANK DO NOT ATTEMPT TO PUMP IT OUT YOURSELF WATER AND WASTE PUMPS ARE NOT DESIGNEDTO PUMP FUEL AND A FIRE OR EXPLOSION COULD RESUL...

Page 37: ...erefore it is important to moni tor the fuel level in each tank carefully while run ning both engines on one tank In some situa tions it is possible to run the engines long enough for the return fuel...

Page 38: ...iming the fuel system 3 4 Generator Fuel System The generator fuel system is much like the pri mary fuel engine fuel system With diesel en gines there is a fuel supply and a fuel return line With gaso...

Page 39: ...SE CABIN WINDOWS DOORS AND HATCHES BEFORE FUELING Estimate how much fuel is needed and avoid overfilling the fuel tanks Note When the fuel tank is full fuel will come out through the fuel tank vent Th...

Page 40: ...quire refueling at least once a month Severe algae in a diesel fuel system can be ex tremely difficult and expensive to clean You should be diligent in monitoring the fuel system by checking the filte...

Page 41: ...TER STARTING THE ENGINES FOLLOWING ANY FUEL SYSTEM SERVICE TO REDUCE THE POSSIBILITY OF A FIRE OR EXPLOSION MAKE SURE ALL ELECTRICAL SWITCHES ARE IN THE OFF POSITION BEFORE SERVICING THE FUEL SYSTEM B...

Page 42: ...350 SPORT YACHT 42 THISPAGEWASLEFTBLANK INTENTIONALLY...

Page 43: ...tarting batteries When the switch is released the relay is deactivated and the batteries are isolated Most 12 volt power is distributed to the 12 volt accessories through individual circuit breakers l...

Page 44: ...e battery charger owner s manual to make sure the charger is set to the type of batteries in your boat and do not mix the size type or brand of marine batteries The batteries in your boat were supplie...

Page 45: ...OPERATING UNDER NO CIRCUMSTANCES SHOULD THIS PROCEDURE BE OVERLOOKED Aft Bilge Pump Activates the manual aft bilge pump which is in stalled in the bilge near the transom between the engines The pump m...

Page 46: ...The green light indicates the system is charged and ready The red light indicates the system has discharged The system is completely automatic and will shut down the engines when it is activated The p...

Page 47: ...for the automatic float switch in the shower sump pump This push to reset breaker is always supplied current when the House battery switch is activated Carbon Monoxide Detector Supplies 12 volt elect...

Page 48: ...m pump on the electric head system A vacuum switch on the pump automatically controls the pump and maintains proper vacuum in the sys tem Stereo DVD Supplies 12 volt electrical current to the stereo a...

Page 49: ...s located in the transom storage compartment just forward of the swim platform There is a main circuit breaker for each power cord located above the inlets and a main breaker for each circuit in the A...

Page 50: ...AL SYSTEM FROM SHORE POWER WITH REVERSE POLARITY ELECTRIC SHOCK CAN CAUSE SEVERE INJURY OR EVEN DEATH DO NOT ATTEMPT TO CORRECTTHEWIRINGYOURSELF ALWAYS HAVE A QUALIFIED ELECTRICIAN CHECK WIRING KEEP C...

Page 51: ...to check the light and the dockside wiring if necessary Battery Charger Supplies electrical current directly to the auto matic battery charger The fully automatic bat tery charger charges and maintai...

Page 52: ...GFI electrical outlets Cockpit Outlet Supplies 120 volt AC electrical current to the cock pit ground fault interrupter GFI electrical outlet Note All AC electrical outlets are provided with ground fau...

Page 53: ...ed near the generator It is important to check and clean the strainer regularly to ensure the seawater system can circulate enough water to provide cooling for the closed cooling and ex haust systems...

Page 54: ...aying particular at tention to portable appliance cords and plugs Check all below deck wiring to be sure it is prop erly supported that the insulation is sound and that there are no loose or corroded...

Page 55: ...in many ways to the main engines The most important factors to the generator s lon gevity are proper ventilation and maintenance of the fuel system ignition system cooling system lubrication system an...

Page 56: ...le or when supplying power from the optional generator You should be aware of the load each accessory draws and make sure you don t overload the circuit The table in this section will assist you in do...

Page 57: ...ARY 5 2 Fresh Water System Operation Fill the water supply tank slowly through the la beled deck plate near the port transom steps After filling the water tank partially open all fau cets The Water Pu...

Page 58: ...WATER HEATER DAMAGE TO THE HEATER WILL RESULT THE SYSTEM MUST BE FILLED AND PRIMED BEFORE USING THE WATER HEATER 5 4 Shore Water Connection The shore water connection allows the direct con nection of...

Page 59: ...ted periodically for accumulated debris that needs to be removed 5 6 Fresh Water System Maintenance Information and owner s manuals supplied with water system components is included with this manual R...

Page 60: ...lorine with water in a separate container first and never add straight chlorine to the fresh water tank Fill the water tank half full with freshwater then pour the mixture into the water tank and top...

Page 61: ...e boat is hauled from the water will help to eliminate air locks in raw water systems Note It may be necessary to reprime the raw water system if the system is not used for an extended period and at t...

Page 62: ...ation and maintenance of the air conditioner 6 3 Raw Water System Maintenance The following items should be done routinely to help maintain your raw water system Check hoses particularly the sea water...

Page 63: ...r panel All bilge pumps pump water out of thru hulls lo cated above the waterline in the starboard side of the hull The aft bilge pumps and automatic switch are located near the transom between the en...

Page 64: ...NTIGUOUS ZONE IF SUCH DISCHARGE CAUSES A FILM OR SHEEN UPON OR A DISCOLORATION OF THE SURFACE OF THE WATER OR CAUSES A SLUDGE OR EMULSION BENEATH THE SURFACE OF THE WATER VIOLATORS ARE SUBJECT TO A PE...

Page 65: ...circuit breakers in the bat tery switch panel They are activated whenever the house battery switch is on and are located below the forward berth in the aft cabin The fluid level in the waste grey wate...

Page 66: ...ated debris and flush with fresh water Frequently test the automatic pump switch for proper operation Note All drains and pumps must be properly winterized before winter lay up Note Never use harsh ch...

Page 67: ...two cam levers and slide locks Each hatch is equipped with a retractable sun shade and screen A magnetic latch secures the screen and shade together To use the screen pull the plastic tab for the scre...

Page 68: ...aintained on the bridge deck by opening windshield or forward clear connector vents as far as possible to help pressurize the cockpit area The canvas drop or aft curtain must be removed and the side c...

Page 69: ...fles that prevent sea water or spray from entering the en gine compartment while providing adequate air movement for the engines Forced Ventilation Electric blowers provide ventilation to the engine c...

Page 70: ...iodic inspection and cleaning of the engine compartment ventilation ducts is necessary to ensure adequate air circulation A buildup of leaves twigs or other debris can severely reduce ventilation It a...

Page 71: ...he anchor line is stored in the rope locker and routed out the rope locker hatch through the roller and connected to the anchor chain A cleat or chain binder is provided on the deck near the roller to...

Page 72: ...the deck near the windlass Once the anchor is retrieved indepen dently secure the anchor to a cleat to prevent it from being accidentally released This is espe cially important while the boat is unde...

Page 73: ...female slide track on the deck Center the cush ion and secure the rear with the snaps Make sure the cushion is properly installed prior to leaving the dock or mooring The cushion is large and somewha...

Page 74: ...nts and should be closed and latched at all times They should only be open when accessing equipment stored in the compartment or when making the connection to shore utilities Additionally this com par...

Page 75: ...e the transom door unse cured OPERATING THE BOAT UNDER POWER WITH THE TRANSOM DOOR OPEN MAY ALLOW PERSONS TO FALL OVERBOARD AND INTO BOAT PROPELLERS OR TO BE LOST IN OPEN WATER ALWAYS CHECK TO MAKE SU...

Page 76: ...to a thru hull fitting in the hull side above the waterline The ice maker or storage access doors are se cured in the closed position with special latches that are flush to door To open press the kno...

Page 77: ...d in the open position with a ratchet type hatch support that automatically locks in the up position when the hatch is raised To release the support raise the hatch until it stops this will release th...

Page 78: ...gainst the door jam with enough pressure to allow the latch to secure the door When the door is open it must be properly secured with the latch near the bottom door track and to the star board side of...

Page 79: ...e side curtains can be put on Attach the forward side curtains to the zippers on the sides of the top and to the front connector Snap the curtains to the windshield deck and arch beginning with the fo...

Page 80: ...ith white front and rear LED lights When toggled down the switch activates the center halogen lights along with red front and rear LED lights The lights are off when the switch is in the center positi...

Page 81: ...eakers on the cabin DC panel are on Then add water to wet the bowl by de pressing the foot activated flush lever slightly un til the desired water level is reached Flush the toilet by activating the f...

Page 82: ...pump If it cycles more than once every two or three hours or runs longer than three min utes after a flush there may be a leak in the system or the vacuum pump may require service Always make sure to...

Page 83: ...the stove from activating when the cover is closed To activate the stove make sure the Stove breaker in the AC breaker panel is on Lift the front of the Karadon cover until it is in the full up posit...

Page 84: ...player stereo and storage is built into the cabinet above the dinette The stereo is activated by the Stereo breaker in the DC electrical panel and the TV is activated by one of the Outlet breakers on...

Page 85: ...ems and Safety Equipment chapters in this manual This is especially essential if your boat is equipped with the optional generator If you did not receive a manual for your carbon monoxide detectors pl...

Page 86: ...cle enough to de frost the coils on the condenser This could cause the coils to develope enough ice to reduce the unit s ability to cool the boat The intake line for the pump is equipped with a sea st...

Page 87: ...is optional The couch and the hanging locker is located on the port side of the stateroom near the door A light in the locker is automatically activated when the door is opened and turned off when the...

Page 88: ...home Walls Cabinets and Trim The hardwood used for the cabin walls and cabi nets is finished with a high quality urethane var nish It can be routinely cleaned with a damp cloth For heavy duty cleanin...

Page 89: ...by you or your dealer 11 2 Engine Alarms Your boat is equipped with engine alarms that monitor water temperature and oil pressure The alarms are equipped with a buzzer and or a light located in the he...

Page 90: ...ay and night use requirements They should be stored in a cool dry location They include Pyrotechnic red flares hand held or aerial Pyrotechnic orange smoke hand held or floating Launchers for aerial r...

Page 91: ...BOAT Bilge and Fuel Fires Fuel compartment and bilge fires are very danger ous because of the presence of gasoline or diesel fuel in the various components of the fuel sys tem and the possibility for...

Page 92: ...nguishing agent has dis sipated from the engine compartment When sufficient time has elapsed for the fire to be extinguished and a flashback is no longer pos sible find and fix the problem then the ov...

Page 93: ...Weakness 7 Inattention or confusion 8 Lack of normal coordination Persons who have been exposed to carbon mon oxide should be moved into fresh air immediately Have the victim breath deeply and seek i...

Page 94: ...additional safety equipment This is particularly important if you operate your boat offshore You should consider the following items depending on how you use your boat Satellite EPIRBS EPIRBs Emergen...

Page 95: ...95 350 SPORT YACHT 11 9 Caution and Warning Labels Warning Label Locations...

Page 96: ...350 SPORT YACHT 96 THISPAGEWASLEFTBLANK INTENTIONALLY...

Page 97: ...ferent situations or sea conditions No boat is indestructible no matter how well it is constructed Any boat can be se verely damaged if it is operated in a manner that exceeds its design limitations I...

Page 98: ...night you should Make sure your navigation lights are on and working properly Navigation lights warn oth ers of your position and course and the posi tion and course of other vessels All navigation ru...

Page 99: ...99 350 SPORT YACHT...

Page 100: ...ough seas The engine fuel filters should be checked for leaks or corrosion Turn the battery switches on Check the bilge water level Look for other signs of potential problems Monitor for the scent of...

Page 101: ...e the blowers when operating the boat below cruising speed or when the generator is running to help cool the engine compartment and remove dangerous fumes Avoid sea conditions that are beyond the skil...

Page 102: ...boat is securely moored TO PREVENT DAMAGETOTHE BOAT CLOSE ALL SEACOCKS BEFORE LEAVING THE BOAT 12 5 Docking Anchoring and Mooring Docking and Dock Lines Maneuvering the boat near the dock and securin...

Page 103: ...bow and stern line and two spring lines The bow and stern lines are usually secured to the dock at a 40 angle aft of the stern cleat and forward of the bow cleat The after bow spring line is secured t...

Page 104: ...e engine compartment to make repairs If you are unable to correct the problem call for help If only one engine has failed you can usually run home on the other engine Be careful not to ap ply too much...

Page 105: ...tay with the boat as long as you can It is much easier for the Coast Guard aircraft or other boats to spot than people in the water If your boat is equipped with an EPIRB make sure it is activated Whe...

Page 106: ...restrict the dumping of other forms of garbage Regional State and local restrictions on garbage discharges also may apply Responsible boaters store refuse in bags and dis pose of it properly on shore...

Page 107: ...G PAINT MANUFACTURERS SHOULD BE FOLLOWED EXACTLY BARRIER COATINGS AND BOTTOM PAINT SHOULD BE APPLIED ONLY BY QUALIFIED MARINE PROFESSIONALS IN A BOAT YARD OR DEALERSHIP THAT SPECIALIZES IN THEIR APPLI...

Page 108: ...to bring the gelcoat back to its original luster For power cleaning use a light cleaner To clean the boat by hand use a heavier automotive cleaner Before cleaning the surfaces read the instructions gi...

Page 109: ...to the alu minum hardware The salt spray salty steam and chemicals in exhaust gases are particularly corrosive and will even tually penetrate and damage the sur face of anodized or powder coated alu m...

Page 110: ...r edge of the stain towards the center in order to prevent spreading Rinse with soap and water Crayon mustard ketchup Sponge with mild soap and water For stubborn stains that may have set use a cloth...

Page 111: ...clean only with water based shampoo or foam upholstery cleaner Pretest a small inconspicu ous area before proceeding Do not over wet Do not use solvents to spot clean Pile fabrics may require brushing...

Page 112: ...n egar and water Wipe the wood dry with a clean towel To preserve the cherry and teak wood work use furniture polish with wax To maintain the carpeting use a vacuum cleaner Because air and sunlight ar...

Page 113: ...is not being run enough to require at least one full tank of fresh fuel a month a fuel additive should be added to protect it from deg radation Your dealer or the engine manufacturer can provide addi...

Page 114: ...350 SPORT YACHT 114 THISPAGEWASLEFTBLANK INTENTIONALLY...

Page 115: ...r engine For more recommendations for your specific area check with your dealer Drain water from the fresh water system Consult the engine owner s manual for detailed information on preparing the engi...

Page 116: ...ace like packed gravel concrete or pavement All of the supports must be set up properly to prevent the boat from shifting while it is in storage When storing the boat on a cradle Make sure the cradle...

Page 117: ...umped through the entire sys tem and out of the thru hull For additional information refer to the Fresh Wa ter System chapter Also refer to the ice maker owner s manual for information on winterizing...

Page 118: ...mildew moisture accumulation etc It is essential to fasten the canvas down securely so that the wind can not remove it or cause chafing of the hull super structure Do not store the boat in a damp sto...

Page 119: ...sure all antifreeze is flushed from the water heater and it is filled with fresh water before it is activated Check and lubricate the steering system Clean and wash the boat Install all upholstery cus...

Page 120: ...350 SPORT YACHT 120 THISPAGEWASLEFTBLANK INTENTIONALLY...

Page 121: ...121 350 SPORT YACHT MontereyWire Legend Appendix A SCHEMATICS...

Page 122: ...350 SPORT YACHT 122 Hull Electrical 1...

Page 123: ...123 350 SPORT YACHT Hull Electrical 2...

Page 124: ...350 SPORT YACHT 124 Hull Electrical 3...

Page 125: ...125 350 SPORT YACHT LewmarWindlass RelayWiring...

Page 126: ...350 SPORT YACHT 126 Trim Tab Wiring...

Page 127: ...127 350 SPORT YACHT Gas RelayWiring...

Page 128: ...350 SPORT YACHT 128 Diesel Halon RelayWiring...

Page 129: ...129 350 SPORT YACHT Generator Remote Starting...

Page 130: ...Hull Harness 1...

Page 131: ......

Page 132: ......

Page 133: ......

Page 134: ...350 SPORT YACHT 134 Panel Hatch Relay...

Page 135: ...135 350 SPORT YACHT Battery Switch Panel...

Page 136: ...350 SPORT YACHT 136 Arch Harness...

Page 137: ...137 350 SPORT YACHT Guage Panel...

Page 138: ...350 SPORT YACHT 138 Port Switch Panel...

Page 139: ...139 350 SPORT YACHT Starboard Switch Panel...

Page 140: ...350 SPORT YACHT 140 Port Ignition Panel...

Page 141: ...141 350 SPORT YACHT Breaker Panel...

Page 142: ...350 SPORT YACHT 142 Helm Harness...

Page 143: ...143 350 SPORT YACHT Helm Instrument Harness...

Page 144: ...350 SPORT YACHT 144 Helm Harness...

Page 145: ...145 350 SPORT YACHT AC DC Deck Harness...

Page 146: ...350 SPORT YACHT 146 AC DC Deck Harness...

Page 147: ...147 350 SPORT YACHT AC DC Deck Harness 220V...

Page 148: ...350 SPORT YACHT 148 AC DC Deck Harness 220V...

Page 149: ...149 350 SPORT YACHT DC Panel...

Page 150: ...350 SPORT YACHT 150 AC DC Head Harness...

Page 151: ...151 350 SPORT YACHT AC DC Head Harness 220V...

Page 152: ...350 SPORT YACHT 152 AC Harness 120V...

Page 153: ...153 350 SPORT YACHT AC Harness 120V...

Page 154: ...350 SPORT YACHT 154 AC Harness 120V...

Page 155: ...155 350 SPORT YACHT AC Harness 220V...

Page 156: ...350 SPORT YACHT 156 AC Harness 220V...

Page 157: ...157 350 SPORT YACHT AC Harness 220V...

Page 158: ...350 SPORT YACHT 158 AC Panel 120V...

Page 159: ...159 350 SPORT YACHT AC Panel 220V...

Page 160: ...350 SPORT YACHT 160 Shore Power Inlet Panel 120V...

Page 161: ...161 350 SPORT YACHT Shore Power Inlet Panel 220V...

Page 162: ...350 SPORT YACHT 162 Digital Generator Adapter Harness...

Page 163: ...163 350 SPORT YACHT 8402Wire Guide...

Page 164: ...350 SPORT YACHT 164 KAC6402 SET UP KAC8402 SET UP...

Page 165: ...165 350 SPORT YACHT Generator System...

Page 166: ...350 SPORT YACHT 166 Gasoline and Diesel Engine Fuel System Fuel Valves...

Page 167: ...167 350 SPORT YACHT Air Conditioning...

Page 168: ...350 SPORT YACHT 168 Water System...

Page 169: ...169 350 SPORT YACHT Bilge and Drain 1...

Page 170: ...350 SPORT YACHT 170 Bilge and Drain 2...

Page 171: ...171 350 SPORT YACHT Waste System...

Page 172: ...350 SPORT YACHT 172 Proper Cradle Support...

Page 173: ...l i B n a e l C X X r o f s t n e n o p m o c e n i g n e d n a e g l i b k c e h C s k a e l X X s r e n i a r t s r e t a w w a r n a e l c k c e h C X X t n e m n g i l a e n i g n E X s m e t s y...

Page 174: ...350 SPORT YACHT 174 MAINTENANCE LOG Hours Date Dealer Service Repairs...

Page 175: ...175 350 SPORT YACHT MAINTENANCE LOG Hours Date Dealer Service Repairs...

Page 176: ...350 SPORT YACHT 176 MAINTENANCE LOG Hours Date Dealer Service Repairs...

Page 177: ...177 350 SPORT YACHT MAINTENANCE LOG Hours Date Dealer Service Repairs...

Page 178: ...350 SPORT YACHT 178 MAINTENANCE LOG Hours Date Dealer Service Repairs...

Page 179: ...se Type Trailer License Color and make of auto 7 Persons aboard Name Age Address telephone No 8 Do any of the persons aboard have a medical problem Yes No If yes what 9 Trip Expectations Leave at From...

Page 180: ...350 SPORT YACHT 180 THISPAGEWASLEFTBLANK INTENTIONALLY...

Page 181: ...ER LOCATION Give location precisely Lat Long STATE NEARESTCITYORTOWN COUNTY WEA THER Clear Rain Cloudy Snow Fog Hazy WATERCONDITIONS Calm waves less than 6 Choppy waves 6 to 2 Rough greater than 6 Str...

Page 182: ...re of Equipment If diagram is needed attach separately Continue on additional sheets if necessary Include any information regarding the involvement of alcohol and or drugs in causing or contributing t...

Page 183: ...one end shaped to aid in extending one s reach from the side of the boat Bow The front end of a boat s hull Bow Line A line that leads forward from the bow of the boat Bow Rail Knee high rails of sol...

Page 184: ...the lowest part of the deck Galley The kitchen of a boat Grab Rail Handhold fittings mounted on cabin tops or sides for personal safety when moving around the boat both on deck and below Ground Tackl...

Page 185: ...n driven into the bottom to which a boat can be tied Pitching The fore and aft rocking motion of a boat as the bow rises and falls Pitch The measure of the angle of a propeller blade Refers to the the...

Page 186: ...ls with water from over the side Swimming Ladder Much the same as the boarding ladder except that it extends down into the water Taffrail Rail around the rear of the cockpit Thru hull A fitting used t...

Page 187: ...h is bad Replace the defective switch The cable is worn or corroded Replace cable The fuel injector linkage is corroded and stiff Lubricate the linkage The throttle control in the helm control is corr...

Page 188: ...amaged need repair A propeller shaft is bent Repair or replace damaged components An outdrive is fouled by marine growth or rope Clean running gear The outdrives are not trimmed properly Trim outdrive...

Page 189: ...c fire extinguisher in the engine compartment has activated and the engines were shut down by the extin guishing agent Check the monitor panel for a red light or no green light If the red light is lit...

Page 190: ...de curtains to provide proper ventilation The carbon monoxide detector is defective and needs to be calibrated by the manufacturer or replaced Have the boat checked by a professional before condemning...

Page 191: ...r replace the battery The pump impeller is jammed by debris Clean pump impeller housing The wire connections in the bilge have corroded Replace connectors and secure above the bilge waterline The auto...

Page 192: ...lter Waste is in the discharge hose Flush enough to move waste to the holding tank particularly at the end of each day No deodorizer in the holding tank Add deodorizer to the holding tank each time it...

Page 193: ...193 350 SPORT YACHT...

Page 194: ...MONTEREY BOATS 1579 S W 18th Street Williston FL 32696 Phone 352 529 9181 Fax 352 529 9173 www montereyboats com P N MANUAL 350SY O M 0 Rev 8 2007...

Page 195: ...Hull Harness 1...

Page 196: ......

Reviews: