


Customer Service 908-368-1025
︱
Page 9 of 10
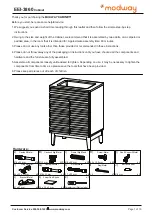
STEP 13:
STEP 14:
Fx4
Dx8
Hardware required. Screwdriver not included
www.modway.com
Dx16
L x4
Hardware required. Screwdriver not included
J x2
EEI-3860
Cabinet
D
13.1- Lay both door on flat surface.
13.2- Place the
Hinge (F)
on each of the pre-cut cup. ( 2 cups on each door).
13.3- Secure each
Hinge (F)
with 2 nos of
Screws(D).
14.1
-
Carefully align each
Door
(12/13)
to the edge of the
Side
Panel (2 & 3)
and secure each
Hinge (F)
with 4 nos of
Screws (D)
14.2- Stick the
Door Buffer
(J )
to the top end of each door.
14.3- Place the
Foam Pad (L)
on
the cabinet top edge.
Securing the
door hinges (F)
Securing the
Left & Right Door (12&13)
Sold Separately
Mx1
Mx1
12
13
D
D
F
D
D
F
D
D
F
D
D
F
J
J
12
13
L
L
L
L