


Customer Service 908-368-1025
︱
Page 4 of 10
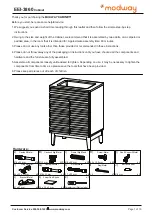
STEP 3:
STEP 4:
Gx2
Cx8
Hardware required. Screwdriver not included
www.modway.com
5
C
8
C
6
G
7
11
C
C
Dx8
Ax6
Cx6
Hardware required. Screwdriver not included
Dx8
2
D
C
C
A
C
C
A
3
EEI-3860
Cabinet
C
C
D D
D
D
C
D
D
D D
C
G
A
A
A
A
C
C
D
DD
DD
DD
Carefully insert all hardwares as mentioned in the list to the respective components as shown.
Carefully insert all hardwares as mentioned in the list to the respective components as shown.
Pre-insert
Dowel (C), Cambolt (G), & Screw (D)
Pre-insert
Dowel (C), Cambolt (A), & Screw (D)
Mx1
Mx1