


Customer Service 908-368-1025
︱
Page 7 of 10
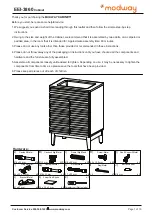
STEP 9:
STEP 10:
www.modway.com
Bx8
Hardware required. Screwdriver not included
B
Bx2
Hardware required. Screwdriver not included
6
B
EEI-3860
Cabinet
B
B
B
B
B
Carefully place the
Leg Apron
assembly to the cabinet structure and
tighten the
Camlock (B)
to secure
both structures.
10.1- From
STEP 9,
carefully turn the
Cabinet with Leg Apron upright.
10.2- Insert the
Camlock (B)
to both
Side Panels (2 & 3)
10.3- Align the
Front Panel (6)
with
protruded
Cambolt (A)
to the
Side
Panel (2 & 3)
edges.
10.4- Secure the
Front Panel (6)
by
tightening the
Camlock (B).
Securing the Leg Apron completed in (Step2) to the main cabinet structure.
Pre-inserted
Cambolt (A)
to Anchor the Leg Assembly (completed in Step 2)
3
2
3
2
Mx1
Mx1