


Customer Service 908-368-1025
︱
Page 8 of 10
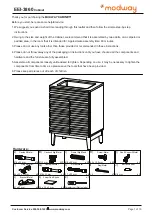
STEP 11:
STEP 12:
www.modway.com
Kx4
Hardware required. Screwdriver not included
Hx2
I x
Hardware required. Screwdriver not included
Ex4
4
I
5
H
4
E
EEI-3860
Cabinet
H
E
E
E
11.1- Place the
Corner Bracket (K)
at the protruded
Screw (D)
on
both
Side Panel (2&3)
and
Top Back Rail (7).
Continue to
place it on another 3 corners.
11.2- Carefully tighten all
protruded
Screws (D)
.
12.1- Align the protruded dowel on
Shelf Back Panel (5)
edge to the pre-drilled holes on
Shelf Panel (4)
and secure it by
Hex Screw (H).
12.2- Insert the
Shelf Support (E)
to the desired height.
12.3- Carefully place the pre-drilled holes underneath
the
Shelf Panel (4)
to the inserted
Securing the
Corner Bracket (K)
3
2
To assemble the
Adjustable Shelf Panel (4) and Shelf Back Panel (5)
Shelf Support (E)
Mx1
Mx1
K