background image

63

/160

Available Accessories

© MOBOTIX AG  •  Security-Vision-Systems  •  Made in Germany

www.mobotix.com  •  [email protected]

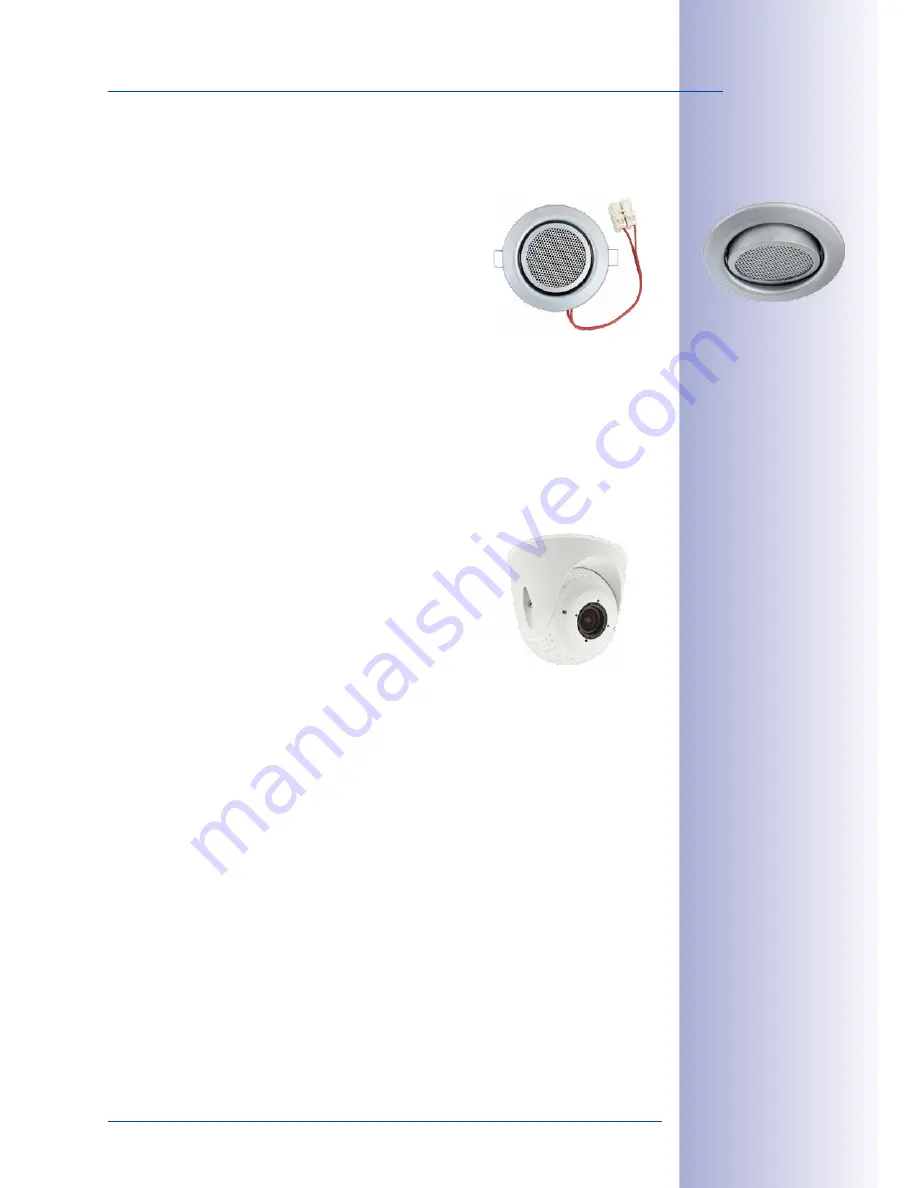
1.4.18  SpeakerMount

Order no.: MX-HALO-SP-PW/CM

The SpeakerMount, available from MOBOTIX in white or 
matt chrome, is an external speaker that can be directly 
connected to the S15D/S15M (no additional power supply 
required). The high-quality speaker is especially suitable 
for S15 cameras. The speaker is pre-installed in the 
20-degree-tilting mechanism of the HaloMount and is 
fitted in the same way in fake ceilings and walls. The 
SpeakerMount has not been designed to be used in outdoor applications. Temperature 
range: 0 to +60°C/32 to 140°F; protection class: IP20; nominal/music output: 3/4 W; imped-
ance: 8 Ohms; material of the speaker: metal with perforated steel cover; connection type: 
two-wire strand with luster terminal; installation diameter: 68 mm/2.7 in.

1.4.19  PTMount

Order no.: MX-PTMount-OPT-PW

MOBOTIX offers the high-quality, weatherproof PTMount, 
an attractive, compact, discreet, and dome-shaped acces-
sory mount that holds a single sensor module and is 
adjustable in three directions. The maximum flexibility for 
adjusting the modules means that you can always find 
the right position. When mounted to a wall, for example, 
the mount enables you to compensate for sideway tilt and 
to re-align the image horizon horizontally to record the 
best possible image of the surveillance area.

1.4.20 Other Accessories

Since the range of accessories for the MOBOTIX system keeps growing, you should visit 
the MOBOTIX website 

www.mobotix.com

 in the 

Products > Accessories

 section to see 

the entire list of available accessories.

Summary of Contents for S15

Page 1: ...pt has made high resolution video systems cost efficient MOBOTIXAG D 67722Langmeil Phone 49 6302 9816 103 Fax 49 6302 9816 190 sales mobotix com Discreet Flexible Hemispheric With the S15D FlexMount two sensor modules featuring microphones are connected to a concealed camera housing via cables up to 2 m 6 6 ft long Two adjacent rooms can be discreetly monitored with just one camera up to 2 m 6 6 f...

Page 2: ... logo the Bonjour icon iPod and iTunes are trademarks of Apple Inc registered in the U S A and other countries iPhone iPad iPad mini and iPod touch are Apple Inc trademarks Linux is a trademark of Linus Torvalds All other marks and names mentioned herein are trademarks or registered trademarks of the respective owners Copyright 1999 2014 MOBOTIX AG Langmeil Germany Information subject to change wi...

Page 3: ...42 1 3 4 Sensor Modules L35 L76 L160 44 1 3 5 BlockFlexMounts L12 L23 L25 L38 L51 L76 L160 L320 46 1 3 6 BlockFlexMount CSVario L24 54 48 1 3 7 Thermal Sensor Modules L43 L65 L135 50 1 3 8 S15M 52 1 4 Available Accessories 58 1 4 1 Extension for Sensor Module 58 1 4 2 Ceiling Wall Installation Set 58 1 4 3 Connection Cable for Sensor Module 58 1 4 4 MiniUSB Cable to MiniUSB Straight Straight or St...

Page 4: ... 89 2 2 8 External Audio Support Microphone Speaker 89 2 2 9 Replacing the MicroSD Card 90 2 2 10 Tools Required for Installation 90 2 2 11 Preparatory Steps 91 2 3 Installing the S15D FlexMount 92 2 3 1 Attaching the S15D Base Module 92 2 3 2 Attaching and Connecting the S15D Sensor Modules 93 2 3 3 Plugging in and Removing Extensions 94 2 3 4 Connecting Network Cables and Additional S15D Cables ...

Page 5: ...Full Image Recording 126 3 4 1 Preparing the Virtual PTZ Function 126 3 4 2 Full Image Recording 128 3 4 3 Special S15 Configuration in the Browser 130 3 5 MicroSD Card Recording 140 3 5 1 Introduction 140 3 5 2 Formatting the MicroSD Card 142 3 5 3 Activating MicroSD Card Recording 143 3 5 4 Accessing Data on the MicroSD Card 144 3 5 5 Deactivating Card Recording 144 3 5 6 Using a MicroSD Card in...

Page 6: ...image sensors or parts thereof must not be exported to countries embargoed by the U S A or the ITAR At present this applies to the following countries Syria Iran Cuba North Korea and Sudan The same export ban applies to all persons and institutions listed in The Denied Persons List see www bis doc gov Policy Guidance Lists of Parties of Concern Under no circumstances can the camera itself or its t...

Page 7: ...onsumption of attached extension modules The power consump tion of all attached MxBus modules must not exceed 3 W When attaching modules to the MxBus connector and the USB connector the power consumption of all attached modules must not exceed 4 W if the camera is powered by PoE class 3 If PoE class 2 is used the power consumption of all attached modules must not exceed 1 W If thermal sensor modul...

Page 8: ...n installing the modules When using the Thermal Sensor Modules the S15 can use its state of the art video sensors to reliably detect movements even in total darkness Thanks to their precision of 50 mK 0 02 C these sensors offer a degree of detail that is by far superior than comparable products The S15M camera variant has a hemispheric sensor module day or night that is integrated into the camera ...

Page 9: ...botix com sales mobotix com S15D One Camera Two Surveillance Areas Indoor Entrance Area Left and Outdoor Entrance Area Right 180 Panorama 180 Panorama S15M Camera with Hemispheric Sensor Module for Concealed Installation Behind a Wall or Ceiling Panel 180 Panorama ...

Page 10: ...r data and power to connect to a PoE switch and thereby to any expandable Ethernet network There are two options for a weatherproof connection of the network cable to the housing A MOBOTIX patch cable up to 10 meters in length can be plugged externally into the housing from below and secured with a weatherproof bayonet catch or the eight individual strands of the installation cable can be attached...

Page 11: ...Complete Sets MOBOTIX also offers fully equipped S15D sets with one or two sensor modules For more information see the MOBOTIX webseite www mobotix com or contact your MOBOTIX partner directly Ethernet patch cable MiniUSB PoE switch 2 m 6 6 ft cable 2 m 6 6 ft cable Sensor modules including status LEDs and microphone ...

Page 12: ... the camera housing which can be concealed behind a cover or cladding for example stainless steel up to 6 4 mm in thickness Thicker surfaces may also be suitable for mounting the if they can be hollowed out accordingly New Five Megapixel Images Sensors In The Day Or Night Model TheS15Mfeaturesahigh resolutionfive megapixelcolororblackandwhitesensorforinstallation under all lighting conditions day ...

Page 13: ...r module is available in white or black enabling it to blend into most installation environments The S15D features up to two five megapixel HiRes image sensors which can be combined to output a color dual image up to six megapixels in size The system can be fitted with two day and two night sensor modules or with one day and one night sensor module The maximum frame rate can be up to 30 frames per...

Page 14: ...itions as the camera uses a real infrared sensitive black and white image sensor instead of the usual color sensor with electronic color fade out whereby the infrared sensitivity is reduced through integrated color filters Double Hemispheric Camera S15D When an S15D with two hemispheric sensor modules is deployed they can be installed in different mounting positions ceiling wall floor even in diff...

Page 15: ...on cable into the sensor module and secure it with the bayonet catch attach the hinged ferrite drill a circular hole diameter at least 43 mm feed through the cable and sensor module from the front secure it with a nut plug the connection cable into the core mod ule and secure it You re done Flexible and Future Proof The system can easily be matched to suit the location s requirements thanks to a r...

Page 16: ...se plates to be identified for example In contrast the H 264 standard which was developed for feature movies and is favored by some video security providers cannot achieve this with the required level of quality Good Color Images Even in Low Light The more light sensitive an image sensor is the better the image quality especially when the ambient light level is low such as at dusk and in heavy rai...

Page 17: ...arm and movements that do not set off an alarm such as shadows changing light conditions and trees swaying in the wind MOBOTIX Mounts Flexible Installation Options Whether in ceilings behind faceplates or built into other devices the MOBOTIX mounts provide flexible solutions for every application scenario The HaloMount installs sensor modules into ceilings as easily as halogen spot lamps the Speak...

Page 18: ...amera Using an ultra wide angle lens the hemispheric camera captures a 180 hemispheric image of the room and projects it onto a high resolution image sensor When ceiling mounted the image area of the hemispheric camera covers the entire room The image in the hemisphere is convex particularly near the image borders These image sections are corrected for the viewer by the integrated distortion corre...

Page 19: ...be recorded as a hemispheric image S15D Perfect Overview in Two Rooms Day and Night A world first the S15D provides the option of using two hemispheric sensor modules within a single camera This way two entirely separate spaces next to or on top of each other indoors or outdoors can be secured simultaneously using just one camera The S15D can also be used as a hemispheric day night camera The blac...

Page 20: ...l to wall It offers a substantially better view of the scene compared to other cameras and it also results in the need for fewer cameras overall Panorama Focus Maximum room overview while simultaneously viewing detail in a single image A hemi spheric sensor module can also provide two additional views so that you can focus on two detail scenes simultaneously in addition to the panorama view No Bli...

Page 21: ...he ceiling in a room the Double Panorama display mode provides a corrected panorama image of both halves of the room It corre sponds roughly to the situation of personally standing in the middle of the room and being able to look both forwards and backwards at the same time This is a superb overview for the user provided by a single sensor module Original full image ...

Page 22: ...e MOBOTIX cameras such as the S15 to automatically detect when an event has occurred If necessary the cameras will respond immediately with an alarm sound and will establish a direct video and sound connection to a control room The S15 is equipped with a shock detector as standard for all IT and Secure models For example if the camera receives a blow to the housing it can simultaneously take a vid...

Page 23: ... of panorama images with mega pixel technology Fewer recording devices because in the decentralized system ten times the standard number of cameras can be used to record high resolution HDTV video with sound on one computer server simultaneously Lower network bandwidth because everything is processed in the camera itself and the high resolution images therefore do not have to be constantly transpo...

Page 24: ...P65 cameras are highly robust and work without high power climate control and extra protective housing in a temperature range from 30 to 60 C 22 to 140 F Modern Integrated into the cameras are high power processors and flash storage thus making energy consuming servers and storage devices unnecessary And of course the disposal of waste later High Resolution A hemispheric MOBOTIX camera with two im...

Page 25: ...ules Six different MOBOTIX sensor modules are available for the S15D L12 Fisheye with 180 image angle horizontal L23 Super Wide Angle with 92 image angle horizontal L25 Super Wide Angle with 82 image angle horizontal L38 Wide Angle with 55 image angle horizontal L51 Wide Angle with 40 image angle horizontal L76 Telephoto with 27 image angle horizontal L160 Telephoto with 13 image angle horizontal ...

Page 26: ...lliant 5 megapixel images during the day and in twilight hours and reliable motion detection at night B Dual thermal operation 2 thermal sensor module two thermal images of two different detection areas with only one camera C Single thermal operation 1 thermal sensor module One thermal image thermal sensor module flexibly installed A Mixed operation B Dual thermal operation C Single thermal operat...

Page 27: ...istance Image width N A 104 86 8 51 5 36 2 24 3 11 4 Image height N A 67 5 59 3 37 3 27 0 18 0 8 6 Available from Q4 2014 Notes The specified focal lengths of the MOBOTIX lenses do not reflect the actual focal length of the lenses but the focal length Lxx mm converted to 35 mm camera format For example the MOBOTIX L25 Super Wide Angle lens has an actual focal length of 4 mm This would be the equiv...

Page 28: ...0025 Hardware Features IP protection class IP65 IP65 IP65 Temp Internal DVR MB 64 64 64 Internal DVR MicroSD up to 64 GB 4 GB included 4 GB included 4 GB included Mikrophone in sensor modules speaker X Passive infrared sensor PIR Integrated temperature sensor X X X Shock detector X X X Power consumption in watts typical 5 4 5 4 5 Variable PoE class 2 3 2 3 2 3 Image Formats Frame Rates and Image S...

Page 29: ...X X Weekly schedules holidays X X X Web functionality FTP email X X X Playback Quad and MultiView bidirec tional sound in browser X X X Logo generator animated X X X Flexible event logic X X X Master Slave arming X X X Several scheduled privacy zones X X X Customized voice messages X X X VoIP telephony audio video alert X X X Remote alarm notification network msg X X X Signal inputs outputs RS232 ...

Page 30: ...ssion MxPEG M JPEG JPEG H 264 Internal DVR MicroSD slot inluding 4 GB max 64 GB External video ring buffer Directly on NAS and computer server without additional recording software Software included MxEasy video management software MxControlCenter control center software MOBOTIX App for iOS devices with iOS 5 0 and higher Image processing Backlight compensation automatic white balance image distor...

Page 31: ...S15M Typical 4 5 W Operating conditions IP65 30 to 60 C 22 to 140 F Dimensions weight S15M W x H x D 115 x 130 x 40 mm installation dimensions weight approx 457 g including lens Dimensions weight S15D W x H x D 115 x 130 x 33 mm weight approx 444 g without sensor modules see below Dimensions weight Sensor modules L12 diam x H 43 x 45 mm installation dim weight 85 g L25 L51 diam x H 43 x 57 mm inst...

Page 32: ...r display bar chart or diagram temperature control windows Power Consumption Typ 1 5 W per Thermal Sensor Module Operating Conditions IP66 DIN EN 60529 30 to 60 C 22 to 140 F DIN EN 50155 Dimensions Total length 78 mm max Ø 63 mm Materials Module housing Aluminum black anodized Pressure plate Stainless steel V2A Weight 330 g one Thermal Sensor Module without sensor cable Technical Data S15D with T...

Page 33: ...33 160 Technical Specifications MOBOTIX AG Security Vision Systems Made in Germany www mobotix com sales mobotix com MOBOTIX S15D with 2 MX SM Thermal MOBOTIX S15D with 1 MX SM Thermal 1 MX SM D12 ...

Page 34: ...com 1 3 Delivered Parts and Dimensions 1 3 1 S15D Core Base Module On www mobotix com go to Products S15 FlexMount and open the basket It contains a Product Configurator Use this to order the required parts in any of the available colors 1 1 1 11 1 8 1 7 1 6 1 3 1 4 1 10 1 9 1 2 1 5 M 6 M 3 M 2 M 1 M 7 M 8 M 5 M 4 M 10 M 9 ...

Page 35: ... 8 1 Single wire plug white Ethernet installation cable microphone speaker MxBus installed 1 9 1 MicroSD card 4 GB installed 1 10 1 Rotary plug SD card blue installed 1 11 1 Ethernet patch cable 50 cm with seal Mounting Parts Item Number Part Name M 1 4 Stainless steel washers diam 4 3 mm M 2 4 6 mm screw anchors M 3 4 Stainless steel wood screws 4x40 mm with PZ 2 driver bit M 4 2 Cable plug 5 7 m...

Page 36: ... use the corresponding MOBOTIX cables with seal Ethernet patch cable MX OPT CBL LAN 1 2 5 10 MiniUSB straight straight MX CBL MU STR 05 2 5 MiniUSB straight angled MX CBL MU EN STR 05 2 5 MiniUSB to USB A straight to USB port MX CBL MU STR AB 05 2 5 Sensor modules MX FLEX OPT CBL 05 1 2 Pressure compen sation Base plate R L 2 1 LEDs MicroSD card Keys Triple cable retainer Bayonet catch S15D housin...

Page 37: ...ng cover are removed Before laying the Ethernet installation cable remove the bayonet catch and replace the Ethernet patch cable plug with either one of the additional plugs M 4 5 or the single wire plug 1 8 depending on the cable used Ethernet installation cable or MxBus microphone speaker MOBOTIX RJ45 or MxBus microphone speaker LSA terminal Ethernet Installation cable Screw terminals MxBus micr...

Page 38: ...e Base Module Dimensions Attaching the Base Module The drilling templates can be found at the end of the manual Always print or copy drilling template in their original size 115 mm 4 53 in 100 mm 3 94 in M6 Diam 5 5 mm 0 22 in 130 mm 5 12 in 47 5 mm 1 87 in 100 mm 3 94 in 110 mm 4 33 in 8 5 mm 0 33 in 13 5 mm 0 53 in M6 tap holes Slots ...

Page 39: ...39 160 Delivered Parts and Dimensions MOBOTIX AG Security Vision Systems Made in Germany www mobotix com sales mobotix com 33 5 mm 1 32 in 5 mm 0 2 in ...

Page 40: ...ix com 1 3 2 L12 Sensor Module Item Number Part Name 3 1 1 Sensor module with affixed washer 3 2 1 L12 lens installed 3 3 1 Dome installed 3 4 1 Cable retainer with bayonet catch installed 3 5 1 Sealing plug blue small installed 3 6 1 Nut plastic Sensor module including status LEDs and microphone 3 1 3 4 3 5 3 2 3 6 3 3 ...

Page 41: ... mm 2 in 2 1 Sensor module housing LEDs Microphone LED default settings 1 Power on Error flashes 2 Recording flashes Diam 43 mm 1 7 in Diam 43 mm 1 7 in Sensor module housingl Markers for top Sensor cable con nection Pressure compen sation 30 mm 1 2 in 58 mm 2 3 in Diam 43 mm 1 7 in Diam 43 mm 1 7 in 15 mm 0 6 in 40 mm 1 6 in Sensor module weight without lock ring 85 g weight with lock ring 91 g E...

Page 42: ... Item Number Part Number 3 1 1 Sensor module with affixed washer 3 2 1 L23 L25 L51 lens installed 3 3 1 Protective glass insert with coated glass installed 3 4 1 Cable retainer with bayonet catch installed 3 5 1 Sealing plug blue small installed 3 6 1 Nut plastic Available from Q4 2014 Sensor module including status LEDs und microphone 3 1 3 4 3 5 3 2 3 6 3 3 ...

Page 43: ...am 50 mm 2 in 2 1 Sensor module housing LEDs Microphone LED default settings 1 Power on Error flashes 2 Recording flashes Diam 43 mm 1 7 in Diam 43 mm 1 7 int Sensor module housing Markers for top Sensor cable con nection Pressure compen sation 45 mm 1 77 in Diam 43 mm 1 7 in 15 mm 0 6 in Diam 43 mm 1 7 in 40 mm 1 6 in Sensor module weight without lock ring 111 g weight with lock ring 117 g Extens...

Page 44: ...L35 L76 L160 Item Number Part Name 3 1 1 Sensor module with affixed washer 3 2 1 L35 L76 L160 lens installed 3 3 1 Protective glass insert with coated glass installed 3 4 1 Cable retainer with bayonet catch installed 3 5 1 Sealing plug blue small installed 3 6 1 Nut plastic Sensor module including status LEDs und microphone 3 1 3 4 3 5 3 2 3 6 3 3 ...

Page 45: ...iam 50 mm 2 in 2 1 Sensor module housing LEDs Microphone LED default settings 1 Power on Error flashes 2 Recording flashes Diam 43 mm 1 7 in Diam 43 mm 1 7 in Sensor module housing Markers for top Sensor cable con nection Pressure compen sation 48 mm 1 89 in Diam 43 mm 1 7 in 15 mm 0 6 in Diam 43 mm 1 7 in 40 mm 1 6 in Sensor module weight without lock ring 122 g weight with lock ring 128 g Extens...

Page 46: ... 1 3 5 BlockFlexMounts L12 L23 L25 L38 L51 L76 L160 L320 Item Count Part Name 4 1 1 Housing MX BFM MX black anodized 4 2 1 MOBOTIX lens L12 to L320 installed 4 3 1 Cable lock with bayonet catch installed 4 4 1 Sealing plug blue small installed Available from Q4 2014 Sensor module with status LEDs and microphone 4 1 4 3 4 4 4 2 ...

Page 47: ...r image bor der North direction 40 mm 32 mm 32 mm 40 mm Microphone 4 holes 4 2 mm diam Status LEDs Connector for sensor cable Pressure vent 40 mm Arrows indicate top Measurements dep on Lens Lens D mm L mm L12 23 5 13 0 L25 22 0 17 0 L38 22 0 18 2 L51 20 0 11 7 L76 22 0 17 5 L160 22 3 17 8 L320 27 0 42 5 22 mm 40 mm 25 mm 8 mm L D 2 tap holes side M4 x 5 mm Lens ...

Page 48: ...otix com 1 3 6 BlockFlexMount CSVario L24 54 Item Count Part Name 5 1 1 Housing MX BFM CS black anodized 5 2 2 Spacer disc 0 25 mm thick 5 3 1 Cable lock with bayonet catch installed 5 4 1 Sealing plug blue small installed Sensor module with microphone 5 1 5 2 5 3 5 4 MX OPTCS L24 54 lens needs to be ordered separately ...

Page 49: ...ont View Back View Top View Top upper image bor der North direction 40 mm 32 mm 32 mm 40 mm Microphone 4 holes 4 2 mm diam Connector for sensor cable Pressure vent 40 mm Arrows indicate top 22 mm 37 6 mm 22 5 mm 8 mm 43 4 mm Ø 34 mm 2 tap holes side M4 x 5 mm Lens needs to be ordered separately Lock screw Allen wrench 1 5 mm ...

Page 50: ... 1 Housing MX SM Thermal L43 65 135 black anodized 6 2 1 Front plate aluminum black anodized installed 6 3 1 Pressure plate Ø 63 mm stainless steel installed 6 4 3 Cylinder head screws M4x50 mm stainless steel installed 6 5 1 Cable lock blue installed 6 6 1 Sealing plug blue small installed 6 7 1 Allen wrench 3 mm 6 8 1 Special export regulations German English 6 1 6 4 6 5 6 2 6 6 6 7 6 8 6 3 ...

Page 51: ...upper image bor der North direction Ø 57 mm 2 44 in Ø 63 mm 2 48 in Front plate Ø 57 mm visible Pressure plate Ø 63 mm behind wall faceplate Arrows indicate top Connector for sensor cable Pressure vent 60 mm 3 cylinder head screws 78 mm 12 5 mm 3 5 mm 17 mm Thickness 0 to 14 mm Hole diameter Ø 48 mm Ø M4 length of thread 4 mm 3 cylinder head screws M4x50 mm ...

Page 52: ...tix com sales mobotix com 1 3 8 S15M On www mobotix com got to Products S15 FlexMount and open the basket It contains the Product Configurator Use this to order the required parts in any of the available colors M 6 2 1 2 13 M 3 M 2 M 1 2 10 2 9 2 8 2 5 2 6 2 12 M 7 2 2 2 11 2 4 2 3 2 7 M 5 M 4 M 10 M 9 ...

Page 53: ...yonet catch Ethernet patch cable installed 2 10 1 Single wire plug white Ethernet installation cable microphone speaker MxBus 2 11 1 MicroSD card 4 GB installed 2 12 1 Rotary plug SD card blue installed 2 13 1 Ethernet patch cable 50 cm with seal Montagezubehör Item Number Part Name M 1 4 Stainless steel washers diam 4 3 mm M 2 4 6 mm screw anchors M 3 4 Stainless steel wood screws 4x40 mm with PZ...

Page 54: ...wing external connections that can be accessed once the cover plugs are removed The external connections may only be used with the designated sealed MOBOTIX cables MX OPT CBL LAN 1 2 5 10 Ethernet patch cable and MX MX CBL_MU_STR 5 MiniUSB cable Pressure compen sations Lens with dome Base plate R L 2 1 LEDs MicroSD Card Keys Triple cable retainer Bayonet catch S15Mhousing cover LED default setting...

Page 55: ...g cover are removed Before laying the Ethernet installation cable remove the bayonet catch and replace the Ethernet patch cable plug with either one of the additional plugs M 4 5 or the single wire plug 2 10 depending on the cable used Ethernet installation cable or MxBus microphone speaker MOBOTIX RJ45 or MxBus microphone speaker LSA terminal Ethernet installation cable Screw terminals MxBus micr...

Page 56: ...nsions S15M Attaching the Camera Housing The drilling templates can be found at the end of the manual Always print or copy drilling template in their original size 115 mm 4 53 in 100 mm 3 94 in M6 Diam 5 5 mm 0 22 in 130 mm 5 12 in 47 5 mm 1 87 in 100 mm 3 94 in 110 mm 4 33 in 8 5 mm 0 33 in 13 5 mm 0 53 in M6 threaded holes Slots ...

Page 57: ...57 160 Delivered Parts and Dimensions MOBOTIX AG Security Vision Systems Made in Germany www mobotix com sales mobotix com 33 5 mm 1 32 in 39 5 mm 1 56 in 48 mm 1 89 in 5 mm 0 2 in ...

Page 58: ...isible area and the other one for insert ing on the rear 1 4 3 Connection Cable for Sensor Module Order No MX FLEX OPT CBL 05 1 2 This cable which is up to two meters long connects one sensor module to the S15D The seals integrated into the cable combine with the bayonet catch on the sensor module and the sealed port of the S15D to pro vide IP65 compliant weatherproofing Also included are two hing...

Page 59: ...ltage sources This is a multifunctional PoE injector according to the IEEE 802 3af standard with three connectors for network camera PoE device PC universal power supply unit with interchangeable adapter plugs and crossover function The NPA PoE Set connects and remotely supplies an S15 with power via an Ethernet cable up to 100 m in length The blue adapter can also be connected to mobile voltage s...

Page 60: ...triggering of GPS based events reaching or moving away from a specified posi tion exceeding or not reaching a specified speed The MX GPS Box can be connected as an add on module to all MOBOTIX cameras with an MxBus interface The MX GPS Box has the same compact exterior housing as the MX Patch Box and the MX NPA Box IP65 protection class 30 to 60 C 22 to 120 F Note that this box should not be insta...

Page 61: ...oE to be set up via two wire cables which saves users from having to lay several hundred meters of Ethernet cable For example an existing two wire cable of an analog video camera can be reused to connect a high resolution and modern IP network camera Mx2wire is delivered in the standard wall outlet frame in different designs however it can also be used with the available on wall socket that is inc...

Page 62: ... image with up to 6 megapixels displays a much higher degree of detail than a camera with only one hemispheric lens To better support these types of installation MOBOTIX offers the SurroundMount installation option for the S15D Since both sensor modules are tilted downwards by 25 degrees the resulting images cover the entire area without any blind spots Note that you can use the SurroundMount only...

Page 63: ... 8 Ohms material of the speaker metal with perforated steel cover connection type two wire strand with luster terminal installation diameter 68 mm 2 7 in 1 4 19 PTMount Order no MX PTMount OPT PW MOBOTIX offers the high quality weatherproof PTMount an attractive compact discreet and dome shaped acces sory mount that holds a single sensor module and is adjustable in three directions The maximum fle...

Page 64: ... sales mobotix com THE MOBOTIX INFORMATION CHANNELS MOBOTIX Support on the MOBOTIX Website www mobotix com other Support The MOBOTIX Video Tutorials www mobotix com other Support Tutorials Seminars on MOBOTIX Campus www mobotix com other Partners Seminars The MOBOTIX YouTube Channel www youtube com MOBOTIXAG ...

Page 65: ...at is visible or the full sensor image full image storage This also allows you to examine parts of an image or video that had not been visible in the live image section on display at the time of the recording Unlike in the camera systems from other manufacturers there is no need to buy an install additional software on your computer thanks to the MOBOTIX firmware that can be accessed directly in a...

Page 66: ...onvenient video search functions effective alarm handling automatic camera integra tion video storage on file servers as well as useful configuration and update wizards MxControlCenter Professional Video Management Proven worldwide in the most demanding video applications thousands of times over Unlimited number of users and cameras No license fees Individual user interface adaptable to each indiv...

Page 67: ...the configuration of the corresponding camera The calendar functions integrated in the Alarm Planner provide an innovative tool for the scheduled settings of one or more cameras This tool not only controls video and sound recording based on certain time and date information but also allows features like video motion detection image brightness and the microphone to be activated deactivated based on...

Page 68: ...ers to work with professional security equipment In addition using mobile devices to operate the various functions such as door opening activating the voice mailbox switching the door bell off at night and switching a light on off creates added value in the form of greater convenience and security in every day life MOBOTIX App Mobile Remote Station for MOBOTIX Cameras and Door Stations Bandwidth o...

Page 69: ...69 160 MOBOTIX Software MOBOTIX AG Security Vision Systems Made in Germany www mobotix com sales mobotix com Notes ...

Page 70: ...tact your MOBOTIX partner or MOBOTIX Support directly Contact information can be found at www mobotix com under Support 2 1 Determining the Installation Position The installation options indicated in both the following sections are examples of the most common applications for a S15 FlexMount Many other installation ideas for example with customized lens units can also be successfully implemented t...

Page 71: ...ven at distances of 5 m 16 4 ft and more from the camera Ceiling Mounted A single S15 sensor module can monitor an entire room right into each of the four corners 360 Panorama View thanks to its hemispheric lens The camera should ideally be positioned on the ceiling in the center of the room Rooms with a square floor area of up to approx 40 m generally allow the recognition of detail even at the b...

Page 72: ...ion has been clipped This is not the fault of the camera but intended behavior that aims at achieving the best possible utilization of the image sensor by the camera software Bearing this in mind it is advisable to turn the S15 sensor module in rectangular rooms so that the area marked with two arrows or the rotary plug in a S15M top border or North of displayed image is pointing towards one of th...

Page 73: ...on an inside or outside wall The entire hemisphere of the room directly in front of the camera is then effectively monitored from the wall on the left of the camera to the wall on the right Corresponding fine tuning in the user interface software allows the displayed panorama image to be adjusted to different practical applications at any time 15 wedge for sen sor module S15M panorama one camera t...

Page 74: ... arrows on the back of the sensor module housing S15D or the rounded side of the camera housing S15M are pointing towards the ceiling To install the sensor module on thicker walls or with the 15 wedge see next section the MOBOTIX offers an extension that is attached to the sensor module at the back and secured with a bayonet catch 1 50 m 5 ft 3 m 10 ft 2 5 to 3 5 m 8 2 to 11 5 ft 5 m 16 4 ft Camer...

Page 75: ...the lens will return better results as the center of the lens is then focused more directly on the center of activity in the room optimal utilization of lens capabilities MOBOTIX therefore offers easy to install mounting accessories with a 15 tilt for the S15D sensor modules Size of the Drilling Holes with Different Material Thicknesses Material thickness a Diam of drilling hole b mm in mm in 5 0 ...

Page 76: ...nes are not used an additional microphone can also be connected directly to the camera Hemispheric Day and Night Camera S15D with Sensor Modules D12 and N12 The S15D is the first hemispheric dual camera for use in extremely variable lighting condi tions equipped with two L12 lenses each with a black white and color sensor It is impor tant in terms of mounting whether on a wall or ceiling that both...

Page 77: ...ling panel connector and lock It should be ensured when selecting installation sites that each of the sensor cables do not exceed 2 m 6 6 ft The theoretical maximum distance between the two sensor modules of a S15D where the base module is placed centrally is therefore 4 m 13 1 ft Caution If there is a risk of water collecting on the back of the sensor modules for example in outdoor areas or in th...

Page 78: ...dules next to one another but pointing in opposite direc tions in particularly long narrow rooms for example hotel corridors buses aircraft railroad cars etc delivers double hemispheric images of up to 6 megapixels that in terms of sharpness of detail significantly outperforms a single hemispheric camera with just one lens For these kinds of installations MOBOTIX will soon offer an appro priate mo...

Page 79: ...ccessory MOBOTIX also offers the appropriate installation accessories for mounting the sensor module on thicker walls Longer tunnel holes through a wall can also be bridged using several extension pieces each approx 40 mm 1 6 in The maximum wall thickness is therefore only limited by the length of the sensor cable depending on the installation position of the base module which is in theory 2 m 6 6...

Page 80: ...r and the area outside the entrance with stand up tables Floor Mounting Mounting sensor modules on the floor can also make sense for industrial uses or in areas where there are no people Examples of such uses are vehicle ramps where the vehicles can also be easily captured from below Indoors Outdoors S15D simultane ously monitors indoor and outdoor areas Place sensor modules centrally between the ...

Page 81: ...cture or device Mounting the Sensor Modules with the PTMount The PTMount provides for flexible weatherproof and tamper proof installation of MOBOTIX sensor modules Its three axes of rotation allow installing the sensor module at any given structure and pointing it into any viewing direction This means that you can install the PTMount to any ceiling wall and even upright More information www moboti...

Page 82: ... The housing can be installed by affixing suitable screws M4 4 mm length of thread in at least two of the six tap holes Remove pressure plate and cylinder head screws For additional information on the MOBOTIX thermal sensor modules and the Quick Installation see www mobotix com Products Cameras S15 FlexMount Front plate Pressure plate Hole diameter Ø 48 mm Two tap holes on right hand side of housi...

Page 83: ...nd opening measuring 34 mm 1 34 in The S15M can simply be fixed behind the wall and leave only the lens visible This allows the following installation options Wall and ceiling mounting behind correspondingly thin or countersunk panels cover plates Individual mounting solutions such as installation in industrial equipment paneling air ducts mail boxes homemade mounts etc Note on AudioMount This ins...

Page 84: ...allation cable can also be fitted directly onto the integrated LSA cutting clamp MOBOTIX USB cable with MiniUSB connector This MOBOTIX cable provides the required impermeability even in adverse weather conditions and thereby prevents corrosion of the connectors for example on an external USB hard drive Sensor cable for the sensor modules S15D only The sensor modules are con nected to the S15D via ...

Page 85: ...n Reduced Weather Protection If you are installing the S15 upside down i e the connectors are pointing upwards the camera does not reach protection class IP65 any more but only IP54 If mounted upside down the S15 can only be used in a dry indoor environment Removing MOBOTIX Cables and Plugs The corresponding lock must first be removed or released to remove one of the cables or plugs indicated abov...

Page 86: ...g a MOBOTIX PoE adapter or another similar high quality PoE product to loop in the power supply One camera with the PoE adapter MX NPA PoE or MX NPA Box Multiple cameras with PoE products conforming to IEEE 802 3af PoE switch The maximum length of the network cable for power supply over an Ethernet cable is 100 m 110 yd Make sure that you only use switches or routers that support the 10 100 Mbps n...

Page 87: ... and the blue sealing plug in the right hand connector on the box to establish the network connection to an MX Patch Box or MX NPA Box Then insert the MOBOTIX patch cable into the box and secure the cable using the bayonet catch More information on installing an MX Patch Box or MX NPA Box is available at www mobotix com under Products Accessories Functional Boxes Insert the MOBOTIX patch cable of ...

Page 88: ...eft hand connector must be removed for this purpose The single wire plug or one of the other cable plugs M 4 5 is then pushed into the opening depending on the cable used The bayonet catch will no longer be used The cable used must be fixed to the base plate using one of the cable ties supplied M 9 to ensure that less strain is placed on the cable The individual cable wires must be fixed on the sc...

Page 89: ...ole in the plug Do not mix up the polarity of the cables during installa tion Select a consistent cable color for in the entire MxBus system for example red blue Nach dem Anschließen eines MxBus Moduls muss zunächst der MxBus selbst sofern noch nicht geschehen als auch das Modul selbst in der Benutzeroberfläche der Kamera im Browser in Betrieb genommen werden Admin Menu Hardware Erweiterungen verw...

Page 90: ...erted The card is now locked and can be used If you are using a new MicroSD card it needs to be formatted first see Section 3 5 2 Formatting the MicroSD Card 4 Attach the rotary plug Insert the rotary plug as shown and screw it tight using a coin approximately two turns the plug slot is pointing forwards 2 2 10 Tools Required for Installation Please make sure that all the camera components are inc...

Page 91: ...able The network connector has been guided either with an MX Patch Box an MX NPA Box or a standard network port only permitted in indoor areas into the vicinity of the mounting position of the camera Connection with installation cable If a network installation cable is used instead it may not conduct any voltage and may not be connected to the network Even surface Make sure before attaching the ca...

Page 92: ... screws is 0 4 Nm Only exchange sensor modules when powered off Make sure that the camera s power supply has been disconnected before attempting to exchange any sensor modules 2 3 1 Attaching the S15D Base Module Depending on the system the base module of a S15D can be installed quickly 1 If necessary mark the drill holes at the intended mounting position drill the holes for the base plate and ham...

Page 93: ... 1 Drill the hole for the sensor module at the intended mounting position arrow on the back of the sensor module pointing Up 2 Connect the sensor cable to the sensor module turn the blue bayonet catch to the left and lift off remove the plug insert the sensor cable replace the bayonet catch and turn to the right Make sure that the sensor cables are not sharply bent anywhere 3 Attach one ferrite at...

Page 94: ...ed the sensor cable through the nut and secure the sensor module and mounted extensions using that nut If you need to seal off the sensor module against the wall you should apply silicone sealant before tighten ing the nut 9 Attach the sensor cable of the first sensor module to the Cam1 connector and the sensor cable of the second sensor module to the Cam2 connector of the S15D pull the blue tripl...

Page 95: ...xtensions are always connected as described in Step 2 Attaching the extensions incorrectly will damage the bayonet catch and may result in the nuts not being properly attached Removing Extensions Proceed as follows to loosen and undo an extension lock 1 Push the extension towards the sensor module to unlock it 2 Turn the extension in an anti clockwise direction viewed from the back to open the bay...

Page 96: ...one speaker before mounting the camera as described in Section 2 5 Network And Power Connection Additional Cables 2 4 2 Attaching the S15M Camera Housing Use the drilling template supplied at the end of this manual to mark the position of the drilling holes for the camera Make sure that it is not scaled down when printing or copying the drilling template Caution Make sure the camera is mounted on ...

Page 97: ...e cables Attachment Behind Screens Walls or Ceiling Elements This type of mounting can be completed using various attachment elements Bonded nuts with stud bolts nuts and washers as shown in the illustration Thicker materials greater than 6 4 mm 0 25 in need to be machined accordingly in order to accommodate the camera housing They can then be attached using anchor nuts or screw sockets as well as...

Page 98: ...IX patch cable into the camera and secure the cable using the bayonet catch Connecting the Patch Cable to an MX Patch Box MX NPA Box or Standard Network Port First remove the blue bayonet catch and the blue sealing plug in the right hand connector on the box to establish the network connection to an MX Patch Box or MX NPA Box Then insert the MOBOTIX patch cable into the box and secure the cable us...

Page 99: ...he shield mesh around the sheath to a width of 10 mm 0 4 in so that it can be fixed on the contact surface later using the cable tie 4 Secure the cable Push the plug out and insert the installa tion cable with single wire plug 5 7 mm 0 2 to 0 28 in into the opening intended for the instal lation cable The rubber sleeve must sit tightly on the installation cable to prevent the penetration of moistu...

Page 100: ...offcuts are removed from inside the camera If not this could lead to short circuits Hint Hold the cable ends firm before cutting them with the LSA tool If additional cables are required inside the housing MxBus microphone speaker they must be connected as described in Section 2 5 3 Connecting Additional Cables Only use the LSA Krone blade and set to LOW impact ...

Page 101: ...ne speaker 1 Replace any single wire plugs with appropriate cable plugs M 4 5 for additional cables Additional cables MxBus microphone speaker 1 Remove the bayonet catch and the patch cable and push the single wire plug or appropriate cable plug M 4 5 in so that the edges protrude inside The bayonet catch will no longer be used 2 Push the single wire plug with the individual wires through or push ...

Page 102: ...r or the Ethernet port 3 Plug the RJ45 connector of the power supply unit into the PC Power connector of the PoE adapter The IP addresses in the diagram are shown only as an example For the S15 you should use the blue MX NPA PoE Set or the MX NPA Box previous MOBOTIX network power acces sories such as the NPA Set Power Box and Power Rack MX NPA Set MX NPR 4 and MX NPR8 20 are not suitable for use ...

Page 103: ...le of the camera to the Ethernet connector of the PoE switch router The switch router must support the PoE standards IEEE 802 3af or IEEE 802 3at The IP addresses in the diagram are shown only as an example PoE adapter MX NPA PoE Power supply unit PC 10 8 0 11 255 0 0 0 LAN Power PC Power Camera RJ45 RJ45 RJ45 Camera 10 8 0 99 The PoE adapter replaces the crossover cable when directly connect ing ...

Page 104: ...er provided by the PoE switch for the specified class the switch can disconnect the camera from the power supply In this case the camera will only be accessible again once the peripheral devices have been disconnected from the camera and the camera has been restarted When using thermal sensor modules on an S15D which had been set to PoE Class 2 before you need to set the camera to use PoE Class 3 ...

Page 105: ...p operating system Waiting for key pressed Both LEDs light up for four seconds If you press the R or L key of the camera during this time the camera will execute the corresponding function see Section 3 2 5 Starting the Camera with the Factory IP Address and Section 3 2 6 Starting the Camera with an Automatic IP Address DHCP Ready Once the camera software has been started the green LED is on perma...

Page 106: ...up the camera s network parameters Manually using a web browser see Section 3 2 1 Automatically using MxControlCenter MxEasy see Section 3 2 3 and Section 3 2 4 or via DHCP see Section 3 2 6 3 Configure the camera using the web based user interface MxControlCenter or MxEasy Every MOBOTIX camera comes preconfigured with a static IP address in the 10 x x x range for example 10 8 0 99 However local c...

Page 107: ... the Most Important Settings in the Browser Next click on the Admin Menu button to open the camera s Quick Installation in the browser s user interface This is where you can configure the desired network parameters of the camera Once you have completed the Quick Installation you can connect the camera with its new network parameters to the desired network Benefits The camera does not need to be ph...

Page 108: ...of a MOBOTIX camera that is not operating in the same IP address range as the computer Benefits You can connect the camera directly to the target network The camera does not need to be physically accessible that is it can remain mounted to a pole for example The camera can be configured to automatically receive an IP address optional The network parameters can be manually set optional You do not n...

Page 109: ...ted using DHCP see Section 3 2 6 Starting the Camera with an Automatic IP Address DHCP The IP address automatically assigned by the DHCP server will be announced via the camera speaker as soon as the camera has booted successfully Benefits You can connect the camera directly to the target network Network parameters are automatically assigned No additional software is required You do not need to ac...

Page 110: ...lowing exam ples Replace this IP address with the IP address of your camera You will find the IP address of your camera on a small sticker on the camera Make sure that the IP addresses used in the following examples are not already being used by other devices in the network 3 2 1 Manually Setting Up the Network Parameters in a Browser You need a computer that is using a 10 x x x IP address in orde...

Page 111: ...ing Enter displays the user interface of the MOBOTIX camera see also Section 3 2 2 First Images and the Most Important Settings in the Browser 2 Click on the Admin Menu softbutton in the user interface of the MOBOTIX camera The Quick Installation starts automatically once the admin user has logged on Note The Quick Installation can also be executed at a later stage by opening Admin Menu Network Se...

Page 112: ...r any other graphical browser with activated JavaScript is suitable It does not matter which operating system is used After entering the camera s IP address in the browser address bar you will see the live view of the MOBOTIX camera with its user interface controls such as softbuttons buttons for the different camera screens pull down menus Quick Controls icons for accessing the online help and th...

Page 113: ...ltiView screen displays several cameras with live or recorded images MultiView allows you to view several cameras via a proxy camera especially useful if you want to access your cameras from outside of the network with reduced bandwidth and the PDA mode provides a special screen for mobile devices Note Click on the icon in the top right corner of the camera s user interface in the browser to find ...

Page 114: ...older versions will be removed automatically and the shortcuts are created during the installation process Desktop Start Menu etc Caution MxControlCenter will automatically attempt to find all MOBOTIX cameras in the physically connected network that is even a MOBOTIX camera with a factory IP address of 10 x x x Make sure that the firewall settings on your computer are low enough so that MxControlC...

Page 115: ... for MOBOTIX cameras in the local network when you launch the program for the first time Select Video Source Add from the menu to perform a camera search at a later time If your MOBOTIX camera is properly connected it should appear together with the exist ing video sources in the following list Note Video sources in this context not only refer to MOBOTIX cameras but also to third party IP cameras ...

Page 116: ...live image is automatically displayed in the preview window when a camera is selected to help you identify the cameras For cameras marked with Different subnet or if you want to add additional video sources follow the instructions in the following sections You can also display the selected cameras directly in a layout For more information see section Creating a New Layout Reconfiguring Cameras in ...

Page 117: ...orrect network settings even after they have been rebooted Click OK to close the dialog box Wait until MxControlCenter has changed the network settings and rebooted the cameras The status of the reconfigured camera changes from Different subnet to OK Defining Additional Video Sources In addition to the MOBOTIX cameras that are found automatically you can also manually add video sources to the list...

Page 118: ...ion at that time It is also possible to open the Configure selected cameras dialog box using the shortcut menu in order to change the camera network parameters Creating a New Layout Select the camera or other video sources that you would like to display in a layout a view with a group of selected cameras in the Add video sources dialog box and then click Add selected video sources The Create new l...

Page 119: ...n a list The camera list will be updated automatically as soon as new MOBOTIX cameras are con nected to the local network or removed from the network MxEasy also automatically monitors and displays the operating status of all cameras Cameras that are not on the same subnet as the computer will get a differently colored symbol than the cameras that are on the same subnet Likewise the cameras that h...

Page 120: ...n click Continue After a security prompt a new dialog box for configuring the selected camera is displayed If your computer automatically obtains its IP address from a DHCP server then this is certainly the best choice for that specific camera and most likely for all other cameras that have been found in a different subnet Get IP address automatically option If you have assigned a static IP addres...

Page 121: ...egration and complete the remaining dialog boxes of the MxEasy Assistant until the main window appears If one of the integrated cameras includes a S15D the MxEasy Assistant opens an additional page where you can specify the mounting positions Ceiling Wall Floor and display modes Panorama Surround etc of the individual sensor modules After you are done with the MxEasy Assistant the application s ma...

Page 122: ... is blinking three times if you need to try again go back to Step 1 4 If a speaker is attached to the camera the camera emits a single sound boing after about 30 to 45 seconds The camera has finished booting and can now be used e g MxEasy MxControlCenter MOBOTIX App web browser Notes If you use the camera s L key to load the factory network configuration this configu ration is not automatically sa...

Page 123: ...d hold it down until the LED next to the key is blinking three times if you need to try again go back to Step 1 4 If a speaker is attached to the camera the camera emits a double sound boing boing after about 30 to 45 seconds The camera has finished booting and can now be used e g MxEasy MxControlCenter MOBOTIX App web browser Notes Starting the camera with an automatic IP address DHCP is only tem...

Page 124: ...according to the camera s live image on the computer monitor To do so position the black module wrench with the ring pattern side on the lens and carefully rotate to the right or left Do not turn the lens too far or with force to avoid damaging the image sensor 3 If required clean the inside of the protective glass lens using a clean lint free cotton cloth 4 Place the protective glass lens on the ...

Page 125: ...wrench to the left until you feel a stop max 300 and then a little bit further until the protective glass lens slides out of the sensor module 2 If required clean the inside of the filter using a clean lint free cotton cloth 3 Place the filter on the notches of the blue lens wrench 4 Position the filter with its clips over the two recep tacles on the sensor module red arrow on the image in the mar...

Page 126: ...Z function of the S15 can be controlled in the browser using the mouse This posi tion becomes the new image center by clicking on any position on the image displayed on the monitor The image moves accordingly and the image distortion is automatically corrected The scroll wheel can be used to control the zoom function This functionality is disabled in the default settings of the camera and must the...

Page 127: ...r in the Quick Control Under Browser select the option ActiveX in the field to the right The USB joystick can then be used until the browser is closed To store the setting permanently ActiveX must be activated in the Admin Menu To do so use Language and Start Page in the Admin Menu Under the page options select the ActiveX operating mode Store the settings permanently in the camera by clicking on ...

Page 128: ...The main advantage of full image recording lies in the special functionality of the S15 in that it can always maintain availability of a maximum size full image for later investigation despite vPTZ actions carried out on the live image The mechanical limitations of motor driven PTZ cameras mean that they simply cannot provide this unique advantage to the user Notes Post event search in the full im...

Page 129: ...ty Vision Systems Made in Germany www mobotix com sales mobotix com Activate Deactivate Full Image Recording in the Browser To configure this feature open the Setup Menu Event Control Recording dialog box and activate or deactivate the Full Image Recording option ...

Page 130: ...the available display modes and configuration possibilities by using the MOBOTIX S15D with different sensor modules Because of this a S15D automatically detects which sensor modules are installed and proceeds as follows When the camera is started for the first time it detects the connected sensor modules and captures their data focal length day or night version If only one sensor module is connect...

Page 131: ...ientation of the camera or sensor module is from top to bottom and for Floor the camera or sensor module s orientation is from bottom to top When you are setting up a S15D with two sensor modules specify their mounting positions separately in the Installation right and Installation left Quick Control fields for the right and left sensor modules i e camera images respectively As a result you will g...

Page 132: ...nue with Step 2 Note The currently visible image section may differ from the desired image section due to the installation position or any accessories in use for example However it is not necessary to physically move the camera as in this case the browser alone can be used to adjust the visible panorama image by zooming panning and tilting Tilted vertical lines may also be optically straightened t...

Page 133: ...Screen Control appears 4 Using the OnScreen Control visible in the live camera image you can now change the displayed live camera image as desired panning tilting zooming rotating and panorama correction see fig on the right When doing so the vPTZ function using the mouse or joystick is deactivated In case of a S15D with two sensor modules click on the corresponding camera image right left to edit...

Page 134: ...e left and or right of the center point The same applies for every area The further away that you click from an area s center point the greater the change triggered To reset an area click on its center point again During panorama correction clicking between the two trapezoid symbols straightens the left or right tilting lines which are best visible at the edges of the image section Image tilt corr...

Page 135: ...of sight or the focus of the camera or sensor module It serves as a reference for the North direction in the Surround and Double Panorama display modes the Ceiling option was already selected in the Installation Type Quick Control 1 In the case of a double image click on the corresponding sensor module camera image and select the Normal option from the Display Mode Quick Control 2 Rotate the live ...

Page 136: ... North option 4 Store the desired North direction permanently by first activating the checkbox and then clicking on Yes 5 You have now set the North direction for the Surround and Double Panorama display modes In the next step you can set these views as the standard view for the camera live image Caution No OnScreen Control is available in Double Panorama mode East South North West ...

Page 137: ...and close lock again Camera Images and Subviews of Camera Images The ability of the S15D to operate multiple sensor modules means that in double image display the live image s camera images left right can be used for differing display modes Depending on the display mode selected for each camera image this may be divided into subviews When you click inside one of the subviews this area is highlight...

Page 138: ...r Configuration dialog box in the following cases Swapping the displayed camera images You wish to display the left camera image on the right and vice versa without having to replug the sensor module cables on the camera itself Replacement of sensor modules In this case the S15D detects after startup that the sensor modules have been replaced and indicates this through an alert super imposed on th...

Page 139: ...Section 2 2 8 External Audio Support Microphone Speaker Microphones for the S15D With this camera you can either use an external microphone or the connected sensor modules built in microphones or just one of these If the microphones of both sensor mod ules are used the camera records the sound of both microphones to a single audio track Microphone for the S15M You have to use an external microphon...

Page 140: ...n MOBOTIX cameras can constantly monitor activated flash storage devices MOBOTIX has developed a technology to test the wear of the flash device by logging the number of write delete cycles patent pending The flash memory wear is automatically displayed in the status bar in the live camera image but it can also be viewed at any time in the Admin Menu Camera Status dialog box Low Memory Usage Thank...

Page 141: ... cycle 12 hours 4 hours 14 4 hours 9 2 hours 4 4 hours Caution The MicroSD card s service life depends on production quality and frequency of use Set the type of recording event controlled or continuous recording frame rate resolution according to your specific requirements We recommend changing the pre installed high quality 4 GB MicroSD card once a year if you have it constantly set to continuou...

Page 142: ... the user name and the password of a user of the admins group and click OK to confirm The MOBOTIX camera now starts format ting the card It takes 5 to 12 minutes to format an 8 GB MicroSD card if the Secure deletion Slow option is disabled If Secure deletion Slow is enabled this may take anywhere between 3 and 14 hours Once the formatting has been completed you can activate the MicroSD card for re...

Page 143: ... target If not you must activate the recording see below Activating the Recording If the FR REC symbols are not visible in the live image after rebooting you need to activate the recording using one of the following methods In the web browser Automatic activation by clicking on the Arm Record softbut ton Confirm this in the Easy Dialog by clicking on the Yes button In the web browser Manual activa...

Page 144: ...enter If the recordings stored on the MicroSD card were encrypted you need to enter the password used for the encryption before you can access the data If this is the case both MxControlCenter and MxEasy will provide a dialog box for this purpose Caution When using the MicroSD card from one MOBOTIX camera in another MOBOTIX camera you need to make sure that the time on the original camera is in sy...

Page 145: ... camera Once MicroSD card recording has been activated requires a reboot the new MOBOTIX camera automatically synchronizes with the card and resumes recording No data is lost in this process Make sure that you deactivate MicroSD card recording before removing the card from a MOBOTIX camera and then reboot the camera If the MicroSD card s contents are encrypted you need to enter the same password i...

Page 146: ... as Windows Linux Apple etc The camera provides a HTML based user interface for this purpose The camera executes the changes you make to the camera configuration via HTTP commands using programs and scripts of the embedded software The settings are stored in the camera s flash memory This section contains an overview of the basic browser settings of the MOBOTIX camera as well as further configurat...

Page 147: ...y implement the change when you click Close you will be asked to store the complete configuration in the camera s permanent memory or in the Admin Menu Admin Menu Store current configuration into flash memory The Configuration section of the Admin Menu provides more functions for storing copying and managing camera settings For more information on this topic refer to the online help for the specif...

Page 148: ...tomatic reboot if this is not desired Admin Menu Time Tasks Optimize the image settings The factory image settings of MOBOTIX cameras deliver excellent images for most application scenarios and should therefore not be changed If you do wish to make changes your changes should be minor and gradual You should however set an image program according to the application scenario of the camera Image prog...

Page 149: ...or all IT and Secure models If for example the camera s housing receives a blow it automatically registers it and sends a notification via a network message or telephone call A general advantage is that MOBOTIX cameras are extremely tough because of the absence of mechanical moving parts This allows them to stay fully operational when they are subject to strong vibrations Open the Setup Menu Event...

Page 150: ... BellRFID bell button module with different button sets for the IP Video Door Station one to five buttons with or without function button including transponder cards for keyless entry and operating the mailboxes This module is connected to the MxBus interface of the S15 using a two wire cable cannot be used together with KeypadRFID KeypadRFID keypad module for the IP Video Door Station which is us...

Page 151: ...nnected to the S15 you can launch the auto configuration to set up the S15 as a door station Starting the Auto Configuration 1 Remove the power supply of the camera then restore the power supply The camera will execute a reboot and the LEDs next to the camera keys are lighting up green and red 2 Press both keys on the camera front R L and keep them pressed until the LEDs are flashing several times...

Page 152: ...s just like with a regular IP Video Door Station without a computer using a Grandstream video phone as remote station or with a computer using MxEasy or a web browser 3 7 3 Setting Up an S15 as a Door Station As an alternative to using the auto configuration of the camera as described in the last section you can also use MxEasy to configure an S15 as a door station just like when setting up an IP ...

Page 153: ... of the camera Admin Menu softbutton is only possible after entering a user name and password Factory default user name is admin Factory default password is meinsm The Quick Installation assistant automatically appears when the Admin Menu is accessed for the first time It provides an easy method to adjust the basic camera settings to the current application scenario For security reasons we highly ...

Page 154: ...d a camera without any information or you would like to reset all settings after testing the camera In order to perform this procedure you need to have administrative access to the camera admins group Open Admin Menu Reset to reset the camera to factory defaults Note All defined users are deleted and the admin password is reset to the factory default when you reset the camera using Admin Menu Rese...

Page 155: ...utomatic reboot will refresh the camera s memory and will ensure proper operation without requiring any interaction on the part of the user If desired you can deactivate the automatic reboot of the camera in the Admin Menu Time Tasks dialog box 3 8 10 Browser Current Internet browsers Internet Explorer Mozilla Firefox Safari Google Chrome Opera etc with enabled JavaScript can display the camera s ...

Page 156: ...ith all valid regulations and comply with these laws MOBOTIX AG is not liable for any illegal use of its products 3 8 13 Safety Warnings Installation Instructions This product must not be used in locations exposed to the dangers of explosion Make sure to install this product as shown in Chapter 2 Installation of this manual When installing this product make sure that you are only using genuine MOB...

Page 157: ...rotection laws The operator is responsible for the data protection concept across the entire system The basic settings required to prevent misuse can be configured in the software and are password protected This prevents unauthorized parties from accessing these settings 3 8 14 Online Help in the Browser For more information see the News and Functional Overview pages in the online help of the came...

Page 158: ...oduct contains a battery please dispose of the battery separately the correspond ing product manuals contain specific directions if the product contains a battery 3 8 17 Disclaimer MOBOTIX AG does not assume any liability for damage that is the result of improper use of its products or failure to comply with the operating manuals or the applicable rules and regula tions Our General Terms and Condi...

Page 159: ...AG Kaiserstrasse 67722 Langmeil Germany Phone 49 6302 9816 103 Fax 49 6302 9816 190 www mobotix com sales mobotix com Registration Office Kaiserslautern Local Court Registration Number HRB 3724 Tax Office Worms Kirchheimbolanden Germany Tax Code 44 676 0700 4 VAT ID DE202203501 You can find the latest version of this and other documents e g declarations of conformity at www mobotix com in the Supp...

Page 160: ...pt has made high resolution video systems cost efficient MOBOTIXAG D 67722Langmeil Phone 49 6302 9816 103 Fax 49 6302 9816 190 sales mobotix com Discreet Flexible Hemispheric With the S15D FlexMount two sensor modules featuring microphones are connected to a concealed camera housing via cables up to 2 m 6 6 ft long Two adjacent rooms can be discreetly monitored with just one camera up to 2 m 6 6 f...

Reviews: