background image

© MOBOTIX AG  •  Security-Vision-Systems  •  Made in Germany

www.mobotix.com  •  [email protected]

19

/56

MOBOTIX CamIO User Manual

Summary of Contents for CamIO

Page 1: ...t IP Telephony alarm notify cam remote control lip syncronized audio Recording event ringbuffer 30 cams each 30 fps Backlight safe using CMOS without mechanical iris Video motion multiple windows prec...

Page 2: ...om Caution Only qualified personnel may install and open the CamIO and con nect it to the mains power make sure that the relevant regula tions of your country are respected It is imperative that all e...

Page 3: ...te 16 2 1 4 Connectors and Wiring 20 2 2 Information on Connecting the MOBOTIX CamIO 22 2 3 Mounting the CamIO Wall Mount and the Control Cable 24 2 3 1 Mounting with an M12 Camera 24 2 3 2 Mounting w...

Page 4: ...ad the latest versi on of this document as a PDF file from www mobotix com Support Manuals Note Download the latest version of this document as a PDF file from www mobotix com Support Manuals Informat...

Page 5: ...MOBOTIX AG Security Vision Systems Made in Germany www mobotix com sales mobotix com 3 56 MOBOTIX CamIO User Manual Notes...

Page 6: ...amera The second signal output can be used for potential free switching of another external device e g door opener max 230V or 48V 68V depending on the CamIO model This signal output can also be used...

Page 7: ...mIO PoE but it can be con nected directly to utility power 230 V 115 V and can power one external device with up to 230 V current Ohm resistive load max 5 A max 500 W lamp on 230 V max 300 W on 115 V...

Page 8: ...230 V 115 V at terminals 1 and 2 required allowing you to switch this device from the MOBOTIX camera max 5 A max 500 W lamp on 230 V max 300 W on 115 V You can use the second signal output Out2 for p...

Page 9: ...In terminals of the CamIO the MOBOTIX camera will also use this input device It is likewise possible to connect the Line In terminals of the CamIO to the Line Out connector of a computer Weatherproof...

Page 10: ...IO POE CamIO AC Mx CAMIO AC 230 Mx CAMIO AC 115 CamIO ACplus Mx CAMIO ACPLUS 230 Mx CAMIO ACPLUS 115 Hardware Features Outdoor weatherproof IP65 IP65 IP65 Power Supply Integrated rechargeable battery...

Page 11: ...signal outputs and inputs of the cam era at the CamIO The different cameras require different control cables which need to be ordered separately Control cable for the MOBOTIX M12 Control cable for the...

Page 12: ...installation ca ble for connecting another relay or a signal line e g to an alarm system or an external sensor Connecting the Ethernet cable Make sure that you are using a suitable eight wire Etherne...

Page 13: ...sures regarding the cables as well as lightning and surge protection see further below in this section Wire lengths The cable segments must not exceed the maximum allowed cable lengths in order to ens...

Page 14: ...th of the cable to a MOBOTIX camera must be limited to 140 feet or less running outside of buildings The installation must comply with articles 725 and 800 of the National Electric Code 1 3 6 Charging...

Page 15: ...MOBOTIX AG Security Vision Systems Made in Germany www mobotix com sales mobotix com 13 56 MOBOTIX CamIO User Manual Notes...

Page 16: ...8 Cover for wall mount Cable seals 4x with 3 4x with 5 fingers 1 4 NET plug Allen screws M6x40 7 8 9 10 8 4 Washers 6 4 mm Wood screws 5x80 mm 4 4 Dowels 8 mm Screw caps for wall mount 11 12 13 14 2 1...

Page 17: ...Mount Foot CamIO Housing MOBOTIX AG Security Vision Systems Made in Germany www mobotix com sales mobotix com 15 56 MOBOTIX CamIO User Manual The additional speaker can currently only be used with M12...

Page 18: ...Housing MOBOTIX AG Security Vision Systems Made in Germany www mobotix com sales mobotix com 16 56 MOBOTIX CamIO User Manual The appendix of this man ual contains a 1 1 drilling template for drilling...

Page 19: ...of the MOBOTIX CamIO Housing with Wall Mount Foot MOBOTIX AG Security Vision Systems Made in Germany www mobotix com sales mobotix com 17 56 MOBOTIX CamIO User Manual 162 5 mm 6 5 in 136 mm 5 4 in 158...

Page 20: ...MOBOTIX AG Security Vision Systems Made in Germany www mobotix com sales mobotix com 18 56 MOBOTIX CamIO User Manual...

Page 21: ...MOBOTIX AG Security Vision Systems Made in Germany www mobotix com sales mobotix com 19 56 MOBOTIX CamIO User Manual...

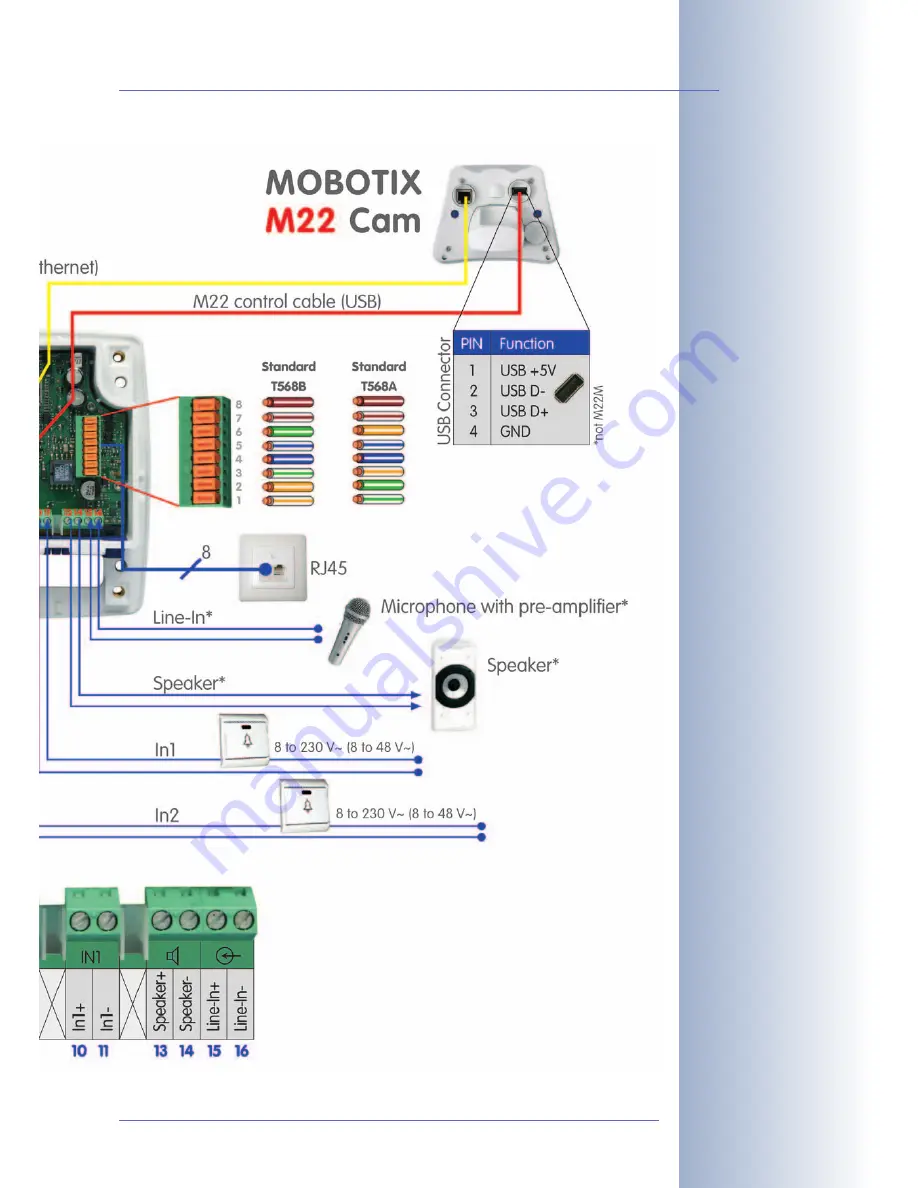
Page 22: ...t within the CamIO Terminal Part Name Remark 1 2 Phase conductor L Neutral conductor N Direct power supply for CamIO and Out1 3 4 5 6 Out1 L signal output 1 Out1 N signal output 1 Ext devices without...

Page 23: ...Vision Systems Made in Germany www mobotix com sales mobotix com 21 56 MOBOTIX CamIO User Manual AWG American Wire Gauge for measuring cable diame ters Variant B T568B Variant A T568A Terminal TIA 568...

Page 24: ...2 Simply replace the origi nal foot of the corresponding SecureFlex mount of the camera by the supplied foot of the CamIO wall mount MOBOTIX M12 with CamIO MOBOTIX M22M with CamIO MOBOTIX AG Security...

Page 25: ...es First mount the housing of the CamIO to a wall This step involves connecting the network cable and the power cable coming from the building infrastruc ture to the CamIO section 2 4 3 Connecting Ext...

Page 26: ...the original wall mount foot Remove the Allen screw of the bottom cover and take off the cover MOBOTIX M12 cameras feature a pre in stalled insect protection which effectively prevents small animals f...

Page 27: ...n tilt unit of the CamIO wall mount foot Insert the supplied cover into the free opening of the CamIO wall mount foot Insert the turn tilt unit of the camera into the vertical opening of the mount all...

Page 28: ...the turn tilt unit of the camera Now guide the M22 control cable through the bent opening of the USB plug Attach the USB connector of the M22 control cable to the USB socket of the camera Push the US...

Page 29: ...nsert the Allen screw with washer and lightly fasten the screw so that you can still easily turn the cam era MOBOTIX AG Security Vision Systems Made in Germany www mobotix com sales mobotix com 27 56...

Page 30: ...sure that the installation cables are guided though the opening at the bottom of the CamIO and that the arrows next to the OBEN TOP label of the CamIO are pointing upwards Remove the lid of the CamIO...

Page 31: ...ernal device from the CamIO termi nals 3 and 4 the CamIO itself needs to be connected to the power supply terminals 1 and 2 This is possible on CamIO AC and CamIO ACplus models by directly connecting...

Page 32: ...ion since this may lead to corrosion of the cables The silicone compound and the cable seals will reliably protect the cables against mois ture Cable fingers Wires with insulation Bare wires Outer cab...

Page 33: ...6 MOBOTIX CamIO User Manual If the blue seal has been punctured at the wrong place you need to replace the entire hou sing to maintain the IP65 protection class If a power cable with ground conductor...

Page 34: ...Ethernet cable all the way into the terminals and observe the cor rect sequence while doing so Do not remove the insulation from any of the Ethernet wires Make sure that you are using the proper con...

Page 35: ...loads of up to 5 A Potential free switching of external devices with individual power supply and with loads between 100 mA and 5 A Connect external sensors to the signal inputs of the camera e g ligh...

Page 36: ...long the wires Make sure that you are respecting the minimum cable diameters 1 2 3 4 5 6 7 8 10 11 13 14 15 16 Terminal Part Name Remark 3 4 Out1 L signal output 1 Out1 N signal output 1 Ext devices w...

Page 37: ...MOBOTIX CamIO Connection Example MOBOTIX AG Security Vision Systems Made in Germany www mobotix com sales mobotix com 35 56 MOBOTIX CamIO User Manual...

Page 38: ...speaker which can be used for audio out put in connection with MOBOTIX M12 cameras This speaker has a higher output power than the camera speaker and is an excellent enhancement to the camera s audio...

Page 39: ...against moisture Connect the control cable from the camera to the re maining socket of the CamIO Install the cable and lock it in place using the supplied screw item 13 and the washer item 14 Press th...

Page 40: ...s spe cial precautions and measures regarding the cables as well as lightning and surge protection see section 2 7 3 Lightning and Surge Protection Wire lengths The cable segments must not exceed the...

Page 41: ...lding and the network infrastructure This includes surge protectors for 19 racks add ing an uninterruptible power supply UPS to the MOBOTIX camera and in stalling surge arresters or similar for router...

Page 42: ...Replacement housing for all CamIO models M12 Control Cable MX CAMIO OPT M12 Control cable for connecting the CamIO and an M12 camera M22 Control Cable MX CAMIO OPT M22 Control cable for connecting th...

Page 43: ...g off the Ethernet cable on M22M camera models M22 USB Plug Plug for sealing off the USB cable on M22M camera models Additional CamIO Speaker Replacement speaker with audio cables for the CamIO wall m...

Page 44: ...ed to activate the CamIO in the camera software Admin Menu Manage Hardware Expansions Activating the CamIO is a mandatory step for using all features of the CamIO MOBOTIX AG Security Vision Systems Ma...

Page 45: ...e on the receptionist s computer signals an inbound video phone call from the corresponding camera at the entrance The receptionist accepts the call and can talk to the guest at the entrance using the...

Page 46: ...Out1 Additional lighting Terminals 5 and 6 Out2 Door opener of the door intercom system Terminals 10 and 11 In1 Doorbell of the door intercom system Terminals 13 and 14 Speaker Additional speaker in...

Page 47: ...ra Activate arming Setup Menu General Event Settings 2 Configure recording Set up event storage on an external file server Admin Menu Event Stor age MOBOTIX AG Security Vision Systems Made in Germany...

Page 48: ...VM event Setup Menu Recording Activate VM event and set up video motion window Setup Menu Event Settings MOBOTIX AG Security Vision Systems Made in Germany www mobotix com sales mobotix com 46 56 MOB...

Page 49: ...d the microphone volume micro phone sensitivity in Admin Menu Loudspeaker and Microphone set Audio Input temporarily to Microphone only required when recording the voice message via the camera microph...

Page 50: ...ercom system s microphone Set up and activate SI event Setup Menu Event Settings Set up and activate SD message Setup Menu Messaging 2 select SI event and recorded voice message MOBOTIX AG Security Vi...

Page 51: ...of MOBOTIX cam eras read chapter 9 Telephony Features in the Software Manual Configure the VoIP settings and activate VoIP Admin Menu VoIP Settings Set up a phone profile Admin Menu Phone Profiles MOB...

Page 52: ...ng a Softphone Configure the softphone and make sure that it is running on the computer For more information on setting up a softphone for use with MOBOTIX cameras read chap ter 9 Telephony Features i...

Page 53: ...MOBOTIX AG Security Vision Systems Made in Germany www mobotix com sales mobotix com 51 56 MOBOTIX CamIO User Manual Notes...

Page 54: ...5 V 240 W at 230 V 120 W at 115 V 240 W 48 V 68 V 5 A 240 W Inputs In1 In2 Min voltage Min amperage 5 V 100 mA Max voltage Min voltage 230 V 325 V 8 V 11 V Speaker Audio Out CamIO main board Recharg b...

Page 55: ...th of the Ethernet cable does not exceed 100 m 300 ft The length of the cables for signal wires and exter nal sensors is not restricted You need to make sure however that the minimum voltage at the co...

Page 56: ...ion box Junction box Lamp Ground CamIO 1 2 3 4 5 6 7 8 10 11 13 14 15 16 Terminal Part Name Remark 1 2 Phase conductor L Neutral conductor N Direct power supply for CamIO and Out1 3 4 5 6 Out1 L signa...

Page 57: ...8 7 4 4 Brown cable white line White cable brown line 6 Rx 5 4 3 Rx 3 1 Green cable white line White cable blue line 1 3 Blue cable white line White cable green line 2 Tx 1 Tx 2 2 Orange cable white l...

Page 58: ...Declaration of Conformity MOBOTIX AG Security Vision Systems Made in Germany www mobotix com sales mobotix com 56 56 MOBOTIX CamIO User Manual...

Page 59: ...0700 4 Tax Office Worms Kirchheimbolanden Germany VAT ID DE202203501 You can find the latest version of this document at www mobotix com under Support Technical specifications subject to change witho...

Page 60: ...phony alarm notify cam remote control lip syncronized audio Recording event ringbuffer 30 cams each 30 fps Backlight safe using CMOS without mechanical iris Video motion multiple windows precision pix...

Reviews: