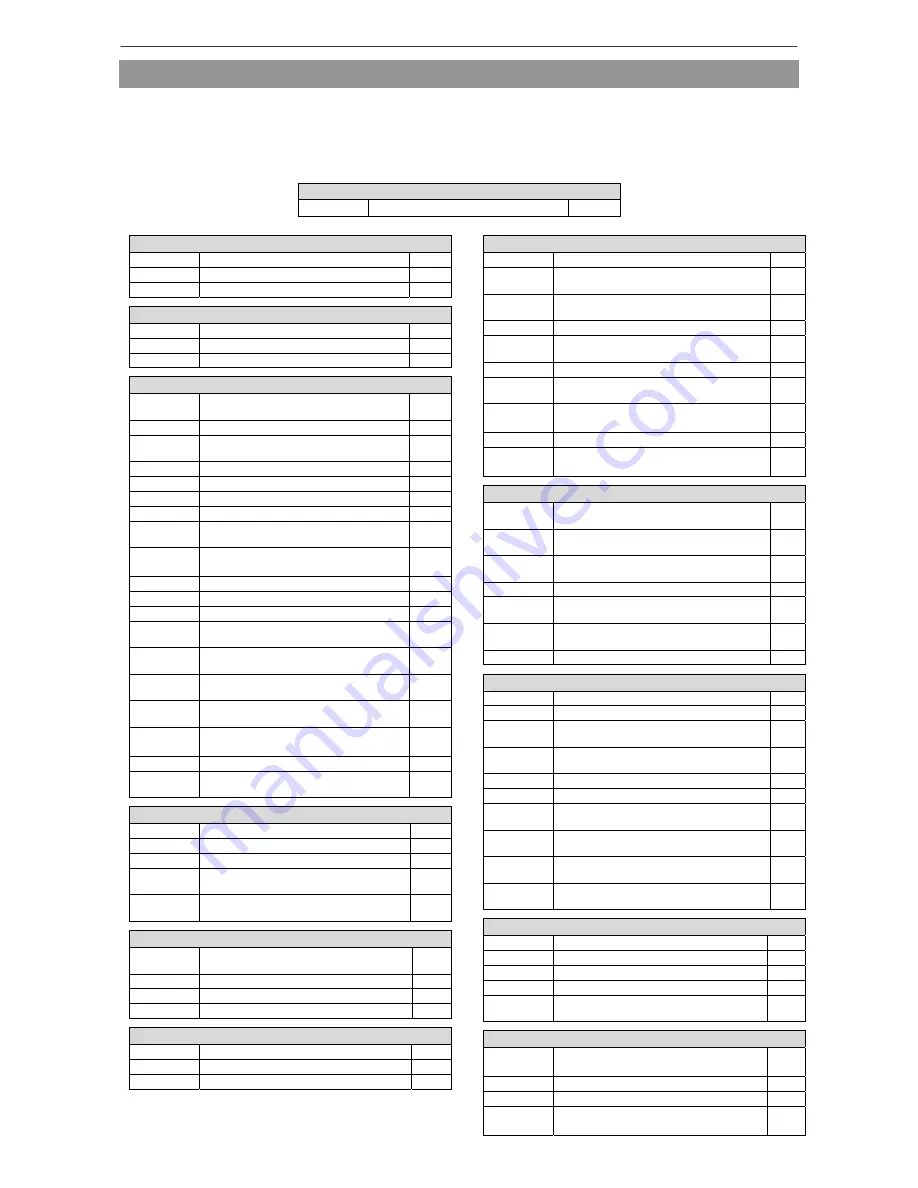
Mitsubishi PLK-E Series Technical Manual Download Page 206

  Program mode list


[17] Program mode list


Changing to the program mode 

When using the LCD panel, refer to the section " Operation panel section[16] Program mode ". When using the 7-segment operation 
panel keys, refer to pages " Control unit section[8]-3 to [8] -4". 

* For item (*1), there is no LCD panel program mode item. Change to each mode using the 7-segment operation panel keys. Depending 

on the item, the other LCD panel functions can be operated. (For example, [O1L] in the "output signal" item can be operated from the 
"input/output setting mode".) 

Table explanation 

type

 ]   

[ symbol ] 

[ function name ] 

[mode]


Wiper


WIP Wiper 

ON/OFF 

4(1)

W1 

Wiper output (W) output start time 

B33

W2 

Wiper output (W) output time 

B34


Slow start


Slow start speed 

B43

SL 

Slow start setting 

B44

SLN 

Number of slow start stitches 

B45


Clamp


OST 

Start/stop even if work holder is not 
lowered 

G40

RPT 

Repeat sewing setting 

G1 

RP(1-8) 

Work holder 1-8 repeat sewing setting 

G(2-
9) 

WHY 

Work holder order of priority setting 

G10

FSR 

All cancel during step over operation 

G11

1PD 

1-pedal specification setting 

G12

1T 

1-pedal timer setting 

G13

(1-8)A 

Work holder 1-8 ON delay timer setting

G(14
-21) 

(1-8)B 

Work holder 1-8 OFF delay timer 
setting 

G(22
-29) 

OFB 

Number of Work holder division setting

G30

FN 

Number of rated Work holder setting 

G31

CF 

Work holder sequence setting 

G32

F21N 

Valid Work holder number setting for 
divided Work holder (OF1…OF4) 

G33

F22N 

Valid Work holder number setting for 
divided Work holder (OF5…OF8) 

G34

CF1 

Work holder sequence setting for 
divided Work holder (OF1…OF4) 

G35

CF2 

Work holder sequence setting for 
divided Work holder (OF5…OF8) 

G36

F4BN 

Valid number setting of Work holder 
blocks 

G37

F4SN 

Number of block steps setting 

G38

AF2 

Pneumatic type two stage work holder 
selection 

G39


Sewing area


ALC 

Sewing area limit cancel 

A1 

XL   

[X axis left side] area limit setting 

X5 

XR   

[X axis right side] area limit setting 

X6 

YU  

[Y axis back side] area limit 
modification 

X7 

YD  

[Y axis front side] area limit 
modification 

X8 


Needle position


RU 

Reverse run needle UP function after 
thread trimming 

B5

R8 

RU reverse angle setting 

B6

U8 

Needle UP position stop angle 

B7

D8 

Needle DOWN position stop angle 

B8


Bobbin winding


Bobbin winding speed 

B46

WSM 

Bobbin winding operation setting 

B47

WT 

Bobbin winding operation time 

B48


Home position


HPM 

Home position return method at HALT 

A10

HPC 

Home position return prohibit at power 
ON 

A11

HPF 

Automatic home position return 
operation prohibition 

A12

HPK 

Reset key setting 

A14

2HS 

Temporary stop method at secondary 
home position 

A15

FHP 

Free home position usage method 

A16

CHS 

Home position correct selection at 
sewing data read 

A17

SHX 

[X axis] limit sensor home position 
return 

X9

SHY 

[Y axis] limit sensor home position return

X10

HPS 

Setting for presser foot state of    home 
return operation after power ON 

A13


HALT


STF 

Feed data stop state at HALT switch 
operation 

A2

STN 

Needle stop state at HALT switch 
operation 

A3

STS 

Various output hold at HALT switch 
operation 

A4

ST2 

HALT switch two-press operation 

A5

STP 

Power operation at HALT switch 
operation 

A7

STD 

Work holder raise operation when 
stopped with HALT code 

A8

STL 

Double-drop prevention after HALT 

A9


Counter


CUP 

Increment (UP) counter function 

A21

CDN 

Decrement (DN) counter function 

A22

UCM 

Increment (UP) counter setting value 
clear method 

A23

DCM 

Decrement (DN) counter setting value 
clear method 

A24

PCM 

Counter clear method at power ON 

A25

CN 

Number of stitches count function 

A26

UCC 

Increment (UP) counter count value 
correction prohibit 

A27

DCC 

Decrement (DN) counter count value 
correction prohibit 

A28

USC 

Sewing work with increment (UP) 
counter 

A29

DSC 

Sewing work with decrement (DN) 
counter 

A30


Brakes


WBK 

Weak brake setting 

B1

BKM 

Weak brake function setting 

B2

BNR 

Weak brake noise setting 

B3

BKT 

Brake time setting 

B4

PW 

Weak brake operation time during 
presser bar lifting operation 

X23


Presser foot


PD 

Presser bar lifting timer 1 (lowering) 
setting 

B35

PU 

Presser bar lifting timer 2 (rising) setting

B36

UW 

Presser bar lifting timer 3 (rising) setting

B37

BPF 

Setting of presser foot when baste is 
sewn and the feed moves 

B26


Summary of Contents for PLK-E Series

Page 1: ...Industrial Sewing Machine TECHNICAL MANUAL Electronic Pattern Sewing Machine PLK E Series Operation Panel Section A180E485P02...

Page 2: ......

Page 3: ...o internal memory 6 2 3 Erasing from internal memory 6 4 7 Reading data short cut function 7 1 8 Creating simple stitching data 8 1 9 Methods of creating stitching data 9 1 1 Linear input 9 1 2 Arc in...

Page 4: ...a block 2 Broken line arc curve input 12 29 17 Modifying a block 3 Zigzag input 12 35 18 Modifying a block 4 Changing the feed data 12 38 19 Modifying the stitching length Designated distance modifica...

Page 5: ...setting mode 15 1 1 Outline 15 1 2 Explanation of input output setting mode 15 2 3 Input signal setting table 15 6 4 Output signal setting table 15 8 16 Program mode 16 1 17 Program mode list 17 1 Lis...

Page 6: ...nd long term use The contents of this manual may not be reproduced in part or whole The contents of this manual are subject to change without notice An utmost effort has been made to cover all points...

Page 7: ...while the key is held down Line at top of screen Normal Index simple explanation of screen When any key is pressed The explanation for that key will appear Refer to sample screen 2 Sample screen 2 Wh...

Page 8: ...n 2 When the forward jogging direction upward arrow is held down and the end of the stitching data is reached the operation will stop with the work holder lowered If there is no error in the input dat...

Page 9: ...inding Setting screen will open The details are explained on the next page Moves the needle up down The direction of the arrow up down will change according to the current state The Up Counter screen...

Page 10: ...bbin winding operation is determined by the program mode setting Refer to 16 Program mode for details on the setting methods Exits the bobbin winding mode Displays the current setting value Explanatio...

Page 11: ...ased from the start switch When the stitching is completed and the work holder returns to the home position the sewing machine will stop and the work holder will automatically rise Halting To stop dur...

Page 12: ...hen using the forward jog reverse jog keys move to the position where the thread broke Tie the needle thread etc and restart stitching by pressing the start switch If the start switch is turned ON whi...

Page 13: ...Explanations of basic screens keys and operations 3 6...

Page 14: ...a Write to No 400 to 499 If written into No 100 to 299 the data will be automatically converted into A data Conversion into B data is not possible 3 B data Write to No 600 to 799 If written into No 10...

Page 15: ...Stitching data type and writing No 4 1...

Page 16: ...and open the Menu mode Press 2 Changing from internal memory to floppy disk When the screen first opens the mode to read from the internal memory is selected The mode display at the upper left of the...

Page 17: ...at this time the Read screen will reappear without reading the data If the data can be overwritten press Memo If the data is overwritten the data in the internal memory will be erased This can be avoi...

Page 18: ...rite Press on the Standard screen and open the Menu mode Press 2 Setting the pattern name and number In the same manner as when reading data the default mode when the screen is opened is the internal...

Page 19: ...me number will appear If is pressed at this time the Write screen will reappear without overwriting the data If the data can be overwritten press After the message indicating writing in progress appea...

Page 20: ...eps 2 and 3 for reading data Memo If a floppy disk is not inserted a message indicating this will appear 3 Selecting and erasing data Press select the number of the data to be erased and press A messa...

Page 21: ...Reading writing and erasing data floppy disk 5 5...

Page 22: ...for details Operation points Select Read from the menu Select the data and execute reading Operation details 1 Selecting data read Press on the Standard screen and open the Menu mode Press 2 Selectin...

Page 23: ...y Memo The sewing data of 255 patterns can be written in the maximum The number of patterns which can be written according to the content of the data Operation points Select Write from the menu Select...

Page 24: ...racters from the right can be deleted from the pattern name or number 3 Starting writing Press If the same number as the data number to be written is found in the internal memory a message prompting w...

Page 25: ...u mode Press 2 Selecting and erasing data Press select the number of the data to be erased and press A message confirming the erasing will appear To cancel the erasing process press The data will not...

Page 26: ...Reading writing and erasing data internal memory 6 4...

Page 27: ...ere Press to sequentially display the No key for the data written in the internal memory from left to right Press to sequentially display the No key for the data written in the internal memory from ri...

Page 28: ...7 1...

Page 29: ...ng simple stitching data as shown below is explained in this section The various types of pattern data are explained later The flow of operations for creating data and the transition of screen display...

Page 30: ...igh speed Medium high speed Medium low speed Low speed Set the stitch length Set in the range of 1 0 1mm to 127 12 7mm using the to and keys When completed setting the data press 4 The Arrow Input scr...

Page 31: ...andard screen will open Return to the Standard screen and confirm the input data This completes the input The work holder will automatically return to the home position Take care when the needle is lo...

Page 32: ...line circle arc curve Press this key to display the data entry method setting screen 2 Multi stitching reverse multi stitching offset data setting key The multi stitching reverse multi stitching and o...

Page 33: ...home position and the end code will be created and the system will exit from the input mode The end code will be created and the system will exit from the input mode The data on feed data from the cu...

Page 34: ...ess found on the input screen menu the modification mode and conversion mode The explanations are made with the Conversion Mode screen 2 Setting skip jogging Determine whether to use ON or not use OFF...

Page 35: ...Creating simple stitching data 8 6...

Page 36: ...through the current position already input and the input point up to 63 points possible is created Broken line A broken line connecting the current position already input and the input point up to 63...

Page 37: ...ill change to SEW 3 Inputting stitching to B point Press the arrow keys and move to the B point Press to set the data Data on straight stitching to point B will be created 4 Inputting stitching from C...

Page 38: ...n be confirmed Even if the data input has not been completed if the data input last has been set the movement can be confirmed in the same manner The needle will rise to the UP position If the needle...

Page 39: ...Methods of creating stitching data 9 3...

Page 40: ...etails 1 Inputting feed data to A point Press and on the Standard screen After making the various settings on the Data Setting Input screen the Arrow Input screen will open Check that the code is set...

Page 41: ...press and change the type The currently set stitching type will be displayed on the key 4 Designating arc input Press and then press The system will return to the arrow input screen 5 Setting B point...

Page 42: ...e arc input data Press 8 Inputting the return end code Press Data on feed data to the home position and the end code will be created A prompt for home position return will appear Press The work holder...

Page 43: ...stitching data Memo The size display of the pattern data is explained when The arc or The Circle is made and the image display is pushed from a standard screen the image display screen is opened For i...

Page 44: ...Methods of creating stitching data 9 7...

Page 45: ...feed data to A point Press and on the Standard screen After making the various settings on the Data Setting Input screen the Arrow Input screen will open Check that the code is set to FEED If differe...

Page 46: ...screen will reappear so press the arrow keys and move to the C point Press to determine point C 5 Creating the circle input data The confirmation message Create circle will appear Press to return to t...

Page 47: ...e confirmed Even if the data input has not been completed if the data input last has been set the movement can be confirmed in the same manner If the confirmed data is correct save the data Refer to 5...

Page 48: ...Methods of creating stitching data Memo Please refer to the memo on page P 9 7 to display the image size display at the circle data making 9 10...

Page 49: ...between 0 1 to 10 0mm Operation details 1 Inputting feed data to A point Press and on the Standard screen After making the various settings on the Data Setting Input screen the Arrow Input screen wil...

Page 50: ...nd set the data The system will return to the arrow input screen 4 Setting B point Press the arrow mark key to move to point B Press to determine point B 5 Setting C point Press the arrow mark key to...

Page 51: ...D point Press to determine point D Press the arrow keys again and move to the E point Press to determine point E Press the arrow keys again and move to the F point Press to determine point F Up to 63...

Page 52: ...e data Press the jog keys so the sewing machine movement can be confirmed Even if the data input has not been completed if the data input last has been set the movement can be confirmed in the same ma...

Page 53: ...the pattern will be regarded as the closed pattern and the same coordinate value will be automatically set for both the start point and end point Precautions for inputting a curve For shape data as sh...

Page 54: ...Methods of creating stitching data 9 15...

Page 55: ...een will open Memo With point input the stitch length setting on the Data Setting Input screen will be ignored Check that the code is set to FEED If different code is set press and set the code to FEE...

Page 56: ...Press the arrow mark key to move to point B Memo The distance between the points must be within 12 7mm Press to determine point B Data on point stitching to point B will be created Press the arrow mar...

Page 57: ...ress the jog keys so the sewing machine movement can be confirmed Even if the data input has not been completed if the data input last has been set the movement can be confirmed in the same manner If...

Page 58: ...Methods of creating stitching data 9 22...

Page 59: ...code data with the modification mode Input between the linear lines is possible as shown in the example Operation details 1 Inputting a linear line from A point to B point Input a linear line from th...

Page 60: ...m 6 8 mm HEVI heavy material Select from one of the following three types Standard Slightly heavy Heavy List of code data Code abbr Function Code abbr Function TRIM Thread trimming FUN1 Function code...

Page 61: ...g this BAT code Moreover it is possible to correspond to a variety of sewing thing and special sewing material used by program mode Pressure foot BPF with setting For example The pattern data like the...

Page 62: ...input before return end It is not input the BAT code before the last of return end but the sewing data is input Inputs here only by 1 stitch of the straight line Memo The purpose of inputting the sew...

Page 63: ...Methods of creating stitching data 9 26...

Page 64: ...Multiple stitching Feed data specifications stitching specifications Reverse multiple stitching Reverse multiple stitching feed data specifications stitching specifications Offset stitching Zigzag sti...

Page 65: ...point with the linear input procedures and create a linear line A straight line having start back tacking and end back tacking will be created After creating the linear line input 3 Confirming the da...

Page 66: ...aight line and Curve also even in the enclosed figure The multiple back tacking can be made only by 1 place per 1 Sewing data origination Operation details 1 Setting the input method Set the feed data...

Page 67: ...of overlap stitches This is the number of stitches at the overlapped section Set a value between 0 and 9 Memo If the distance between the broken line start point and the end point is 0 5 mm or more th...

Page 68: ...Methods of creating stitching data 9 30...

Page 69: ...s connected with stitching and dotted line in the image indicates feed data and solid line in the image indicates stitching Example The following type of pattern data will be created Create the linear...

Page 70: ...d Memo Direction When creating multiple stitching to the left of the input stitching line press left side When creating multiple stitching to the right of the input stitching line press right side Mem...

Page 71: ...below right is made Memo B It is for the combination data of a curve input and multiple sew The data like the figure below right is made as shown in the figure below left when curves which pass point...

Page 72: ...Methods of creating stitching data 9 33...

Page 73: ...The dotted line indicates the actual input line position before offset Operation details 1 Setting the input method Set the feed data from the home position H to the A point with the procedures for b...

Page 74: ...ess to set the data The system will return to the input method setting screen Press to determine the set values The system will return to the arrow input screen Determine the B C D and A points with t...

Page 75: ...Methods of creating stitching data 9 35...

Page 76: ...edures for broken line input and open the Input Method Setting screen Press Circle Press Zigzag Press Overlap Back Tacking Set the zigzag details Press 2 Setting the zigzag details The details are set...

Page 77: ...s other then Center Travel direction right side Travel direction left side Travel direction center Feed amount Deflection width 3 Setting the back tacking details After returning to the Input Method S...

Page 78: ...following the circle data entry procedure determine points B and C to create the circle data After creating the circle data input 4 Confirming the data Zigzag stitching with overlap back tacking Memo...

Page 79: ...Methods of creating stitching data 9 38...

Page 80: ...home position to point A 2 Display of call up screen Press the data entry mode Press in the menu 3 Selection of call up data Select data to be called up and then press Memo After calling up feed data...

Page 81: ...is modified After modification position Fixed Relative Movement Block movement Data in a designated range is moved Prior Subsequent data Change Add one stitch in between Block modification The area b...

Page 82: ...andard screen to enter the modification mode Or press and in the input mode to enter the modification mode Method that uses data input mode 3 Quitting the modification mode After making modifications...

Page 83: ...point positions will change when the A point is added Thus the feed data from the H point to the home position will also change The method for changing this feed data can be selected with the followi...

Page 84: ...e Image screen and opens the previous screen Common for all Image screens Indicates the home position Common for all Image screens Indicates the original stitching start position Indicates the modifie...

Page 85: ...ed to with the arrow keys Modifying a block The broken line input data is created with block modification Indicates the home position Common for all Image screens Indicates the block modification star...

Page 86: ...Modification mode 12 5...

Page 87: ...e and Stitching Start Position Move Press to set the data 2 Moving to the modification position and setting the data Press the arrow keys to move the position to the B point Press The sewing start pos...

Page 88: ...the figure below is the straight line data which puts the start end back tacking of V mode A fat part is back tacking In this case is sewn in order of A B C D Therefore the actual stitch starting posi...

Page 89: ...Modification mode 12 7...

Page 90: ...g the designated No of stitches 1 Selecting deletion of stitches Enter the modification mode Refer to the methods for entering the modification mode Press Stitch Data Change and Stitch Delete Press to...

Page 91: ...to be deleted as 1 and then press 1 stitch of data will be deleted 4 Confirming after stitch deletion Quit the modification mode Press to return to the Standard screen When is pressed the modification...

Page 92: ...will be deleted Operation details Deleting all stitches after the designated position 1 Selecting deletion of stitches Enter the modification mode Press Stitch Data Change and Stitch Delete Press to o...

Page 93: ...press All the data below the specified position will be deleted 4 Confirming after stitch deletion Quit the modification mode Press to return to the Standard screen When is pressed the modifications e...

Page 94: ...Modification mode 12 11...

Page 95: ...mm between A and A Operation details Adding one stitch 1 Selecting stitch addition Enter the modification mode Refer to the methods for entering the modification mode Press Stitch Data Change and Stit...

Page 96: ...ove and input the stitch position to be added A point Press One stitch will be added 4 Confirming after stitch addition Quit the modification mode Press to return to the Standard screen When is presse...

Page 97: ...ing type of stitching data Operation details Adding the same stitch 1 Selecting stitch addition Enter the modification mode Press Stitch Data Change and Stitch Add Press to open the next screen 2 Dete...

Page 98: ...n and then press The same stitch will be added 4 Confirming after stitch addition Quit the modification mode Press to return to the Standard screen When is pressed the modifications executed last will...

Page 99: ...Modification mode 12 15...

Page 100: ...ged Operation details Position of subsequent data fixed 1 Selecting stitch position modification Enter the modification mode Refer to the methods for entering the modification mode Press Stitch Data C...

Page 101: ...t D using the arrow mark keys Press The stitch position will be modified Memo Move the stitch length so that it is within the range of 12 7mm at the maximum 4 Confirming after modification Quit the mo...

Page 102: ...e D E F and G points will move Operation details Subsequent data position moved 1 Selecting stitch position modification Enter the modification mode Press Stitch Data Change and Stitch Position Modify...

Page 103: ...C using the arrow mark keys Press The stitch positions will be modified Memo Move the stitch length so that it is within the range of 12 7mm at the maximum 4 Confirming after modification Quit the mod...

Page 104: ...Modification mode 12 19...

Page 105: ...point At this time the data prior to and after the D point to E point will be changed Operation details 1 Selecting block movement Enter the modification mode Refer to the methods for entering the mo...

Page 106: ...titch length Set the movement method Press Prior Subsequent Data Change Set the stitch length Set to 3 0mm for this example Press 5 Determining the movement amount Using the arrow keys determine the m...

Page 107: ...Modification mode 12 21 6 Confirming after modification Quit the modification mode Press to return to the Standard screen When is pressed the modifications executed last will be undone...

Page 108: ...e new data will be added prior to and after the D point to E point the D point to D point and the E point to E point Operation details 1 Selecting block movement Enter the modification mode Refer to t...

Page 109: ...he start point Take care when the needle is lowered etc Set the movement method Press Add New Stitch To Prior Subsequent Data Set the stitch length Set to 3 0mm for this example Press 5 Determining th...

Page 110: ...Modification mode 12 24 6 Confirming after modification Quit the modification mode Press to return to the Standard screen When is pressed the modifications executed last will be undone...

Page 111: ...Modification mode 12 25...

Page 112: ...pe of stitching pattern will be modified to a linear line Operation details 1 Selecting block modification Enter the modification mode Refer to the methods for entering the modification mode Press Sti...

Page 113: ...e end point Using Jog determine the end point position B point Press 5 Confirming the data creation Press The block position will be modified The work holder will automatically return to the start poi...

Page 114: ...on The start point can be designated when the stitch is stitching data The end point can be designated when the section before the stitch is stitching data Refer to following illustration The data bet...

Page 115: ...Modification mode 12 28...

Page 116: ...nce Example The C point and D point in the following type of data are each modified to the C point and D point Operation details 1 Selecting block modification Enter the modification mode Refer to the...

Page 117: ...range end point Using Jog determine the end point position E point Press Jog Validity Press 5 Moving and setting the modification origin jog position Using Jog move to the position to be modified C p...

Page 118: ...his example move from the D point to the D point in the same manner Press 7 Quitting position modification After determining all modification positions press 8 Confirming the data creation To create t...

Page 119: ...Modification mode 9 Confirming the modified data Quit the modification mode Press to return to the Standard screen When is pressed the modifications executed last will be undone...

Page 120: ...position Using the arrow keys modify the position Move to C point in this example Press If there are several positions to be modified repeat step 5 The number of input points will increase In this exa...

Page 121: ...Modification mode 12 33 7 Confirming the modified data Quit the modification mode Press to return to the Standard screen When is pressed the modifications executed last will be undone...

Page 122: ...Modification mode 12 34...

Page 123: ...and Block Modify Press to open the next screen 2 Selecting the input type Press Zigzag Set the deflection width feed amount and creation direction Set the deflection width to 5 0mm feed amount to 3 0...

Page 124: ...Using Jog determine the end point position B point Press 5 Confirming the data creation To create the data press The block position will be modified When the end point is determined the work holder wi...

Page 125: ...he modification mode Press to return to the Standard screen When is pressed the modifications executed last will be undone When the modifications are undone the work holder will automatically return t...

Page 126: ...Modification mode 12 37...

Page 127: ...eference Example The E point and F point in the following type of data are each modified to the E point and F point Operation details 1 Selecting block modification Enter the modification mode Refer t...

Page 128: ...cation range end point Using Jog determine the end point position A point Press Jog Validity Press 5 Moving and setting the modification origin jog position Using Jog move to the position to be modifi...

Page 129: ...er of input points will increase In this example move from the F point to the F point in the same manner 7 Quitting position modification After determining all modification positions press 8 Confirmin...

Page 130: ...Modification mode 12 40 9 Confirming the modified data Quit the modification mode Press to return to the Standard screen When is pressed the modifications executed last will be undone...

Page 131: ...ching data will be deleted the G point will be newly created and the feed data will be modified Steps 1 to 3 same as previous section Designating the modification position using jog keys 4 Determining...

Page 132: ...will be modified 7 Confirming the modified data Quit the modification mode Press to return to the Standard screen When is pressed the modifications executed last will be undone The work holder will a...

Page 133: ...Modification mode 12 43...

Page 134: ...0mm Operation details 1 Selecting the stitch length modification Enter the modification mode Refer to the methods for entering the modification mode Press Stitch Data Change and Stitch length modific...

Page 135: ...designated distance set the No of modification stitches This will be 69 stitches here Set the stitch length This will be 7 0mm here Press 4 Confirming the modifications Quit the modification mode Pre...

Page 136: ...m 9 0mm Operation details 1 Selecting the stitch length modification Enter the modification mode Refer to the methods for entering the modification mode Press Stitch Data Change and Stitch length modi...

Page 137: ...ignated stitch In this case press Set the stitch length This will be 9 0mm here Press 4 Confirming the modifications Quit the modification mode Press to return to the Standard screen When is pressed t...

Page 138: ...Modification mode 12 47...

Page 139: ...o medium high speed MD1 Operation details All sections after designated position 1 Selecting stitching speed modification Enter the modification mode Refer to the methods for entering the modification...

Page 140: ...ed Press All After Designated Stitch and set the new speed MD1 Press The stitching speed will be modified 4 Confirming the modifications Quit the modification mode Press to return to the Standard scre...

Page 141: ...stitching data will be changed to medium high speed MD1 Operation details N stitches after designated position 1 Selecting stitching speed modification Enter the modification mode Press Stitching Spee...

Page 142: ...After Modified Stitch Set the number of stitches to be changed 3 and the new speed MD1 Press The stitching speed will be modified 4 Confirming the modifications Quit the modification mode Press to re...

Page 143: ...Modification mode 12 51...

Page 144: ...following type of stitching data Operation details 1 Selecting code data addition Enter the modification mode Refer to the methods for entering the modification mode Press Code Data Change and then pr...

Page 145: ...Press Needle UP Halt Press 4 Confirming execution Press The code data will be added 5 Confirming the modifications Quit the modification mode Press to return to the Standard screen When is pressed the...

Page 146: ...the following type of stitching data Operation details 1 Selecting code data deletion Enter the modification mode Press Code Data Change and then press Code Data Delete Press to open the next screen...

Page 147: ...54 3 Confirming execution Press The code data will be deleted 4 Confirming the modifications Quit the modification mode Press to return to the Standard screen When is pressed the modifications execute...

Page 148: ...Modification mode 12 55...

Page 149: ...Fixed Scaling Scaling with a set stitch length or set No of stitches can be carried out independently for the X axis and Y axis centering on the center point Center position Jog Designation Pattern C...

Page 150: ...onversion mode When is pressed the conversions executed last will be undone 4 Confirming on the image screen for the conversion mode Refer to the section Confirming on the image screen for the modific...

Page 151: ...Enter the conversion mode Press Home position Correction Press Note that when Enter is pressed the work holder will move to the home position correction position which is already input 2 Determining...

Page 152: ...Data conversion mode 3 Confirming the converted data After converting the data press to quit the conversion mode When is pressed the conversions executed last will be undone 13 4...

Page 153: ...and end of stitching point B is converted added The bold line indicates the back tacking Operation details 1 Selecting back tacking Enter the conversion mode Press Back tacking Press 2 Setting the blo...

Page 154: ...displayed in this example Selection is not possible 4 Setting the back tacking details The details are set on this screen The details set here are start end back tacking start mode N mode five start s...

Page 155: ...Data conversion mode 13 6...

Page 156: ...the overlap back tacking is converted added The bold line indicates the back tacking Operation details 1 Selecting back tacking Enter the conversion mode Press Back tacking Press 2 Setting the block...

Page 157: ...be enabled This is displayed in this example Selection is possible 4 Setting the back tacking details The details are set on this screen The details set here are overlap back tacking overlap mode thr...

Page 158: ...Data conversion mode 13 8...

Page 159: ...titching Point A to point B linear point B to point C arc point C to point D linear Operation details 1 Selecting zigzag stitching Enter the conversion mode Press zigzag Press 2 Setting the block for...

Page 160: ...en Press to return 3 Selecting zigzag Press zigzag 4 Setting the zigzag details The details are set on this screen Press set the deflection width to 5 0 and feed amount to 3 0 The creation direction i...

Page 161: ...Data conversion mode 13 10 5 Confirming execution of conversion Quit the modification mode Press to return to the Standard screen When is pressed the modifications executed last will be undone...

Page 162: ...Data conversion mode 13 11...

Page 163: ...ress Scaling Press 2 Setting the scaling method etc Method No of Stitches Fixed Fixed Stitch Length Press Fixed Stitch Length for this example Memo For the BA data the fixed stitch length will not be...

Page 164: ...point can be designated without using the jog keys In this case press only If the center point is not to be set on the stitching data use the arrow keys and move to the position to be used as the cent...

Page 165: ...duction The function as the offset is lost by the expansion the reduction about the offset Amount of stitch length and Width of shake of zigzag sewing Distance of multiple sewing Distance of offset Do...

Page 166: ...Data conversion mode 13 14...

Page 167: ...ical Enter the conversion mode Press Symmetrical Press 2 Setting symmetrical method etc and executing Clearing symmetrical origin data Delete Symmetrical Origin Data Keep Symmetrical Origin Data Press...

Page 168: ...Data conversion mode 13 15 3 Confirming the converted data After converting the data press to quit the conversion mode When is pressed the conversions executed last will be undone...

Page 169: ...Data conversion mode 13 16...

Page 170: ...tation Enter the conversion mode Press Rotation Press 2 Setting the rotation method etc Direction Left Rotation Right Rotation Press Left Rotation for this example Angle Input the angle from the numer...

Page 171: ...ut using the jog keys In this case press only If the center point is not to be set on the stitching data use the arrow keys and move to the position to be used as the center After setting the center p...

Page 172: ...Data conversion mode 5 Confirming the converted data After converting the data press to quit the conversion mode When is pressed the conversions executed last will be undone 13 19...

Page 173: ...he offset amount will be A B 5mm C D 7mm A B 7mm and C D 9mm respectively Operation details 1 Selecting offset Enter the conversion mode Press Offset Press 2 Selecting and confirming the changed offse...

Page 174: ...ll be expressed with and Press to return to the original screen 4 Setting and executing the conversion method Select the direction In this case select right Left direction Right direction Input the di...

Page 175: ...ata 7 Setting and executing the conversion method Select the direction In this case select right Left direction Right direction Input the distance Input 9mm for this example Press 8 Completing the sec...

Page 176: ...ted three times for reverse multiple stitching feed data specifications Operation details 1 Selecting multiple stitching Enter the conversion mode Press Multiple Stitching Press 2 Selecting and confir...

Page 177: ...le stitching method direction distance and number of times Multiple Feed data Multiple Stitching specifications Reverse Multiple Feed data Reverse Multiple Stitching specifications In this case select...

Page 178: ...Data conversion mode 13 24 5 Confirming the converted data After converting the data press to quit the conversion mode When is pressed the conversions executed last will be undone...

Page 179: ...Data conversion mode 13 25...

Page 180: ...tions Needle down angle setting Set file read Format mode System set file write Pattern data combination Panel related settings Version confirmation Setting table copy Entering the function mode Press...

Page 181: ...pressing the corresponding numeric key maximum 10 After that press to copy the data To select all the data press From internal memory to floppy disk Memo The number of the data in which the floppy dis...

Page 182: ...sk Internal memory Stitching data combination Memo Combination data created with the PLK B Series cannot be used Creating a combination 1 Combination screen display The previously selected combination...

Page 183: ...s To write the created combination data into the internal memory or floppy disk press 5 Writing the combination data Select the write destination internal memory floppy disk in the same manner as norm...

Page 184: ...y Select the combination data to be read in Select the read destination internal memory floppy disk in the same manner as normal stitching data read If is pressed here the selected combination data wi...

Page 185: ...ion of each model s current system can be confirmed The version shown on the left is an example Advanced functions Advanced functions can be set by inputting a password Table No changeover function Se...

Page 186: ...d STG The Simple setting table SEK The multiplication data STP The step fail BIN The step comment data At the completion of reading if a message such as Turn OFF the power appears follow the direction...

Page 187: ...o cancel the incorrect operation prevention mode press any place on the panel for three or more seconds A beep will sound to indicate that the function has been canceled The touch key lock will be com...

Page 188: ...ial value Standard Return method from simple screen 1 and 2 Keep pushing the corner on the right of main screen for three seconds or more Please switch to other modes because returns to the switch sel...

Page 189: ...signal confirmation Be careful The sewing machine is ready for operation Home position encoder detector confirmation Be careful The sewing machine is ready for operation Input setting Custom input Out...

Page 190: ...changeover key to change the screen 1 Status reference mode The current output status can be confirmed Indicates that the output signal is ON Indicates that the output signal is OFF 2 Test output mode...

Page 191: ...urned on again Input setting Custom input Password function 1 Input Customize Setting screen Press the physical input RAM I1 to I9 IA to IP to be customized The Function Section screen will open 2 Fun...

Page 192: ...etails on the signal types To make detailed settings press the Details setting key 3 Details Setting screen 1 Change the logic of the output signal Normal reversed Change the operation of the output s...

Page 193: ...setting mode 15 4 5 Details Setting screen 3 Set the ON delay Valid Invalid delay time 0 to 2540ms Set the OFF delay Valid Invalid delay time 0 to 2540ms Press the to fix the setting The previous scre...

Page 194: ...he work holder output 8 7 6 and 5 will turn ON in sequence If either of the following is established this input signal FM2 will be invalid When number of work holder division setting OFB in the progra...

Page 195: ...nvalidated 51 HP When the input signal HP is turned ON the home position return operation will be executed Note that there is an invalid timing such as when the sewing machine is running 52 WID When t...

Page 196: ...lder input signal A2F is turned ON second time the pneumatic type two stage work holder high pressure output AFH will turn ON Note that this is valid when the pneumatic type two stage work holder sett...

Page 197: ...e 51 ERR The error occurrence detection output signal ERR will turn ON when and error or message occurs 52 CUE When the up counter count value matches the set value the count up completed output signa...

Page 198: ...TS will turn ON 55 1 Use prohibited 56 DRT The sewing machine rotating output signal DRT will turn ON while the sewing machine is rotating 57 DN The DOWN position output signal DN will turn ON when th...

Page 199: ...rogram Mode panel 2 Program Mode panel This panel is used to select the program mode There are several mode selection pages Press the keys to change the page The number of the displayed page is displa...

Page 200: ...HALT The number of the displayed page is displayed This Setting Selection panel may also have several pages depending on the mode Press the keys to change the page When the key for the function to be...

Page 201: ...en is pressed the Function Explanation panel will open The explanation displayed at the right of the setting value panel can be viewed in its entirety 5 Function Explanation panel for STF setting valu...

Page 202: ...rn later System setting file write 1 Entering the function mode Press and on the Standard screen and open the Function Mode screen 2 Function mode screen Press 3 Writing of setting file Please use the...

Page 203: ...een 2 Function mode screen Press 3 Reading of set file Please use the floppy disk of backed up Memo Reading is done in the superscription mode Please note that setting with origin former is deleted Af...

Page 204: ...Program mode 16 5...

Page 205: ...Program mode 16 6...

Page 206: ...area limit modification X8 Needle position RU Reverse run needle UP function after thread trimming B5 R8 RU reverse angle setting B6 U8 Needle UP position stop angle B7 D8 Needle DOWN position stop an...

Page 207: ...valid setting at position other than needle UP position stop A20 LCD panel KBC LCD panel buzzer cancel A31 LCD LCD panel connection X29 LOF LCD panel backlight OFF function X30 LNN LCD panel display c...

Page 208: ...Program mode list 17 2...

Page 209: ...RE etc DOWN COUNTER ARE SWITCHED DOWN COUNTER IS CLEARED ON OR OFF RETURNS TO PREVIOUS SCREEN NEEDLE FOOT IS MOVED DOWN NEEDLE FOOT IS MOVED UP PATTERNED DATA IS READ PATTERNED DATA IS WRITTEN ENTERS...

Page 210: ...G REVERSE MULTIPLE SEWING OFFSET INPUT IS DONE DETAILS OF MULTIPLE OFFSET DETAILS OF ZIGZAG SEWING IS SET IS SET ZIGZAG SEWING DETAILS OF BACK TACKING BACK TACKING SEWING SEWING IS SET MULTIPLE BACK T...

Page 211: ...de CHANGES SEWING DATA SEWING MACHINE SPEED CODE DATA IS MODIFY IS CHANGED START POSITION IS MOVED DELETION ADDS SEWING STITCH PATTERN MOVE MOVEMENT IN BLOCK DATA IS MODIFIED AFTER CORRECTING IN THE B...

Page 212: ...IS MADE Y IS MADE XY IS MADE PATTERN DATA IS ROTATED PATTERN DATA IS ROTATED DATA IS MADE AT RIGHT TO RIGHT TO LEFT DATA IS MADE AT RIGHT DATA IS MADE AT LEFT DATA IS MADE AT LEFT RETURN TO ORIGINE D...

Page 213: ...t of keys Input output mode INPUT SIGNAL IS CONFIRMED OUTPUT SIGNAL IS CONFIRMED CONFIRM HOME ENCODER DETECTOR INPUT IS SET OUTPUT IS SET ON ON OFF OFF Program mode ALL SENTENCES ARE DISPLAYED Appendi...

Reviews: