


4. DAILY MAINTENANCE AND PERIODIC INSPECTION AND MAINTENANCE
4.3 Replacement Methods
– 51 –
(7) Card-sized I/O (HR361, HR371)
The card-sized I/O is a machine input/output interface PCB used for mounting relay PCBs, etc., in
the electric cabinet onto the control PCB.
a) Replacement procedures
Always replace the card-sized I/O with the control section power turned OFF.
①
Check that the control section power is turned OFF. (If the power is not OFF, turn it OFF.)
②
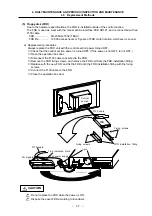
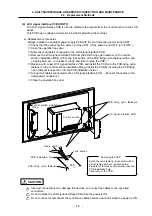
Open the electric cabinet door.
③
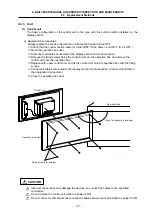
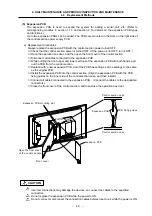
Remove the card-sized I/O from the control PCB in the electric cabinet. (Open the locks of the
card-sized I/O fixing guides outward to open the fixing claws, and then pull the card-sized I/O
out.)
④
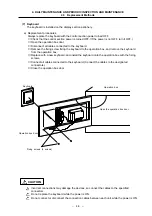
Replace with a new card-sized I/O and install onto the control PCB in the electric cabinet.
(Align the card-sized I/O with the card-sized I/O fixing guides in the control PCB, and insert
until the fixing guide's lock section is securely locked.)
⑤
Close the electric cabinet door.
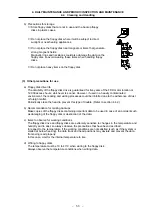
Electric cabinet
Control PCB
Control PCB
Lock section
Fixing guide
Card-sized I/O
(HR361, HR371)
Position of fixing claws
when card-sized I/O is mounted.
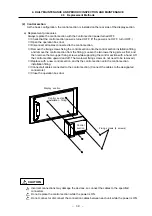
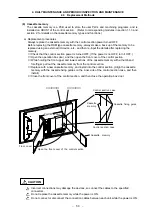
Card-sized I/O
Card-sized I/O fixing guides
Open the locks of the card-sized I/O fixing
guides outward to open the fixing claws, and
then pull the card-sized I/O out.
Removal of card-sized I/O
Incorrect connections may damage the devices, so connect the cables to the specified
connectors.
Do not replace the card-sized I/O while the power is ON.
Do not connect or disconnect the connection cables between each unit while the power is ON.
CAUTION