Connection &
Adjustments
7
5. Display Adjustment
Image Adjustment (for analog connection)
This product has two ways to adjust the picture image Automatic screen adjustment and Manual screen adjustment.
At
fi
rst, execute Automatic screen adjustment after connecting the monitor to the PC. For further adjustment, use Manual
screen adjustment.
•
In rare cases, any image may not be displayed with the speci
fi
ed frequency (Horiz: 30.0 to 61.0kHz, Vert.: 55.0 to
75.4Hz). Please change the refresh rate or resolution of the PC in such case.
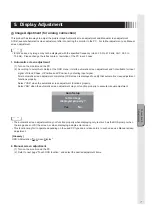
1. Automatic screen adjustment
(1) Turn on the monitor and the PC.
(2) According to select Auto Setup at the OSD menu, it starts automatic screen adjustment and tint suitable for input
signal of Clock, Phase, H.Position and V.Position by detecting input signal.
After automatic screen adjustment completes, OSD screen is displayed to verify that automatic screen adjustment
functions properly.
Select “YES” when the automatic screen adjustment functions properly.
Select “NO” when the automatic screen adjustment may not function properly to execute manual adjustment.
• The automatic screen adjustment may not function properly when displaying only text such as the DOS prompt, when
the image does not
fi
ll the screen, or when displaying a single-color screen.
• This function may fail to operate depending on the used PC type and/or video cards. In such case, use Manual screen
adjustment.
[Glossary]
OSD: Abbreviation "On Screen Display"
2. Manual screen adjustment
(1) Turn on the monitor and the PC.
(2) Refer to next page “Touch OSD function”, and select the desired adjustment items.
Is this image
displayed properly ?
Auto Setup
͑
͑
Yes
͑ ͑ ͑ ͑ ͑ ͑ ͑
No
͑
Summary of Contents for TSD-FT1519-MN
Page 22: ...付 録 22 MEMO ...
Page 23: ...付 録 23 MEMO ...
Page 24: ...40D871151A10 http www mee co jp ...
Page 45: ...Addendum 21 MEMO ...
Page 46: ...Addendum 22 MEMO ...
Page 47: ......
Page 48: ...40D871151A10 ...


