background image

SAMPLING 

Sampling your own sounds with the Mirage is where the fun really begins, Just about any sound 
can be a source of inspiration for you, since just about any sound can be recorded and processed 
with the Mirage. Acoustic sounds can be sampled by using a microphone, while electronic or 
recorded sounds can be connected directly to the Mirage's line level input.  

As you become more familiar with the Mirage and the sampling process, you'll begin to realize 
that your creative possibilities are limited only by your imagination. First, here's a little 
background to help you understand the process better.  

DIGITAL RECORDING 

As we hear them, sounds are energy patterns. In the air, this energy moves the parts of our ears, 
creating electrical impulses that our brains can decipher, In tape recording, this energy moves 
some part of a microphone, creating electrical impulses that are recorded electromagnetically on 
magnetic tape.  

In digital recording, the electrical impulses that represent the sound are converted into a series of 
numbers which are recorded in a computer memory.  

The analog signal is converted to a digital signal by the Analog to Digital Converter (ADC). The 
ADC is a sophisticated, high-speed "observer".  

Imagine, if you will, standing at the seaside with a ruler, stopwatch, pad and pencil. Now think of 
measuring the height of the incoming waves with the ruler every time the stopwatch clicks off a 
second, then writing the measurement and the time down on the pad with your pencil.  

This would give you a rough idea of how to recreate the action of the waves at some future time. 
This is essentially what an ADC does, except that it looks at the sound wave at the rate of 30,000 
measurements, or "samples" per second.  

The ADC records this information in specific locations in the memory in the form of binary code 
numbers. The numbers and locations for one sample, which may be up to six seconds long, are 
called the WAVESAMPLE, Playing the sound back is a matter of reversing the above process. 
This requires a Digital to Analog Converter (DAC) that takes the digital information and re-
assembles the waveshape as voltage information that can be amplified and sent to the speakers.  

Digital Recordings as Instruments 

If we record a sound at a sampling rate of 30,000 samples per second and then play the sound 
back at 60,000 samples per second, the note would be one octave higher than the original. By 
precisely adjusting this playback rate with a keyboard controller, we can begin to create music.  

Like everything else, there are a few catches to digital sampling. There's a limit to how far a 
sampled sound can be raised or lowered in pitch before it begins to sound like a squeak or a thud. 

Summary of Contents for Mirage DSK-1

Page 1: ...able from your authorized Ensoniq Dealer for those who wish to use the Mirage in technically and artistically complex situations e manual from front to back covers including the GLOSSARY The Mirage ha...

Page 2: ...virtually all the features of the original Mirage at a substantially reduced price Plus the Mirage DSK features the added enhancement of stereo circuitry All the sounds ever developed for the Mirage...

Page 3: ...rmatted Mirage diskette for future use This process is called saving Because all of the crucial sound information is included as software your Mirage will never be obsolete An ever growing library of...

Page 4: ...s a general description of the controls and their function 1 CONTROL This section of the panel contains the display and controls parameter values switching functions and commands 2 Display This displa...

Page 5: ...ctions 10 Numeric Keypad The numeric keypad is used to select parameters sounds and programs and to determine which sounds and patches will be transferred to the diskette 11 Cancel This button is used...

Page 6: ...e a sequence you have recorded by transferring if from the Mirage memory to diskette first insert a formatted diskette into the drive Next press the SAVE button and the location number 1 8 on SELECT k...

Page 7: ...arrier Keep the carrier clean Don t allow liquids to come in contact with the carrier or diskette and don t touch the diskette with your fingers We strongly advise that you keep a written record of so...

Page 8: ...n the disk Internal Memory The internal memory of the Mirage consists of two 64k banks of memory The Lower bank will hold the data from one Lower sound off the disk the Upper bank will hold the data f...

Page 9: ...ernal memory holds one 333 note sequence Loading a sequence from diskette will replace the sequence in the internal memory Overdubbing or recording over a sequence in the Mirage internal memory will n...

Page 10: ...onnection is for the Sustain Pedal foot switch Model SW 1 Its function is controlled by parameter 89 SUSTAIN PEDAL FOOT SWITCH SELECT 5 Midi Out Thru This jack sends out Musical Instrument Digital Int...

Page 11: ...ct can be quite stunning with the different notes of a chord all panned to their own locations in the mix It can also be quite effective in adding some interest and movement to drum and percussion sou...

Page 12: ...n is very important because the Mirage takes its operating system from this disk boots from that disk in computer terms The operating system tells the Mirage hardware what to do Because it is basicall...

Page 13: ...d insert it gently into the drive slot until it seats fully in and down Display blank Drive light on The operating system and sound information is now being transferred from the diskette to the hardwa...

Page 14: ...carries four distinct parameter programs along with it Programs as defined here are very similar to patches on a synthesizer each program is a set of playback parameters volume and filter envelopes f...

Page 15: ...rameter 25 UPPER LOWER PROGRAM LINK and switching it ON will connect the program select switch to both keyboard halves so as you change the program for one keyboard half the other will change automati...

Page 16: ...ress STOP Sequencer will stop recording and end the sequence at this point last parameter number used OR Press PLAY The sequencer will stop recording and immediately begin to play the sequence from th...

Page 17: ...ill be overdubbed on top of the previous sequence You can continue to add overdubs until the memory is filled Note that adding pitch bend or modulation will affect all previously recorded tracks and w...

Page 18: ...erity on Ensoniq Sound Disks and your own Formatted Diskettes Each diskette can store 8 sequences in addition to it We highly recommend that you keep a written record of sequence names and their locat...

Page 19: ...ce is loaded from the diskette Each Ensoniq sound diskette contains three sequences which demonstrate the same numbered sounds sequence 1 for sound 1 sequence 2 for sound 2 etc Try loading and playing...

Page 20: ...tton below the display When the parameter is a switch function these are the ON OFF buttons While in the parameter mode the parameter LED will be lit Pressing the On Up or Off Down button will automat...

Page 21: ...LECT keypad Press 2 then 1 You re now telling the Mirage which parameter you wish to work with Parameter number 20 99 Press VALUE button The Mirage will show you the current value of the parameter Cur...

Page 22: ...in increments of one semitone 23 KEYBOARD VELOCITY SENSITIVITY The KEYBOARD VELOCITY SENSITIVITY will automatically set itself default to the touch of the average player VALUE 30 Players with a heavi...

Page 23: ...course you can if you want save data to a Sound Diskette just as you would a blank disk but remember this will Saving a Sound on a Formatted Diskette Each sound on an Ensoniq Sound Diskette carries f...

Page 24: ...ill allow you to copy the program from location 1 into the 4 location You can then modify it ending up with programs 1 2 and 3 intact and 4 as your personal modification make sure that program 1 is se...

Page 25: ...ecializes in one function formatting diskettes Booting the Mirage from the Formatting Diskette can be done in one of two ways 1 Turn the Mirage power off and then back on The display will flash Nd Ins...

Page 26: ...nutes Display blank Drive light on When the procedure is finished the display will read Fc for Formatting Complete and the diskette in the drive will be formatted and ready to use for saving Mirage so...

Page 27: ...the disk in the drive Display blank Drive light on When it is finished the display will read bc for Backup Complete and the diskette in the drive will be an exact copy of the Formatting Diskette It s...

Page 28: ...the seaside with a ruler stopwatch pad and pencil Now think of measuring the height of the incoming waves with the ruler every time the stopwatch clicks off a second then writing the measurement and...

Page 29: ...f the note is cut out and the end is spliced to the beginning resulting in an unending and uninterrupted sound The Mirage s digital circuitry lets you choose the loop start and end pointers electronic...

Page 30: ...d and fast rules governing different techniques for different sounds As you use the Mirage you will quickly adapt to the procedure and develop your own methods for getting the best results As an examp...

Page 31: ...e recording level seems right TO SET THE RECORD LEVEL Here s what s happening Display will show This is a switching parameter that will tell the Mirage what type of signal will be coming in Line level...

Page 32: ...adjusting the programs always press 0 PROG to verify that you are working on the correct keyboard half If the for Upper or L for Lower simply press Cancel and proceed If the wrong half is selected pr...

Page 33: ...wavesamples In order to be able to display all 256 segments or Pages in the memory on the two digit display a hexadecimal system base 16 to math buffs of both numerals and alphabet characters is used...

Page 34: ...beginning of the memory 0 0 Select parameter 61 SAMPLE END PRESS or to set VALUE Since there will be two wavesamples in this wavetable we will give half the memory to each Looking on the Memory Chart...

Page 35: ...waiting for a signal to cross the sampling threshold before it begins to Dots lit You re now ready to begin to sample wavesample l If you ve selected the lower keyboard half and checked the input leve...

Page 36: ...dvanced Sampler s Guide available from your Ensoniq dealer Memory Key Chart of Wave samples Wave sample Number Value of Param 60 Value of Param 61 Top key Lo Param 72 Top Key Up Param 72 1 1 00 FF 30...

Page 37: ...either case you can correct a great many problems with equalization a fancy word for tone controls Put the equalizer in line between the audio source and the Mirage s input and try different settings...

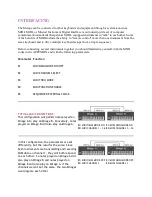
Page 38: ...OMNI MODE ON OFF 82 MIDI CHANNEL SELECT 83 MIDI THRU MODE 84 MIDI FUNCTION ENABLE 85 SEQUENCER EXTERNAL CLOCK TYPICAL MIDI CONNECTIONS This configuration will permit notes played on Mirage A to play o...

Page 39: ...MNI MODE OFF 82 MIDI CHANNEL 1 85 EXTERNAL CLOCK OFF 81 MIDI OMNI MODE ON 82 MIDI CHANNEL 2 85 EXTERNAL CLOCK ON MIDI allows multiple keyboards or other modules to be sequenced from multi track sequen...

Page 40: ...r to take full advantage of these capabilities For more information about the MIDI standard contact the International MIDI Association 11857 Hartsook St North Hollywood CA 91607 MASOS Since the Mirage...

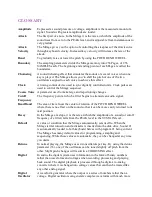
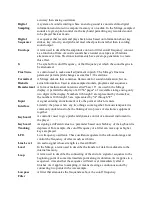
Page 41: ...Dead Band The area of travel near the center of rotation of the PITCH BEND WHEEL where there is no effect on the sound so that it can be more easily returned to its mid position Decay In the Mirage en...

Page 42: ...play of all 256 pages of wavetable storage using only two digits in the display Numbers 0 through 9 are represented by themselves the numbers 10 through 15 are represented by A through F Input A signa...

Page 43: ...basic waves Parameter Any changeable setting switch or command of the Mirage is called a parameter The Mirage uses a multi function panel through which parameters can be selected and controlled Tuning...

Page 44: ...into two sections usually 31 keys lower 30 keys upper Different sounds or different programs of the same sound can be loaded into each keyboard half Sustain The amplitude or filter level held from the...

Page 45: ...f When sounds are loaded Program 1 is automatically selected 11 Save Lower Keyboard Sound SL 12 Save Upper Keyboard Sound SU 13 Save Both Keyboard Sounds SA Command parameters that will tell the Mirag...

Page 46: ...lues and players with a light touch should use the higher values 24 Keyboard Balance 00 63 The KEYBOARD BALANCE will automatically set equal levels for the upper and lower halves of the keyboard VALUE...

Page 47: ...g in MIDI This is a useful function when using the Mirage in a multiple keyboard set up or when using it with external sequencers 31 LFO Speed 00 99 The LOW FREQUENCY OSCILLATOR SPEED parameter will c...

Page 48: ...nant peak of the filter It is adjustable from no peak VALUE 0 to just below oscillation VALUE 40 38 Filter Tracking 00 04 The FILTER KEYBOARD TRACKING parameter allows the note played on the keyboard...

Page 49: ...nds to reach the minimum level and at VALUE 0 it will release instantly 45 Filter Attack vs 00 31 The VELOCITYSENSITIVEFILTERATTACK parameter makes the filter attack rate dependent on key velocity At...

Page 50: ...tude that will be reached at the top of the attack slope It is adjustable from no sound at VALUE 0 to maximum output at VALUE 31 52 Decay Rate 00 31 Controls the rate at which the amplitude descends f...

Page 51: ...ent on release velocity At VALUE 0 velocity will have no effect on release rate Increasing the value will make the release rate more sensitive to key up velocity increased key up velocity will shorten...

Page 52: ...ing and starting values LOOPING Rather than assign valuable memory space to a portion of a wavesample that simply repeats the Mirage uses a technique called looping to extend the decay and sustain por...

Page 53: ...ll move the entire wavesample one sample to the right in memory Pressing the Off Down button will move the wavesample one sample to the left This parameter is called ROTATE because rather than becomin...

Page 54: ...t when sampling It is adjustable from 50Hz at VALUE 0 to 15kHz at VALUE 99 75 Line Level Input On Off Switching parameter to match the Mirage input to the sound source to be sampled in the current wav...

Page 55: ...Controller 1 Modulation Wheel 2 Breath Controller 4 Foot Pedal Controller 6 Data Entry Slider 7 Volume Pedal 8 After Touch Channel 9 After Touch Polyphonic 79 Mix Modulator Source 0 9 The MIX between...

Page 56: ...ny data it receives except clocks but will send data it creates In short when switched ON this parameter turns the Mirage s MIDI Out jack into a MIDI Thru jack 84 MIDI FUNCTION ENABLE 0 3 Selects whic...

Page 57: ...he footswitch between sustain pedal and remote sequencer switch ON In the record function the footswitch operates the same as the sequencer PLAY switch In the play function it operates as a remote STA...

Page 58: ...se the Mirage to load sounds or change upper or lower programs Consult the Owner s Manual of your particular MIDI controller for the proper program transmit number Following are two tables the first f...

Page 59: ...u set Parameter 84 on the Mirage to 3 you must press the Up Arrow button on the ESQ 1 following the program selection before the Mirage will respond Loading Sounds and Transmitting MIDI Program Change...

Page 60: ...s Ch s X X O O Pitch Bender O O Control Change Wheel 1 Breath 2 3 Foot 4 5 6 7 Sus Ped 64 O X X X X X X O O O O O O O O O Programmable Prog Change True 0 47 0 47 System Exclusive X X System Common So...

Page 61: ...control master turning pitch bend range velocity sensitivity adjustment upper lower keyboard balance Separate amplitude loudness and filter brightness envelopes Five independently controllable envelo...

Page 62: ...ored on diskette Dimensions 40 5 103cm wide x 4 10cm high x 13 5 34cm deep Weight 24 75 pounds 10 8 kilograms Options Ensoniq Sound Library Diskettes expanding library of sounds including keyboard str...

Reviews: