2-27
Options
Setting-up
Chapter 2
2
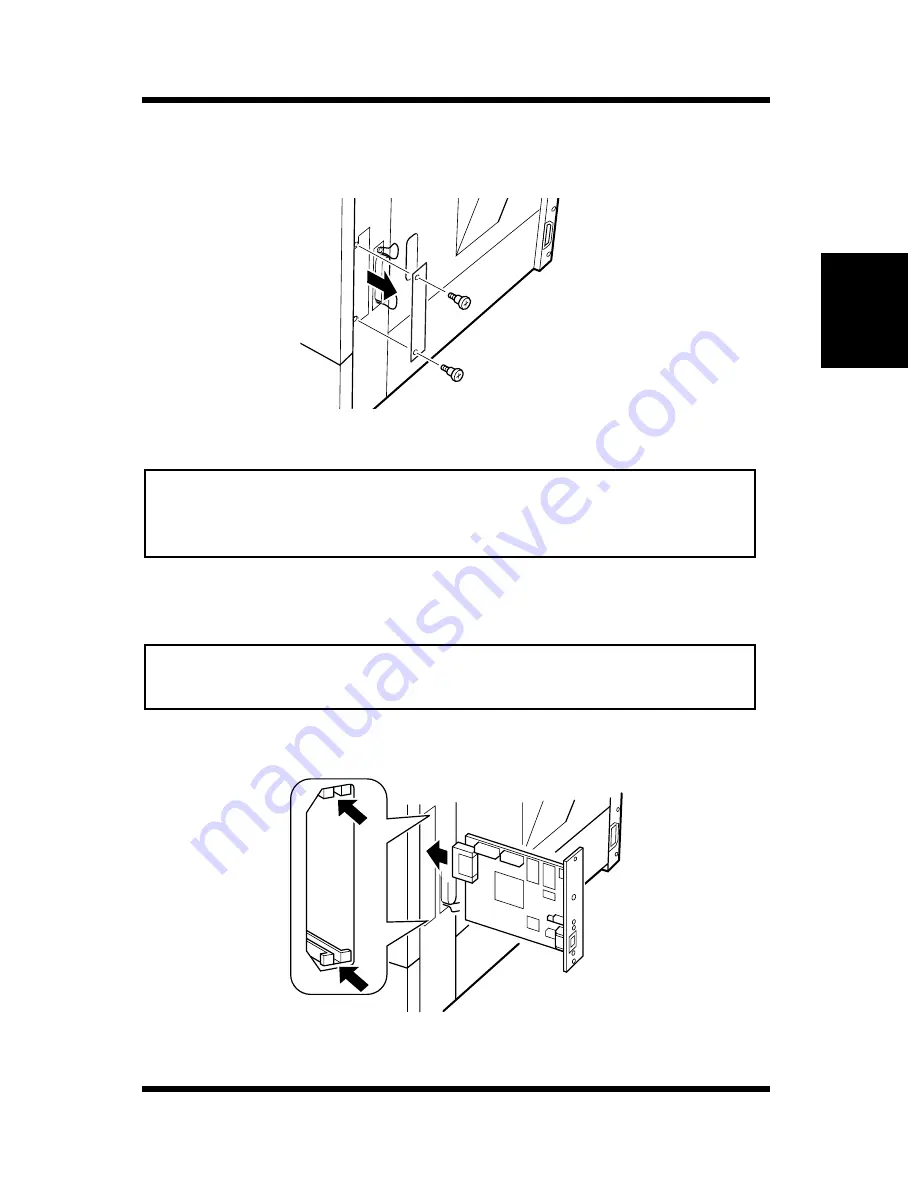
Remove the screw that secures the cover panel to the back of the
printer. Remove the cover panel.
Note
3
Take the NIC out of its carton.
Note
4
Insert the NIC as shown in the diagram.
• Make sure that you do not misplace the cover panel or screws when
you remove them. The screws will be used after the optional NIC is
installed.
• When the NIC is taken out of its conductive bag or off its mat, hold it
by its edges to avoid touching the terminals or the patterned surfaces.
Summary of Contents for PageWorks 18L
Page 1: ...User s Manual PageWorks18L...
Page 16: ...xiv Contents SIMM Option 7 8 Appendix A Glossary Appendix B Quick Reference Appendix C Index...
Page 17: ...Chapter Introduction 1 Introduction Chapter 1...
Page 18: ...Introduction Chapter 1...
Page 28: ...MEMO Introduction Chapter 1...
Page 29: ...Chapter Setting up 2 Setting up Chapter 2...
Page 30: ...Setting up Chapter 2...
Page 59: ...Chapter Using the Printer 3 Using the Printer Chapter 3...
Page 60: ...Using the Printer Chapter 3...
Page 66: ...3 6 Loading Paper Using the Printer Chapter 3 4 Replace the tray cover onto Tray 1...
Page 77: ...Chapter Printer Driver and Status Display 4 Printer Driver and Status Display Chapter 4...
Page 78: ...Printer Driver and Status Display Chapter 4...
Page 143: ...Chapter Maintenance 5 Maintenance Chapter 5...
Page 144: ...Maintenance Chapter 5...
Page 155: ...Chapter Troubleshooting 6 Troubleshooting Chapter 6...
Page 156: ...Troubleshooting Chapter 6...
Page 184: ...MEMO Troubleshooting Chapter 6...
Page 185: ...Chapter Specifications 7 Specifications Chapter 7...
Page 186: ...Specifications Chapter 7...
Page 195: ...Appendix Glossary A Glossary Appendix A...
Page 196: ...Glossary Appendix A...
Page 203: ...Appendix Quick Reference B Quick Reference Appendix B...
Page 204: ...Quick Reference Appendix B...
Page 211: ...Appendix Index C Index Appendix C...
Page 212: ...Index Appendix C...
Page 216: ...MEMO...
Page 217: ...MEMO...
Page 218: ...MEMO...


