background image

Lower Feeder Unit 

133

12

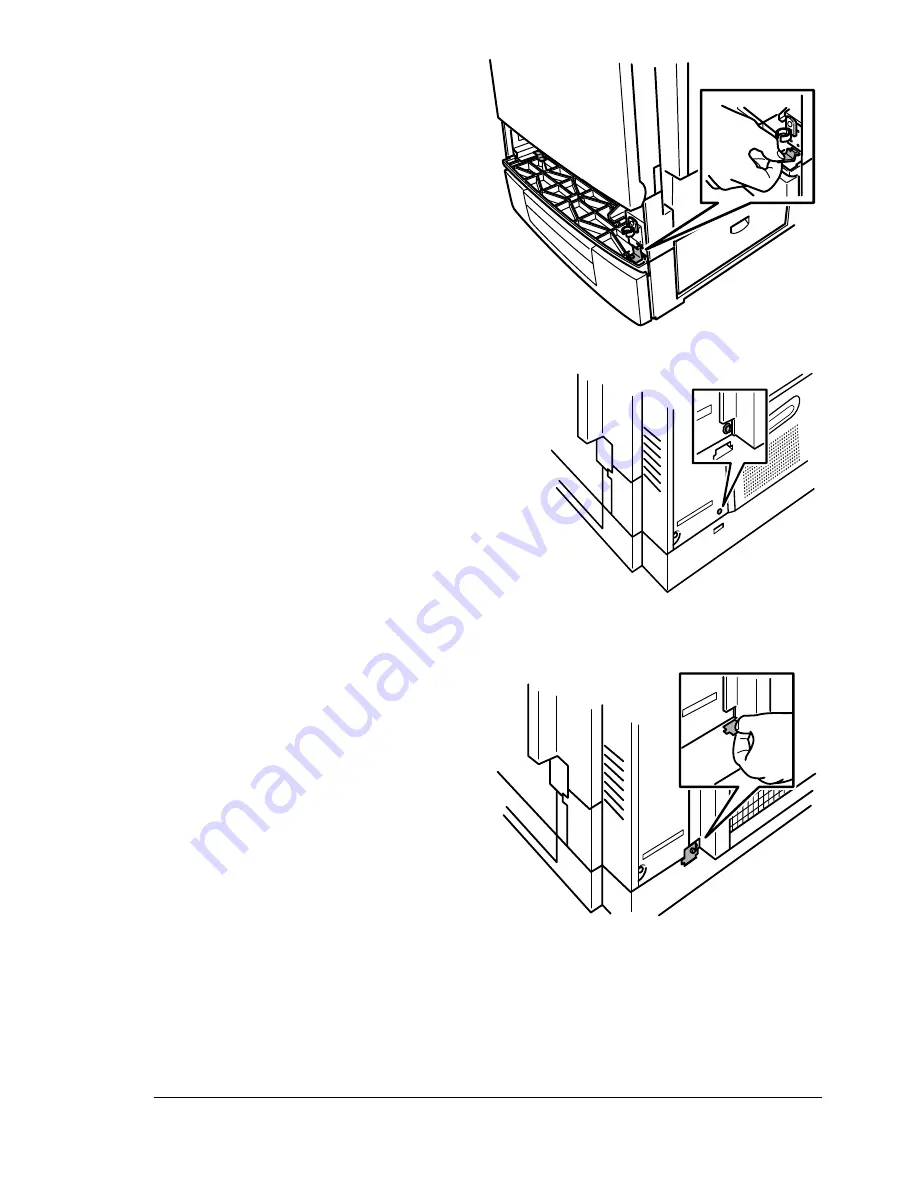
Hold bracket R on a slant to 
insert it from the front end 
into the bracket R slot on 
the right side of the printer 
frame, then hold bracket R 
level and secure it tightly 
with the thumbscrew. 

13

Unscrew the thumbscrew 
from the rear of the printer.

5

"

Retain this screw for use in 
step 15.

14

Hold bracket B on a slant and 
insert the front end into the 
bracket B slot. 

EDNord - Istedgade 37A - 9000 Aalborg - telefon 96333500

Summary of Contents for magicolor 2210

Page 1: ...magicolor 2210 User s Guide 1800669 001B EDNord Istedgade 37A 9000 Aalborg telefon 96333500...

Page 2: ...A QMS Inc Notice MINOLTA QMS Inc reserves the right to make changes to this guide and to the equipment described herein without notice Considerable effort has been made to ensure that this guide is fr...

Page 3: ...U DUWULGJHV 45 5HSODFLQJ WKH 23 UXP LW 46 DVWH 7RQHU 3DFN 23 UXP DUWULGJH DQG DVHU HQV RYHU 46 5HPRYLQJ WKH 8VHG DVWH 7RQHU 3DFN 46 5HPRYLQJ WKH 8VHG 23 UXP DUWULGJH 48 5HSODFLQJ WKH DVHU HQV RYHU 49...

Page 4: ...tatus Page 52 Preventing Media Jams 52 Automatic Jam Recovery 53 Understanding the Media Path 54 Media Tray Standard Upper Tray and Optional Tray 55 Lower Feed Unit LFU Tray s 55 Multipurpose Tray 55...

Page 5: ...tem Memory Requirements in MB 104 Installing a Duplex Unit 107 Emulations Fonts and Other Software 112 Emulations 112 Fonts 114 Kanji Font Internal IDE Hard Disk 115 5 bin Mailbox 117 QFORM 122 Planet...

Page 6: ...150 A Technical Specifications 153 Requirements 154 Space Requirements 154 Power Requirements 155 Location Requirements 155 Engine and Controller Specifications 157 Engine 157 Print Speed Simplex 157...

Page 7: ...1 Replacing Consumables EDNord Istedgade 37A 9000 Aalborg telefon 96333500...

Page 8: ...ndicate that a consumable needs to be replaced Item Message Display This item needs replacing by user after Page Reference Fuser oil roller REPLACE OIL ROLLER FUSER OIL LOW FUSER OIL EMPTY or REPLACE...

Page 9: ...since most color print jobs use all four toner colors A two sided color page may consist of up to eight passes of the OPC drum since most color print jobs use all four toner col ors Stated consumable...

Page 10: ...y to avoid spilling toner inside the printer or on yourself 5 The carbon particle toner is nontoxic If you get toner on your hands wash them in cool water or a neutral detergent If you get toner on yo...

Page 11: ...indicates the toner color Printing continues even though the out of toner warning appears However the color gradually fades so replace the toner cartridge as soon as possible Toner Cartridge Handling...

Page 12: ...the one showing go to step 5 If not go to step 3 3 Press the toner cartridge carrousel button c and release the button d before turning the carrousel dial e counterclockwise until it stops The carrou...

Page 13: ...NG Entsorgen Sie alte Tonerkassetten keinesfalls durch Verbrennen sondern ordnungsgem entsprechend den lokalen Bestimmungen 6 Remove the new toner cartridge from its shipping carton 7 Distribute the t...

Page 14: ...ion rails on the cartridge carrousel 10 Gently push the new cartridge into the printer 11 Close the printer s front cover Refilled Toner Cartridges Attention Refilled toner cartridges may produce vari...

Page 15: ...itive to hand oils and scratches both of which reduce print quality The three items below are included in the OPC drum kit If one needs replacing replace all three items Waste toner pack OPC drum cart...

Page 16: ...dle Keep the waste toner pack upright so the toner does not spill 3 Turn the two caps labeled A counterclockwise and remove them 4 Twist the two A caps c onto the two A holes d Turn the caps clockwise...

Page 17: ...e When the OPC drum is worn out the message REPLACE DRUM appears The printer will not print until the drum kit is replaced When you replace the OPC drum cartridge after a DRUM LOW or REPLACE DRUM mess...

Page 18: ...according to your local regulations 4 Continue with replacing the laser lens cover Replacing the Laser Lens Cover 1 Press on the laser lens cover lock release lever and gently pull the laser lens cov...

Page 19: ...could result 5 Continue with replacing the OPC drum cartridge Installing the New OPC Drum Cartridge 1 Remove the new OPC drum cartridge from its shipping box Attention Keep the protective sheet on th...

Page 20: ...handle of the OPC protective cover with the other hand 5 Peel the protective cover off straight toward you 5 Dispose of it properly according to your local regulations 6 Turn the left release lever o...

Page 21: ...onsumables Items Replaced Waste Toner menu choose Yes to reset the consumables monitoring system Replacing the Fuser Unit and Transfer Roller Kit WARNING The fuser unit can become extremely hot and ca...

Page 22: ...nsfer roller unit Replacing the Fuser Unit 1 Open the printer s top cover 2 Rotate the two fuser oil roller lock levers to release the fuser oil roller 3 Remove the fuser oil roller Hold it by the gre...

Page 23: ...ere is to be installed in the new fuser unit handle it with care If you set the fuser oil roller on the table do it as shown in the illustration Do not allow the roller surface to contact the table or...

Page 24: ...Transfer Roller Kit 22 6 Holding the fuser unit handles lift up the unit 5 Dispose of it properly according to your local regulations 7 Remove the new fuser from its shipping box EDNord Istedgade 37A...

Page 25: ...stallation holes in the fuser unit 9 Press in on the fuser unit release levers c and rotate them downward d This secures the fuser unit Attention If the fuser unit release levers are not set correctly...

Page 26: ...r into place 12 Close the printer s top cover Check the release button to make sure the top cover is properly closed Replacing the Transfer Roller Unit 5 If there is media in the multipurpose tray rem...

Page 27: ...from the fuser kit box Attention Do not touch the surface of the transfer roller unit This could lower image quality 4 Place the new transfer roller unit on a level surface 5 Lift up the two transfer...

Page 28: ...d cause severe burns Make sure the unit is cool before handling it ACHTUNG Die Fixiereinheit kann sehr hei werden so da Verbrennungsgefahr besteht Bitte lassen Sie die Fixiereinheit einige Zeit ab hle...

Page 29: ...fuser oil roller installation guides front rear into the fuser unit installation rail 5 Carefully lower the roller 6 Rotate the two oil roller levers to lock the oil roller into place Attention If the...

Page 30: ...er does not print Replace the trans fer belt After the new transfer belt is installed printing automatically resumes if you have not turned off the printer 1 Open the printer s front cover 2 Remove th...

Page 31: ...age could result Also handle the cartridge carefully by its sides so you don t touch the surface the green part of the drum The drum is also extremely sensitive to hand oils and scratches both of whic...

Page 32: ...8 Press on the transfer belt front handle with one hand take the handle of the transfer belt fixture with your other hand and pull the fixture straight toward you 5 Dispose of it properly according to...

Page 33: ...tall the OPC drum cartridge 11 Close the transfer belt lock lever 12 Check to make sure the laser lens cover is firmly seated 13 Reinstall the waste toner pack 14 Close the front cover 1 2 EDNord Iste...

Page 34: ...EDNord Istedgade 37A 9000 Aalborg telefon 96333500...

Page 35: ...2 Using Media EDNord Istedgade 37A 9000 Aalborg telefon 96333500...

Page 36: ...bossed warped or wrinkled Perforated or prepunched Too slick too coarse Composed of foil or gilt Coated with a processed surface such as carbon paper heat sensitive paper heat pressure paper Irregular...

Page 37: ...up Type Any standard or recycled office paper suitable for plain paper laser printers such as Hammermill Laser Print Georgia Pacific Microprint Laser 1000 Neusiedler Color Copy 90 Xerox 4024 Weight 16...

Page 38: ...placement Input Multipurpose Tray Only Up to 50 sheets depending on the thickness of the media Orientation Face down Type For information about thick stock media recommended for your printer go to ww...

Page 39: ...roved for laser printing with diagonal joints sharp folds and edges and ordinary gummed flaps such as Commercial 10 Columbian Recycled COR02 International DL Auto Fil 01914 Duplexing Not supported Not...

Page 40: ...t ing environment If problems occur stop the continuous print and print one sheet at a time Check your application documentation for other information on printing labels Formatting Format postcard dat...

Page 41: ...M PP2500 for monochrome printing Duplexing Not supported Notes If you touch the face of transparencies with your bare hands print quality may be affected Do not handle transparency media too much Do n...

Page 42: ...de range of media types it is not intended to print exclusively on a single media type except plain paper Continuous printing on media other than plain paper such as envelopes labels thick stock or tr...

Page 43: ...the multipur pose tray load the media printing side up with the top of the media toward the printer 5 The options in the driver are Simplex 1 sided pages or Long Edge flipped horizontally as in a loos...

Page 44: ...retainers The media should fit easily between the guides 4 Load the paper face up short edge toward the right of the tray Often an arrow on the media package label indicates the printing side of the...

Page 45: ...ved the tray from the printer slightly tilt up the tray to insert it into the installation rails to slide it back in Multipurpose Tray Page sizes other than letter A4 and legal can be printed only fro...

Page 46: ...on the right side of the printer 2 Open the media support Attention Load only one type size of media per tray at a time 3 Load the media face down short edge toward the printer F A C E D O W N EDNord...

Page 47: ...inserting the media A guide that is not properly adjusted can cause poor print quality media jams or printer damage 5 Specify the media size in the multipurpose tray by using the MP Size key on the co...

Page 48: ...nvelopes 6 Open the flap of each envelope immediately before it cools after the envelope is delivered to the output tray 5 Because the envelopes pass through heated rollers the gummed area on the flap...

Page 49: ...3 Maintaining the Printer EDNord Istedgade 37A 9000 Aalborg telefon 96333500...

Page 50: ...first then turn off the mailbox Either clean the printer before use or allow time after unplugging it to allow the fuser unit to cool down Attention The fuser unit is hot When the top cover is opened...

Page 51: ...er keep the printer level to avoid toner spillage If you get toner on your skin wash it off with cool water and neutral detergent WARNING If you get toner in your eyes wash it out immediately with coo...

Page 52: ...t damp cloth to clean the printer exterior Sharp or rough implements such as wire or plastic cleaning pads Mild detergent to clean the printer exterior Abrasive or corrosive solutions that contain sol...

Page 53: ...4 Troubleshooting EDNord Istedgade 37A 9000 Aalborg telefon 96333500...

Page 54: ...ED is on Make sure that Avoid Media matches the printer specifi cations Media that is folded wrinkled or excessively curled Media is flat especially on the lead ing edge Double feeding remove the medi...

Page 55: ...t qual ity paper jams or printer damage Allowing the output tray to overfill the face down output tray has a 500 sheet capacity jamming may occur if you allow media to accumu late more than 500 sheets...

Page 56: ...Transfer belt g g g g OPC drum cartridge h h h h Duplex unit optional i i i i Multipurpose tray j j j j Upper media tray k k k k Lower feeder unit LFU and optional tray optional l l l l 5 bin mailbox...

Page 57: ...it Optional The media is picked from a media tray passed under the transfer belt passed through the fuser fed into the duplex unit where the media undergoes a change in direction cycles through the tr...

Page 58: ...oner in your eyes wash it out immediately and consult a doctor Material Safety Data Sheets MSDS information can be found at www minolta qms com click on the Answer Base ACHTUNG Sollte Toner in Ihre Au...

Page 59: ...Reinsert the media printing face up Make sure the media is lying flat is under the media separating tabs and doesn t exceed the media limit mark Check to see if the media width guides are correct 5 S...

Page 60: ...the media limit mark Check to see if the media width guides are correct 5 Open the front cover then close it The media jam message is no longer displayed in the printer message window Clearing Inner...

Page 61: ...right side cover release button and carefully open the cover all the way 3 Remove the jammed media by pulling it slowly from the bottom of the fuser Attention Do not pull jammed media from the top of...

Page 62: ...was removed in step 1 and even up the front edges 8 Reinsert the media printing face down Make sure the media is lying flat and doesn t exceed the media limit mark Check to see if the media width guid...

Page 63: ...eft hand and carefully remove the jammed media in the duplex media feed area with your right hand 4 Close the media jam removal cover with your left hand and close the top cover 5 Check the release bu...

Page 64: ...am message press the right side cover release button and carefully open the cover all the way 12 Lift the inner paper guide 13 Remove the jammed media by pulling it toward you If the media came out ea...

Page 65: ...jam message is no longer displayed in the printer message window Media Jams near the Fuser Unit 1 Open the top cover Attention Do not pull jammed media from the top of the printer through the fusing r...

Page 66: ...d media by pull ing it slowly from the bottom of the fuser Be careful not to touch the transfer belt while removing jammed media 8 Close the right side cover Check the release button to make sure the...

Page 67: ...remove the jammed media from the paper eject area of the mailbox 2 Open the mailbox door 3 Lift up the paper jam removal guide in the mailbox with your left hand and use your right hand to carefully...

Page 68: ...h the printer together The front edges of the media are not even Remove the havemedia and even up the front edges then reload it The media is moist from humidity Remove the moist media and replace it...

Page 69: ...If you removed jammed media from near the OPC drum reset the OPC drum s locking levers Media is jamming The media is not correctly positioned in the tray Remove the jammed media aand reposition the me...

Page 70: ...pose tray so the the flaps are facing up If the flaps are on the short edge set the envelopes in the multipurpose tray so that the flaps are on the printer side Multiple sheets of transparency OHP med...

Page 71: ...ower cord socket end to the mailbox power plug upper connection Plug the printer power cord into the outlet Something is wrong with the out let you are using for the printer Plug another electrical ap...

Page 72: ...luctuation rate within 50 60 3 Hz Note If you experience problems the first thing you want to do is print a status page You can t print a sta tus page Is the printer off line before you try to enter t...

Page 73: ...in Data indicator stays on Too many type faces are being downloaded at the same time Make sure you have enough printer memory Printer resets Occasionally soft ware applications interfere with each ot...

Page 74: ...artridges is defective empty or missing Check the toner cartridges The image does not print if the cartridges are empty If the toner cartridges are not empty and blank pages are ejecting take each car...

Page 75: ...then close the covers to confirm that they are securely closed If you turned the printer off make sure that you have turned the printer on again and waited for it to warm up Transfer belt can not be r...

Page 76: ...s too light there is low image density Image darkness sensor is dirty Open the front cover Lift up the transfer belt release lever to the 12 o clock posi tion Next return the lever to the 3 o clock po...

Page 77: ...drum cartridge is damaged Remove the OPC drum cartridge and check for damage If necessary replace the entire drum kit The transfer roller unit is misinstalled Reset the transfer roller unit Horizon t...

Page 78: ...ered by the printer warranty Your media type may be incorrectly set Envelopes glossy stock labels trans fer media and thick stock have to be set in the Thick Stock mode The print or color density may...

Page 79: ...f the toner cartridges is defective Remove the toner cartridge and check for damage If necessary replace it The OPC drum cartridge is damaged Remove the OPC drum cartridge and check for damage If nece...

Page 80: ...y replace the entire drum kit Image is too dark One or more of the toner cartridges is defective Remove the toner cartridge and check for damage If necessary replace it The OPC drum cartridge is damag...

Page 81: ...eck the toner car tridges Install new ones if neces sary The image transfer roller need cleaning If toner smudges are on the front and back of the page Open the printer front cover once and close it a...

Page 82: ...oller and check the roller surface for dirt or worn places If necessary replace the fuser oil roller One or more of the toner cartridges is defective Remove the toner cartridge and check for damage If...

Page 83: ...eral image defects have 1 2 mm spacing The laser lens cover is dirty Clean the laser lens cover Lateral image defects have 35 mm spacing The toner cartridge is damaged Remove the toner cartridge with...

Page 84: ...lines or bands appear on image The printer is not on a level enough surface Level the printer not exceeding 1 5 slant The media path is dirty with toner Print several sheets and the excess toner shou...

Page 85: ...ective The item may be defective or misin stalled Remove the designate item check it for damage and reinstall it If necessary replace the entire drum kit The OPC drum may be defective or misinstalled...

Page 86: ...media is moist from humidity Remove the moist media and replace it with new dry media The transfer roller is misinstalled Confirm the proper installation of the transfer roller Agfa Screening is not...

Page 87: ...g jobs X identifies the number of jobs in process No action needed X COVER OPEN The X specified cover is open and must be closed Close the cover X LIFE LOW The X specified item is near end of life suc...

Page 88: ...FILE 80 FULL The Job Accounting File is 80 85 90 or 95 full If you want accounting enabled copy the job accounting and paper accounting files to floppy disk s or transfer them to your host computer u...

Page 89: ...AIDC cycle This process is provided to make sure reliable printer operation with optimum output quality Wait No action needed CANCEL ALL JOBS The Cancel key has been pressed and one or more of the pri...

Page 90: ...sed and the End Job option selected Press Select to provide an end of job indica tor for a print job that does not have one ENERGY SAVER The printer is in energy saver mode to reduce power con sumptio...

Page 91: ...is warming up and getting ready to go on line Wait No other action needed INPUT BIN JAM Input bin jams occur in the input bin Locate and remove the jam INPUT IDLE PRINTING The printer is on line and...

Page 92: ...as been detected between the fuser and output tray rollers located near the top cover Exit jams occur in the media eject area MEDIA JAM FUSER Media has jammed leaving the fuser area MEDIA JAM MAIL BIN...

Page 93: ...move the jam MEDIA JAM UPPER TRAY Media has jammed while being pulled from the specified tray MEDIA SIZE MISMATCH The media detected in the tray doesn t match the media size setting Change the media i...

Page 94: ...is set to Off and the displayed tray is empty Refill it with the specified size media SIZE is the media size detected by the engine and BIN is the empty tray Refill the tray with the specified size m...

Page 95: ...el key No other jobs can be printed until this job has ended Wait until the job is finished and the printer goes idle to access the config uration menu WARMING UP The printer is warming up Wait No oth...

Page 96: ...f an unusual combination of events not because of an actual problem When the printer stops and a service message displays in the message window turn the printer off and then back on This often clears...

Page 97: ...umes Always try this before making a service call Service calls should be placed to the ven dor from whom you purchased the printer If you cannot get service from your vendor see the Service Support G...

Page 98: ...tion resumes Always try this before making a service call Service calls should be placed to the ven dor from whom you purchased the printer If you cannot get service from your vendor see the Service S...

Page 99: ...1 Too many transformations 1 State lost 2 Math error 2 Math error 3 Job aborted 3 Job aborted 4 Instruction not recognized 4 Out of memory for macros 5 Wrong number of parame ters 5 Disk full Cannot...

Page 100: ...oblems you can t solve refer to the Service Support Guide or visit our web site at www minolta qms com for current information on getting help Menu Administration Startup Options Do Error Handler Choi...

Page 101: ...5 Installing Other Accessories EDNord Istedgade 37A 9000 Aalborg telefon 96333500...

Page 102: ...er Software ImageServer TIFF CALS LNO3 CGM Kanji Font Internal IDE Hard Disk QFORM PlanetPress forms creation utility Fonts Interfaces and Daughterboards Crown for DECnet TCP IP equipped with 10BaseT...

Page 103: ...ent Turn off all power switches first Plastic rubber wood painted metal surfaces and telephones are not acceptable grounding points The printer isn t an acceptable grounding point either because it mu...

Page 104: ...rt unplug it from the printer 2 Attach one end of the parallel cable on the interface box to the printer s parallel port 5 The BuzzBox s ribbon cable is designed to be directly attached to the printer...

Page 105: ...e key to take the printer off line 5 You can use the BuzzBox switches to enable or disable the buzzer the light or both When the printer goes off line the light flashes and the buzzer sounds until the...

Page 106: ...d of the required 256 MB minimum the file prints at 600x600 dpi The magicolor 2210 will print all print jobs at the highest resolution that the installed memory will support Minimum System Memory Requ...

Page 107: ...e a problem with your magicolor 2210 first go through the installation procedure in this guide once more Verify each item thoroughly You may also refer to the User s Guide for troubleshooting tips If...

Page 108: ...s flat and the I O connector panel is facing you 5 If you need to remove a DIMM before installing one remove it as follows otherwise skip to step 6 5 If all the DIMM connectors are filled and you want...

Page 109: ...oller board into the printer until it is fully seated and then tighten the five screws When you print a startup page verify that the total size of the RAM installed in your printer is listed Installin...

Page 110: ...the tape from the unit 3 Open the multipurpose tray 4 Remove the two thumbscrews from the right side cover 5 Retain these screws in case you need to remove the duplex unit in the future EDNord Istedg...

Page 111: ...ward you lift it and unhook it from its frame 8 With the multipurpose tray still open close the right side cover 9 Insert the bottom of the duplex unit at a shallow angle into the right side cover To...

Page 112: ...Unit 110 10 Press the top of the duplex unit in 11 Open the duplex unit paper path cover 12 Secure the duplex unit tightly with the two thumbscrews supplied in the kit EDNord Istedgade 37A 9000 Aalbo...

Page 113: ...ex Unit 111 13 Close the duplex paper path cover and multipurpose tray 14 Open the right side cover 15 Extend the spring wire for the duplex unit about 1 foot 30 5 cm EDNord Istedgade 37A 9000 Aalborg...

Page 114: ...of memory above the base configuration and that you add at least 1 MB memory to each emulation installed This ensures that the printer can run the emulation without slowing down performance Downloadin...

Page 115: ...prompted for a user name and password press Enter for both An ftp prompt displays 6 At the ftp prompt change to binary mode by typing bin 7 At the ftp prompt send the emulation file to the printer s h...

Page 116: ...t disk or CD ROM in your PC and change to that drive for example if you re using the A drive type a 3 Send the fonts to the printer s hard disk Type copy filenamelp 1 where filename is the name of the...

Page 117: ...end the ftp session by typing quit 10 When the Disk light stops flashing and the printer s message window reads IDLE for at least 30 seconds turn the printer off and then on again 11 When the printer...

Page 118: ...n such as a word processing or desktop publishing pack age that supports the PostScript printing If you re using a Macintosh the following Macintosh system software z KanjiTalk version J1 6 0 7 or lat...

Page 119: ...ard Disk Drive on page 127 for detailed steps on installing an internal hard disk Attention If you already have an internal hard disk installed you must remove it before you can install the Kanji disk...

Page 120: ...terial 3 Open the mailbox unit cover and remove any packing material from the rear of the mailbox unit 4 Close the mailbox unit cover 5 Remove any packing material from the front of the mailbox unit E...

Page 121: ...pin and the positioning guide for the mailbox 8 Slowly lower the mailbox unit so that the two pins at the bottom fit into the two holes in the printer and the pin on the printer fits into the hole at...

Page 122: ...e tab on the mailbox then press on the left side of the accessory screen cover so the tab on that side fits into the slot on the mailbox 12 Remove the five plastic bins from their packaging 13 Hold a...

Page 123: ...it lower connection 16 Plug the other end of the power cord into the printer 17 Make sure the printer is turned off 18 Make sure the 5 bin mailbox is turned off Attention Always turn off the printer b...

Page 124: ...page formatting and fonts Duplexing with binding margin offsets Two sided forms with text fill in on front and or back Gray bar listing formats Automatic page numbering ANSI carriage control recogniti...

Page 125: ...er words your printer can simultaneously communicate through all three ports with three hosts either computers or networks If installing a Token Ring optional interface card see the Notices section in...

Page 126: ...troller board b Position the interface card so that its I O connector slides into its opening in the interface panel and that its 80 pin connector aligns with the 80 pin connector on the controller bo...

Page 127: ...n on connecting to the network installing the software and configuring the interface and the network You can also use the documentation that came with the interface SCSI Interface The optional SCSI in...

Page 128: ...e SCSI interface opening 4 You can dispose of the metal plate and screws according to local regulations 5 Attach the SCSI interface card to the controller board a Position the SCSI interface card so t...

Page 129: ...rtup page lists the interface SCSI just installed under Options Using a SCSI Interface 5 Installing a SCSI interface allows the attachment of external SCSI storage devices such as hard drives JAZ and...

Page 130: ...d will not function if any of the leads are broken or shorted together 1 Ensure that the printer is turned off and the power cord and all interface cables are disconnected 2 Loosen five screws from th...

Page 131: ...mly on the cable connector until it is fully seated Attention Do not push or pull with the ribbon cable Use the cable connector 8 Align the support posts with the holes on the controller board and the...

Page 132: ...e printer level when moving it to prevent accidental spills If your printer is located in its permanent location follow this procedure Otherwise skip to step 3 1 Pull out the two carrying bars on the...

Page 133: ...will be located 4 Slide out the optional media tray from lower feeder unit 5 Remove any tape and packing material 6 Put media in the optional tray 7 Slide the optional media tray all the way into the...

Page 134: ...he hand grips d 10 Slowly lower the printer onto the lower feeder unit lining up the four holes in the bottom of the printer with the corresponding pins in the lower feeder unit 11 Place bracket L on...

Page 135: ...t side of the printer frame then hold bracket R level and secure it tightly with the thumbscrew 13 Unscrew the thumbscrew from the rear of the printer 5 Retain this screw for use in step 15 14 Hold br...

Page 136: ...tray tray 2 The optional lower feeder unit has another 500 sheet optional media tray that provides two main benefits Expanded flexibility to switch media size color and type without having to unload a...

Page 137: ...y connecting an SC 210 digital color convenience copier option to the standard parallel port on the printer interface set to non interactive The SC 210 supports up to legal size paper An optional 25 s...

Page 138: ...rectly installed or replaced Replace it only with a supported MINOLTA QMS time of day clock Dispose of any used time of day clock in accordance with local laws and regulations ACTUNG Da der Uhrenbaust...

Page 139: ...with the pin 1 notch or printed label on the controller board d Gently press down on the time of day clock until it s firmly seated 5 Reinstall the controller board Gently slide the controller board i...

Page 140: ...EDNord Istedgade 37A 9000 Aalborg telefon 96333500...

Page 141: ...6 Color Printing EDNord Istedgade 37A 9000 Aalborg telefon 96333500...

Page 142: ...color output Now even a novice can produce professional quality colorized documents without the use of sophisti cated manual optimization techniques The following is a summary of MINOLTA QMS QCOLOR au...

Page 143: ...lt color matching for a variety of common monitors and printing presses Download device profiles For custom color matching QCOLOR sup ports downloaded to disk only ICC profiles Support for Internet st...

Page 144: ...EDNord Istedgade 37A 9000 Aalborg telefon 96333500...

Page 145: ...7 Repacking the Printer EDNord Istedgade 37A 9000 Aalborg telefon 96333500...

Page 146: ...nter 2 If the printer has a lower feeder unit and or a 5 bin mailbox remove them 3 If you are moving to a distant location follow the instructions for repacking the printer 4 Relocate the printer WARN...

Page 147: ...disposable strapping and buckling supplies These supplies must be replaced prior to shipping the printer If you need replacement packaging in the United States call MINOLTA QMS Spares at 251 633 4300...

Page 148: ...n off the printer 2 Remove the power cable and all interface cables Remove the Fuser Oil Roller WARNING The fuser unit can become extremely hot and cause severe burns Make sure the unit is cool before...

Page 149: ...m cartridge from dam age and light Remove Transfer Belt 1 Remove the transfer belt and store it in a plastic bag in a box to avoid toner spillage 2 Close the printer s front cover Remove the Duplex Un...

Page 150: ...ou don t have a lower feeder unit installed skip to the next section 1 Remove the rear bracket securing the lower feeder unit to the printer 2 Remove the upper media tray 3 Remove the brackets on the...

Page 151: ...and request part number 2600674 901 for the repacking kit Refer to the Service Support Guide or www minolta qms com for locations outside the United States 1 Place the lower cushions into the shippin...

Page 152: ...place them in the shipping carton 5 Don t ship these items if you re returning the printer for service 7 Securely tape the top flaps of the shipping carton closed Strapping Buckling Kit Contents 4 le...

Page 153: ...ping together at the approximate center of the top of the printer 3 Thread both ends up through the center of the buckle 4 Weave the slack of one end through the buckle 5 Pull the slack on that end so...

Page 154: ...uckle is taut against the printer box 8 Pull the buckle against the printer as tightly as possible Some slack may still exist 9 Repeat this procedure three more times spacing the straps equidistant ac...

Page 155: ...A Technical Specifications EDNord Istedgade 37A 9000 Aalborg telefon 96333500...

Page 156: ...r replacing supplies and removing media jams If you have added accessories the printer s height will increase by Lower feeder unit 4 6 116 5 mm Duplex unit 0 0 mm 5 bin mailbox 15 34 400 mm 4 100 mm 4...

Page 157: ...ange of 50 95 F 10 35 C and relative humidity range of 15 85 noncondensating Power Japan 100 VAC 50 60 Hz 12 amps North America 120 VAC 50 60 Hz 8 amps Europe 220 240 VAC 50 60 Hz 6 amps Latin America...

Page 158: ...easily burn At an altitude of 0 8202 0 2500 m Away from items that produce excessive vibration Near your computer 6 5 2 m or less for an IEEE 1284 bidirectional par allel connection cables for other c...

Page 159: ...changes to a low power state the engine remains on but the fuser turns off When a print job is received the printer returns to normal power within a user configurable time period Engine and Controller...

Page 160: ...r Semiconductor laser with rotating mirror Recorder Black writing electrophotographic Process Cyan magenta yellow and black dry toner image transfer to print media Fuser Heated rollers Resolution Stan...

Page 161: ...or Type 1 and Type 3 host resident downloadable PostScript fonts TrueType Support for Type 42 PostScript format host resident downloadable TrueType fonts support for TrueType fonts in PCL Kanji fonts...

Page 162: ...t Guide for a complete listing of support telephone numbers Time of day clock Optional socket provided for Job accounting Crown job accounting requires an optional IDE drive Warning function convenien...

Page 163: ...nsing Temperature range Operating 50 95 F 10 35 C Transportation Storage 32 95 F 0 35 C Altitude Operating 0 8202 ft 0 2500 m Inclination Operating 1 or less slant at any point around the machine 80 6...

Page 164: ...including consumabl es Shipping 117 lbs 53 kg Shipping Printer 117 lbs 53 kg Lower Input Feeder 31 lbs 14 kg Shipping Printer 117 lbs 53 kg Lower Input Feeder 14 8 lbs 6 7 kg Duplex Unit 5 3 lbs 2 4 k...

Page 165: ...current date Date End comments EndComments Print document owner For Print document host Host Page Job completion notification via email Notify Select page order PageOrder Save job for reprinting proof...

Page 166: ...t number of lines per inch IncludeFeature linesperinch Set point size IncludeFeature pointsize Resource IncludeFeature resource Lineprinter Emulation Commands Select font for current job IncludeFeatur...

Page 167: ...background Set printer resolution IncludeFeature resolution Print page range IncludeFeature pagerange Duplex printing IncludeFeature duplex Collate print job IncludeFeature collate Logical page size...

Page 168: ...Specify default paper size IncludeFeature paper_size Control transformation point IncludeFeature paper_size_override Adjust image horizontally IncludeFeature xorigin Adjust image vertically IncludeFea...

Page 169: ...100 CrownNet for Token Ring 100 Daughterboards 100 DIMMs 103 Dual In Line Memory Modules DIMMs 100 Duplex unit 107 Emulations 100 Fonts 100 Hard disk 127 ImageServer 100 Installation 101 Interfaces 1...

Page 170: ...1 QCOLOR Technology 140 See also the CrownBooks 141 Consumables Life Expectancy 6 Replacement 6 Continuous printing 40 Control panel messages 85 Controller Board removal 106 Specifications 159 Convien...

Page 171: ...P GL DOC 163 I IDE hard disk 127 Idle Status message 89 Idle message 89 Image darkness sensor 75 ImageServer 112 Initializing Status message 89 Installation Accessories 101 BuzzBox 102 Duplex unit 107...

Page 172: ...and outer jams 58 Inner outer and drum jams 58 Lower right side door 58 Outer inner and drum jams 58 Vertical transport area 58 Memory modules DIMMs Dual in line memory modules 103 Memory requirements...

Page 173: ...38 Method 158 Speed 157 158 Printing status message 92 Proof and print 163 Put x paper in any bin message 92 Put x paper in x bin message 92 Q QFORM 122 Q SHOP 8 R Relocating your printer 144 Relocat...

Page 174: ...87 Created files 88 Creating x file 88 End job 88 End job 93 Extended accounting file size 88 Fuser oil roller Fuser oil empty 89 Idle 89 Idle input printing 89 Initializing 89 Mailbox jam 90 Please w...

Page 175: ...much time 72 Status service and error messages 85 U UNIX 113 Upper standard tray 41 V Ventilation grilles 156 W Waiting for idle message 92 Waiting for idle status message 92 Waiting on input end job...

Page 176: ...EDNord Istedgade 37A 9000 Aalborg telefon 96333500...

Reviews: