


:enter
:size
12
F
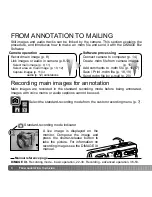
ROM ANNOTATION TO MAILING
Press the center of the controller to select the area. The audio stand-by
screen is displayed.
In the stand-by screen, press the shutter-release button to begin
recording. The frame counter displays the elapsed time; during the
last ten seconds, the counter will turn red and count down the time.
The recording stops when the shutter-release button is pressed
again or the remaining time has elapsed.
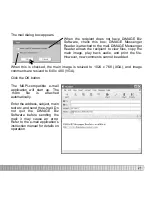
The annotation screen with the selected main image
is displayed with a red area marquee. The subsequent
audio track is linked to the area in the marquee.
Pressing the display button switches the marquee
between the entire and local image areas.
Annotation screen
When making audio recordings, be careful not to touch
or cover the microphone. For best results, hold the
camera approximately 20cm (8in) from your mouth.
Use the left/right and up/down keys of the
controller to move the area marquee.
To exit the audio-annotation mode, press the center of the controller for one second. To
return to the main-image selection screen, press the menu button.
Press shutter button
to record.
:enter
:size
The main image is displayed again. The yellow marquee indicates
the previous marquee position. The red marquee is for the next
linked audio track. Repeat the procedure to record subsequent
tracks. The audio files are stored in WAV format on the memory
card, but they do not appear in the main-image selection screen.
Recording audio.
Press shutter button to stop.
:enter
:size


