-Replace the brewing unit by turning it into the right posi-
tion (the outlet tube facing downwards and to the front),
insert the brewing unit into the guide grooves and push it
completely into the coffee machine.
-Push the coffee grounds container back into the
appliance and push the outlet unit into the upper posi-
tion. Close the door.
The cleaning programme is complete when the “ Clea-
ning programme” display goes out.
Remove the water tank (G) and fill it with minimum 1L
fresh water.
Replace the water tank.
The coffee machine is now ready for operation again and
returns to the last selected coffee mode.
CAUTION:
Residues of descaler may cause damage to the brewing
unit in the long run!
It is imperative that you rinse the brewing unit thoroughly
after every descaling process.
Anomalies and repair
- Take the appliance to an authorised technical support
service if product is damaged or other problems arise.
Do not attempt to disassemble or repair the appliance
yourself as this may be dangerous.
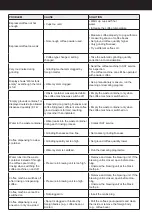
- If any anomaly is detected, check the following table:
CAUSE
SOLUTION
Brewing unit
soiled.
Remove the brewing
unit and rinse it
thoroughly with
flowing water.
Brewing unit
soiled.
Insert the brewing
unit into the
appliance and close
the door.
Grinding
fineness is
set too fine or
coffee powder
used is too fine
Set a coarse grinding
fineness or use diffe
-
rent, coarser coffee
powder.
Communication
failure
If one of these
messages are
displayed, switch the
device off.
Switch back on again
after a cooling down
phase of approx. 30
minutes.
If the message is
displayed again, an
error has occurred
that may need a
technical evaluation.
Input voltage
error
Main switch
blocked
Coffee
temperature is
incorrect
Brewing unit
is blocked
(technical
reason).
Use the splined
opening on the
measuring spoon to
open the back of the
brewing unit with the
splined journal
(min.3 turns)


