background image


miniDSP Ltd, Hong Kong / 

www.minidsp.com

 / Features and specifications subject to change without prior notice


11 

2


H

ARDWARE 

C

ONNECTIVITY


All connections to the 

DDRC-88D

 are made on the rear panel. 

2.1


D

IGITAL INPUT AND OUTPUT


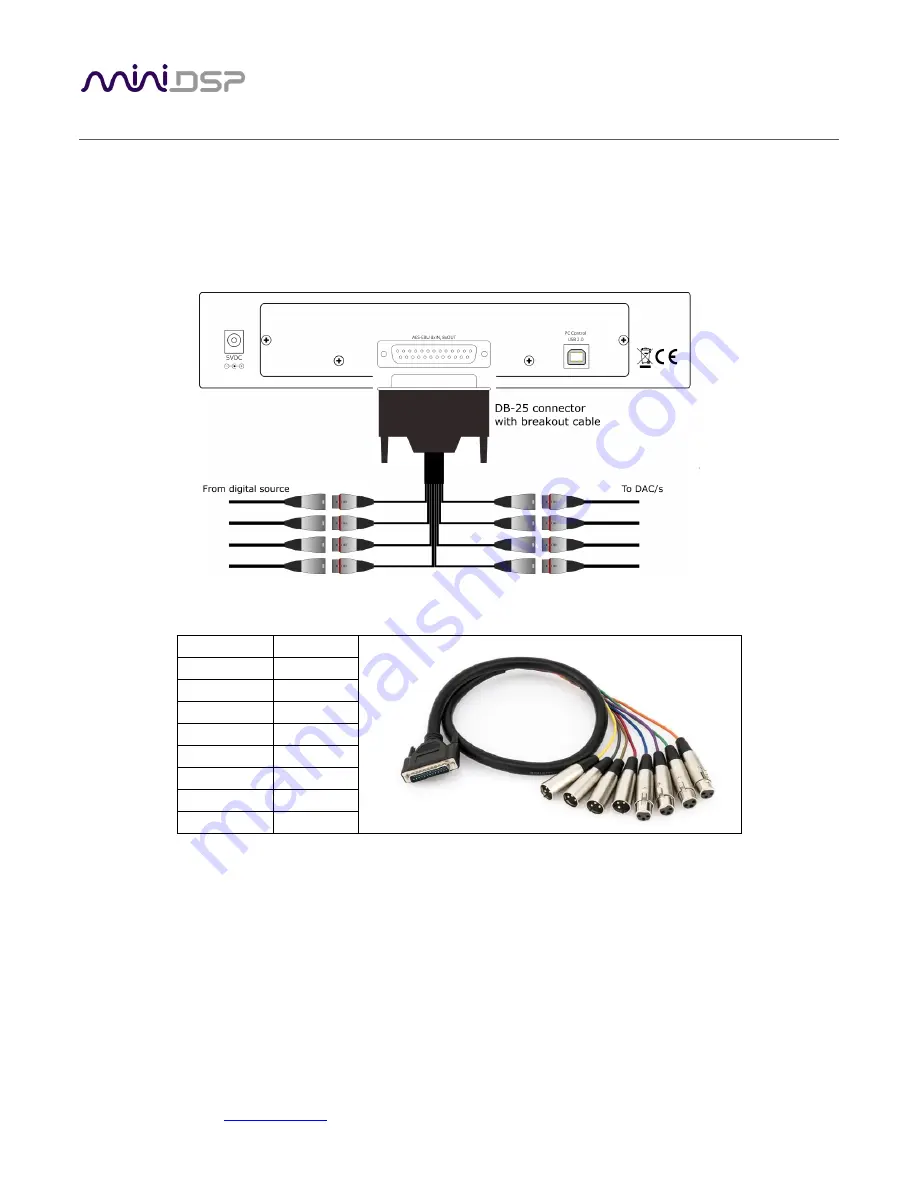
Up to eight channels can be connected to the 

DDRC-88D

 via the supplied DB-25 breakout cable. 4 AES/EBU 

digital inputs and four AES/EBU digital outputs are present on the connector using the TASCAM pinout. 


The supplied cable has the following channel assignment: 

Channels 

Color 


In 1&2 

Purple 

In 3&4 

Blue 

In 5&6 

Green 

In 7&8 

Orange 

Out 1&2 

Yellow 

Out 3&4 

Red 

Out 5&6 

Grey 

Out 7&8 

Brown 


Input sample rate 


All inputs have asynchronous sample rate conversion (ASRC) and accept sample rates from 32 to 
192 kHz. Each pair of channels can have a difference sample rate. 

Output sample rate 


All outputs run at the sample rate of input channels 1 and 2. If there is no signal on input 
channels 1 and 2, all output channels run at 48 kHz. 

Note that the internal sample rate is 48 kHz regardless. An asynchronous sample rate conversion on the output 
channels is used to produce data at the sample rate detected on input channels 1 and 2, thus preserving the 
sample rate integrity of the system as a whole. 

Summary of Contents for DDRC-88D

Page 1: ...nidsp com Features and specifications subject to change without prior notice 1 DDRC 88D 8 CHANNEL AUDIO PROCESSOR WITH DIRAC LIVE TECHNOLOGY AND OPTIONAL UPGRADE FOR BASS MANAGEMENT AND CROSSOVER Digi...

Page 2: ...SP Ltd Hong Kong www minidsp com Features and specifications subject to change without prior notice 2 Revision history Revision Description Date 0 1 First draft 31 July 2017 1 0 Public release 4 Sept...

Page 3: ...installation 15 3 3 3 Dirac Live Calibration Tool DLCT installation 15 4 The DDRC 88BM Plugin 16 4 1 Plugin user interface basic mode 16 4 2 Synchronizing with the DDRC 88D 17 4 3 Master control 17 4...

Page 4: ...r interface enhanced bass management mode 40 8 2 Signal flow 41 8 3 Plugin design configuration guide 42 8 4 Connecting and configurations 43 8 4 1 Connection options 43 8 4 2 More about configuration...

Page 5: ...or incorrect configuration of this product Please read this manual carefully to ensure that you fully understand how to operate and use this product as incorrect use or use beyond the parameters and...

Page 6: ...ment off and on the user is encouraged to try to correct the interference by one or more of the following measures Reorient or relocate the receiving antenna Increase the separation between the equipm...

Page 7: ...outputs are digital AES EBU x 4 provided on a DB 25 connector All output channels are sample rate converted to the same rate as the input channels 1 and 2 to preserve system sample rate integrity The...

Page 8: ...e transient An ideal loudspeaker has none of these so correcting the impulse response makes the speaker in the room behave much more like that ideal loudspeaker The impulse response is a critical fact...

Page 9: ...es of acoustic measurements using the Dirac Live Calibration Tool for miniDSP program to capture the acoustic behavior of your speakers and room See Section 5 Acoustic Measurement for Dirac Live 3 Gen...

Page 10: ...annel in order to implement for example active crossovers or multisub management See Section 8 Enhanced Bass Management Mode 3 Run a series of acoustic measurements using the Dirac Live Calibration To...

Page 11: ...Purple In 3 4 Blue In 5 6 Green In 7 8 Orange Out 1 2 Yellow Out 3 4 Red Out 5 6 Grey Out 7 8 Brown Input sample rate All inputs have asynchronous sample rate conversion ASRC and accept sample rates...

Page 12: ...ns have been made The DDRC 88D uses little power and can be left powered on all the time 2 3 USB To configure the DDRC 88D using Dirac Live Calibration Tool for miniDSP Connect the USB port of the DDR...

Page 13: ...n Mac double click The folder containing the software has a name like DDRC 88 BM_v1_4 and will contain the following folders Dirac Live This folder contains the installers for Dirac Live Calibration T...

Page 14: ...or x64 64 bit operating system 3 2 2 DDRC 88BM plugin installation 1 Navigate to the Plugins folder of the software download and then to the Windows folder 2 Double click on the DDRC_88_BM_v1_4 exe in...

Page 15: ...lick and open as described above We recommend that you accept the default installation settings 3 To run the DDRC 88BM plugin locate DDRC 88 BM app in the Applications miniDSP folder and double click...

Page 16: ...nt mode you will need to perform the upgrade procedure described on page 60 Be sure to quit Dirac Live Calibration Tool for miniDSP before starting the DDRC 88BM plugin Running both programs at the sa...

Page 17: ...gin is online The Mute button disables all audio output The Dirac Live button turns Dirac Live filtering on and off A Dirac Live correction filter must have been loaded into the currently selected con...

Page 18: ...Live delay and gain settings and real time levels In the DDRC 88BM plugin this tab displays the gains and delays of the Dirac Live filters loaded into the DDRC 88D The plugin must be online to display...

Page 19: ...eaker and subwoofer positioning should be optimized In particular the location of the subwoofer will have a large impact on bass response With Dirac Live you have more freedom with loudspeaker and sub...

Page 20: ...is supplied with the UMIK 1 but a larger stand with boom arm can be used if desired If necessary a longer USB cable can be used up to a total USB cable length of 5 meters In larger spaces an active U...

Page 21: ...k the status here Screen selection tabs Each tab selects a different step of the calibration process These are generally worked through in order from top to bottom This section covers the first four t...

Page 22: ...em configuration Use the dropdown menu to select your system configuration For multi channel surround sound use 5 1 Speaker System or 7 1 Speaker System if it is desired that Dirac Live calibrate for...

Page 23: ...uracy To download the unique calibration file for your microphone go to the UMIK 1 page and enter your microphone s serial number It is in the form xxx yyyy and labelled on the microphone Ensure that...

Page 24: ...ed to converse with someone sitting next to you 3 Set the Input gain slider so that the blue bar on the level meter is about in the middle of the green section or around 12 dB 4 Click again on the Tes...

Page 25: ...t channel maps to the same numbered output channel input channel 1 to output channel 1 and so on The dropdown selectors can be used to change this mapping Note that DLCT will not let you assign more t...

Page 26: ...ile the measurement technique used by Dirac Live is quite robust low frequency noise traffic machinery aircraft storms in particular can adversely affect measurement accuracy A high level of ambient n...

Page 27: ...asurements are shown in green while the next measurement to be done is highlighted in yellow and has a red arrow marker pointing to it A drop down menu underneath selects three different views which s...

Page 28: ...is towards the ceiling or floor click on the Start button The DDRC 88D will generate a test signal audible as a frequency sweep through the left speaker then the right and so on through all channels...

Page 29: ...edo a measurement delete it move the microphone to the appropriate location and click on Start Note if more than one measurement is deleted the marker will move to the lowest numbered one It is import...

Page 30: ...asured magnitude responses These plots are shown in light blue Avg spectrum after The predicted average magnitude response after correction These plots are shown in green and can be viewed only after...

Page 31: ...verage response The predicted responses after correction can be viewed after filters are generated with the Optimize button see Generating correction filters on page 36 To return to the magnitude resp...

Page 32: ...am above as this will make it easier to experiment with target curves Once you are up and running with target curves and filter sets you can experiment with different target curves for different chann...

Page 33: ...Editing the target curve You can edit the target curve to produce any desired magnitude response This is done with the use of anchor points shown as orange dots on the curve Drag an anchor point to m...

Page 34: ...lity of the system so it is important that you experiment with different target curves to find the optimum If you initially don t achieve a satisfactory result please ensure that you have spread your...

Page 35: ...se Magnitude response dips In some cases it may be helpful to adjust the target curve to follow dips in the magnitude response This can occur where for example the listening area is very close to the...

Page 36: ...e speed of your computer When the algorithm completes the predicted average magnitude response will be shown in green The predicted impulse response can be viewed by clicking on the Impulse button Dir...

Page 37: ...t the top right To load a filter set into a slot that already has filters loaded first delete the loaded filter set by dragging it onto the trashcan icon then drag and drop the current filter set onto...

Page 38: ...ntrol only Dirac Live filtering enable bypass remote control only 7 2 1 Status indicators The current status of the DDRC 88D is indicated by a set of LEDs Dirac Live Dirac Live filtering is enabled Th...

Page 39: ...ur current remote if it supports one of the following remote control codes NEC Sony Philips RC6 To initiate the learning process run the DDRC 88BM plugin and click Connect Drop down the IR Remote menu...

Page 40: ...perly configure and use the DDRC 88BM plugin see the Acoustic Measurement section of the application notes library on our website for details 8 1 PLUGIN USER INTERFACE ENHANCED BASS MANAGEMENT MODE Up...

Page 41: ...tion each channel is optionally high pass filtered Routing pre Dirac The eight high pass filtered channels and the subwoofer signal are routed into a 9 into 8 matrix mixer Each input signal to this bl...

Page 42: ...he test signal is injected if using an external measurement program such as REW In this case the test signal passes through all of the processing blocks including Dirac Live Therefore If using an exte...

Page 43: ...tly selected configuration into the DDRC 88D Note that this applies only to data that can be changes in the DDRC 88BM plugin Dirac Live filters are not changed by doing this After downloading the conf...

Page 44: ...ea By default configuration 1 is selected To switch to a different configuration click on a different button There are two cases The plugin is online Audio processing will switch to the parameters of...

Page 45: ...ive filters use the Export tab of the Dirac Live Calibration Tool for miniDSP 8 4 5 Relationship with Dirac Live Each configuration preset in the DDRC 88BM plugin corresponds to the same numbered filt...

Page 46: ...d then the bass management is set up 8 6 LFE MGT When movies are mixed for the cinema each speaker is specified as a full bandwidth channel that is 20 Hz to 20 kHz although 40 Hz to 18 kHz for the spe...

Page 47: ...d are limited to a maximum slope of 24 dB octave The gain control blocks labelled with the attenuation such as 0 dB or 10 dB set the levels at which the low pass filtered signals from each channel are...

Page 48: ...is mixed into the corresponding output channel labels along the top if the lettering is highlighted in yellow The crosspoint is turned on and off by clicking on it Any number of input channels can be...

Page 49: ...re labeled along the top This is the default setting In a typical straightforward surround sound application each channel from Dirac Live is routed directly to each output channel In more sophisticate...

Page 50: ...ider or by typing the desired gain into the Current Gain text box The maximum gain setting is 12 dB and the minimum gain setting is 72 dB 0 dB the default is unity gain or no change in level The signa...

Page 51: ...AK Create a dip or a peak in the frequency response LOW_SHELF Reduce or increase part of the frequency spectrum below a given frequency HIGH_SHELF Reduce or increase part of the frequency spectrum abo...

Page 52: ...ed by switching to Advanced mode In this mode the coefficients of each filter biquad are entered individually The coefficients will need to be calculated by a filter design program A useful spreadshee...

Page 53: ...er channel with an 18 Hz high pass filter and an 80 Hz low pass filter Each filter can be set to one of a range of filter types and slopes The filter type determines the shape of the filter around the...

Page 54: ...hannel are mirrored to the other Typically the corresponding left and right channels are linked front left and right surround left and right and rear surround left and right To link a channel select t...

Page 55: ...pinout If there is a signal on input channels 1 and 2 all output channels have asynchronous sample rate conversion applied to match that sample rate Otherwise all output channels operate at 48 kHz Au...

Page 56: ...ode DO NOT DISCONNECT THE USB CABLE OR POWER FROM THE DDRC 88D WHILE FIRMWARE UPDATE IS IN PROGRESS DOING SO MAY BRICK YOUR DDRC 88D 9 2 1 Windows 1 Download and install the latest version of the DDRC...

Page 57: ...set Device button and then quit the upgrade utility 10 Return to the DDRC 88BM plugin If there is a dialog informing Connection to DSP closed click on OK Click on the Connect button 11 You may see the...

Page 58: ...ow 5 Click on the Connect button a If your unit does not require requires a firmware upgrade the connect button will change to a green tick and you do not have to proceed any further c If your unit do...

Page 59: ...he DDRC 88BM plugin If there is a dialog informing Connection to DSP closed click on OK Click on the Connect button 11 You may see the following dialog This can occur if you upgraded from an earlier D...

Page 60: ...the miniDSP com website 2 Start the plugin and click the Connect button 3 Drop down the Help menu and select Activate Bass Management 4 The following screen will appear 5 Click on the button Copy Act...

Page 61: ...your source b Check that your source is playing audio and that it is not muted or have volume control turned down c Check that the plugin is synchronized with the hardware unit 5 Low audio on outputs...

Page 62: ...UMIK 1 is securely seated b Check that the UMIK 1 is selected in the Mic Config tab c Remove any USB hubs and extensions 4 Insufficient recording level a Increase microphone level in the Output Level...

Reviews: