Minelab Manticore Instruction Manual Download Page 14

CONTENTS

14 

Batteries and Charging 

(Continued)

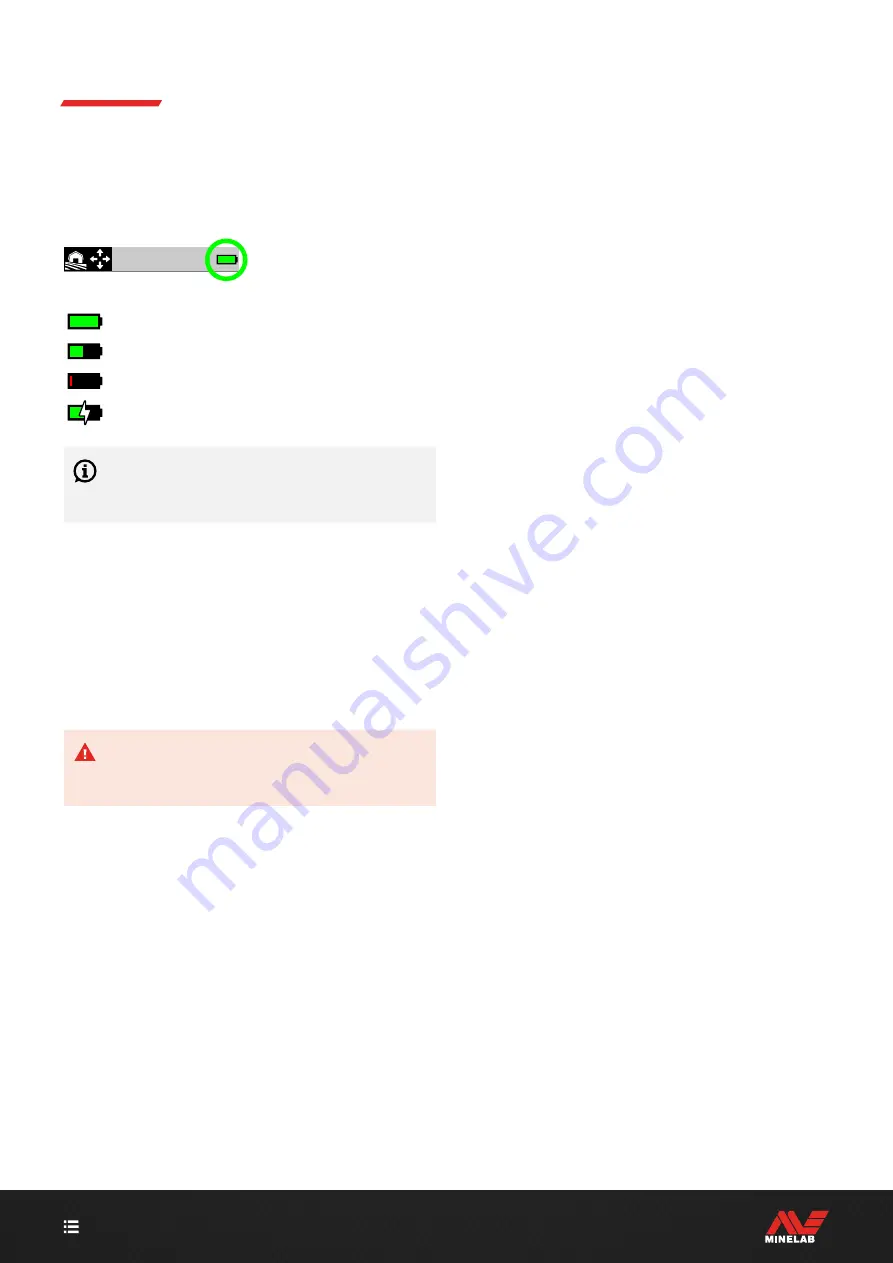
Battery Level Indication

The current battery level is shown in the Status Bar�

100%–90%

90%–7% (50% shown)

Less than 7%

Charging

The detector regulates the battery voltage so that 
detector performance remains constant regardless 
of the battery level�

Automatic Shut-Down

When the battery level is critically low (< 1% remaining), an 
Error message will be displayed briefly before the detector 
automatically powers Off� See 

"Critically Low Battery 

Error" (page 69)

OPERATING WITH A POWER BANK

CAUTION:

 DO NOT use the detector underwater or 

in a wet, salty environment whilst charging or when 
connected to a power bank�

You can use your MANTICORE detector whilst plugged 
into a portable power bank� This means you can continue 
detecting even if the detector battery is flat�

Connect the power bank to your detector using the 
supplied USB charging cable, and continue detecting�

BATTERY MAINTENANCE

See 

"Battery Maintenance" (page 73)

Summary of Contents for Manticore

Page 1: ...Instruction Manual...

Page 2: ...Target Identification ID Map rich audio options and an intuitive user interface packaged in a rugged lightweight and waterproof housing CAUTION Before assembling charging or using your detector for th...

Page 3: ...sitivity Settings 21 Adjusting the Sensitivity Level 21 Depth Indicator 22 Target Identification Pinpointing Recovery Target ID Number 24 Target ID Number Overview 24 Ferrous Target IDs 24 Target ID T...

Page 4: ...dit a Discrimination Pattern 52 Accept Reject an ID Upon Detection 53 All Metal 53 Recovery Speed 54 Adjust the Recovery Speed 54 Swing Rate 54 Ground Balance 55 Auto Ground Balance 55 Manual Ground B...

Page 5: ...5 CONTENTS Getting Started...

Page 6: ...tening the Camlocks on page 73 ATTACH THE ARMREST 6 Unlock the Armrest Lock 7 Slide the Armrest onto the Armrest Rail 8 Lock the Armrest then insert your arm into the Armrest to check the position is...

Page 7: ...Noise Cancel then press the Right Soft Key Auto Noise Cancel 4 GO DETECTING Press Back to return to the Detect Screen and begin detecting If there is excessive ground noise after completing the Quick...

Page 8: ...8 CONTENTS Overview...

Page 9: ...il Washers 2 30 Coil Bolt 31 Yoke Bracket 19 29 3 23 7 4 8 2 5 20 26 30 18 27 15 22 25 21 23 28 9 6 31 17 16 12 14 13 SCREEN PROTECTOR APPLICATION Applying a screen protector will protect your screen...

Page 10: ...cting at night 6 Light Sensor page 34 When the Display Backlight setting is Auto the Light Sensor monitors environmental light levels and automatically adjusts the Backlight brightness 7 Wireless Audi...

Page 11: ...ted target based on its Conductive properties This allows objects to be identified before digging For example a US quarter will always have a Target ID Number of 88 2 3 6 7 THE SETTINGS MENU The Setti...

Page 12: ...computer via the supplied USB charging data transfer cable 5 Flashlight Indicator page 34 Indicates that the Flashlight is On 6 Tracking Ground Balance page 56 Indicates that the Tracking Ground Balan...

Page 13: ...C CAUTION DO NOT use the detector underwater whilst charging or when connected to a power bank NOTICE Minelab Metal detectors and accessories are not intended to be operated while connected to a mains...

Page 14: ...age will be displayed briefly before the detector automatically powers Off See Critically Low Battery Error page 69 OPERATING WITH A POWER BANK CAUTION DO NOT use the detector underwater or in a wet s...

Page 15: ...15 CONTENTS Search Modes...

Page 16: ...l to that location There are additional options for each Search Mode that can be edited viewed via the Search Mode Menu You are able to Change the Search Mode page 59 Set the Favourite Search Mode pag...

Page 17: ...Excellent all round performance for most targets and conditions Target Separation Trash Rejection Fast Inland detecting optimised for separation of targets Coke rejection makes this mode suitable for...

Page 18: ...that given to ferrous targets so that it is easily distinguished from desirable targets and can be discriminated out General Salt water beach general purpose detecting Excellent all round performance...

Page 19: ...maximises sensitivity to weak target signals When a target is detected the signal volume and pitch vary proportionally to the strength of the target signal Most goldfield locations have a variable le...

Page 20: ...20 CONTENTS Detect Screen Settings...

Page 21: ...tecting locations For beginners start with a low setting and increase it progressively Decreasing the Sensitivity may reduce false signals and interference This will also improve differentiation betwe...

Page 22: ...indication is given 20 The Depth Indicator on the Detect Screen when no target is detected The Depth Indicator is a guide only Fewer arrows indicate a shallower target more arrows indicate a deeper t...

Page 23: ...23 CONTENTS Target Identification Pinpointing Recovery...

Page 24: ...then classified as ferrous indicated by a low audio tone and accompanying red Ferrous Indicator beneath the Target ID number By having separate ferrous indication a greater Target ID resolution for f...

Page 25: ...identification A common effect is that a weaker target will be dragged closer to the stronger target causing a different Target ID than if the targets were detected individually Targets of a similar t...

Page 26: ...e ID Map and cannot be edited via the Settings Menu 88 20 89 5 20 This example shows the detection of a coin and a nail in Multi IQ then again using a single frequency While the coin s Trace and ID re...

Page 27: ...trace are more transparent TARGET TRACE EXAMPLES The following examples show some typical targets on the ID Map Coins Most non ferrous coins appear on the centreline as a distinct round dot Low conduc...

Page 28: ...e variation that is possible for a single bottle cap A different bottle cap bottle cap B showing a different shaped Trace to bottle cap A bottle caps are highly variable in composition making them dif...

Page 29: ...hex head falsing Non ferrous objects masked by nearby iron Non ferrous objects with nearby iron trash can also create an unusually shaped Target Trace Often iron trash is much stronger and dominates t...

Page 30: ...m of the screen As the centreline of the Coil approaches the target the Pinpoint Bar fills from the outside towards the centre When the Bar is full the target is directly beneath the centreline of the...

Page 31: ...e target by listening for the loudest target signal response 3 Make a mental note of the position or mark a line on the soil with your shoe or a digging tool 4 Move to one side so that you can pass th...

Page 32: ...32 CONTENTS General Settings...

Page 33: ...sity proportional to the target signal strength when detecting and when Pinpoint is enabled The Vibration setting is remembered after the detector is powered Off When Vibration is On battery runtime i...

Page 34: ...Auto Display backlight setting that automatically adjusts the Display brightness depending on the light levels sensed by the Light Sensor which is located to the top right of the Display For the Auto...

Page 35: ...re automatically applied When you return to the Detect Screen the Soft Key icons in the Action Bar will show the newly assigned Actions for the Left and Right Soft Keys Soft Keys Favourite Mode 20 The...

Page 36: ...ttings Menu 1 Turn the Detector On 2 Navigate to Reset Settings General Settings Reset 3 Press to display the Reset confirmation screen 4 A warning message will be displayed if you are sure you want t...

Page 37: ...37 CONTENTS Settings Menu...

Page 38: ...ingle frequencies are not available Similarly Goldfield is optimised for detecting low conductive gold nuggets that are more easily detected at higher frequencies Therefore the lower single frequencie...

Page 39: ...ellery at a shallow depth then 20kHz or 40kHz may give better results in some detecting environments In some noisy environments e g high EMI locations where Noise Cancel is not fully effective a singl...

Page 40: ...0 1 to 50 1 to 50 1 to 50 Profile Simple Medium Rich Volume Simple Medium Rich Timbre Simple Medium Rich Volume Min and Max Pitch 1 to 65 Ferrous Pitch 1 to 65 Ferrous Tone On Off Target Tones Enabled...

Page 41: ...le The amount of volume modulation can be modified using the Profile setting This theme uses a Reference threshold tone that blanks for rejected targets see Reference Threshold Tone on page 43 You can...

Page 42: ...e Profile 1 Navigate to Settings Audio Theme 2 Press to select the Audio Theme you want to adjust then press the Right Soft Key Edit 3 Press to select Profile then press to change the Profile setting...

Page 43: ...Rejected ID Blanked Detection no sound Time TRUE THRESHOLD TONE The Prospecting Audio Theme uses a more nuanced true threshold tone which is recommended for gold detecting A true threshold tone can be...

Page 44: ...ctive IDs within the Tone Region have a sightly different pitch 25 25 2 Region All Tones There are two Tone Regions Adjacent Conductive IDs within each Tone Region have a sightly different pitch 25 25...

Page 45: ...hat you want to adjust 25 25 4 Press the Right Soft Key Edit The Region Volume will highlight in red 25 25 5 Press to adjust the Volume 6 Press Back to return to the top level of the Editor ADJUST THE...

Page 46: ...rrous detections quieter Adjusting Ferrous Volume 1 Navigate to Ferrous Tones Settings Ferrous Tones 2 Press to select Ferrous Volume then press the Right Soft Key Edit 3 Press to adjust the Volume In...

Page 47: ...pper Limits The Upper Limits control the ferrous classification of most iron objects This includes the most common small iron objects such as screws and nails which typically appear in the top half of...

Page 48: ...e of settings suitable for almost all scenarios and most users will operate using Presets rather than Custom Ferrous Limits The Presets can be copied to any of the Custom Ferrous Limits to serve as a...

Page 49: ...Ferrous Limits are not achieving the ferrous rejection that you need you can create your own more precise Custom Ferrous Limits In the Custom Ferrous Limits Editor the Upper and Lower Limits are each...

Page 50: ...Press to navigate to the Region nearest to the coin s Trace and then press the Right Soft Key Edit The Region nearest to the coin s Trace selected for editing 6 Wave the Coil over the coin at a range...

Page 51: ...navigate to the Region nearest to the screw s Trace and then press the Right Soft Key Edit The Region nearest to the screw selected for editing 6 Wave the Coil over the screw at a range of heights ad...

Page 52: ...get Trace Accepted IDs white areas Selection Width Rejected IDs grey areas Currently selected ID More Ferrous Less Ferrous More Ferrous EDIT A DISCRIMINATION PATTERN 1 Navigate to the Custom Pattern E...

Page 53: ...t Key Accept is pressed again the Target ID will remain Accepted This means you can keep swinging over the target while repeatedly pressing the Soft Key to ensure the target is completely Accepted Thi...

Page 54: ...on depth in soils with low mineralisation and may reduce EMI susceptibility Using a lower Recovery Speed in soils with high mineralisation may reduce discrimination performance making difficult target...

Page 55: ...due to highly mineralised ground or high salt levels then repeat the Auto Ground Balance process by sweeping the Coil from side to side rather than the standard up and down motion AUTO GROUND BALANCE...

Page 56: ...E Tracking Ground Balance continuously monitors the ground signal and adjusts the Ground Balance setting to ensure it is always set correctly This is useful in locations where the ground signals are c...

Page 57: ...ise Cancel as a Soft Key Action see page 35 Noise Cancel 0 Noise Cancel in the Settings Menu AUTO NOISE CANCEL Auto Noise Cancel automatically scans and listens to every frequency channel and then sel...

Page 58: ...ascending tones 4 When the first cycle is complete approximately 3 seconds the selected channel will be displayed 5 Continue to hold the Soft Key to repeat as many cycles as desired the channel will c...

Page 59: ...k to return to the Detect Screen The new Search Mode icon will be displayed in the Status Bar 4 Perform a Noise Cancel page 57 FAVOURITE MODE One Search Mode can be set as the Favourite mode You can t...

Page 60: ...want to reset the selected Search Mode this cannot be undone press the Right Soft Key Confirm to confirm A message will be displayed confirming that the Search Mode has been reset SEARCH MODE INFORMA...

Page 61: ...Volume Volume in the Settings Menu For a more nuanced volume adjustment there are additional volume controls for individual target tones ferrous tones and the threshold tone See the following Adjust t...

Page 62: ...62 CONTENTS Detector Audio...

Page 63: ...phones will connect automatically the Wireless Audio Indicator in the Status Bar will remain On and the LED on the headphones will flash blue once every 3 seconds If no connection is made within 5 min...

Page 64: ...headphones can be fully submerged to a depth of 5 metres 16 ft Minelab waterproof headphones not included must be used for underwater detecting because they have a unique connector that forms a water...

Page 65: ...65 CONTENTS Troubleshooting Errors...

Page 66: ...repeatable tones that are not considered to be noise Ground Noise Ground noise is present when the metal detector interprets the ground as being a target due to the changing mineral content of the gro...

Page 67: ...free of moisture or debris 7 If available try using a different set of headphones No sound ML 105 wireless headphones 1 Check that the headphones are turned On 2 Check that detector Wireless Audio is...

Page 68: ...ring Try charging with the detector switched off 3 Avoid using a USB extension cable when charging Speaker is squeaky or muffled after submersion in cold water 1 Allow up to 30 minutes for the detecto...

Page 69: ...when charging COIL DISCONNECTED ERROR Coil Disconnected Shutting Down The Coil Disconnected Error message The detector will shut down automatically 5 seconds after reporting this Error To resolve the...

Page 70: ...form a Factory Reset see Factory Reset page 36 If the Error persists contact a Minelab Authorised Service Centre LARGE METAL OVERLOAD MANTICORE will display the Large Metal Overload icon if a very lar...

Page 71: ...71 CONTENTS Safety Care Maintenance...

Page 72: ...luding the Shafts Camlocks and Yoke assembly If sand and grit accumulates in these parts they should be rinsed in fresh water then dried thoroughly Prior to going detecting check that the Camlocks are...

Page 73: ...ng the internal battery as this will damage the battery seal Coil Maintenance The Skidplate is a sacrificial replaceable part intended to protect the Coil from damage Replace the Skidplate when it bec...

Page 74: ...74 CONTENTS Specifications Presets Compliance...

Page 75: ...5 m 16 ft Audio Output Speaker 3 5 mm headphones Wireless low latency headphones Headphones included Minelab ML 105 wireless low latency headphones non waterproof Display Colour LCD 3 5 Display Backl...

Page 76: ...his metal detector has not been designed for use as a mine detector or as a live munitions detection tool MINELAB MANTICORE Multi IQ M11 and SCORPION are trademarks of Minelab Electronics Pty Ltd COMP...

Page 77: ...4901 0428 1 www minelab com...

Page 78: ...8 14 40 Tone Volume 25 25 4 25 25 25 25 8 25 25 25 25 25 25 25 25 25 25 25 25 25 25 25 25 25 25 Ferrous Tones Ferrous Volume 8 4 4 8 12 12 12 12 12 12 Ferrous Pitch 1 1 1 1 1 1 1 1 1 1 Ferrous Limits...

Reviews: